Causes of malfunctions
The main cause of the malfunction is simple mechanical wear. Any oil seal is, by its nature, a consumable - after a certain period of time it begins to deteriorate, since it is made of an elastic material.
The malfunction may manifest itself in the form of changes in shape, swelling, scarring, rupture or chipping of the material from which the consumable is made. Another manifestation of a malfunction may be the cuff being completely squeezed out of the seat.
Other causes of problems with the camshaft oil seal are incorrect selection of consumables, manufacturing defects, or incorrect installation. In these cases, the oil seal also does not perform its functions and needs to be replaced.
How to replace the camshaft oil seal on a Mitsubishi Lancer engine
Replacing the camshaft oil seal is not a difficult task at all.
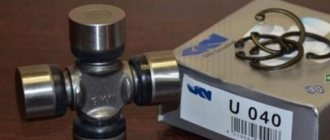
The difficulty lies in the fact that you must first remove the attachment belts, then remove the timing belt, and only then proceed with replacement. Therefore, when replacing the timing belt, it is always better to change the camshaft and crankshaft oil seals at the same time. It is better to buy an original camshaft oil seal: Mitsubishi MD372536
1. First of all, you need to remove the timing belt. Having followed the link, you need to reach step 12, while not forgetting to slightly loosen the bolt securing the camshaft gear while the belt and roller are still in place. Loosen as follows:
We engage fifth gear. An assistant sits behind the wheel and presses the brake. Another person at this time breaks off the camshaft bolt
2. After this, you need to unscrew the bolt securing the camshaft gear.
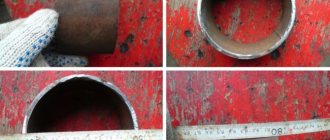
3. Using a flat-head screwdriver, remove the old oil seal. It looks quite normal, there are no signs of leakage, but it was decided to replace it along with the timing belt, since the car’s mileage is already over 150,000 km.
4. After removing the old oil seal, you need to clean everything with a cloth:
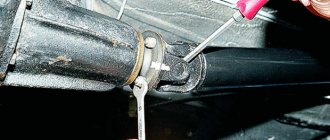
5. To install the new oil seal in place, you will need a special mandrel, unfortunately I don’t remember the diameter:
6. Install the new oil seal in place. Don't forget to lubricate the new oil seal with engine oil. Carefully press the oil seal until it stops:
Diagnostics
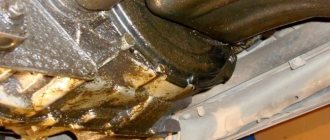
Diagnosis of a malfunction of the camshaft oil seal is carried out visually. Oil marks on the timing belt cover may indicate a cuff leak. For a more accurate diagnosis, remove the belt cover and inspect it. In the event of a malfunction, you can find traces of wear or even the belt jumping over one or more pulley teeth due to moisture.
Also, a seal malfunction can be detected during a scheduled replacement of the timing belt - it is during the procedure that oil leaks can be detected on the belt itself or on the camshaft gear. Another reason to replace the oil seal is deformation of the seal. Even if there are no oil leaks at the moment, they will certainly appear if the shape of the oil seal changes.
The need to replace oil seals
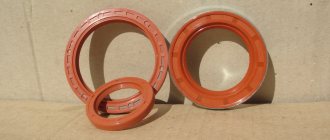
The camshaft oil seal (cuff) is a sealing ring that prevents oil from leaking out of the camshaft. This gasket is equipped with engines that are equipped with a gas distribution mechanism (timing belt). If it suddenly does not perform its tasks, then the seal needs to be changed.
The main reason for malfunction is normal mechanical wear. All seals are common consumables, and after a certain amount of time they begin to deteriorate because they are made of elastic materials.
Any defect may appear: swelling, change in shape, tears, scarring, etc. Another possible malfunction: the cuff can be squeezed out of its seat.
It happens that the cuff is defective or installed (selected) incorrectly. In such situations, it is also necessary to change the camshaft oil seal, because it does not fulfill its intended purpose.
Oil seal failure is diagnosed visually. If it leaks, you can see traces of oil on the timing belt cover. In order to more accurately determine the extent of the problem, you need to remove the belt cover and conduct an inspection. If there is a malfunction, traces of wear will be visible, or due to increased moisture, the belt has jumped over one or a couple of pulley teeth.
We recommend
“Replacing gearbox seals: subtleties and tricks” More details
The fact that the seal is faulty can be seen when it’s time to change the timing belt according to the plan. It is then that oil leaks can be detected on the belt or on the camshaft gear. If the seal is deformed, it should be replaced, despite the fact that oil is not leaking at this moment. However, changing the shape of the oil seal will cause oil traces to appear.
In addition to the above, the element should also be replaced if obvious mechanical damage is detected. This procedure is not urgent, and the car can be operated carefully for a long time. However, you should still know how to change the camshaft seal if it unexpectedly fails.
Moreover, if there are significant oil losses due to a damaged seal or the element is severely damaged, then there is no escape from replacement.
After traveling a certain number of kilometers, the car develops oil traces in the area of the camshaft pulley and oil seal. As the mileage increases, so do the leaks. This situation indicates that it is time to change the camshaft seal.
The problem here is not the loss of oil, but the fact that it is transferred to the timing belt and camshaft drive pulley. This turn of events becomes dangerous because the hot oil causes the rubber of the belt to deform. In this case, the oily liquid makes the belt slippery, and it may begin to slip on the pulley teeth.
As a result, cracks may form on the pistons or bend the valves. Be that as it may, you should change the seal to get rid of oil traces.
Replacement instructions
The sequence of actions when replacing the front and rear oil seals is slightly different. This is because the front oil seal can be replaced directly on the engine itself. Getting to the rear seal is usually more difficult.
Front oil seal
The sequence for replacing the front camshaft oil seal looks like this.
- The car is placed in neutral and the parking brake is applied.
- As with any work performed in the engine compartment, the battery terminals are disconnected.
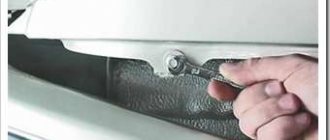
- The plastic timing belt cover is removed.
- The valve cover is removed, for which you need to unscrew the fastening bolts with a screwdriver.
- A marker marks the location of the belt relative to the camshaft.
- Then you need to remove the timing belt. You don’t have to completely remove it - just remove the belt from the camshaft timing pulley. To remove it, you need to unscrew the fastening bolt with a 17 mm wrench, securing the pulley from turning. You can use a pry bar for fixation.
- Using a puller, the pulley is removed from the camshaft shank. If the camshaft has 2 pulleys, then both are removed, and the locations of the pulleys are also marked so that they are not confused during further installation.
- The key located behind the camshaft pulley is removed.
- Then, using a screwdriver or tweezers, remove the used oil seal. You should remove it carefully so as not to scratch the working surface of the camshaft to which the oil seal is attached.
After dismantling the old oil seal, you can proceed to installing a new one and reassembling it.
- The working edge of the new oil seal adjacent to the camshaft is lubricated with engine oil, and the outer part is treated with sealant.
- The oil seal is placed on the camshaft and then pressed using a pressing mandrel.
Further collection of the timing belt is carried out in reverse order.
- A key is placed on the camshaft.
- Then the pulley is installed. If there are two pulleys, then each is installed in the place where it was located.
- The pulleys are tightened using a torque wrench. The voltage torque can be found in the vehicle owner's manual. When tightening, it is necessary to secure the pulleys from turning using a pry bar. First you need to engage fourth gear at the gearbox.
- Then you need to put the belt on the pulleys according to the previously marked marks. You should first inspect the belt for damage, abrasions, etc. Since oil seal leaks are detected when replacing the timing belt, it is often necessary to install a new belt. In this case, it is mounted according to the factory marks.
- The tension roller mounting bolt is tightened. The tension torque can again be found in the car's owner's manual.
- Then the crankshaft is manually turned several revolutions clockwise. This checks the belt tension. If any irregularities are noticed, the tension is further adjusted.
- At the end, the valve cover is secured back and the plastic belt cover is installed.
- After replacing the oil seal, you need to add engine oil to the oil tank to the upper mark.
Rear oil seal
Rear oil seal replacement may vary from vehicle to vehicle. For some models, access to the rear oil seal is only possible when driving the car onto a lift or inspection hole and disconnecting the clutch and gearbox drive.
For other car models, access to the oil seal is limited by the camshaft position sensor, which must be removed. To do this you need:
- disconnect the electrical connector of the sensor;
- Unscrew the fastening screw and remove the sensor;
- Using a 10mm wrench, unscrew the bolt securing the gas hose holder to the sensor wire bracket;
- Unscrew the screws securing the sensor cover, remove the cover and the bundle of wires;
- remove the sensor rotor;
- Remove the sensor cover mounting plate.
After this, you can use a screwdriver to remove the rear camshaft oil seal. Replacement is carried out in the same way. After replacing the cuff, the sensor is assembled in the reverse order.
After installing the new oil seal, you must make sure that no oil leaks appear. If the oil seal is installed correctly, then even at high engine speeds the oil should not leak. Otherwise, the sensor is installed or pressed in incorrectly, or there is a manufacturing defect in the product.
Replacing the rear oil seal
Now let's talk about how exactly the rear oil seal is changed.
- the electrical connector of the sensor is disconnected;
- the sensor is removed;
- the bolt securing the gas hoses is unscrewed;
- the sensor cover is removed and the wires are disconnected;
- the sensor rotor is pulled out;
- The sensor mounting plate is removed.
After replacing the seals, you need to make sure that there are no oil drops. If there are any, it means the work was performed incorrectly, or there is a manufacturing defect.
Causes and symptoms of malfunction
How long the oil seal will last depends on the conditions in which the car is operated, the tightening of the bolts, and the belt tension. If the driver has a sporty driving style, the engine often experiences stress, which leads to premature wear of the components.
Seals should be changed:
- when changing oil;
- when defects are detected;
- if traces of oil are found;
- if the engine knocks.
In addition, the cuff must be changed when replacing the standard camshaft with a sports one.
Replacement procedure
Replacing the camshaft oil seal on a VAZ-2114 8-valve car and other vehicles equipped with a similar engine is practically no different from that on the 16-valve power units of the 2112 model. However, there are still some differences.
Performing manipulations on 8-valve engines
The replacement procedure begins with fixing the car in a stationary state using the parking brake and “heels” under the wheels. The gear lever must be in neutral. After this, using a 10mm wrench, the timing cover is removed.
The camshaft and crankshaft pulleys should be installed in the TDC position. To do this, the mark on the camshaft sprocket is aligned with the installation lug located on the rear cover of the timing drive. After the gas distribution mechanism has been brought to the required position, it is fixed using a screwdriver inserted into the teeth of the flywheel.
Using a 17 key, loosen the tension roller bolt and remove the belt from the upper sprocket. After this, the camshaft pulley is secured from turning and the bolt securing it to the end of the shaft is removed. The star itself is removed. When dismantling the sprocket, care should be taken, since under it there is a small semicircular key, which is very often lost during the disassembly of the timing drive.
After the above-described manipulations, the camshaft oil seal is removed using a screwdriver. The new part is lubricated with engine oil and pressed into place using a special mandrel. If you don't have one, you can use a socket head of a suitable size. Assembly of the mechanism is carried out in reverse order.
Performing manipulations on 16-valve engines
Replacement of VAZ-2112 camshaft oil seals is carried out in a manner similar to that described above. In this case, the exhaust camshaft sprocket is first dismantled, then the intake camshaft. The amount of work increases slightly due to the greater number of mounting points for the timing cover.
In addition, special care should be taken when reassembling the mechanism and setting marks. On 1.5 liter 2112 engines, incorrect installation of timing marks often leads to damage to the valve mechanism and CPG.
Replacement of Camshaft Seal VAZ 2112 16 Valves
Replacing the stuffing box camshaft 2112 16 valves
VAZ 2110 camshafts VAZ 2111 | VAZ 2112. removal, installation, replacement
Removal, installation, replacement of camshafts on VAZ 2110, VAZ 2111, VAZ 2112 cars is shown on the VAZ 21124 (1.6i) engine injector. Features of removing the cylinder head cover from the VAZ 2112 (1.5i) engine. see in the text.
3. To prevent damage, we remove the emergency oil pressure sensor (see Emergency Engine Oil Pressure Sensor. Replace) or disconnect the end wire from the sensor.
4. Using an 8 mm socket wrench, remove the 20 camshaft bearing housing bolts one-half turn.
5. Remove the camshaft bearing housing.
On the VAZ 2112 (1.5i) engine, remove the camshaft bearing housing along with the spark plug guide tubes (spark plug holes). Remove the pipes from the camshaft bearing housing.
6. Remove the two technological hole plugs from the seats in the cylinder head (at the rear ends of the camshafts).
10. Inspect the camshafts. On the camshaft necks and cams, strong signs of wear, scratches, cracks, and traces of metal coating should not be observed.
READ Replacing the Common Rail Injector Sprayer
We are replacing the oil seal
How to remove the gearshift mechanism
2x camshafts
on 21124 1.6 16v you can immediately
replace
timing belt and rollers, process
When is it time to change the camshaft
Emergency intervention in the operation of the VAZ 2114 8 cl camshaft is necessary in the event of any obvious malfunctions. Signs may be different, for example, a knocking sound is heard when the engine is running or problems with the seals. You need to check what’s wrong in such a situation immediately, either yourself or at a service station.
If you determine that the problem is in the seals, then 10 minutes will be enough for you to make a replacement. The oil seals are located in easily accessible places and installing a new one does not require dismantling large systems and components. If you don’t know which one you need to replace, you can check this simply by looking at which one is already installed.
A more complex malfunction may occur if you hear a knocking sound in the engine. This malfunction may not progress, that is, the knocking does not increase, while the readings of all sensors are normal
Some drivers take this calmly; they are not bothered by this state of affairs and continue to use the vehicle without paying attention to it. But the solution is simple, if your engine knocks, it means that the camshaft end play has increased
In this case, you can put a washer between the camshaft and the cover and there is a high probability that the knocking will stop. A fairly simple way out of this situation.
Some cars are equipped with camshaft position sensors, whose task is to signal in case of malfunction or malfunction of the system. But sometimes sensors fail and may need to be replaced. It is inexpensive and the price of such a sensor on the market does not exceed $10, and you can find out which one to buy from the car’s instructions. Installing such a sensor is simple, so there is no point in stopping there.
Sparco24 › Blog › Installing 16V camshafts
In this article we will look at the installation of sports and tuning camshafts on VAZ 2112, 21124, 21126 and 11194 engines. First, you need to remember that engines 2112 and 21124 have their own timing belt drive and are incompatible with the timing belt of engines 21126 and 11194 - this worth considering when purchasing split gears. Engine gears 21126 and 11194 have rounded teeth, so the belt, pump, lower crankshaft gear and camshaft gears have their own. To install the camshafts you need to do the following:
1. Disconnect the TPS, IAC and mass air flow sensor connectors, loosen the clamps holding the inlet pipe on the receiver, loosen the ventilation clamp for the crankcases of the cylinder head cover and dismantle the intake pipe assembly with the mass air flow sensor;
2. Unscrew the nuts that secure the receiver to the cylinder head; it is most convenient to do this with a ratchet with a 13-mm socket;
3. Remove the receiver assembly with the throttle;
4. Remove the timing belt cover using a ratchet and a short 8mm socket;
5. Loosen the bolts of the camshaft gears;
6. Set the crankshaft position to TDC of cylinder 4, aligning the mark on the flywheel and, loosening the tension roller, remove the belt from the camshaft gears;
It will be useful Checking diesel injectors at home for return flow and on a bench
7. Completely unscrew the bolts of the camshaft gears and remove the gears themselves. Be careful - the keys for fixing the gears on the camshafts can fly out and, due to their small size, can easily get lost;
8. Using a ratchet and a 8mm socket, unscrew the timing cover bolts and remove it. Using the same tool, unscrew the bolts of the bed and also dismantle it;
9. Remove the standard camshafts, not forgetting to remove the keys that secure the gears;
10. Remove the hydraulic compensators using a magnet. It is advisable to number the hydraulic compensators by wells in order to install them in their places. If the camshafts are not full-base, install the included bearings on the valve stem;
Camshafts 2112 lift 11.8/11.8 mm Sport
7,800 rub. Club price 7,500 rub. 11. Place new camshafts and check them for rotation in bed. If the cams cling to the hydraulic compensator wells slightly, use a sharpened screwdriver or chisel to carefully modify the edges of the wells to rotate the camshaft cams. To ensure that this procedure is as safe as possible and that shavings do not fall into the wells, it is recommended that before processing the well, fill it with cotton wool or a piece of cloth; after processing, this should be removed and the well should be blown out. If the camshaft cams do not turn at all, and the wells need to be thoroughly modified, it is strongly recommended to dismantle the cylinder head, modify the wells using a drill or machine, wash it and install it back, otherwise, in the case of rough return, excess chips can clog the oil channel or, by over-modifying the well, worsen the performance of the hydraulic compensator by reducing oil pressure;
12. Clean the surface of the bed from sealant on both sides; the seats of the bed bolts must be blotted from oil using a thin screwdriver and a piece of cloth so that when tightening the bolt you do not pull out the thread (remember that oil does not compress, and if the bolt has nowhere to twist - it will begin to pull the threads out of the cylinder head), apply new sealant to the lower plane of the bed;
13. Having aligned the new camshafts with the veneer grooves vertically upward, place the bed and tighten its bolts, starting from the central holes towards the timing belt and pump;
14. Place the split gears on the camshafts and tighten their bolts, put on the timing belt; Guided by this article, set the valve timing recommended by the manufacturer; Clean the cylinder head cover, apply new sealant and close the cylinder head cover, tighten it with bolts, starting from the center and moving away to the sides of the timing belt and pump; Repeat the installation operations of the receiver, timing case and sensor connectors in reverse order.
Attention! To achieve the maximum effect from installing camshafts, it is mandatory to change the ECU program online