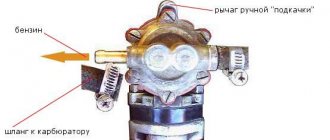
YUKKA "TIIR"
This is a domestic manufacturer, but despite this, many people use these brake pads. “Gazelle Business” and other models from GAZ, even the newest ones, are equipped with them.
Thanks to the use of special composite material, high-tech products received a gold medal for quality. These products have one advantage. With their stable properties in any conditions, they are characterized by an increased service life. There is no asbestos in both the rear and front pads. And excellent friction properties make the braking process very effective. The pads are in good demand among Gazelle owners.
The company produces brake pads (Gazelle) in several series. So, there is an economy series, a comfort series, and also an elite series. Even in the budget series, these consumables have excellent properties and characteristics.
Owners of Next models speak particularly positively about the products of this company - they are no worse than the original products, the cost of which is very high.
Prices and manufacturers
If we talk about models 2705 and 3302 (including “Business”), the cheapest set of pads is “Premium”. For 4 overlays they ask for about 700 rubles. But, as reviews note, this is not the best option for replacement (although the manufacturer is GAZ OJSC). The pads wear out quickly.
Many people recommend pads from NIPPON as a good alternative. Their price is 900 rubles. The set includes 4 pads.
GAZelle is perhaps the only car where original parts are cheaper than analogues.
Judging by the reviews, NIPPON can handle 40-45 thousand kilometers without any problems. As for the Nexts, there are Markon pads for them. The cost of four elements is 730 rubles.
Brake disc Gazelle Next
Wheels Gazelle NEXT. Brake discs NEXT. Brake disc Gazelle NEXT.
Price 1800 rub.
NEXT brake discs
The photo above actually shows a Gazelle NEXT ventilated brake disc. However, very often drivers ask this question. Isn't it time to change the Gazelle NEXT brake discs? The issue is controversial, but we will listen to the advice of factory specialists. The permissible thickness of the Gazelle NEXT brake disc must ultimately be at least 30 mm. Although some drivers dispute this value and claim that they used Gazelle NEXT wheels with wear of up to 28 mm. We do not recommend doing this in any case. On new brake pads it hasn't gone anywhere yet, but if the brake pads are worn almost to metal. There is a danger of brake caliper failure and leakage, usually of brake fluid. Which in turn entails a decrease in the effectiveness of the brakes in general. Again, replacing the caliper will also cost a pretty penny. Do you need it? It is better to take a closer look at the brake system as a whole.
This way, in any case, you will save yourself from unnecessary hassle.
Next brake discs
In addition, on average, Gazelle NEXT wheels last 350 - 380 thousand km. What actually determines the wear rate of brake discs? Most often, as a rule, it depends on the ferodo composition of the brake pads. And of course, it definitely depends on the degree of loading (overload) of the vehicle during operation. For example, if TIIR ferodo is soft and has brass shavings interspersed with it. Gazelle NEXT discs will last a little longer than, for example, NIPPON brake pads. On NIPPON pads the ferodo compound is harder. The pads will last longer and will need to be changed less frequently, but the wear rate of NEXT brake discs will increase. We should not forget that brakes, their effectiveness and reliability, directly affect traffic safety. Therefore, the entire brake system in any case requires careful maintenance and care. And in any case, you should not save on the cost of brake pads. Because all sorts of counterfeit versions of the pads very often crack and crumble due to heat.
Moreover, this trouble arises “according to the law of meanness” at only the most inopportune moment. Therefore, regular replacement of pads is certainly the key to your safety.
It should be recalled that the manufacturer recommends that all repair work on the brake system, namely replacing Gazelle Next discs, be carried out only at licensed service stations. All the best and good luck on the roads.
Drum Gazelle
Bored Gazelle drum. Brake drum Gazelle. Rear drum Gazelle.
Price 2400 rub.
First of all, we bring to your attention a bored brake drum for Gazelle. Drums however come in two types. Bored and, for example, not bored. The difference between them lies in the following. Only bored 3302 drums can be fitted onto two brand new rear brake pads. Unfortunately, you won’t be able to put unbored drums on both new brake pads. That is, you will have to change one pad at a time. If one block was worn out, a new one was installed. If the second block was worn out, it was replaced again. Such drums last longer, but there is also more fuss with them. Only on bored drums you can easily replace two pads with new ones at once. In general, how many people, so many opinions. We sell only bored brake drums for Gazelle. We can also offer you Gazelle brake pads, rear and front.
Replacing front brake pads
Brake pads must be replaced when the lining wear is less than two mm.
Brake pads must be replaced as a set on both sides.
We place stops under the rear wheels of the car.
We set the car to the handbrake.
Loosen the wheel mounting bolts on the side of the pads being replaced.
We lift the front side of the car and place it on a reliable support.
Removing the front wheel
Using a large screwdriver, press the pistons of the caliper cylinders to move the brake pads away from the disc
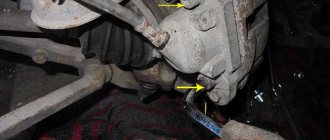
Loosen the bolt securing the lower caliper guide pin
Unscrew the bolt
Raise the caliper up
Removing the inner block
Removing the outer block
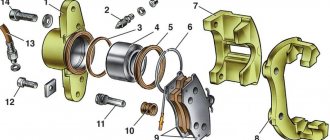
This is what the front brake pads look like
Inner “A” and outer “B” brake pads are different.
Pressure plates are installed on the inner pads, and spring wear limit indicators are mounted on the outer pads and have different catalog numbers.
Remove the lower and upper pad pressure springs and inspect them
We replace deformed or heavily corroded springs
Whenever you replace brake pads, be sure to check the condition of the protective rubber covers of the guide pin and the movement of the caliper relative to the brake pad guide.
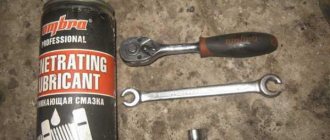
If movement is difficult, lubricate the caliper guide pins with grease.
To do this, remove the guide pin, lubricate it with grease, and then lubricate the protective cover of the pin with grease.
Similarly, lubricate the second guide pin and its cover. Install the guide pins in the reverse order of removal.
Replace the guide pin guards if they are hardened, deformed or torn.
Install the brake pads in reverse order.
We apply an anaerobic thread locker to the threaded part of the guide pin mounting bolts.
After replacing worn brake pads with new ones, do not rush to immediately drive onto busy highways.
It is possible that at the first intensive braking you will be unpleasantly surprised by the low efficiency of the brakes, although the pads are branded.
The brake discs also wear out, and the new pads only touch them at the edges, practically without braking.
Choose a quiet street or passage without cars and brake smoothly several times so that the pads get used and begin to fit the entire surface.
At the same time, evaluate the effectiveness of the brakes.
Try not to brake sharply for at least the first 100 km.
When unused pads become very hot, the top layer of their linings “burns” and the brakes will not be as effective for a long time.
We will consider replacing the brake pads of the rear wheels in the article - Replacing the brake drum and pads of the rear wheels of Gazelle Next
Article: 3302-3502070more, additional articles: 3302-3502070-01hide
Order code: 015071
Pickup only Data updated: 03/16/2021 at 20:30
Order code
015071 Articles 3302-3502070, 3302-3502070-01 Manufacturer GAZ Catalog group: ..Brakes Control mechanisms Width, m: 0.32 Height, m: 0.12 Length, m: 0.32 Weight, kg: 13.26
Description
Limited Liability Company Trading House "Russian Machines" (LLC "TD "Russian Machines") To the head of the organization-Distributor LLC "TD "Russian Machines" SPARE PARTS SALES DEPARTMENT Ilyich Ave., 5 Nizhny Novgorod, 603004 tel/fax: ( 8312) 90-80-34E-mail 1404/994-06 No. 30.10.06 On brake drums Dear colleagues! I inform you that when you purchase brake drums 3302 - 3502070 and 2217 - 3502070 from LLC "TD "Russian Machines" before installing them For the car, they must be bored to the final size and balanced together with the hub in certified service centers. In the catalog of parts and assembly units for cars of the GAZelle and Sobol families, the number of these parts has a note indicating that the part must be bored to the final size as part of the assembly unit 3302-3104010 (2217-3104010). Please note, that the “beating” defect that occurs during the operation of the car after replacing the brake drums is associated primarily with their incorrect installation by the consumer, and not the fault of the manufacturer, which is confirmed by statistics on returns of spare parts and research in the production divisions of GAZ OJSC. Since boring of brake drums is carried out by service stations, responsibility for the quality of processing of the working surface of the drum lies entirely with the enterprises that performed this operation. If the boring and balancing process is impossible due to defects in the brake drum itself that are of a production nature (violation of geometric parameters, presence of cracks, asymmetry with respect to the hub, ...), then only in this case the advertised brake drums are accepted by the divisions of GAZ OJSC for examination. At the same time as replacing the brake drums, it is recommended to also replace the brake pads. It is necessary to take into account that after installing brake drums on a vehicle during the initial period of its operation, significant vibrations during braking may occur, which are caused by the running-in of brake drums and pads. In connection with the above, I ask you to bring this information to the attention of all Sales Representatives assigned to your organization, and also take into account the fact that the return of advertised brake drums due to the “beating” defect should be carried out to the service companies that carried out the work on their boring and balancing, and not to LLC “TD “Russian Machines”.
968bc382b68a3379c4ada64dcb5b26c0
Add to cart
Available to order:
Order quantity:
Product successfully added to cart
!
The principle of operation of the caliper
The brake caliper on the Gazelle is a unit that clamps the brake system pads to the discs when a person presses the pedal and the car begins to brake. In the entire braking system, only this element moves. This part is installed only on disc brakes. But the drum system functions completely differently.
The caliper is an extremely important component. It is recommended to consider it together with the pads, since they bear the main load in the entire braking system. 90% of front brake failures depend on the calipers.
Mounted caliper on brake disc
The brake caliper is a simple design that is not complicated. It is used on almost all passenger cars. The design will be similar everywhere, but the changes themselves in different models will be minimal. The operation is based on hydraulic pressure.
After a person presses the brake pedal, a certain piston in the main cylinder of the brake system begins to press down on the brake fluid. Then it goes through certain hoses and channels to the brake caliper.
Technical components of calipers for Gazelle
It contains a piston that moves forward under pressure. On one side there is one block, which presses the disc in one direction. The second pad is simply fixed on the caliper and does not move. As a result, both pads clamp the disc: first they rub against the part, and then they completely stop its movement.
This disk has a relationship with the wheel of the vehicle, so that the speed of the car gradually decreases. With such contact, the pads, if they are made poorly, begin to creak because they cannot withstand the high temperature (heating occurs due to friction).
This is what the front brake mechanism looks like on a Gazelle
The support can be either a simple design or large. In the second case, it includes brake pads that are quite long and wide. This is the shape used in modern vehicles.
Design and features of ZIL brake drums
Structurally, the brake drums of ZIL vehicles do not differ from the drums of other trucks: they are a solid-cast metal part of a cylindrical shape, which can be divided into two parts - the drum itself with a smooth inner surface, and a flange with holes for installing studs.
However, ZIL drums also have a number of design features. In particular, a number of models of brake drums for ZIL cars are equipped with inspection holes, with which you can measure the gap between the pads and the drum, assess the condition of the pads and the brake mechanism, etc. There are no inspection windows in the drums for ZIL-5301 “Bychok” trucks, but this is compensated by a special flange design made in the form of bosses with holes for studs - the brake mechanism can be inspected at intervals between these bosses.
Also among the design features of ZIL brake drums, it is worth noting the dual function of the holes for the studs - they simultaneously serve both for attaching the drum to the hub and for mounting the wheel on the drum. To do this, studs with left-hand threads are used, which are screwed into the hub on one side, and nuts are screwed onto their other side to hold the wheel rim.
The brake drums of ZIL vehicles are highly durable and reliable. This is ensured, first of all, by the fairly large thickness of the walls, and some drums also have stiffening ribs. In particular, the ZIL-5301 drums have stiffening ribs, so they have high rigidity and reliability despite their compact dimensions.
Today, all ZIL brake drums are made only from gray cast iron by casting with further boring. Typically, gray cast iron of the SCh-20 and SCh-24 grades is used for this. It is interesting to note that “original” drums are supplied to ZIL conveyors, but there are drums from a number of third-party manufacturers on the market. Regardless of the manufacturer, all brake drums must comply with GOST 31341-2007; only in this case will they ensure reliable braking and vehicle safety.
Repair work
Pistons and guides require repairs. As for the latter, they are unusual bolts. They must be screwed directly into special ears on the body. If corrosion appears (even in the form of small spots), then the bolts can no longer be restored; they simply need to be removed and replaced with new ones.
This is what repairing caliper guides looks like
To do this, unscrew the guide from the fastening (often called an eyelet) and insert a new one. The replacement process is very simple, so anyone can handle this task. After such work, it is imperative to use only high-quality and correct lubricant (it is included in the kit)
It is very important not to forget about the anthers, which also need to be put on. After this, you need to check whether they are installed tightly
Cracks, breaks and other defects must not remain.
We recommend watching: how to repair the caliper and brake pads on a gazelle.
As for repair work in relation to the pistons, this will be somewhat more complicated, since these parts are located inside the caliper itself. There are cases when this part inside the housing simply jams and stops moving. In such a situation, there are 2 options:
- Revive the caliper itself. Transfer it to silicone grease or gasoline. After this, carefully remove the piston from the entire structure.
- Buy a new brake caliper. In some cases it jams very strongly. In the end, all that remains is to break the case, so repairs in this case are definitely not able to correct the situation.
Watch the video: how to replace the boots and seals on the caliper.
https://youtube.com/watch?v=TLTIohQatXA
If the pistons are still moving, then the first difficulty is to pull them out of the entire structure. To do this, it is recommended to use compressed air at a service station. It is directed into a hole that is intended specifically for brake fluid. As a result, the piston itself will simply fly out. If repair work is carried out at home (for example, in a garage), then you need to carefully squeeze out this part using brake fluid, but do not disconnect the elements from the entire structure. Don't worry that brake fluid will start leaking after this. It will have to be changed upon completion of the repair work.
We advise you to look at: how to replace caliper guides.
https://youtube.com/watch?v=z2Ayzc5rCoE
Now you need to carefully examine the condition of the case. If rust, plaque, any kinks, defects or mechanical damage appear, then in this case everything will have to be completely changed, since repair work is not justified. To do this, you need to buy a new repair kit. Moreover, there should be not only new pistons, but also special seals in the form of rubber bands. In addition, the kit must contain a special lubricant, which is required for both pistons and guides. Without lubrication there is no point in repairs, since the rubber seals themselves will simply break.
Next steps will be as follows:
- Remove the old rubber and other seals.
- Pull out the old piston.
- Clean the housing thoroughly (not only inside, but also on the outside).
- Use a new lubricant to treat all fixation points.
- Install new rubber bands for sealing.
- Install the piston (it must be lubricated first).
After these steps, you should assemble the support structure. At this point, the repair work is completed, so the system can be installed on the car. Don't forget to change the brake fluid. Then you should bleed the entire system.
Allied Nippon
This is a Japanese company, which is considered throughout the world one of the leaders in the production of brake systems. The company supplies consumables to the assembly lines of many automotive giants. This brand offers several different models of products for light-duty trucks from GAZ.
Model ADB0795 are front brake pads for Gazelle.
They are ideal for 3302 and modifications based on it. Tests were carried out on these products. During the tests there was a running-in test, speed tests, and stability tests.
If you don’t go into numbers and details, the result is an effective consumable that fully meets all the requirements of the GAZ company. During the test, one minor drawback was identified - a squeaking noise when braking. But he doesn't appear often. Overall efficiency and quality make this squeak unnoticeable.
Replacing front pads gazelle next
On a Gazelle Nex car, the braking system is slightly more powerful than on a regular Gazalka. To replace the front brake pads on the Gazelle Next, you will need to unscrew the caliper guides with a 14 key (while holding it with a 17 key). The pads are removed from the guide bracket using a flat screwdriver. There is an anti-squeak plate on the inner pad, so if the set of new pads does not include such a plate, then do not forget to remove it and rearrange it. The brake caliper has two piston, so it is better to press them in with a mounting tool or a special tool. In general, nothing new, everything is as usual, but you can verify this simply by watching a video on replacing the front pads on a Gazelle Next.
Even more useful tips in a convenient format
When starting from a standstill, everything on the Gazelle shakes very much
Is it necessary to change the engine oil according to its service life?
The EBD light came on in the Gazelle
What is the volume of the Gazelle Business cooling system?
GAZelle is a very common car in Russia. It is widely popular due to its low cost. With regular use, such a machine pays for itself in 2-3 years. But servicing such a car at a dealer is very expensive. It costs about three thousand rubles to change the front pads of a GAZelle. We will tell you how to save money and perform maintenance yourself by investing 700-900 rubles.
How to separate the brake pads on a Gazelle
View gallery
The sequence of actions is as follows:
- Place the car on a flat, horizontal platform (ideally on a viewing hole or a lift).
- Place wheel chocks under the front wheels.
- Place the gear lever in the “neutral” position, the handbrake is lowered, and hang out the adjustable wheel.
- Remove the two rubber plugs from the inside of it. Bottom - for visual monitoring of the gap between the pads and the drum, as well as their condition. The top one hides the locked eccentric.
- Using a 17mm socket wrench or a sufficiently curved socket wrench, loosen the locknut. Then use a 9 mm socket wrench to rotate the eccentric, visually checking the gap between the pads and the drum. Achieve the “golden mean” when the gap is minimal, but the wheel rotates easily.
- Tighten the locknut, check again for easy rotation, and replace the plugs. The job is half done.
Rear wheel brakes
Rear wheel brake:
- working cylinder fastening bolt;
- working cylinder;
- bleeding valve;
- brake shield;
- block;
- protective case;
- piston;
- thrust ring;
- springs;
- springs;
- expansion link;
- parking brake actuator lever;
- pad mounting plate;
- springs;
- cotter pin;
- screw;
- washers;
- washers;
- bolt;
- plugs;
- eccentric bushings;
- plugs;
- eccentric bushings;
- eccentric;
- eccentric axis;
- screw;
- cups;
- springs;
- kernel.
How to replace the brake drum and rear wheel pads of a Gazelle
We replace the rear wheel pads if they are damaged, oily, or if the linings are worn to a thickness of less than 1 mm.
We replace the drum if it is damaged, cracked, or if the working surface is worn to a diameter of more than 283 mm. We replace all four rear wheel pads at the same time.
ATTENTION: The brake drums are machined together with the hubs, so we install the removed drums only in their original places.
The factory instructions recommend grinding new drums together with the hub before installing them on the car. Do not press the brake pedal after removing the brake drum.
Remove the rear wheels.
Using a large slotted screwdriver, remove the three screws securing the brake drum to the hub.
We remove the drum.
In case of a tight fit or “sticking” of the drum to the hub, you can compress it by screwing three M10 bolts into special holes.
Using a hook or thin pliers, remove the end of the tension spring from the hole in the rear brake shoe.
It is more convenient to use a special device for this.
From the inside of the brake shield, with one hand we press on the cap of the rear brake pad rod, with the other hand on the cup, compressing the spring.
Rotate the spring cup 90°.
In this case, the slot on the cup will align with the tip of the axle. Remove the cups with the spring.
Remove the rod from the hole in the brake shield
Turn the rear block and remove the lower tension spring.
We remove the parking brake lever from the cable end.
Similarly, remove the fastening of the front brake pad to the brake shield, and remove the front pad.
Remove the tension spring from the block and the spring from the spacer rod.
Using a 17mm wrench, unscrew the nut securing the rod to the block
Remove the parts of the parking brake adjustment mechanism.
Use pliers to unscrew the nut securing the parking brake lever.
Holding the fastening bolt with a 17mm wrench, use the same wrench to unscrew the nut
We take out the bolt and remove the parts securing the parking brake lever to the block
We rearrange the removed parts onto new pads. We install new brake pads in the reverse order, and then adjust the gap between the pads and the brake drum.
We install the drum, lubricating its seating belt with CV joint grease-4 or graphite grease.
ATTENTION: The brake drum is installed on the hub in only one position, since the holes for the screws are made with a variable pitch around the circumference.
We install the wheels and press the brake pedal several times to self-install the brake components.