Description of the Chevrolet Niva handbrake
The parking brake in a Chevrolet Niva, as in other cars, is an important component of the braking system. Frequent use of the handbrake leads to wear on the cable and brake pads. Therefore, over time, it is necessary to carry out repairs and replacements of worn-out parts of Chevrolet Niva parking brakes.
Why do you need a handbrake on a Chevrolet Niva?
The parking brake serves for:
- Parking a car on slopes or slippery terrain.
- Temporary parking of a car, without turning off the engine.
- Additional braking.
- In case of failure of the main braking system.
The Chevrolet Niva parking brake has the same design as on all other car models. The design consists of the following parts that make up a single integral braking system for the rear wheels of the car:
- The handbrake is a lever that is activated by the efforts of a person’s hand, thereby bringing the rear wheels into a locked state. The handbrake consists of a lever, which is about 15 cm long, and covered mainly with decorative materials. The handbrake is located in the Chevrolet Niva (as in all cars) between the driver and passenger seats. It is activated by smoothly pulling the lever towards you. Return to the reverse position by pressing the button and smoothly move it down until it stops. The handbrake has from 3 to 7 squeeze (click) positions, it depends on the tension of the cable. The handbrake operates on the principle of a ratchet mechanism. If the brake cable is loose, the lever is tensioned up to 7 clicks.
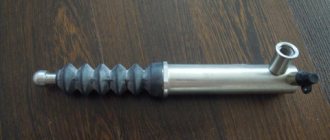
- The tension cable is a special steel wire made from a special carbide material that operates the brake pads. The length of the cable on Niva is approximately 2 meters. And it is located under the bottom of the car, sometimes hidden in a rubber or plastic shell.
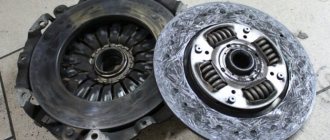
- Brake pads are an arc (backing) with a special layer (friction plate) that is pressed against the wheel rim, thereby blocking the wheel. Such pads are placed under the wheel rim and are hermetically sealed to prevent the entry of dust, dirt or moisture, which will lead to disruption of the handbrake and damage to its elements. Brake pads wear out quickly when the handbrake is used frequently while driving and require subsequent replacement.
Parking brake adjustment
Adjustment is carried out periodically or if a weakening of the tension cable is detected. It is not difficult to find out that the cable is loose; you will feel that the handbrake does not hold the car in various inclined planes. You can adjust the tension cable and, accordingly, the brake system itself by performing simple sequential steps. It is necessary to drive the car into the inspection hole, or you can do without it, but it will not be very convenient.
To do this, set the handbrake lever to its extreme position towards the floor. In this position of the handbrake, the rear wheels should rotate freely. After this, we lower ourselves into the inspection hole and begin adjusting the cable tension. It is necessary to first unscrew the lock nut with a thirteen wrench, and then begin to tighten the main adjusting nut, while counting the number of turns made.
Tighten the cable three to four turns of the nut, after which you need to squeeze the lever and check at what click the handbrake keeps the wheels stationary. The handbrake is considered normal when the wheels lock at the fifth click. Wheel locking is checked by trying to move the car. After the cable is adjusted, it is necessary to tighten the lock nut all the way to the main nut, and after this the hand parking brake can be considered working.
To be completely convincing, you need to drive up a 25-degree slope and put the car on the handbrake. On the fifth click, the handbrake performs its function - it keeps the car stationary.
Stages of dismantling the hand brake and replacing it
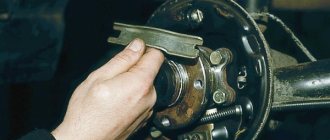
To do this, you need to place the car on a level surface, put it in gear and place chocks under the wheels. The rear wheels must be removed to get to the brake pads. Having reached the pads, it is necessary to disconnect both cables that are connected to the brake pad drive levers. Figure 1 shows the main components of the Chevrolet Niva parking brake.
Figure 1. Parts of the Chevrolet Niva parking brake.
- The handbrake or lever that operates the brake system.
- A button on the end of the handbrake that helps release the car from the brake.
- Traction spring.
- Latch pull.
- The case in which the cable is located.
- Cable.
- A cable guide that goes directly to the brake pad.
- Spacer sleeve.
- Spring.
- Spacer bar.
- A lever that moves the pads into working position.
- Rear cable in a case.
To remove the handbrake elements and subsequently replace them, it is necessary to remove the ends of the cables, and the cables themselves 12, which fit directly to the pads. The lever is removed along with the front cable and all elements. The front cable is pulled out of the lever and replaced with a new one. In the reverse order of removal, all elements of the parking brake are assembled. Replacement is made only of elements or parts that have failed.
During assembly, it is recommended to lubricate the cables and guides together with the bushing with Litol-type lubricants. This is necessary to reduce the likelihood of corrosion.
Replacing pads
Rear brake pads need to be changed when adjustment does not help, and there is no place on the bushing where to tighten the nut. Replacing the pads does not require any special skills, so it can be easily replaced by a young master. To do this, remove the disk, inside of which there are two pads. After which they are inspected; if the top layer is worn off or has a critical thickness, then they need to be replaced. The pads cannot be repaired.
Disconnect one end of the tension spring using a screwdriver and remove it, after which the clearance adjuster earring is removed. Disconnect the cable ends and remove the tension spring. We remove the worn pads and replace them. Before reassembling, it is necessary to measure the diameter of the wheel rim; it must be at least 201 mm. If it is less, it must be replaced. Before installation, lubricate everything with Lithol, except the surface of the pad and disc, and assemble all the parts into place.
Soft brake pedal: reasons
So, the most common problem is poor, low-quality fluid, due to the fact that it may not be suitable for a certain car model, and corrosion of the hoses may gradually appear. Rubber elements are not able to withstand such liquid; they delaminate and increase in diameter, which leads to loss of tightness. If the brake pedal has become soft, it is best to undergo diagnostics of the entire brake system, replace the fluid and defective elements.
The second reason is rust in the rods. There is only one way out - replacing them completely. You can determine such a malfunction by holding down the brake pedal; if it remains down and you have to “lift” it with improvised tools, there is definitely a problem in the rods.
The incorrect gap between the pedal and the cylinder is also determined by the pedal being clamped. If pressing immediately occurs easily and smoothly, and at the end the applied force has to be doubled, most likely the gap is incorrectly adjusted; the pressure present does not allow the pedal to be lowered and raised normally. You will have to adjust and bleed the brakes.
Air locks also cause a lot of trouble, appearing due to wear and tear of the hoses; they lead to breakdowns in the vacuum pump. The brake cylinders lose some of the pressure, the pads do not move apart, and therefore cannot press against the disc. The pads should be checked for any wear.
Having figured out why the brake pedal can be hard, you should pay attention to an equally common problem when the brake pedal has become soft. In such a situation, the brakes may be weak and perform poorly, which is no less dangerous than a hard pedal.
In extreme cases, the brake pedal may not rise after being pressed or may sink to the floor when braking. Naturally, in the case of a “cotton” pedal, owners are interested in what is the cause of the malfunction, why the pedal is soft after bleeding the brakes, and also how to make the brake pedal harder.
If bleeding has already been carried out, there is a high probability that mistakes were made, undetected breakdowns, brake fluid leaks, etc. occurred. For example, drivers often encounter a problem when, after replacing the brake pads, the pedal is soft, the brake pedal falls off after replacing the brake fluid, after bleeding the brake pedal fails, but the fluid does not drain, etc.
- One way or another, the main reason is depressurization of the brake system. Pipes fray and crack, problems with brake cylinders are possible, dirty brake fluid damages the cylinder mirror. Jamming of the TC pistons should not be ruled out.
At the same time, it is necessary to inspect the locations of all connections, fittings and other elements, since even a few drops of brake fluid leakage have no effect on the level in the reservoir, but air still enters the system, which is the cause of the soft pedal.
It should also be taken into account that if certain elements of the brake system have been changed (discs, pads, drums, working cylinders, etc.), in this case the braking efficiency will be slightly reduced until the parts are broken in. In this case, over several tens of km. The pedal may also feel softer than usual, or the brake pedal may alternate between being soft and stiff.
If the brake fluid is dirty, old and has lost its properties, it may boil due to heat. This leads to the brake pedal sinking or becoming too soft (“cotton”). This situation is dangerous because the problem may have a so-called “floating” nature. If such symptoms appear, you need to start with a complete replacement of the brake fluid.
Also interesting: Test drive of the new Suzuki Vitara crossover
How to tighten or replace the handbrake on a Chevrolet Niva
By pressing against the brake drum or disc, they immobilize the wheel.
I tighten the handbrake of Chevrolet Niva 4x4 Chevrolet Niva 2016
This type of repair is simple, performed relatively quickly and does not require the use of special equipment. Release the handbrake and check that the rear wheels rotate freely.
Replacing the fuel filter on a Chevrolet Niva - Duration: Garage. Niva. Here's the handbrake! -...
By rotating the adjusting nuts equally, ensure that the pads barely touch the drums and that the wheels rotate with the same resistance. The handbrake consists of a lever, which is about 15 cm long, and covered mainly with decorative materials.
In such a situation, adjustment of the Chevrolet Niva hand brake is required. After dismantling, install a new Niva rear hand brake cable.
If the lever can be raised above eight, then adjust the handbrake cable as described below.
Remove the handbrake boot. On some vehicles, access to the handbrake mechanism may require removing the center section of the tray.
Loosen one bolt on each rear wheel. Raise the car and place it on stands. Remove each loosened bolt.
Using a flashlight, turn the wheel until you see the adjuster gear in the bolt hole.
Rotate the adjuster wheel clockwise or counterclockwise to spread the brake shoes until they touch the brake drum. Move the pads back so that the wheels rotate freely 3 or 4 teeth on the adjuster.
Warning If the adjuster gear is difficult to turn, remove the wheels and brake disc, then lubricate the adjuster and repeat the adjustment. In the case when you pull the handbrake lever towards you for seven clicks of the ratchet mechanism or more, but the car still rolls, the conclusion is as follows: In such a situation, adjustment of the Chevrolet Niva handbrake is required.
This type of repair is simple, performed relatively quickly and does not require the use of special equipment. If you were still not familiar with the structure of the brake system and have never encountered the need to repair the Niva hand brake, this is not a reason to contact service station specialists. Being careful and patient, you can do everything yourself, and the instructions below will provide information on how to tighten the handbrake on a Chevrolet Niva: To do this, place the vehicle on an overpass or find a suitable section of the road.
10.11. Adjusting the hand brake
If the problem occurs, then we proceed to adjustment. Setting the optimal parking brake cable tension is done under the car, so it is better to place it above the inspection hole.
Chevrolet Niva replacing rear brake pads
If this is not possible, use a lift or jack. In any case, the rear of the car must be raised. When the vehicle is ready for use, secure it and release the handbrake lever.
Next, using a wrench, loosen the lock nut on the handbrake adjusting rod, then use a second identical wrench to tighten the adjusting nut until the cable is properly tensioned.
By the way, pliers are needed to keep the rod from turning during the adjustment process. Now tighten the locknut and make a full stroke first to the working position, and then lower it. After this, spin each rear wheel by hand. The rotation must be uniform, jerking is not allowed. The length of the cable on Niva is approximately 2 meters. And it is located under the bottom of the car, sometimes hidden in a rubber or plastic shell.
Brake pads are an arc backing with a special layer of friction plate that is pressed against the wheel rim, thereby blocking the wheel. Such pads are placed under the wheel rim and are hermetically sealed to prevent the entry of dust, dirt or moisture, which will lead to disruption of the handbrake and damage to its elements.
Brake pads wear out quickly when the handbrake is used frequently while driving and require subsequent replacement. Adjusting the parking brake Adjustment is carried out periodically or if a weakening of the tension cable is detected. It is not difficult to find out that the cable is loose; you will feel that the handbrake does not hold the car in various inclined planes.
You can adjust the tension cable and, accordingly, the brake system itself by performing simple sequential steps.
It is necessary to drive the car into the inspection hole, or you can do without it, but it will not be very convenient. To do this, set the handbrake lever to its extreme position towards the floor.
In this position of the handbrake, the rear wheels should rotate freely. After this, we lower ourselves into the inspection hole and begin adjusting the cable tension.
It is necessary to first unscrew the lock nut with a thirteen wrench, and then begin to tighten the main adjusting nut, while counting the number of turns made. Tighten the cable three to four turns of the nut, after which you need to squeeze the lever and check at what click the handbrake keeps the wheels stationary.
Source: https://iaarus.ru/niva-shevrole/kak-podtyanut-ruchnik-na-niva-shevrol.html
Adjusting the NIVA hand brake. We tighten the Niva hand brake cable ourselves
To do this, set the handbrake lever to its extreme position towards the floor. In case of failure of the main braking system. Now tighten the locknut and make a full stroke first to the working position, and then lower it.
The handbrake is located in the Chevrolet Niva (as in all cars) between the driver and passenger seats. ...
You can adjust the tension cable and, accordingly, the brake system itself by performing simple sequential steps.
If during an external inspection the Chevrolet Niva does not hold the handbrake, you notice that the cable is damaged, replace it immediately - do not risk your own safety. Tighten the cable three to four turns of the nut, after which you need to squeeze the lever and check at what click the handbrake keeps the wheels stationary. To do this, place the vehicle on an overpass or find a suitable section of road.
In any case, the rear of the car must be raised. When the vehicle is ready for use, secure it and release the handbrake lever. Next, using a wrench, loosen the lock nut on the handbrake adjusting rod, then use a second identical wrench to tighten the adjusting nut until the cable is properly tensioned.
The brake pedal has gone to the floor - what to do?
If the brake pedal becomes soft, that is, it begins to sink significantly, you should immediately check the entire brake system of the car. Most likely, diagnostics will be required at a service center and further repairs.
The main thing is to contact the service center in time
It is important to remember that all malfunctions of this kind are fraught with consequences. Brakes with a defect can fail while driving; this can probably happen on a busy avenue; such a car can only be stopped even at an average speed by colliding with some other vehicle or structure. If the brake pedal is easy to press, there may be several reasons:
- the brake cylinder is not able to hold fluid and the corresponding pressure; there may be significant wear on the cuffs and rubber gaskets;
- the wrong fluid has been filled into the brake tank;
- there are problems with the pads or discs;
- there are defects in the operation of the vacuum pump;
- The traction pedals may exhibit rust.
Problems with the brake system are clearly indicated by the presence of vibration, hissing and tapping in the pedal when it is pressed.
There may be several reasons why the brake pedal has become hard. It is worth noting that there are traditional faults that are typical for most cars, and specific ones that can only occur in some models of the brake system.
A hard brake pedal may occur due to the following reasons:
- blockage formed in the air filter. The malfunction disappears after replacing the filter;
- valve jamming. You can fix everything by replacing the amplifier;
- damage to the diaphragm. The hard brake pedal will disappear after replacing the booster;
- Malfunction of the tip in the vacuum booster. The tip will need to be replaced;
- poor functioning of the check valve, the valve will have to be replaced;
- leakage, which causes the flow of fuel;
- defects in the hose going from the amplifier to the manifold. It's best to replace the hose. The condition of the hose should be checked regularly, especially in winter. It functions normally only in a cold state; any overheating makes it flexible and elastic, which is why delamination may appear in the future. They reduce throughput and cause brake problems.
- loosening the rubber hose on the fitting. It is treated by tightening the fastening clamp.
A stiff brake pedal can be the result of swollen o-rings located in the cylinders. Such a defect occurs after fuels and lubricants begin to leak onto the surface. In this case, you will have to repair the brake cylinders and change the fluid.
Equally worrying is the malfunctioning of the vacuum booster. It should be checked regularly; to do this, before starting the power unit, you should press the pedal; if the brake pedal is pressed tightly, there is a malfunction in the amplifier or hose.
In order to more specifically identify the location of the malfunction, you should press the pedal again 5 minutes after turning off the engine. If the brake pedal becomes stiff a second time, the booster valve is faulty.
As you know, the safe operation of any vehicle directly depends on the proper operation of the braking system. At the same time, the driver may notice that at some point the car brakes worse, extraneous noise appears during braking, the brake pedal sinks, the brake pedal becomes hard or soft, etc.
In any case, if the brake pedal is hard to press or the brake pedal is soft and does not brake the car well, you must immediately stop using the car, determine the cause and eliminate the problem. Next, we will look at why the brake pedal is hard to press, the brakes are too soft, or the brake pedal is either soft or hard.
Also interesting: FROST car air conditioners // Online store // Prices // Air conditioners for Lada VAZ, VolksWagen Polo, Daewoo Matiz cars
Read in this article
How to tighten or replace the handbrake on a Chevrolet Niva
The parking brake in a Chevrolet Niva, as in other cars, is an important component of the braking system. Frequent use of the handbrake leads to wear on the cable and brake pads. Therefore, over time, it is necessary to carry out repairs and replacements of worn-out parts of Chevrolet Niva parking brakes.
How to tighten the handbrake on a Chevrolet Niva. instructions
Check the operation of the automatic slack adjuster mechanism by pressing the brake pedal. Ask to tighten the Chevrolet Niva handbrake, go to the drums and listen for clicks, indicating the correct operation of the mechanism. Install the wheels, then lower the car to the ground and tighten the wheel bolts to the torque specified in the Specifications.
Handbrake adjustment Models with rear drum brakes Location of the adjusting nut with the handbrake cable adjuster attachment on models with a SOHC engine The optimal clearance between the brake pads and the brake drum is maintained by an automatic adjustment mechanism, however, with prolonged use of the vehicle, the handbrake cable stretches, resulting in increased tightening Handbrake Niva Chevrolet handbrake lever.
Raise the rear of the car and secure it on stands. In this position of the handbrake, the rear wheels should rotate freely.
tighten the handbrake Niva Chevrolet After this, we lower ourselves into the inspection hole and begin adjusting the cable tension. It is necessary to first unscrew the lock nut with a thirteen-size wrench, and then begin to tighten the main adjustment and tighten the Chevrolet Niva handbrake, while counting the number of revolutions made.
Tighten the cable three to four turns of the nut, after which you need to squeeze the lever and check at what click the handbrake keeps the wheels stationary.
The handbrake is considered normal when the wheels lock at the fifth click.
Wheel locking is checked by trying to move the car. After the cable is adjusted, it is necessary to tighten the lock nut all the way to the main nut, and after this the hand parking brake can be considered working.