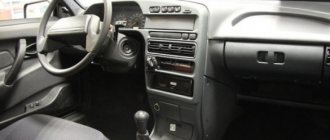
The need to remove and replace the dashboard on a VAZ 2110 car may arise when repairing devices and parts located under its surface. In particular, it is with the removal of the dashboard that the car’s air intakes are inspected. Sometimes they can become clogged and prevent your heating or air conditioning systems from working properly. The process of removing and replacing the dashboard on a VAZ 2110 is not particularly simple. To carry it out, you will need to be patient and master the skills of masterly working with instruments.
In today's article we will tell you how to remove, replace, install, modify and improve the dashboard on a VAZ 2110 with your own hands. In addition to all this, we will give you a photo report of the work done and show you an interesting thematic video.
What should be considered when replacing a torpedo on a VAZ 2110
Replacing the torpedo on a VAZ 2110 will not only add some charm to the car, but can greatly improve the ride comfort not only for the passenger, but also for the driver. After all, you can replace the dashboard with a torpedo. When replacing it, the following points should be taken into account:
- What exactly does the car owner want to achieve with a replacement? This could be an increase in space in the cabin in front of the front seat.
- Just to give, so to speak, an expensive look to the car.
- Organize a place to install additional devices - radios, screens, and so on.
In any case, you can get the most beneficial effect from such an undertaking.
The first thing to consider when selecting a torpedo for a VAZ 2110 is its size and the shape of the car’s interior.
It is also worth considering the category of people, passengers, who will be in the car. This will sometimes improve the safety of the vehicle.
Once the type of torpedo is determined, it is worth thinking about what additional functions it should perform. This could be the installation of additional equipment, space for mobile phones, space for a car audio system - speakers, or a radio.
The next stage is choosing a coating. It is best to get it as universal as possible and try to install torpedoes with the following coatings:
- Plastic. The torpedo is made entirely of plastic without unnecessary inserts.
- Plastic with wooden or leather inserts.
These are the two most popular types of torpedoes for the VAZ 2110, which are the most practical to use and will best suit almost any type of interior.
When disassembly is required
There are several reasons why car owners want to remove the tidy:
- It is damaged by mechanical shocks, as a result of hitting potholes, etc. In fact, the strength of the standard dashboard leaves much to be desired, so damage is not uncommon for dozens;
- There are scratches and abrasions on the surface of the device, the paint has peeled off somewhere, and there are signs of wear. That is, the appearance of the panel leaves much to be desired, so to correct the situation it needs to be removed;
- The desire to transform the interior of the car. Many VAZ 2110 owners decide to get rid of the old dashboard in order to put something more modern, original in its place, and change the backlight to LED lights.
To make any changes to the instrument panel, the first priority for the car owner is to remove the old structure. It's not difficult to do this yourself. Follow the instructions strictly, do not break the sequence of steps, and pay close attention to the markings of all elements and especially wires.
If you connect something incorrectly and reassemble the panel without checking, you risk not only having to re-disassemble the dashboard, but also encountering non-functioning devices, short circuits and even worse consequences.
How to remove the dashboard on a VAZ 2110 with your own hands - step-by-step instructions + photo report
In order to remove a torpedo on a VAZ 2110, you must perform the following procedure:
- Unscrew 2 screws on the right and 2 on the left on the central tunnel.
- Next, remove the covers on both sides.
- Remove the plug near the handbrake.
- Unscrew the screws on the left and right of the central tunnel.
- Unscrew the screws at the back of the central tunnel.
- Removing the plastic of the central tunnel.
- Disconnecting the cigarette lighter wires. Mark so as not to get confused when connecting to the assembly.
- Remove the gearshift knob cover.
- Using a wrench, unscrew the interior heating air duct.
- Removing the air duct.
- Unscrew the fastenings of the central panel from the front.
- Unscrew the fastenings of the central panel at the back.
- We finally remove the panel.
- We unscrew the screws of the glove compartment.
- We remove the glove compartment.
- Disconnect the glove box light wires.
- We unscrew the screws inside the space in place of the glove compartment.
- Unscrew the remaining screws on the sides of the torpedo.
- Unscrew the torpedo bolts as follows as in the photo.
- Removing the air duct.
- Unscrew the nut on the dashboard under the air duct.
- We lower the torpedo from the pins.
- We disconnect the wires from the front panel and mark them so as not to get confused during assembly.
As you noticed, if you follow our instructions, the process becomes much easier. You can remove the VAZ 2110, 2111, 2112 torpedo with your own hands, but it is better to do it with an assistant.
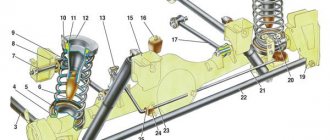
What is included in the design?
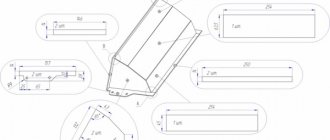
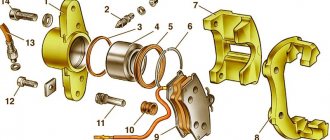
To make it easier to remove the entire dashboard or its individual elements, you need to know what the structure consists of. In a VAZ 2114 car, the dashboard includes 11 main elements, which are shown below:
Dashboard base. It contains controls for interior systems.
- Overlays. This part is needed to securely fasten the base.
- Bracket.
- The sealing element is a plug.
- Ashtray.
- Crossbar, there are two of them. The number “6” shows the right one.
- Right dashboard screen.
- A shield that blocks access to the wiring.
- Central bracket.
- Left screen of the instrument panel.
- Left cross member.
In VAZ cars, you can improve the appearance of the dashboard. To do this, you need to unload the dashboard from the dials. More stylish and modern information devices are usually installed to replace them. The same applies to the backlight; if you wish, you can update it yourself and install modern original LEDs.
By dismantling these elements one by one, you can completely disassemble the dashboard. Below you will find detailed instructions with which the motorist can completely remove the dashboard elements from the car.
Installing a torpedo on a VAZ 2110 - step-by-step instructions
In order to install the instrument panel of a VAZ 2110 (torpedo), you must perform the following steps:
- Install the instrument panel so that the guide pins fit into the holes on the instrument panel.
- At the same time, move the steering column adjustment knob into the hole on the instrument panel.
- Using a screwdriver, drive the threaded rods into the holes on both sides of the panel.
- Install the foot warmer air duct so that the air duct fits into the hole in the air distributor housing.
- Connect all terminals to wires in reverse order. Secure the panel and reinstall all components that were removed during disassembly. After completing the work, check the operation of all devices.
Instrument panel - removal and installation
The repair manuals for the Lada 112 car indicate that to remove the instrument panel it is necessary to almost completely disassemble it. This is not always convenient, so this section discusses removing the instrument panel without disassembling it
1. We prepare the car for work (see “Preparing the car for maintenance and repair”).
2. Remove the decorative linings of the steering column (see “Decorative linings of the steering column - removal and installation”).
3. Remove the steering wheel (see “Steering wheel - removal and installation”) without removing the horn contact plate.
4. Remove the steering column switches (see “Steering column switches - removal and installation”) without removing their connector.
5. Disconnect the ends of the two wires from the connector of the steering column switches (see “Steering column switches - removal and installation”).
6. Using a slotted screwdriver, remove the headlight hydraulic adjustment control knob.
21mm deep socket wrench
unscrew the nut securing the headlight hydraulic corrector and recess its rod into the hole in the instrument panel.
8. Open the cover of the mounting block (see “Mounting block - replacing fuses and relays”).
Improvement and tuning of the dashboard on the VAZ 2110
One of the most popular ways to improve the dashboard on a VAZ 2110 is its sound insulation. In order to do this, you must perform the following steps:
- We remove the tidy, I already told you how to do this earlier
- Next we foam, but under no circumstances should you pile up a huge pile of foam at once, it won’t dry out in a week.
- Don’t forget to try it on so that later it doesn’t turn out that your steering wheel touches it, or it’s just too high.
- In principle, all the work consists of two things, you cut, foam, cut again and so on many times.
- Next, we apply the cheapest putty we could find.
- Next we cover the dashboard with Shumka.
- We install the torpedo back.
You can modify the dashboard of a VAZ 2110 in different ways, someone covers it with leather, someone inserts an LCD monitor into it, in tuning a car it all depends on you and your fantasies and desires.
How to install the trim without disassembling the dashboard
Detailed instructions: repairing and replacing locks in the doors of a VAZ 2110 car
Any dashboard on a VAZ 2110 consists of several parts, but the Euro panel is only a cover on the top of the dashboard. And just so as not to completely disassemble the instrument panel, you can replace only its upper part.
Replacement is carried out as follows:
- Remove the instrument panel.
- Open the glove compartment, unscrew several screws inside it.
- Next, you need to pull out the ECU and unscrew the screws behind it.
- Loosen the fuse panel.
- Then you need to unscrew the screws that hold the panel on top. And after that you can remove the old trim.