A faulty starter relay is often the reason why the car refuses to start when the key is turned in the ignition. Perhaps these are not the most pleasant moments in the life of any driver. Therefore, in such cases, it is important to know how to check the starter solenoid relay, and how to start the car if it does not work.
We will tell you about the purpose of the starter solenoid relay and its structure, how you can check it and perform simple repairs yourself.
At the end of this article, watch the video that shows how to start your car if the starter solenoid relay is not working.
Also on our website you can find information about other common causes of starter malfunction with step-by-step instructions on what to do if the starter does not work.
When, when you turn the key in the ignition switch, you can clearly hear that the starter is idling, then the cause of this malfunction may be the solenoid relay. But before you start diagnosing it, you should know the purpose of this electrical unit.
How to check the starter solenoid relay for serviceability
In this article we will tell you how to test the starter solenoid relay to identify faults and look at ways to eliminate them.
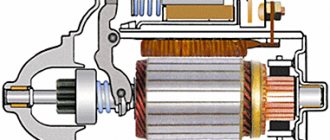
The car starter is a traction motor, which spins the crankshaft to further start the power plant.
Unwinding is carried out by means of a gear mounted on the starter rotor, which at the time of starting has a gear engagement with the flywheel ring.
But the engagement between the starter gear and the flywheel is only necessary until the power plant starts.
If the engagement were constant, the starter would fail very quickly.
Therefore, the design of the latter includes a solenoid relay, through which the starter gear is brought into engagement with the flywheel during engine starting and disengaged after starting.
The retractor relay is combined with the starter relay, and the design of this device is not complicated, which ensures its operational reliability.
But nothing is eternal, therefore, and it can also fail, although this happens infrequently.
There are not so many malfunctions that can arise with this element, but if they do occur, it is often either impossible or very difficult to start the engine.
Malfunctions that may occur with the solenoid relay are:
The occurrence of these malfunctions may result in:
Repair of starter retractor relay
Worn relay contact plates
On many modern cars, the solenoid relay is made in a non-separable form. This is done for two reasons. First, this increases the reliability of the mechanism and its durability due to mechanical protection from external factors. The second is that automakers want to make more profit from the sale of their components. If your car has just such a relay, then the best solution in this case is to replace it. Write down the brand of the relay, its technical parameters, or better yet, take it with you and go to the nearest store or car market for a similar new one.
However, some car owners repair it themselves. But at the same time you need to know how to disassemble the starter solenoid relay . If the relay is collapsible, then it can be repaired. In the case of non-dismountable parts, repairs are also possible, but to a small extent. In particular, when burning “nickels”, improving and cleaning the contact. If one of the windings burns out or short-circuits, then such relays, as a rule, cannot be repaired.
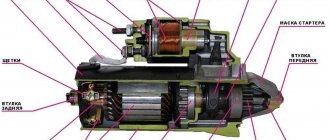
Solenoid relay design
To understand how to identify a malfunction, you first need to understand the design and operating principle of the retractor relay, as well as the starter relay, since they are located in the same housing.
So, there is a housing, inside of which two coils are installed - retracting and holding.
On the one hand, the body is covered with an ebonite or plastic cover. Three terminals for connecting wiring are installed on the outside of this cover.
One of the terminals is intended for connecting the “positive” wire from the battery, the second is for supplying electricity to the starter motor, and the third is for connecting the relay to the ignition switch.
On the inside of the cover there are two contact plates of the “positive” terminals.
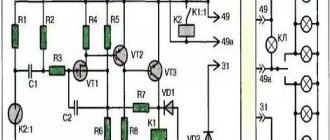
Schematic diagram.
Inside the housing with the coils there is an armature, spring-loaded on one side, and a starter relay rod.
On the outside of the armature there is an eyelet, with which it engages with the Bendix fork and gear.
Starter solenoid relay diagram
Solenoid relay circuit
In addition to the previous point, we present to your attention a diagram of the starter retractor relay . With its help, it will be easier for you to understand the principle of operation of the device.
The solenoid coil of the relay is always connected to the negative side through the starter. And the holding winding goes directly to the battery. When the relay core presses the working plate against the bolts, and “plus” is supplied to the starter from the battery, then a similar “plus” is supplied to the “minus” output of the retractor winding. Because of this, it turns off, and the current continues to flow only through the holding winding . It is weaker than the retractor, but has sufficient strength to constantly hold the core inside the housing, which ensures continuous operation of the motor. The use of two windings allows you to significantly save battery energy when starting the engine.
Principle of operation
It all works like this: when the engine is not running, the armature of the retractor relay is pulled out of the housing due to the action of the spring on it. The same spring holds the Bendix and gear through the fork in a position where there is no engagement.
When the ignition key is turned to the start position, the solenoid relay is first activated.
The electrical energy supplied to the coils of the solenoid relay ensures the appearance of a magnetic field inside the housing.
This field acts on the armature, and it, overcoming the force of the spring, enters the body, after which the retracting coil is turned off and ceases to create a magnetic field, but in the retracted position the armature is held by the holding coil with its magnetic field.
In this case, the armature pulls the fork, which in turn moves the bendix forward along the rotor shaft, and its gear engages with the flywheel ring.
The armature, entering the housing, pushes the starter relay rod, and, moving, closes the contact plates of the positive terminals with each other.
Electricity from the battery is supplied to the brushes of the starter motor, and its rotor begins to rotate. And since the gear has already engaged, the rotor begins to rotate the flywheel.
After starting the power plant and turning the ignition key back, the power to the holding coil stops, its magnetic field disappears and the armature comes out of the housing under the influence of a spring.
At the same time, it disengages the bendix through the fork and stops acting on the relay rod. He, in turn, moving away, opens the contact plates, and the starter is completely turned off.
New model solenoid (traction) relay for VAZ 2108, Priora
Dear customers, in order to avoid errors when sending a new VAZ 2108-2110 retractor (traction) relay, please indicate your car model, year of manufacture, gearbox (automatic or manual transmission) in the “Comment” line.
The starter solenoid relay is responsible for quickly connecting two toothed parts: the flywheel and the overrunning clutch gear (Bendix).
In order for the engine to start, it is necessary to forcibly rotate the crankshaft until the fuel mixture begins to ignite in the combustion chambers. In a working motor, this requires a “second” of time.
The starter traction relay is located above the starter in a strong connection with it. If necessary, it can be easily removed, but this can only be done with the starter removed.
The solenoid relay performs the following functions:
• redistribution of electricity between the relay electromagnet and the starter motor;
• synchronization of the operation of the starter components when starting the engine;
• feed of the bedix gear until it engages with the teeth of the flywheel ring;
• return the gear to its original position after starting the engine.
Different manufacturers offer relays in two versions: collapsible, which, if necessary, can be diagnosed, inspected and repaired, and non-dismountable, which can be replaced entirely in the event of a breakdown.
The main parts of the traction relay are:
• frame;
• anchor;
• magnet with windings (retracting and holding);
• return spring;
• contacts.
After turning the key in the ignition switch, an electromagnetic field appears in the coil on the retractor winding. The anchor, being attracted, moves into the core, which, through a lever, engages the Bendix working gear with the flywheel crown.
As soon as the core reaches its extreme position, the “retractor” of the starter closes a pair of contacts, which are called “nickels”. At this moment, the holding winding is turned on and current is supplied to the motor winding, which begins to rotate the shaft and the flywheel meshed with the gear.
When the engine starts, the contacts in the ignition switch open, the supply of electricity to the starter is stopped, and the return spring returns the armature to its original position, and with it the gear with the overrunning clutch.
Other articles of the product and its analogues in the catalogs: EZHAI.647000.002, 57.3708-800, 2110-3708805-00, RL 001C3.
VAZ 2108, VAZ 2109-099, VAZ 2110-2111, VAZ 2112, VAZ 2113-2115, VAZ 1118, VAZ 2170, Chevrolet Niva – 2123.
Any breakdown is not the end of the world, but a completely solvable problem!
What are the causes of problems with the retractor relay in a VAZ family vehicle?
How to independently replace the solenoid relay on a VAZ family car.
AvtoAzbuka online store, repair costs will be minimal.
Just COMPARE and BE SURE!!!
Don't forget to share the information you find with your friends and acquaintances, because they may also need it - just click one of the social networking buttons located above.
Malfunctions
Troubleshooting a traction relay is not that difficult. It should be noted that its operation is accompanied by a click - this is the result of the armature being retracted and the gear being engaged.
When you turn the key, this click is clearly audible. Thus, the absence of a click may indicate a break in the coils, lack of power, or the armature being stuck in one position.
If, when you turn the ignition key, a click is heard, but the starter itself does not start or starts but spins very slowly, this may indicate that the contact plates are burning.
Continued operation of the starter after starting the power plant will be accompanied by a characteristic buzzing sound.
It is possible that the armature is stuck in the retracted position and cannot return back, so it keeps the bendix gear engaged and continues to close the contact plates.
Checking the solenoid relay
Checking the functionality of this element is not so difficult. Moreover, you can check it even without removing the starter from the car. For example, let's take a VAZ-2110 car.
So, the starter on this car does not work. First you need to check the wiring going to it for a break.
If everything is in order with the wiring, you need to find out whether the traction relay works at all.
To do this, you can ask someone to turn the ignition key, and listen for yourself to see if there is a click. If it is missing, it is faulty and needs to be replaced.
If there is an actuating click, but the starter itself does not turn, it is possible that the relay does not operate due to burnt contact plates.
You can check whether this is true using a regular screwdriver. The terminal coming from the ignition switch is disconnected from the relay.
Next, a screwdriver is used to close the terminal coming from the battery with the terminal going to the starter - this results in a direct transfer of electricity to the electric motor, bypassing the relay. If it works, you need to look for the cause in the relay.
You can check the voltage going to the starter with a multimeter, but this will most likely make it clear whether the problem is in the starter or in the wiring and battery.
To do this, a multimeter is connected to the positive terminal of the solenoid relay, to which voltage from the battery is supplied. Connect the other negative wire of the multimeter to ground.
Next, someone must turn the ignition key to the start position. The voltage on the multimeter display should correspond to 12 V.
If it is lower, perhaps the battery is simply discharged and its energy is not enough to start the engine, but at the same time its charge is enough to operate the relay, but there is not enough energy to rotate the rotor.
Replacing the solenoid relay
The solenoid relay is not repairable, and in the event of a malfunction, it is simply replaced.
The only thing that can be changed is the anchor. Replacing this element on a VAZ-2110 is a simple operation; it is more difficult to remove the starter itself from the car.
To replace, you will need to remove the starter from the car. To do this, the car is driven into a pit, since it can only be reached from below. If the car has a crankcase protection, then it is removed first.
Next you need to disconnect all the wiring going to the starter. To remove it, you need to unscrew the two nuts that secure it, after which it is carefully pulled out of its seat.
The sequence of work performed when replacing a relay:
First, you should turn off the power from the battery, because while the electrical circuit is connected, it is prohibited to dismantle or disassemble the starter, otherwise a short circuit may occur and you will burn all the wiring.
- Before disassembling, thoroughly clean the starter from dust and dirt so that dirt does not get inside.
- Unscrew the brush assembly nut from the traction relay bolt and remove the contact from the bolt.
- We unscrew the coupling screws securing the relay to ground and pull it out.
- Unscrew the nuts from the end and divide it into two parts
- We take out the old core and replace it with a new one
- Reassemble everything in reverse order and install the retractor
- We check the entire mechanism and install it on the car
After all the parts have been installed on the car, we check them again for functionality, to be sure that we did everything correctly and everything is working properly for us.
The starter does not turn on a Priora
A car has long ceased to be a luxury. It’s hard to imagine life without a car these days. Many people drive a car every day and for any need - to work, study, dacha, shopping, on vacation. And that's why it becomes very bad when the car won't start. Plans are ruined, meetings are cancelled, people lose money!
We will look at situations where the starter works, but the car still does not start, another time. And now - about what to do if the starter on a Priora does not turn.
First, let's understand how a starter works and what its structure is. An electric motor with a gear that meshes with the engine flywheel and turns it when started. All this is hidden in a housing on which the solenoid relay is mounted. It is designed to control the movement of the gear and supply power to the electric motor.
When you turn the ignition key, current is supplied to the relay. Using an electromagnet, it is retracted, using a special mechanism, it moves the gear and starts the engine by closing the contacts. When the key is released, power stops being supplied to the magnet of the solenoid relay, the relay operates in the other direction and the contacts open. So, we know what the principle of operation of the starter looks like in general terms, so now it will be easier for us to understand why the starter does not turn on the Priora.
If you hear clicking sounds when you turn the ignition key and the lights on the instrument panel go out, it may be the battery. It needs to be checked, recharged, topped up with electrolyte or replaced. Is the battery OK? Then the situation becomes more interesting. Check the wires that come from the battery. If they get hot, check their contact with the battery. Remove the terminals from the battery, clean, lubricate them (sometimes oxidation occurs) and reinstall.
Check the connection between the ground terminal and the body. If necessary, clean this connection. Check the connection between the plus terminal and the starter. Determine if power is supplied to the solenoid relay from the ignition switch. To do this, you need to disconnect the connector from the relay, and turn the ignition key “to start” and measure the voltage at the connector.
The Priora starter still won't turn? Then you will have to remove it from the car and check it.
The removal procedure looks like this: disconnect the battery terminals, unscrew and remove the air filter, unscrew and remove the positive wire from the starter. Then disconnect the connector from the relay, unscrew the starter mounting nuts and remove it. We are already much closer to solving the question of why the Priora’s starter does not turn. Now we take the wires for lighting (crocodiles) and connect them with the negative wire of the battery and the starter housing. We connect the positive one to the relay connector, after which the gear should be activated and ejected forward. If not, change the retractor.
You can hook the negative wire to the starter housing, and the positive wire to the lower terminal of the solenoid relay. The electric motor didn't work? The culprit is most likely the motor brushes.
In this article, we briefly examined the reasons why the starter does not turn on a Priora.
Starter Lada Priora device and principle of operation
The starter is a DC electric motor powered by a battery. It is intended for short-term operation of 10-15 s. Between periods you need to take breaks 1.5-2 times longer than the time it was turned on. This is explained by the fact that when starting the engine of a Priora car, it is necessary to provide a large torque aimed at overcoming compression in the cylinders and friction forces. During operation, the starter consumes a large current, about 300-400 A, which leads to heating of the conductors.
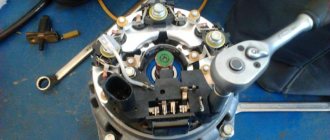
The design of the starter allows it to be disassembled and repaired without having to buy it completely (assembled). The starter consists of:
These are the main parts of the starter, not taking into account seals, retaining rings, restrictor rings, bushings, etc.
The operating principle is based on the interaction of the magnetic field of permanent magnets with the armature field. The traction relay moves the clutch with the gear along the shaft, that is, it engages and engages it with the flywheel ring gear.
Useful tips when using the Lada Priora starter
In order to avoid many starter malfunctions, follow a number of simple rules when operating it: – when starting the engine, turn on the starter for no more than 10–15 s and again after 20–30 s. Continuous operation of the starter for a long time can lead to overheating. If after three attempts the engine does not start, then you should check and eliminate faults in the engine power supply system or in the ignition system;
– after starting the engine, immediately turn off the starter, since prolonged rotation of the drive gear with the flywheel can damage the starter freewheel;
– it is not allowed to move the car using the starter, as this causes significant overload and damage.
Causes of starter malfunction VAZ 2170 2171 2172 Priora
Causes of starter malfunction VAZ 2170 2171 2172 Priora
Ways to eliminate the causes of starter malfunction VAZ 2170 2171 2172 Priora
External signs of a malfunction of the VAZ 2170 2171 2172 Priora starter
Battery is faulty or discharged
Replace, charge the battery
When the ignition is turned on, the starter armature does not rotate, the retractor relay does not operate
Terminals and tips are oxidized
Clean, stretch contacts, lubricate with grease containing copper dust
When the ignition is turned on, the starter armature does not rotate, the retractor relay does not operate
Interturn short circuit, short circuit to ground, break in the traction relay winding
Replace the traction relay
When the ignition is turned on, the starter armature does not rotate, the retractor relay does not operate
Open circuit starter traction relay
Check the wires, connections, check the wire from contact 50 of the starter to the ignition switch
When the ignition is turned on, the starter armature does not rotate, the retractor relay does not operate
The contact part of the ignition switch is faulty, there is no short circuit between contacts 30 and 50
Replace the contact part of the ignition switch
When the ignition is turned on, the starter armature does not rotate, the retractor relay does not operate
Traction relay armature jammed
Remove the relay, check for ease of movement of the armature, and for the absence of wear on the mating parts
When the ignition is turned on, the starter armature does not rotate, the retractor relay does not operate
Burnt commutator, stuck or worn brushes
Clean the commutator, replace the brushes
When the ignition is turned on, the starter armature does not rotate, the retractor relay does not operate
Damaged, faulty additional starter relay
Check and replace the relay (installed at the bottom right side of the passenger side in the instrument panel)
When the ignition is turned on, the starter armature does not rotate, the retractor relay does not operate
Malfunction in the control circuit of the additional starter relay
Check wires and connections (there may be problems with the controller)
When the ignition is turned on, the starter armature does not rotate, the retractor relay does not operate
Battery is faulty or discharged
Replace, charge the battery
When the starter rotates, the armature does not rotate or rotates too slowly, the traction relay is activated
Terminals and tips are oxidized
Clean, stretch contacts, lubricate with grease containing copper dust
When the starter rotates, the armature does not rotate or rotates too slowly, the traction relay is activated
Loose wire connections from the power unit to the body
When the starter rotates, the armature does not rotate or rotates too slowly, the traction relay is activated
Contact bolts on the traction relay are oxidized or loose
Clean the bolts, tighten the nuts of the bolts
When the starter rotates, the armature does not rotate or rotates too slowly, the traction relay is activated
Burnt commutator, stuck or worn brushes
Clean the commutator, replace the brushes
When the starter rotates, the armature does not rotate or rotates too slowly, the traction relay is activated
Open or short circuit in the armature winding
When the starter rotates, the armature does not rotate or rotates too slowly, the traction relay is activated
Battery is faulty or discharged
Replace, charge the battery
When the ignition is turned on, the traction relay is activated and switched off repeatedly
Interturn short circuit, short circuit to ground, break in the traction relay winding
Replace the traction relay
When the ignition is turned on, the traction relay is activated and switched off repeatedly
Large voltage drop in the traction relay circuit due to oxidized contacts
Clean and stretch contacts
When the ignition is turned on, the traction relay is activated and switched off repeatedly
Freewheel slipping
When the starter is turned on, the armature rotates, the flywheel does not rotate
The drive gear does not engage with the ring gear, noise is heard (wear of the engagement part)
Replace gear drive or flywheel
When the starter is turned on, the armature rotates, the flywheel does not rotate
Wear of bearings (armature shaft bushings)
Replace bearings or starter caps
Starter noise when rotating the armature
The starter is loose or the cover on the starter side is broken.
Tighten the nuts, replace the cover
Starter noise when rotating the armature
Damage to individual teeth of the drive gear or flywheel ring
Replace gear or flywheel
Starter noise when rotating the armature
Jamming of the coupling along the splines of the shaft or armature in the traction relay
Clean the splines, lubricate or replace the traction relay
Starter gear does not disengage from flywheel
Removal and installation of VAZ 2170 2171 2172 Priora starter.
You will need: ring wrenches “13”, “15”.
1. Disconnect the wire from the negative terminal of the battery.
2. Remove the air filter (see “Removing and installing the air filter”).
3. Unscrew the terminal securing nut. 4. Disconnect the wire with the terminal from the contact bolt of the traction relay.
5. Disconnect the wire from the traction relay terminal.
6. Unscrew the nut of the upper mounting stud.
7. Then the stud nut for the lower starter mounting.
8. Remove the starter from the vehicle.
9. At the start of the Lada Priora car, install it in the reverse order.
solenoid relay and starter fuse for VAZ 2110 and Priora
Owners of domestic “ten”, when faced with the problem of starting the engine, first of all believe that the solenoid relay has failed, and not the starter. And his search under the hood turns out to be fruitless - the starter relay cannot be found.
The thing is that the design of the starters of the VAZ 2110-2115 family, including the Lada Priora car, has an interesting feature - the retractor relay is located inside the starting device. The starter starts when the traction relay gear engages with the drive, which, in turn, engages with the crankshaft flywheel. In other words, if the solenoid relay does not work for some reason, then the engine will not start.
In addition, the traction relay also performs another important function - when its contacts are closed, power is supplied to the starter windings from the battery. It is controlled directly by turning the key in the ignition switch. Over time, unclear operation of the starter or its slow rotation appears, as the contact group of the relay wears out due to increased starting currents. In this case, it is necessary to repair the VAZ starter with replacement of the traction relay.
Where is the starter and solenoid relay located?
The relay is located in the starter housing; to remove it for replacement, you must perform the following operations:
After replacing the solenoid relay, the assembly procedure must be performed in reverse order.
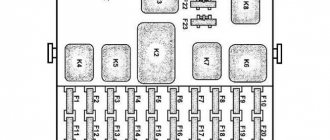
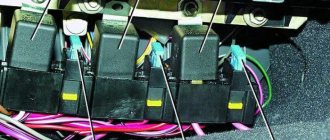
Where are the fuses and starter relay located?
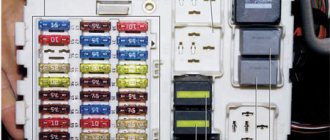
To check the integrity of the fuses and the functionality of the starter relay, you need to press the latch on the left side of the steering wheel, at the bottom of the dashboard, and lower the unit cover down. Above the fuse boxes, on the right is the starter relay. The relay and ignition fuse are located in a different place - to access them, you need to unscrew two screws in the side trim of the console and remove the additional electrical equipment unit.
The integrity of protective devices, the operability of the relay and starter windings can be checked with an ohmmeter if you have the skills and minimal experience in diagnosing electrical equipment.
If you have any difficulties in identifying a malfunction of the starting device in your car, we recommend contacting specialists at the StarterPro car service, where they will quickly and efficiently identify all faults and eliminate them at minimal cost. In addition, finding a starter, relays, fuses and other equipment can be difficult due to design changes in the arrangement of devices, depending on the year of manufacture and modification of the car.
Signs and causes of relay failure
External signs of a broken starter relay include the following:
- When you turn the key in the ignition switch, no action is taken to start the engine, or starting is possible only after making several attempts.
- After the engine starts, the starter continues to rotate at high speed. This can be heard by ear by the strong buzzing of the mechanism.
A malfunction in the relay is one of the reasons that the car does not start, and there may be several reasons for its breakdown:
- failure (burnout) of the contact plates inside the relay (popularly called “nickels”), reduction in their contact area, “sticking”;
- breakage (burning) of the retracting and/or holding winding;
- deformation or weakening of the return spring;
- short circuit in the pull-in or holding winding.
How to check the starter solenoid relay with a multimeter
If you find at least one of the listed signs, then the next step to fix the problem is to conduct a detailed diagnosis.
Starter malfunctions, their causes and methods of elimination
Cause of malfunction - Remedy
When the starter is turned on, the armature does not rotate, the traction relay does not operate:
The battery is faulty or completely discharged - Charge the battery or replace it
The battery terminals and wire tips are heavily oxidized, the tips are loosely tightened - Clean the terminals and wire tips, tighten and lubricate with Vaseline
Interturn short circuit in the pull-in winding of the traction relay, its short to ground or open - Replace the traction relay
Open circuit in the power supply circuit of the starter traction relay - Check the wires and their connections in the circuit between plugs “50” of the starter and
The contact part of the ignition switch is faulty: contacts “30” and “50” do not close - Replace the contact part of the ignition switch
Traction relay armature sticking - Remove the relay, check the ease of movement of the armature
When the starter is turned on, the armature does not rotate or rotates too slowly, the traction relay is activated:
Basic faults
Externally, a breakdown of the Priora starter can be recognized by the following signs:
- “turns” and at the same time starts the engine;
- does not “twist”;
- continues to “twist” after the key is released;
- creaks, clicks are heard;
- It spins, but for too long.
The reason may lie in a faulty battery, in the starter itself and fuses. The most common are those that are most likely to disable
the car – it’s worth taking a closer look.
Doesn't turn on
If the engine does not start, the problem may be:
- discharged or broken battery;
- no closure of contacts 50 and 30;
- terminals or tips are oxidized;
- interturn closure;
- short circuit to ground;
- open circuit “starter - traction relay”;
- the ignition module is faulty;
- break in the traction relay winding;
- brush wear;
- the anchor jams;
- the additional relay or the control circuit connected to it is damaged.
Clicks won't start
If the starter clicks but does not turn, there may be several reasons:
- the gear working with the bendix does not engage with the engine flywheel;
- the bearing of the armature shaft bushings is worn out;
- the starter mount or housing is broken;
- gear or flywheel teeth are damaged.
Doesn't turn off
When the Priora starter unit does not turn on, the problem may lie in the following:
- the freewheel slips;
- the battery is discharged or broken;
- sudden and severe voltage drop in the circuit;
- oxidation of contacts.
Starter rotates slowly
Reasons for slow performance may include:
- the battery is discharged or broken;
- terminals or tips are oxidized;
- the connection of wires from the power unit to the body is very weak;
- the contact bolts on the traction relay are loose or oxidized;
- brush wear;
- a short circuit or break has occurred in the armature winding.
Lada Priora starter: where is it located, how to remove, replacement
Many owners, at the first malfunction of the starter, change the entire unit, without understanding the causes of the breakdown itself. But in most cases, the reasons for failure are as follows:
Each of the problems listed above can be solved much cheaper than buying a new starter for a Priora. Therefore, first you should contact a specialist who will tell you exactly what the reason is and answer whether it can be repaired or not!
If repair is no longer possible, which is extremely rare, then a replacement must be made. To do this you will need the following tool:
Starter Lada Priora
- 1 Introduction
- 2 What does it consist of?
- 3 Operating principle
- 4 Main faults 4.1 Battery
- 4.2 Retractor
- 4.3 Brushes
- 4.4 Bendix
- 4.5 Windings
- 7.1 Required tools
The procedure for replacing the starter on a Priora with your own hands
This repair is very simple, so it won’t take more than 25-20 minutes. The ideal option is to work either in the inspection hole, or to remove the air filter housing from the cushions, after which very good access to the starter opens.
First of all, we disconnect the “-” terminal from the car’s battery, after which we disconnect all the wires from the starter, one of which is screwed on with a nut.
Then you need to unscrew the three starter mounting nuts, one on top:
And it’s more convenient to unscrew two from the bottom, as clearly shown in the photo below.
When they are unscrewed, you can easily remove it, since there are no more fasteners left.
Installation of a new one during a complete replacement occurs in the reverse order, and no difficulties will arise when performing this repair.
It is important to keep in mind that the starters on the Priora were installed with both three fasteners and two (old and new). Therefore, before buying a new one, make sure which one was on your car.
The price of a new 2170 can range from 3,500 to 4,000 rubles, although you can find Chinese options a little cheaper, but of relatively dubious quality. The most reliable and problem-free are KZATE factory production, which can easily cover over 200,000 km of a vehicle without repairs.
Lada Priora - checking and repairing the starter
To preliminary check the Lada Priora starter and make a decision on its repair or replacement, you will need:
-Using the second wire, we connect the “+” of the battery and the contact on the back of the solenoid relay. At the moment the wire touches the “male”, the solenoid relay should operate, and the sound of a characteristic click can be heard.
If no sounds are heard, we repeat the test, only this time we attach the negative crocodile to the lower bolt of the solenoid relay (we again bring the positive crocodile to the male terminal).
If this check does not show a positive result, feel free to change the solenoid relay, and to perform this procedure you do not even have to dismantle the starter itself. If the relay works, then most likely the problem lies in the starter brush assembly.
With this connection scheme, the starter should work, and extraneous noise in the form of crunching and clicking, which may indicate mechanical damage to the bendix or gearbox (for example, loose bushings or destruction of bearings), is unacceptable.
In such a situation, further disassembly of the starter is necessary in order to identify a specific defect.
To disassemble and repair the Lada Priora starter, you must have on hand:
After removing the starter from the car, you should first of all inspect it externally. There should be no visible cracks, scuffs or signs of significant wear on the gear (if these signs are present, the bendix must be replaced). There should also be no damage to the armature bushing or shaft.
To check the bendix, turn it with a screwdriver. It should rotate without jamming, and only in one direction.
Partial disassembly of the starter is performed as follows:
When inspecting the planetary gearbox, pay attention to the absence of wear on the working teeth. To facilitate inspection, it is recommended to clean the gearbox of old grease with carburetor cleaning fluid. At the same time, the condition of all gaskets, seats and trunnions is inspected.
The starter is assembled in the reverse order, and do not forget to apply new lubricant to the gearbox and bushings, as well as to the Bendix shaft splines.
Similar materials
Replacing the Priora starter, main faults
The car starter starts the engine. The Priora will not start without his participation. Without it, starting a movement is simply impossible. Sometimes the Lada Priora does not start because the fuse has blown, or the starter relay has malfunctioned; it is marked K3. Sometimes it clicks but doesn't turn. The reasons are in the details.
The starter on a Priora consists of the following parts: bendex, retractor relay, armature and others - for a complete list of how many parts the starter of a Priora car contains, see the article below. It is advisable for car owners to know where this mechanism is located on a Lada Priora car - it is located immediately under the air filter.
The price of the part is a starter for a Priora engine (16 valves): from 2750 to 4500 rubles. When a breakdown occurs, the device on the Priora stops turning.
Standard starter and analogues - article number and price
Unfortunately, if the mechanism does not work, the problem can only be solved by replacing it. Neither installing new parts under the body, nor any cleaning will save the situation. The standard starter for a Priora with 16 valves goes under catalog number 2111.3708010-01, its cost is about 4,000 rubles. As analogues we can consider:
Lada Priora starter: device and principle of operation
As mentioned earlier, this part can be installed on the Priora of two types: geared and gearless. Sometimes it may be necessary to remove the starter, note that it is located under the engine, on the right - closer to the space under the air filter.
To ensure that the starter unit does not wear out so quickly, it has a special mechanism that disengages the gear from the crankshaft flywheel - the Priora starter retractor relay. If it were not there, the service life of the unit would be greatly reduced, or repairs would be required.
Geared
This mechanism is small in size. It turns out this way because the gearbox allows you to increase or decrease the torque. The planetary gearbox itself in the car in question is located between the armature and the bendix; it serves as a “buffer” and an intermediate part between them. Thus, it does not take up so much space in the case, under which there are:
Standard starter and analogues - article number and price
Unfortunately, if the mechanism does not work, the problem can only be solved by replacing it. Neither installing new parts under the body, nor any cleaning will save the situation. The standard starter for a Priora with 16 valves goes under catalog number 2111.3708010-01, its cost is about 4,000 rubles. As analogues we can consider:
Lada Priora starter relay and fuse where is it located?
No one will definitely like to sit and try to start a car for a long time. To prevent this from happening, it is important to regularly inspect and prevent the machine, that is, to fully care for it. The Lada Priora is no exception.
Every experienced car owner understands that timely prevention does not always protect against trouble. When a power unit refuses to start, this is always an alarming signal that indicates a breakdown of some system.
The car owner should know how the engine starts, and this will help reduce the risk of failure to start to a minimum. Among other things, this will save your time in identifying the cause of the breakdown and save your money in case you decide to contact the service for diagnostics.
In this material, we invite you to study in detail the principle of operation of the starter relay, and other related details, in particular, where such a device as a relay and additionally a starter fuse are located in the popular domestic Lada Priora.
How the starter works in a Priora
It is easy to briefly and clearly explain what a starter is: it is essentially a motor that is driven by electrical force. The device constantly requires the current that powers it, naturally the battery. What is the purpose of the mechanism? Spin the crankshaft to minimum speed. Its operating time is no more than 15 seconds.
The driver of a Lada Priora and any other car should know that if you have an unsuccessful attempt to start the engine, you should definitely pause before trying again. The pause before restarting should be at least 2 times longer than the starter operating time, that is, wait at least 30 seconds.
What is the reason for this rule? Because the starter must provide a strong torque to the crankshaft, which allows it to overcome both compression in the cylinders and the friction force. The wiring gets very hot, since the starter requires up to 300-400A of current. If there is a malfunction, the wiring may burn out or melt the insulation itself, resulting in a short circuit.
The device we are considering was designed in such a way that anyone can easily find out where it is located in order to disassemble and carry out repairs.
A starter in a car consists of the following elements:
The working principle of the device is based on the interaction of a magnet and the armature field. The relay helps the clutch and gear move along the shaft. This is how it is inserted/disengaged from engagement by the gear rim.
Where is the relay located in Priora?
A car starter is a very reliable device and, as a rule, it is rare to find any problems with it. Often all problems occur in the starter relay. Many people are interested in the question, where is the relay located? On the Lada Priora it can be found in the fuse box, located in the car interior on the left side of the driver, near the module that controls the light.
Information about where the starter relay is located will be very useful to every car owner, since sometimes it is necessary to replace the starter fuse, and in Priora this happens regularly. In general, in the car we are considering, the electrical system as a whole is not the most reliable. Many Lada Priora owners note the poor quality of its work.
So, in order to gain access to the starter relay mechanism, you will need to remove the panel that actually hides the unit. The panel is secured with 5 fasteners. Carry out all work carefully.
How to check a relay on a Priora
In order to make sure for yourself that there is no blocking of the contacts of the starter relay (marking K3), you should remove it and put a new, serviceable element in the connector. If there is no new relay, then you can use a jumper; even a screwdriver will do.
If with this manipulation the starter starts working as expected, then everything is obvious. Relay is faulty. If the device does not work, you will need to look further for the breakdown.
Advice from experts: If you are far from home or service, and the relay is faulty, then it can be replaced with the same one that is in the K10 block. This interchangeable relay controls the heated rear window.
The following faults may occur in the LADA Priora traction relay:
Identifying signs of a problem
When the contacts burn out, the driver begins to hear clicks, indicating that the magnet is triggered. At the same time, there is an anchor in the starter, which remains motionless, and even if it moves, it moves extremely slowly. This happens when the contacts, or rather their working surface, are not completely connected, which causes:
As a result, a dielectric - oxide - appears on the surface. There is only one way you can fix everything. It is necessary to clean the deposits from the deposits that have formed.
You can do this work yourself. If the damage is not large, then you can use a diamond file or use a student's eraser.
When the device is severely damaged, it is better to replace it completely.
It happens that the coils short out. This happens due to moisture ingress, or if the insulating properties of the emulsion that protects the wires are lost. The latter option is definitely due to large overheating.
Among other things, you can make sure that the device we are considering is working by connecting the starter directly to the battery. For this purpose, you can use wires to start the LADA Priora engine from another car. We connect the wires to the battery and to the starter.
First the negative ones. If the relay is working as expected, then you will need to inspect the connectors, wiring and battery.
Initially, the wiring is checked for integrity. Start your inspection from the starter to the battery. Next, test the entire circuit with a multimeter; if you don’t have one at hand, a light bulb will do. The test is carried out from the battery to the starter.
Don't forget to check the starter fuse, sometimes the problem lies only there.