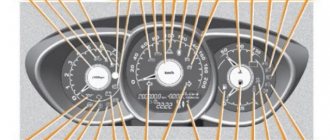
Torpedo device
Usually, removing a dashboard is not difficult for a car enthusiast.
But everything changes when it comes to VAZ cars. For some reason, the designers of these cars went to great lengths to make removing the dashboard an extremely difficult task. So is it possible to remove the dashboard yourself? Can. Today we will talk about how to do this. What is a torpedo? In short, this is the dashboard. The word “torpedo” came to us from the West and has now become firmly established in the everyday life of domestic car enthusiasts.
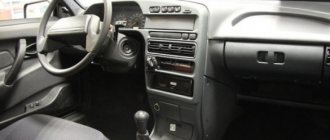
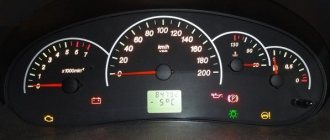
Dashboard of a VAZ 2115 car
The instrument panels on the VAZ 2113, 2114 and 2115 are almost the same. These are complex collapsible structures made of metal with plastic inserts. In addition, in the panels of this line of VAZ models, engineers actively used polymer film, which covers most of the controls.
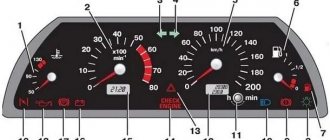
Diagram of the main elements of the VAZ 2115 dashboard
In short, no. The dashboard on the VAZ 2115, 2114 and 2113 has a number of design features that are not found on other cars. Its cross members, mounting brackets and console sides are too long. There is nothing like this even on other VAZ models, not to mention foreign cars. But it should be noted that car owners often practice reverse replacement.
If you want to install the instrument panel of a VAZ 2114, then everything must be done in the same way, but in reverse order.
Install the instrument panel in reverse order.
Removing the rear trim
There is no point in repeating the main points; they are almost identical.
The handle is also disassembled and the plug and the upper locking “latch” are removed. But there are no shelves or speakers here.
There is also no power window, that is, there is no wiring that needs to be disconnected. But here there is a regular window handle, as people call it – “oars” or a “muscle power” drive. In order to disassemble it, you need to bend it slightly towards yourself with a screwdriver - pull out the lower locking ring. After which the handle will simply come off on its own.
We repeat the same procedure with the upholstery as on the front door, just gently pull. Remember about rivets.
Now a short video.
What else I would like to note is that if you read the instructions, it recommends completely changing the rivets every time you remove the upholstery - they simply lose their characteristics, the antennae fall off, if my memory serves me correctly, there are 8 of them on each upholstery. This threatens to cause rattling on bumps and uneven roads.
We completely disassemble the interior of the car, remove the seats, carpet, door trim, dashboard and ceiling. We remove everything that covers the metal. Only the handbrake should remain on the floor.
After that, take a rag, water and wash everything thoroughly. There shouldn't be any dirt. We also wash the doors. In addition, it is necessary to degrease everything. White spirit or brake cleaner works well for this.
First of all, we glue vibration-proofing material. It must follow all areas of the body and must be glued well. We use a hair dryer and a smoothing roller to ensure that the material sticks tightly. Important advice - if there is a technical hole, it is better to make it in the vibrating material right away, otherwise problems will arise later.
The next stage is sound insulation. Here everything is simpler. Even if it doesn’t stick well to the vibration isolation, it’s not a problem. If there is a gap between them, it will only be for the good. We glue it on top of the vibration insulation and that’s it.
When gluing doors, it is most convenient to glue them with one sheet, and then distribute the cores on the trunk. The VAZ 2114 body allows you to do this with sound insulation. It is better to glue doors with thin hands, so it is better to call a friend who can crawl through the technical holes.
After gluing, the most difficult thing remains - putting everything together. The fact is that the thickness of all surfaces becomes higher, which means it will be difficult to attach the plastic to where it used to stand as if it were original.
To tighten the seats, I had to sit on them. Otherwise it wouldn’t work. And don’t be lazy to buy interior clips in advance, since half will break during disassembly.
Photos belong to user BonuS94 from drive2.ru
I feel like the car has become much quieter. There are no more vibrations, nothing. At 100 kilometers per hour, the cabin is very quiet, like in a foreign car.
Withdrawal procedure
- Remove the negative cable from the battery.
- Unscrew the left trim of the instrument panel console.
- Remove the cover. To do this, you need to remove the lower protrusion from the bracket.
- Unscrew the right panel of the instrument panel console.
- Disconnect the wires from the cigarette lighter.
- Disconnect the wires from the cigarette lighter light bulb.
- We push from the inside and take out a niche for small items.
- Unscrew the 2 screws and push the diagnostic connector block inside.
- Remove the heater fan switch handle.
- Using a narrow screwdriver, remove the handle from the lever.
- Unscrew the 2 screws above the instrument panel.
- Unscrew the two screws under the instrument panel.
- Remove the plug and unscrew the screw of the upper fastening of the lining.
- Unscrew the 2 screws of the lower fastening of the lining.
- We move the cover to the side.
- Mark the order in which the blocks are connected to the switches.
- Disconnect the wires from the switches.
- Remove the instrument panel.
- Unscrew the bolts securing the steering column and lower it down.
- Unscrew the 2 screws securing the panel to the bracket.
- Unscrew the 2 screws securing the bracket to the right cross member.
- Unscrew the 2 screws of the lower bracket fastening.
- We move the bracket to the side.
- Unscrew and remove the light guide from the instrument panel.
- We unscrew the 4 screws securing the stove control unit and recess it inside.
- Remove the lamp socket for the heater fan switch handle.
- Press the right lock and remove the air duct from the panel.
- Pull out and remove the headlight hydraulic adjustment handle.
- Remove the instrument lighting control knob
- Remove the decorative insert of the instrument panel.
- Unscrew the light guide.
- Unscrew the nut securing the hydraulic corrector and recess it inside the panel.
- Unscrew the nut securing the instrument lighting control.
- We take out the hydraulic corrector illumination lamp.
- Disconnect the wires from the instrument lighting control.
- Disconnect the wires from the immobilizer sensor.
- Disconnect the wires from the immobilizer unit.
- Disconnect the wires from the glove compartment light bulb.
- Disconnect the wires from the socket of the portable lamp.
- Unscrew the 2 screws of the top panel fastening
- Unscrew the 2 screws on the bottom fastening of the panel.
- Unscrew the self-tapping screw securing the panel to the left cross member.
- Remove the instrument panel.
- Installation of the instrument panel on the VAZ 2114 is carried out in the reverse order.
Torpedo is the modern name for the dashboard. Initially it was used for foreign cars, but today this name is used by motorists in the CIS countries. The dashboard in the VAZ 2114 car is a collapsible metal structure that contains plastic elements.
Removing the dashboard may be necessary if the owner of a VAZ 2114 wants to change the heater radiator or even the entire stove. To get to these parts, you will certainly have to disassemble the dashboard. Depending on the purpose, the analysis may or may not be complete. For example, dismantling a heater core requires only partial removal of some elements.
For some body work, it is necessary to remove the dashboard, as the structure may be damaged during repairs. Disassembly of the structure is also required when the motorist decides to increase sound insulation in the car interior - for this it is necessary to seal the wheel arches, hood, doors and dashboard.
Regardless of the number of dismantled parts, the following tools are required to disassemble the dashboard:
- Several types of screwdrivers (flat and Phillips);
- A set of keys;
- Flashlight;
- An adhesive base, which is required if the panel is planned to be sealed.
Let's figure out how to remove the dashboard on a VAZ 2114. Using a Phillips-head screwdriver, carefully unscrew the 3 screws (top, middle and bottom) that secure the left console screen.
Next, remove the trim itself and the protrusion located at the bottom, then remove it from the body bracket.
Using a Phillips screwdriver, unscrew the next five screws, which are located in the right panel of the console, then remove the screen itself.
Then disconnect the negative cable terminal from the battery. If a radio is installed in the car, then remove it, also disconnect the block of its harness with a wire or remove the plug container from the panel. Next, the block of the wiring harness must be disconnected from the cigarette lighter. You also need to remove the ashtray light bulb socket. Then remove the handle from the levers by carefully prying it off with a narrow screwdriver.
The next step is to remove the heater fan switch handle. To do this, you need to pull it towards you or pry it with a screwdriver.
Using a Phillips screwdriver, unscrew the two self-tapping screws located above the instrument cluster, as well as the two self-tapping screws located under it.
Prying off the plug, remove it and unscrew the self-tapping screw located under it.
Next, unscrew the two screws of the lowermost fastening of the lining.
Then remove the dashboard trim.
Now we mark the order in which the wiring harness blocks are connected to the switches, and disconnect them.
We place the already completely removed instrument panel and unscrew the bolts securing the steering column. Using the same screwdriver, unscrew the two screws, as shown in the photo.
Using an 8 mm wrench, we also unscrew the 2 screws of the lowest mounting of the bracket to the dashboard.
Next, unscrew the self-tapping screw securing the light guide using a Phillips screwdriver and remove the light guide.
Then we unscrew the screws that held the heating control unit, and also remove the lamp sockets from its reverse side.
Then we remove the decorative insert, but only after we have removed all its external parts.
We unscrew the nuts numbered one and two with a wrench or pliers (21 cm).
Then you need to remove the lamp responsible for illuminating the hydraulic corrector.
Carefully unscrew the screws for the lower and upper fastenings of the instrument panel, as well as the fastenings to the left cross member, using a Phillips screwdriver.
Now all that remains is to remove the instrument panel. That's it, now you know how to remove the instrument panel on a VAZ 2114 (VAZ 2115).
1. Prepare the car for work and disconnect the terminal from the negative terminal of the battery (see “Preparing the car for maintenance and repair”).
2. Using a Phillips screwdriver, unscrew the three self-tapping screws securing the left trim of the instrument panel console.
3. Remove the trim, removing the protrusion in its lower part from the body bracket.
4. Using a Phillips screwdriver, unscrew the five screws securing the right trim of the instrument panel console.
5. Disconnect the wiring harness block from the cigarette lighter.
6. Disconnect the wire connector from the cigarette lighter lamp.
7. Pushing out from the inside, we take out the niche for small items.
8. Using a Phillips screwdriver, unscrew the two fastening screws and recess the diagnostic connector block inside the panel.
9. By pulling towards yourself or prying it with a screwdriver, remove the handle of the heater electric fan switch.
10. Using a narrow slotted screwdriver inserted between the lever and the handle, remove the handle from the lever.
11. Using a Phillips screwdriver, unscrew the two screws above the instrument panel.
12. We also unscrew the two screws under the instrument panel.
13. Using a screwdriver, remove the plug and unscrew the screw of the upper fastening of the instrument panel trim.
14. Unscrew two self-tapping screws (the second is on the right side of the lining) of the lower fastening of the lining.
15. Move the trim slightly away from the instrument panel.
16. With a marker (or in another way) we mark the order of connecting the wiring harness blocks to the switches.
17. Disconnect the wiring harness connectors from the switches.
Note: If it is necessary to replace the instrument panel trim, remove the switches from it.
19. Unscrew the bolts securing the steering column bracket and lower the column down (see “Steering column - removal and installation”).
20. Using a Phillips screwdriver, unscrew the two self-tapping screws securing the bracket to the panel.
21. Using an 8 mm wrench, unscrew the two self-tapping screws securing the bracket to the right cross member.
. as well as two self-tapping screws for the lower bracket mounting.
22. We move the bracket with the control unit and the relay and fuse box to the side.
23. Using a Phillips screwdriver, unscrew the self-tapping screw securing the light guide and remove it from the instrument panel.
24. Using a Phillips screwdriver, unscrew the four self-tapping screws securing the heater control unit and recess it into the panel.
25. From the inside of the panel, turning 90°, remove the socket for the backlight lamp of the heater electric fan switch handle.
26. Having released the lock on the right side of the air duct, remove it from the panel.
27. Pull it towards you and remove the headlight hydraulic adjustment handle.
28. In the same way, remove the instrument lighting control knob.
29. Using a screwdriver, remove the decorative insert of the instrument panel.
30. To avoid damaging the light guide, use a Phillips screwdriver to unscrew the screw securing it and remove it from the panel.
Warning! The light guides for the illumination of the heater electric fan switch handles and the headlight hydraulic adjustment are not interchangeable.
31. Using a 21 mm socket wrench (spark wrench), or pliers with narrow jaws, unscrew the nut securing the hydraulic corrector (1) and recess it inside the instrument panel.
32. In the same way, unscrew the nut securing the instrument backlight control (2) (see photo above).
33. Turn the light bulb socket 90° and remove the hydraulic corrector illumination lamp from the panel.
34. Disconnect the wiring harness connectors for the instrument backlight control.
35. Disconnect the two connectors of the immobilizer sensor wires.
36. Disconnect the wiring harness block from the immobilizer unit.
37. Disconnect the wiring harness connectors for the glove box lighting lamp.
38. Disconnect the wiring harness connectors for the portable lamp socket.
39. Using a Phillips screwdriver, unscrew the two screws for the top fastening of the panel (the second screw is located on the right side).
Step-by-step instructions for disassembly
- The first step is to remove the left screen. To do this, you need to unscrew 3 screws, as shown in the photo. Once the fasteners are removed, the left dash screen can be removed.
Now the console can be completely removed if replacement is planned. When performing other repair work, it is recommended to navigate by access to the parts of interest. For example, to access the heater stove, it is enough to remove only the lower part of the dashboard.
How to disassemble the instrument panel on a VAZ 2114
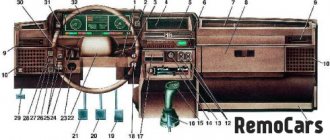
The device of the VAZ 2114 dashboard
1 - VAZ 2114 torpedo, or - instrument panel, that is, the main part of the entire structure to which the instrument unit, on-board computer, stove control levers, key blocks and other linings and latches are attached;
2 — overlay on the instrument panel, has a decorative function, it also contains air duct outlets for blowing the windshield;
5 — ashtray body;
6 and 11 - right and left crossbars;
7 and 10 - right and left console screens;
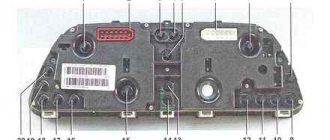
8 — instrument panel;
9 — central bracket.
If you carefully study this diagram, it becomes clear how to remove the panel on a VAZ 2114. Having determined the order for yourself, you can begin the process.
- Using a Phillips screwdriver, you need to unscrew the three screws holding the left console screen. For convenience, when doing this work, it is better to use a screwdriver with a short handle and blade.
Left screen of the VAZ 2114 console
- When removing the screen, carefully remove the lower edge of the trim from the body bracket.
- The right console screen is secured with five self-tapping screws. Using a Phillips screwdriver, carefully unscrew all the screws while holding the trim with your hand.
Right screen of the VAZ 2114 console
- remove the screen without allowing it to get caught in the wiring harnesses that are hidden behind it.
Disconnect the ground from the battery by disconnecting the connectors. If your car has a radio, disconnect it from the main bundle of wires by pulling out the connecting connector. If there is no radio installed on the car, then simply pull the wires out of the panel; they should be closed with a plug. Be sure to turn off the cigarette lighter and remove the socket with the ashtray light bulb.
- Remove the handles from the heater damper control levers. To make the process easier, pry them off with a flat-head screwdriver.
Removing handles and levers from the dashboard of a VAZ 2114
- Despite the apparent simplicity of this item, removing the handles from the levers can take a lot of time. To do this, a clear example is given of how this should be done on a removed unit.
Removing the handle using a VAZ 2114 screwdriver
- Remove the electric heater fan handle by simply pulling it towards you.
Removing the handle of the electric fan VAZ 2114
- Unscrew the cross-head screws securing the instrument panel to the brackets on the right and left with a screwdriver.
Self-tapping screws on the dashboard brackets of VAZ 2114
- in the window on the instrument panel where the instrument unit is located there are two screws on top and two on the bottom - under the window. It is necessary to turn them out, loosening the cover (2) and the shield (8).
Releasing the lining and shield of the VAZ 2114
- pull out the plug and unscrew the screw located behind it.
Self-tapping screw under the plug VAZ 2114
- remove the two screws from the bottom holding the trim and remove it.
- Having marked the wires suitable for the switches, disconnect them.
Disconnecting wires from VAZ 2114 buttons
- Unscrew the bolts from the steering wheel bracket.
Bolts on the VAZ 2114 steering bracket
- Using the “8” key, unscrew the screws of the lower bracket fastening.
Lower mount on the VAZ 2114 bracket
- Unscrew the self-tapping screw and remove the light guide.
- remove the fasteners of the heating control unit and remove the cartridges from the back of the unit.
Cartridges from the reverse side of the VAZ 2114 block
- remove the decorative insert, removing all external parts.
- Unscrew the nuts with a key to “21”.
- remove the hydraulic corrector illumination.
- Unscrew the top and bottom fastenings of the panel, remove the fastening to the cross member on the left side.
Upper mount on the left side of the VAZ 2114 panel
- Now you can remove the VAZ 2114 torpedo.
Removing the instrument panel of VAZ 2114
- Installation is in the reverse order.
In order to clearly see the whole process in motion, you can watch a video on how to remove the dashboard on a VAZ 2114.
What's next
After all devices are disconnected from the car, you need to remove the handles from the heater switches. This can be difficult to do, because they are fixed quite firmly. To install the handles, special latches are used, which are installed inside. There is a small protrusion on each handle that will help us remove them. You just need to get into this hole with the tip of a minus screwdriver, then pick up the latch and lift it up.
The further procedure is as follows:
- The handle of the stove motor is removed. It is enough just to slightly pull it towards you;
- The torpedo is fastened to the instrument block using several self-tapping screws. They are removed using a “plus” screwdriver;
- Next, you need to remove the plug. It is fixed with a single self-tapping screw that needs to be removed;
- The cover is held in place by two fasteners. And again the screwdriver comes to our aid;
- Let's move on to the cables that are connected to the switches. They must be carefully removed, having previously marked each of them;
- Next, remove the steering mount bracket bolts;
- remove the fasteners from the bottom of the bracket. The key to 8 will help us here;
- remove the light guide;
- Next in line is the heating system control unit. Unscrew the fasteners and remove the cartridges;
- in front of us is a decorative insert. We also don’t need it, so we temporarily get rid of it;
- remove the hydraulic corrector;
- The last step is to dismantle the upper and lower fasteners.
We recommend: How to remove the front and rear bumpers on a VAZ 2110
That's all, actually. Now the torpedo is carefully removed, and you can perform any necessary actions with it. Assembly is carried out in reverse order. The procedure is quite complex and troublesome, filled with various little things, so please spare yourself time and patience. If any points remain unclear to you, you can watch the video on our website.