The domestic car VAZ 2108 has traveled a long, difficult path with us, becoming a silent witness to numerous life, political, and social collapses and turning points. The G8 appeared back in the eighties, when the country was slowly choosing a new path, still so foggy and alluring.
Of course, like any car, the VAZ sometimes malfunctions. One of the most common car problems is a faulty steering rack. How can driving be without a steering wheel? Let's look at what features the G8 steering has, for what reasons it breaks, and how the VAZ 2108 steering rack is repaired.
Where do the problems start?
Today, like many years ago, the VAZ 2108 is quite popular even though new times have opened the way for numerous interesting import projects. The advantages that keep the model afloat include reliability, durability and low price compared to foreign cars. In such a car, it’s not scary to go to the outback, which is by no means famous for its good roads, and to the country, and it’s not a shame to appear in the city.
Most often in the "eight" the chassis fails
When the car is in good condition, and the traction is good, and the dynamics are not satisfactory, then you enjoy the ride and the speed. But the time of testing comes, and the machine begins to remind you that material things do not last forever. And this is always an unpleasant discovery.
Domestic cars break down more often than foreign cars, the reason lies in both the design technology and the quality of parts. Our people always try to save on everything, even where it is not possible. Speaking about malfunctions of the well-known G8, it is worth remembering such a mechanism as the steering rack, since it is this that breaks down quite often.
At first the problem is not too noticeable, only on difficult sections of the road the steering wheel begins to beat, as if afraid of the problems awaiting the car on the bumpy roads of endless Russia. But soon it begins to pound almost constantly, making the driver feel like an asphalt driller. After such a trip, it’s not easy to get your nerves in order and not shake yourself. In addition, knocking is often heard. These two symptoms signal one thing: the steering rack has failed.
We have two options before us: either go to the nearest auto store and look for a replacement mechanism, or repair the steering rack. The last option is considered the most optimal, economical, but requires a responsible approach.
Causes of rack malfunction
Before we begin repairing the steering rack, let's figure out what actions the car owner takes that lead to its inevitable wear. Firstly, it’s a hectic ride on bumpy roads riddled with potholes and bumps. When faced with such a problematic route, do not drive with full sail, it is better to slow down and then pick up speed. If you give up on the complexity of the road surface, then in the near future there will be absolutely nothing left of the steering rack, like the rest of the equipment.
This is the car part
The second reason lies in defects in the anthers. You should regularly check their condition, since even a small crack can lead to bad consequences: dust, dirt and even moisture will get into the steering rack, which is a disaster for any device. Contamination leads to wear of seals and leaks. As a result, the steering rack needs to be replaced or urgently repaired.
The third reason for problems with the steering wheel is the carelessness of the car owner. Sometimes car owners leave their car in the cold, even with the wheels turned out. The steering rack, like other mechanisms, does not withstand such strength tests.
Change the hydraulic fluid in the power steering mechanism in a timely manner; forgetfulness in this matter leads to irreversible consequences.
Repair
After disassembly and cleaning, it is necessary to “defect” the parts and determine the extent of replacement:
– the body is visually inspected. For chips, cracks, etc.;
– inspection of shafts for burrs, wear, scratches, etc.;
– checking bearings;
Once the defective parts are identified, assembly can begin:
– a new plastic bushing is pressed in;
– new bearings are pressed in;
– shafts are inserted and assembled;
– generously lubricated with suitable lubricant (litol, fiol, uniol)
– preliminary adjustment is made (the adjusting sleeve is tightened until it stops, then loosened until the shaft can be turned by hand);
– put on and secure the rubber boot (it is advisable to use a new one);
– install tie rods with ends without tightening them;
Repair of steering rack VAZ 2108, 2109 (Video):
Steering repair
Suspension repair in progress
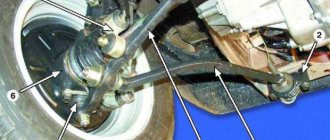
Controlling a VAZ 2108 is a complex thing, but easy to understand, so it is quite possible to repair any faults that have arisen yourself. Most often, parts such as the rod, seals and slide wear out, because the entire operation of the system rests on them. If you hear a telltale knocking and grinding noise in the suspension, it means that the ball joints (rods) have most likely become unusable. You will have to go to a car store or market to buy this part.
Functionality check
From time to time it is necessary to inspect the steering. Where is the best place to start? Be sure to study the condition of the rods, their tightness, and do not forget about the protective cover. Have you noticed cracks or other damage that makes the device leaky? Change it.
You should check whether the steering wheel spoke is in a horizontal plane when the car wheels are in a straight position. If even a slight deviation is observed, it is necessary to identify the cause of the malfunction and eliminate it before it develops into a dangerous problem.
To make sure that the car's steering is working properly, you need to turn the steering wheel all the way clockwise and counterclockwise. In this case, there should be no sounds or jamming. The steering wheel must be firmly and reliably fixed; gaps in the hinges and other parts are unacceptable. Check whether the bolts and nuts of the fastenings are fully tightened.
If something goes wrong when checking the controls, knocking or other problems appear, remove the suspension control rods and check the condition of the steering mechanism again. This will make sure that knocking and malfunctions are caused by malfunctions of the steering wheel, and not by other reasons, of which there may be many.
It is also important to make adjustments. We advise you to use the following rules for proper rack setup.
- When checking the operation of the mechanism, eliminate vertical play in the rods; it should correspond to 15 degrees.
- Steering should be soft and light. Jamming occurs due to improper installation of the steering rack.
- Do not forget to make the next adjustment after 700 kilometers to avoid any serious problems with the steering.
Ball joints are a fragile, fragile part, and they often fail. But there is a very effective way to extend its service life - you sometimes need to pierce the anthers with a syringe and inject one cube of lubricant used for the transmission there. The puncture is small, so there will be no deformation of the part; the hole will immediately be covered with layers of rubber.
Greetings, friends! When I sat behind the wheel of my car for the first time, the first thought that flashed through my head was that this car was assembled from 10, and in winter it will have 4 tracks ((, because I hold the steering wheel in my hands and the car goes to the side , I taxi and lo and behold, she drives herself in the other direction, somehow reaching home, which is no less than 90 km from the place of purchase, straight to the service station, they tightened the rack and the ride became bearable. Repair of the rack/or replacement was postponed indefinitely because naturally the car broke down and it was simply necessary. So I drove away from the beginning of summer until these days... I was thinking about replacing the rack, I wanted to install a new one right away. I consulted with friends: opinions were divided - someone said that repairs were a waste of money, but someone says that even new slats are crap now... Thinking that I would always have time to buy a new slats, I decided to remove and troubleshoot the old slats (having bought a repair kit just in case). I drove the car into the garage and started disassembling it, because my work takes away from me I spent a lot of time taking the rack off slowly. During disassembly there were some surprises. I broke off both rack mounting pins on the side of the left pillar (I wouldn’t wish this on anyone). I decided to deal with the rack first and then rack my brains about the studs. So let’s get started Repair kit
Troubleshooting and replacement of damaged parts
After cleaning from dirt, oil residues and drying, the steering wheel of the VAZ-2109 is carefully inspected for wear, chips, cracks and other damage. The parts included in the small repair kit are definitely replaced during repairs with new ones. They served their time. This is a split sleeve, a clamping stop, lock washers, rubber bands, in general, everything that is found in the bag. If the bearings do not have any play or noise, they do not need to be changed during rotation. With gear and rack it is more difficult. These parts exhibit uneven wear. The car drives straight most of the time, and such a connection takes on all the loads from the influence of the road surface. In this position, the wear of the parts is maximum, in contrast to the teeth located on the edge, which come into operation only when the steered wheels are fully rotated. That is why during disassembly their location is marked. It is enough to install the gear with a rotation of 180 degrees from its original position, and the most worn parts of the parts will never be encountered in operation, which will ensure the necessary clearance and rotation force along the entire length of the rack and pinion mechanism. The drive will not knock when driving straight and “bite” when turning the steering wheel at maximum speed.
You can also install a complete repair kit. In this case, only the crankcase will remain from the old rack. But the price of such a kit makes repairing the mechanism economically unfeasible.
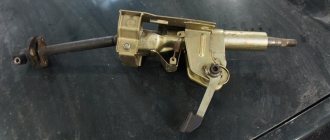
Signs of breakdown
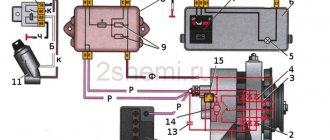
By means of steering racks, rotational movements from the steering wheel through a rack and pinion mechanism are transmitted to the rotary levers, which turn the front wheels with rods.
If you find one of the symptoms listed below on your car, be sure to conduct a full diagnosis of the condition of the unit, and then repair it.
Signs of a faulty steering rack include:
- A grinding noise is observed in the rack area when the steering wheel is rotated;
- The steering wheel periodically sticks;
- Lubricant begins to leak from the seals;
- The steering wheel has noticeable play.
These symptoms may also indicate problems in other components of the steering mechanism, but first you must check the condition of the rack, disassemble it and decide whether to replace or repair it.
Node diagram
Adjustment methods
The steering rack can be adjusted in two ways.
| Adjustment method | Peculiarities |
| Dismantling the device | If the rack is removed and adjusted, we are most often talking about repairing or replacing the unit with a new one. It is recommended to carry out such settings only in these situations |
| Without dismantling the unit | This method of adjustment is relevant if it is necessary to tighten the rack slightly, remove play, and get rid of knocking noises. Here it is quite possible to do without dismantling work, that is, to set up the mechanism directly on the car |
Malfunctions
There are several typical steering rack malfunctions that VAZ 2109 owners encounter. In some situations, simple adjustments can be done, while in others, more detailed intervention in the design of the unit and its components will be required.
Steering rack breakdowns are as follows:
- The steering rack fastenings are loose;
- The rack itself or its gears have worn out;
- Pair engagement is not adjusted properly;
- The bushings at the junction of the rack and steering rods have worn out.
It is not always possible to adjust the rack to eliminate its incorrect operation. This occurs due to the fact that an impressive production of components is formed inside. This can only be determined by dismantling. Therefore, if the adjustment does not bring the expected effect, you will have to remove the rack from the car and check what is wrong with it.
Dismantling
You will not be able to assess the current condition of the steering rack unless you dismantle the device.
There is no optimal way to dismantle the steering rack, since the process in any case involves quite labor-intensive, time-consuming work that involves disassembling many components.
- Suspend the front of the car with a jack to be able to remove the front wheels. Be sure to carefully consider safety measures, install wheel chocks and boots so that the machine does not move while the rack is being repaired.
- Disconnect the gas adsorber, disconnect the wires and take them to the side. This will give you full access to the steering rack.
- Unscrew the bolt from the spline connection. Before doing this, be sure to align the wheels using the steering wheel. The bolt is located near the pedals. To dismantle the fasteners, use a cardan head or a simple spanner.
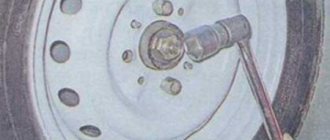
- Clean the tie rod mounting nuts from accumulated dirt, then undo them using pliers. Unscrew the nuts using a spanner.
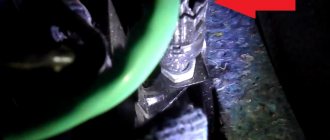
- Using a special puller, the rods are disconnected.
- Next, unscrew the rods from the steering rack housing. However, experts recommend dismantling the crankcase with the rods together, since in a vice the removal process is much easier.
- Once you have the rack free, remove it from under the car through the wheel arch. Clean, rinse and clamp in a regular vice.
Now you have a choice - completely replace the steering rack or try to repair it. The second option will take more time, but will save an impressive amount of money.
STEERING GEAR REPAIR
It will be easy to repair the steering mechanism yourself if you follow the recommendations of our material:
- We clamp the mechanism in a vice and clean it with a metal brush, then treat it with Whitespirit and a rag
- As soon as the case shines like new, unscrew the mustache bolts
- We recommend checking the condition of the silent blocks first.
- If play, rubber cracks or other defects are detected, we replace them
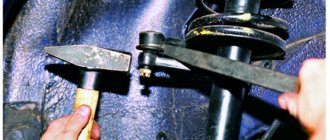
- We bend the plate that locks the bolts using a hammer and chisel, unscrew the bolts and remove the mustache
We bend the edges of the plate with a chisel and hammer
We tighten the plugs from both ends of the rail. Then we remove the rubber bands of the shaft and the cover. The cover can be thrown away immediately, the remaining elements must be thoroughly washed and dried, just not in the sun. Remove the bearing lock washer, pry it off with a screwdriver. Unscrew the nut with a special key prepared in advance, and find the bearing under it. Tighten our splined shaft in a vice.
It is advisable to place soft pads on the jaws of the vice so as not to damage the shaft. Gently tap the housing with a hammer until the bearing comes out. The shaft, gears and other parts will easily follow. All removed elements are thoroughly washed with White Spirit using a brush. Finding a bearing of this particular type will be very problematic, since it is non-standard, so you should carefully wash it and save it. If you still need to remove it, use a special puller. We recommend not touching it unless absolutely necessary, since it functions quite well for a long time. Shake the rack out of the housing and wash it with White Spirit. Then dry it and lubricate it. Through the hole located in the body, carefully remove the plastic insert and unscrew the clamping nut. Often this action is very tight, know that there is a new one in the repair kit, if you are afraid of damaging this one. Replace the seal rings, first do not forget to shake out the stop. We carefully examine mustache, tips should not play, fingers should move with some effort, protective covers should not contain cracks or other defects. If you notice that any part (or several) has defects or incorrect operation is detected, be sure to rinse the part and dry it. did not help, we replace the part, but try to maintain the maximum length of the lever. To protect against the effects of corrosion, at this stage we recommend treating the threads with Movil. Next, we work on the hinges. Install new hinges, if there is something you don’t like about their operation or seems suspicious. Insert a new plastic bushing into the body, its protrusions must certainly be directed into the holes
Cutting off the elastic bands