Exhaust system VAZ 2106
Any system in the design of a vehicle is designed to perform one role or another. The exhaust system on the VAZ 2106 allows the power unit to operate at full power, since exhaust gas removal is exactly the function for which all elements of the exhaust system are designed.
The engine, converting incoming fuel into energy, emits a certain volume of unnecessary gases. If they are not removed from the engine in a timely manner, they will begin to destroy the car from the inside. The exhaust system serves to remove harmful accumulations of gases, and also allows the engine to run quieter, since exhaust gases can “shoot” very loudly when leaving the engine.
Thus, the full operation of the exhaust system on a VAZ 2106 involves the implementation of three processes:
- distribution of exhaust gases through pipes for their further removal from the engine;
- noise absorption;
- soundproofing.
Exhausts are white - this indicates normal operation of the engine and exhaust system.
What does the exhaust system consist of?
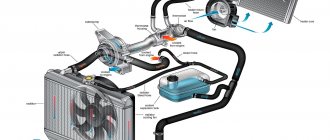
Considering the structure of the exhaust system, you can see that the design on the VAZ 2106 is generally identical to the systems on the VAZ 2107, 2108 and 2109. The exhaust system on the “six” consists of the same elements:
- collector;
- exhaust pipe;
- additional first stage muffler;
- additional muffler of the second stage;
- main muffler;
- exhaust pipe.
The main elements of the exhaust system are pipes, and auxiliary elements are gaskets and fasteners.
An exhaust manifold
The exhaust from the internal combustion engine cavity is collected in a manifold. The main task of the exhaust manifold is to collect all the gases together and discharge them into one pipe. The gases coming directly from the engine have a very high temperature, so all manifold connections are reinforced and very reliable.
The part collects exhaust from each engine cylinder and connects them in one pipe
Downpipe
After passing through the exhaust manifold, the exhaust gases enter the “pants” or downpipe. The collector is connected to the intake pipe with a gasket to ensure reliable sealing of the fasteners.
The downpipe is a kind of transition stage for the exhaust.
The pipe connects the exhaust manifold and muffler
Muffler
The VAZ 2106 is equipped with a whole series of mufflers. Passing through two small mufflers, the exhaust gases quickly lose their temperature, and sound waves are converted into thermal energy. Additional mufflers cut off sound vibrations of gases, allowing you to significantly reduce noise when the car is moving.
The main muffler is attached to the bottom of the “six” not statically, but movably. This is explained by the fact that final processing of the exhaust takes place in the main muffler housing, which affects its resonance. Body vibrations will not be transmitted to the body, since the muffler does not come into contact with the bottom of the car.
On the sides of the muffler body there are special hooks on which the part is suspended from the bottom of the car
Exhaust pipe
The exhaust pipe is connected to the main muffler. Its only purpose is to remove processed gases from the exhaust system. Often inexperienced drivers call the pipe a muffler, although this is not true, and the muffler is a completely different part of the car's exhaust system.
The exhaust pipe is the only element of the system that can be seen outside the body
Device
The muffler is part of the exhaust system. Its complete structure is as follows:
- an exhaust manifold. Through it, gases penetrate into the “pants”;
- “pants” (reception pipe). They are separated from the manifold by a special gasket that holds the mount hermetically;
- pipe. Which is attached to the gearbox using a bracket;
- additional resonators. They are attached to the main muffler and exhaust pipe with clamps. They form an additional muffler;
- main muffler. Fixed to the bottom of the car to prevent the transfer of vibrations to the body;
- exhaust pipe.
What is a resonator and how do they differ from each other?
Welcome! Resonator - before we begin to understand what is the difference between them, let’s say a few words about them, firstly, this unit has a lot of other names, by the way, the most common names for this unit are a resonator and just an additional car muffler, let’s go over everything a little closer to this topic.
Note! At the very end there is an interesting video, if you are really interested in what a resonator is, then watch it, it says a lot about this unit!
What is a resonator? (In details)
Firstly, you must understand that this unit is the main part of the exhaust system and therefore it is present on almost all cars of the VAZ family, it acts as a kind of pipe that is located in the very middle of the car and therefore, as such, an additional muffler has a much greater chance of getting into under attack than, for example, the same intake pipe, and by the way, it is mainly the tank or tanks of the resonator that come under attack (More on this a little later) and generally the deformed tanks of the additional muffler are very noticeable on the so-called lowered cars, otherwise on low ones, for In order for you to have at least some idea about this additional muffler, then in this case, look at the photo prepared especially for you, in which the arrows indicate the resonator itself, as well as the places where it is attached to the exhaust pipe (Blue arrow) and to the rear part muffler (Green arrow).
Note! This photo above was taken under the bottom of a VAZ 2106 car; on other cars of the VAZ family, the additional muffler is located almost the same way!
Types of resonators:
At the moment, there are many different types, as they say, each car has its own, and in fact, almost every car of the VAZ family uses its own resonator, but they are all very similar to each other, for example, let’s take an additional muffler from a classic. On classic cars, and this is the VAZ 2101-VAZ 2107 line, two types of resonators are used, namely an additional muffler with one and two tanks, let's look at them in more detail:
Single barrel resonator - its main feature is that it costs less, unlike an additional muffler with two barrels. In size, both types of resonators are almost similar to each other, the only peculiarity in them is that another so-called additional tank is welded to the free space in the resonator with one barrel, and thus an additional muffler with two barrels is obtained.
Resonator with two barrels - let's start with the fact that its cost is slightly higher than that of a resonator with one barrel, but its main feature is that the engine runs quieter with it and thus you drive in a quiet car and can freely enjoy music and not be distracted constantly to the sound of the engine, since on a car where this unit with one barrel is installed, the engine, namely its exhaust system, is louder, which creates some discomfort.
Note! When choosing a resonator, you should pay attention to its dimensions, because not every resonator can fit perfectly into the bottom of the car, and also not every given unit can seamlessly fit into the exhaust pipe of your car and the rear part of the muffler, so when choosing, be careful and pay attention pay special attention to this!
Link! How to replace the resonator - on a classic? How to replace an additional muffler on cars of the Samara family?
Vaz-Russia.ru
Advantages and disadvantages of the injection modification of the VAZ 2107
The “Seven” in injection version and with a modernized exhaust system has a number of advantages over the old “carburetor” model. They are as follows:
- thanks to the injector, the engine operates more stable in all modes;
- the specific power and torque of the injection engine are higher;
- the exhaust of a VAZ 2107 with an injection system is cleaner than smoke from a carburetor engine;
- Driving a car with an injection engine is easier, it is not so demanding on the driver’s qualifications and “forgiven” mistakes when operating the gas and clutch pedals.
But installing the injector at the same time worsened some performance characteristics:
- the clearance of the injection “seven” decreased to 7 cm, which worsened its cross-country ability;
- due to the installation of the catalyst, the “survivability” of the exhaust system has decreased;
- the high temperature of the catalyst sometimes causes grass and dry leaves to ignite when the car is stopped.
Muffler VAZ 2106
Today, mufflers for the “six” can be purchased in two versions: stamped and welded.
The stamp-welded muffler can be considered a classic option, since these are the models that were installed on all old cars. The essence of such a muffler is in its production: the two halves of the body are welded together, then a pipe is welded to the body. The technology is very simple, so the device is inexpensive. However, it is precisely because of the presence of welded seams that the stamped-welded “glushak” will last at most 5–6 years, since the seams will quickly corrode corrosion.
Products made using traditional technology are affordable
A sunset muffler is more durable and can last up to 8–10 years . Its production technology is more complex: a sheet of metal is wrapped around the inside of the muffler. Technology makes production more expensive.
Modern rolling technology allows us to produce high-quality and durable mufflers
Original mufflers for the VAZ 2106 can only be stamped and welded, since the plant still produces exhaust system elements using traditional technology.
Which muffler to put on the “six”
Choosing a muffler is not an easy matter. In auto stores and on the automobile market, sellers will offer a variety of models of mufflers, and at quite attractive prices:
- muffler IZH from 765 RUR;
- muffler NEX from 660 RUR;
- AvtoVAZ muffler (original) from 1700 RUR;
- muffler Elite with nozzles (chrome) from 1300 rubles;
- muffler Termokor NEX from 750 rub.
Of course, it is best to spend money on an original AvtoVAZ muffler, although it is 2–3 times more expensive than other models. However, it will serve many times longer, so the driver can decide for himself: buy an expensive one for a long time, or buy a cheap muffler, but change it every 3 years.
Original mufflers are preferable for the VAZ 2106, as they last longer and do not provide the driver with additional problems associated with maintenance
DIY exhaust system repair
Replacing the main muffler of a VAZ 2106 with your own hands
Before starting repairs, let the entire system cool down. Working with hot pipes is simply unsafe. From the tools we need two 13mm wrenches, as well as a straight screwdriver.
1. Using a wrench, loosen the clamp nut a little, and use a second wrench to hold the bolt from turning. Next, use a screwdriver to unclench the clamp, and then move it down the inlet pipe of the main muffler.
2. Now use a wrench to unscrew the bolt that secures the rubber cushion. After this, disconnect the pillow from the mounting bracket, push it out and remove it.
4. Remove the rubber muffler hangers by pressing the wire fasteners.
5. With some effort, rock the muffler and disconnect it from the additional muffler. After disconnecting, remove the main muffler.
We install the new muffler in the reverse order of removal.
Effect on the engine
Muffler VAZ 2106
As you know, engine power is directly proportional to torque and crankshaft speed and is calculated by multiplying them. In this case, how quickly the crankshaft rotates depends on the filling of the cylinder with the fuel-air mixture. As a result, it becomes possible to influence the rotation of the shaft with the help of successful gas distribution. And if the muffler is plugged with something (for example, potatoes), then the pressure here will not decrease, which will make clearing it of gases almost impossible. This, in turn, will increase the pressure in the manifold, so the cylinder cannot be cleaned when the exhaust valve opens.
Because of this, a large amount of exhaust gases will remain here, which will prevent the cylinder from filling with a new mixture. This will cause the device to not be able to rotate at the same speed. Therefore, glitches will appear during its operation.
However, such a device does not increase power, so the amount of horsepower in the VAZ 2106 is quite low. In this case, you can perform engine tuning, which will help increase its power. Thus, the exhaust system affects the operation of the engine, but even if it is in perfect condition, the engine power does not increase.
Modification of mufflers for VAZ 2106
When the muffler begins to “tire” from work, the driver will begin to notice this on himself: increased noise when driving, the smell of exhaust gases in the cabin, a reduction in engine dynamics... Replacing the muffler with a new one is not the only way to eliminate all these problems. Fans of experiments often tune the exhaust system, because this way it lasts longer and works better.
Today, car enthusiasts distinguish three types of muffler modifications:
- Audio modification is the name of tuning, the purpose of which is to enhance the “growling” sounds in the muffler while driving. This modification really allows you to turn the quiet “six” into a roaring lion, but it has little effect on the performance of the exhaust system.
- Video modification is a tuning aimed at external decoration of the exhaust pipe rather than at creating improved performance characteristics. Video tuning usually includes replacing the exhaust pipe with a chrome one and using nozzles.
- Technical tuning is the most effective in terms of performance. It is aimed at improving the performance of the exhaust system and even increasing engine power by up to 10–15%.
How to make a sporty muffler
A sports muffler is a straight-through muffler. It is necessary to create additional dynamic properties and give the model a special sporty look. The straight-through muffler has an extremely simple design, so you can easily make it yourself, even from a standard VAZ 2106 muffler.
To make a sports forward flow you will need:
- standard muffler;
- a pipe of a suitable size (usually 52 mm);
- welding machine;
- angle grinder (grinder);
- drill;
- metal cutting discs;
- ordinary metal sponges for washing dishes (about 100 pieces).
Video: how forward flow works on a VAZ 2106
The procedure for manufacturing a direct-flow muffler boils down to the following work:
- Remove the old muffler from the car.
- Use a grinder to cut out a piece from its surface.
- Remove all internal parts.
- On a 52 mm pipe, make cuts in the form of a herringbone or drill many holes with a drill.
- Insert the perforated pipe into the muffler and weld it securely to the walls.
- Fill all empty space inside the muffler with metal sponges for washing dishes made of metal.
- Weld the cut piece to the muffler body.
- Cover the product with mastic or heat-resistant paint.
- Install direct flow to the car.
Photo: main stages of work
A direct-flow sports muffler of our own production optimizes engine performance and makes the VAZ 2106 more sporty and dynamic. There is a huge selection of such modifications of mufflers in stores, so if you have no manufacturing experience, you can buy a new one.
Do-it-yourself and purchased nozzles for Glushak
Attachments, which are usually used as a decorative element, allow you to modify the muffler and optimize its performance. Thus, a correctly made and installed nozzle is guaranteed to improve the following indicators:
- the fuel burns out completely;
- less carbon deposits form on the spark plugs;
- the power of the power unit increases by approximately 15%;
- fuel consumption is reduced (by about 20%).
That is, the use of an attachment can improve the basic indicators of vehicle convenience and efficiency. Today you can find attachments of various shapes on sale; the choice is limited only by the financial capabilities of the driver.
The nozzles create an attractive appearance for the body and also optimize the operation of the entire exhaust system.
However, you can make the attachment for the “six” muffler yourself. To do this you will need the simplest materials and tools:
- stainless steel sheet with a thickness of 1–1.2 mm;
- cardboard for template;
- Bulgarian;
- sandpaper and polishing materials;
- metal scissors.
A typical exhaust pipe nozzle has a round cross-section, so the easiest way to make just such an element is:
- Use cardboard to model the body of the future nozzle, taking into account the locations for fastening joints.
- Using a cardboard template, cut out a product blank from sheet material.
- Carefully bend the workpiece and fasten the joint with bolted connections or welding.
- Clean the future nozzle, you can polish it to a mirror shine.
- Install on the vehicle exhaust pipe.
Video: making a nozzle
The nozzle is usually attached to the pipe using a bolt and a through hole or simply on a metal clamp. It is recommended to lay fire-resistant material between the pipe and the nozzle to increase the service life of the new product.
Checking pants for defects
In fact, there is nothing complicated about this, firstly, let’s clarify one detail, we will check this pipe not for defects (Although you can say so) but for the evenness of the mating surface of this pipe, because as we already mentioned a little earlier when -the rolling surface of the receiving pipe must be perfectly flat, and bending it can ultimately lead to the system losing its tightness and, as a result, the sound of your engine increasing when driving.
In general, to check it, pick up a caliper or a metal ruler and, applying the caliper or ruler to the mating surface of the receiving pipe, check it for evenness in at least two places, a deviation of more than 2 mm, or traces of rough surface treatment not allowed.
What is a muffler for?
The exhaust system of any vehicle is based on the use of a special element called a muffler. Operating a car without a muffler is basically impossible.
The muffler is designed to perform two main tasks:
reduce exhaust noise;
transform the temperature and pulsation of the exhaust.
The rationale for using a muffler is explained by the fact that the exhaust gases, after exiting the engine cylinders, have very high pressure and temperature. At the same time, sound waves are launched ahead of the gases in the exhaust system, which can make very loud noise during the exhaust. The muffler converts sound waves into heat energy, thereby reducing the amount of noise created by the exhaust. However, all modern mufflers in some way affect engine performance, since the transformation creates counteraction, due to which engine power is reduced.
VAZ car mufflers use several different methodologies to reduce noise:
expansion/constriction of gas flow;
change in flow direction;
sound wave interference;
Mufflers use multiple chambers of varying volumes to expand or narrow the flow of gas exhaust.
On VAZ 2106/2107 cars, one muffler is installed. For comparison: modern foreign cars can have up to five mufflers.
Muffler on VAZ classic
The entire exhaust system on domestic Zhiguli cars of the sixth and seventh models consists of three parts: the exhaust pipe, the main muffler and the resonator. Each of them performs its own function: the pipe extracts exhaust gases from the engine, the muffler converts gases and sounds, and the resonator reduces the noise level.
Mufflers for VAZ 2106–2107 are “famous” for their fragility, since thin metal can burn out very quickly. Original factory products last for 60–70 thousand km, while homemade mufflers often do not last even 30 thousand km.
Traditionally, VAZ classics are equipped with mufflers manufactured by AvtoVAZAgregat. They are made of stainless steel with a thickened wall. Therefore, their service life can be considered durable. Silencers of more modern Zhiguli models can be considered alternative options, but not all of them are optimally suited to the “sixes” and “sevens”. However, craftsmen quickly remake the fastening elements and equalize the length of the mufflers in order to make them identical to the originals.
The modern muffler produced by AvtoVAZAgregat is an integral part of VAZ cars
Traditionally, the muffler on a VAZ classic is installed under the bottom of the car and is secured using bolted connections and special suspension rubber bands. The exhaust pipe exits from the rear of the body on the left side.
Exhaust system functions and parts replacement intervals
Despite its apparent simplicity, the exhaust system performs several important functions:
- removal of fuel combustion products;
- reduction of noise level from the exhaust;
- maintaining air balance in intake and exhaust systems;
- ensuring ventilation and cleaning of cylinders;
- reduction of CO content (in the presence of a catalyst).
Exposure to high temperatures, moisture, fuel and oil combustion products leads to through corrosion of exhaust system parts. This is aggravated by the external influence of gravel, sand and salt solutions that are used to treat roads in winter. Therefore, parts of the system have to be changed. The frequency of replacement depends on the following factors:
- car use activity;
- frequency of machine operation in bad weather (rain, snow);
- fuel quality;
- quality of exhaust system parts.
What materials are they made from?
Silencers of all types can be made from:
- Of stainless steel;
- Aluminized (alloy of aluminum and steel);
- Regular black steel.
A stainless steel product can last, during active vehicle use, from 6 to 10 years, as it is least susceptible to corrosion.
They are sold on the market in a high price range, their big advantage is that despite the high price, they are mass produced and can be matched to most car brands.
Products made from aluminized steel are sold in the middle price range, they are also quite durable, but they are difficult to match to a specific car brand, since the choice on the market is not large (only a few companies produce them).
It is problematic to make such a muffler in a garage. The main advantage is a long service life of up to 6 years, and are less susceptible to corrosion.
Products made of black steel are mass produced because they are the cheapest. They can be made in a garage for any brand of car, but they will serve for 3, maximum 5 years, then the aggressive environment and rust will do their dirty work.
Muffler malfunctions on VAZ 2106
Like any part of a car’s structure, the muffler also has its “weaknesses”. As a rule, any malfunction of the muffler leads to the following:
- the cabin begins to smell strongly of exhaust;
- the motor loses its power characteristics;
- Clouds of black gas burst out of the exhaust pipe.
One way or another, having noticed any of these signs, the driver must immediately stop and figure out the cause of the breakdown. A muffler, especially a low-quality one, can quickly burn out, get a dent or hole when driving on uneven roads, rust, or lose its position under the bottom.
Black exhaust gases are the first sign of a muffler malfunction.
Knocks while driving
Muffler knocking while driving is perhaps the most common malfunction of all VAZ cars. At the same time, knocking can be eliminated very simply and quickly:
- It is necessary to find out why the muffler is knocking and what part of the car it hits when driving.
- It will be enough to shake the pipe a little with your hand to understand why the knocking occurs when driving.
- If the muffler hits the bottom, then stretched rubber suspensions are to blame. It will be necessary to replace the suspensions with new ones, and the knocking will stop immediately.
- In rare cases, the muffler may touch the gas tank housing. You will also need to change the hangers, and at the same time wrap this part of the pipe with insulating material - for example, reinforced mesh with asbestos. This, firstly, will reduce the load on the muffler during the next possible impact, and, secondly, will help protect the gas tank itself from holes.
By shaking the muffler with your hand, you can understand which part of the body it is knocking on.
What to do if the muffler burns out
On forums, drivers often write “help, the muffler is burned out, what should I do?” Holes in metal can usually be repaired with standard repairs such as patching.
However, if the muffler burns out while driving, it is not recommended to start the engine, since the exhaust system will not work normally.
Corrosion, dents and long-term use lead to the fact that the muffler can burn out while driving
Do-it-yourself muffler repair
It will not be possible to repair the muffler under “road conditions”. As a rule, repairing an old silencer involves welding - installing a patch on a hole in the body.
Therefore, repairing a muffler is a job that can take a lot of time. You need to prepare tools and materials in advance:
- two keys for 13;
- two keys for 17;
- screwdriver with a flat thin blade;
- welding machine;
- Bulgarian;
- stainless steel sheet for patch;
- brush for cleaning metal;
- degreaser;
- heat-resistant paint.
Muffler repair is carried out according to the following scheme:
- Dismantling a failed product.
- Inspection.
- A small crack can be repaired immediately, but if there is a fairly large hole, you will have to install a patch.
- A piece of metal is cut out of a sheet of steel, 2 cm larger on each edge than is necessary to install the patch.
- The damaged area is treated with a brush to remove all rust.
- Next, you can begin welding work: the patch is applied to the damaged area of the muffler and first tacked on all sides.
- Afterwards the patch is boiled around the entire perimeter.
- After the welding seam has cooled, it is necessary to clean it, degrease it and paint the welding areas (or the entire muffler) with heat-resistant paint.
Video: how to repair small holes in the muffler
Such a simple repair will allow you to use the muffler for a long time, however, if the hole or burnt-out part of the body has a large diameter, it would be advisable to immediately replace the muffler with a new one.
How to replace an old muffler with a new one
Unfortunately, the mufflers on the VAZ 2106 have one not very good quality - they quickly burn out during operation. Original products last up to 70 thousand km, but a self-made product is unlikely to last at least 40 thousand km. Therefore, every 2-3 years the driver should replace his muffler.
Before starting work, it is necessary to allow the entire exhaust system to cool down, otherwise you can get serious burns, since the pipes become very hot when the engine is running.
The easiest way to replace it is on a lift or inspection pit.
To replace the muffler you will need the simplest tools:
- two keys for 13;
- screwdriver with a straight blade.
It is also recommended to prepare WD-40 fluid in advance, since rusted fastening bolts may not be dismantled the first time.
The procedure for dismantling the muffler on a VAZ 2106 is not much different from removing the pipe from other VAZ models:
- Place the car on an inspection hole or on jacks.
- Climb under the bottom, use 13 keys to loosen the fastenings of the exhaust pipe clamp. Use a screwdriver to loosen the clamp and lower it down the pipe so that it does not interfere.
- Next, unscrew the bolt that holds the rubber cushion.
- Disconnect the cushion itself from the bracket and pull it out from under the car.
- Remove all rubber hangers that secure the muffler itself to the bottom.
- Lift the muffler, removing it from the last suspension, then pull it out from under the body.
Video: procedure for replacing the muffler and rubber bands
Accordingly, the new plug will need to be installed in the reverse order. Usually, with a new muffler, fastening elements are also changed - bolts, clamps and rubber suspensions.
Repair procedure
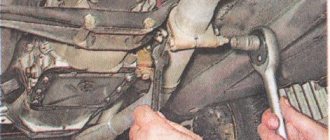
First you need to disconnect the exhaust pipe from the resonator. Read more about this here: Replacing the resonator on a VAZ 2106. After which you can proceed to further actions. Unscrew all the nuts securing the pants to the exhaust manifold, first tearing them off with a regular wrench.
After which you can use a ratchet to make everything much faster.
When all 4 nuts are completely unscrewed, you can pull the exhaust pipe off the manifold studs, as is clearly demonstrated in the photo below.
Now the pants are practically free and fall down easily, provided that the right side of the car is jacked up high enough.
As can be seen from the photo below, the exhaust pipe of the VAZ 2106 fell down, and now it can be easily removed from under the car without any problems:
In order to replace this part of the car exhaust system, we buy new “pants” and install them in the reverse order. The price of new ones is about 400 rubles, which is much cheaper than other exhaust parts.
Instructions for replacing the resonator
Since the resonator on the VAZ 2107 is not attached to the body, it is necessary to hold it when replacing so as not to deform the exhaust pipe.
Resonator VAZ 2107
- Tap the pipe connections and clamps with a hammer, as in the previous case.
- First of all, we disconnect the resonator from the muffler, then from the “pants”. When connecting the resonator and the receiving pipe, we proceed according to the same scheme, bend the petals, use a “liquid key” or a grinder in the most extreme case, and very carefully.
- At the point where the resonator meets the muffler, the situation is more complicated. When the pipes have become stuck, we cut off a piece of pipe coming from the resonator, then remove the remaining part from the flare using a gas wrench or pliers. Usually in this place the pipes are stuck tightly, when it is impossible to separate them, we also change the muffler
- We install a new resonator, observing its original position. If the resonator is installed incorrectly, it will start knocking on the underbody or hitting uneven roads. It is desirable that the resonator pipe running from the receiving tube to the tank be parallel to the ground
- In the same way, we align the connection of the resonator with the silencer so that the tank is parallel to the ground and does not knock on the body
Changing the “pants” (reception pipe)
When replacing VAZ 2106 pants, be sure to stock up on a new gasket between the pants and the manifold, because it is destroyed when removed. It is also recommended to replace the nuts securing the pants to the manifold.
When replacing the exhaust pipe, be sure to replace the gasket between it and the exhaust manifold. It is also better to change the nuts securing the “pants” to the manifold. The procedure is as follows:
- loosen the clamp and disconnect the pants from the resonator;
- unscrew the four nuts securing the exhaust pipe to the manifold;
Important: unscrew the nuts carefully so as not to twist the fastening studs. Otherwise, you will have to drill out and replace the studs.
- remove the “pants” (exhaust pipe) and gasket;
- install a new gasket;
- install a new exhaust pipe;
- connect the exhaust pipe to the resonator, tighten the fastening clamp;
- tighten the nuts securing the “pants” to the manifold.
If, after installing a new exhaust pipe, the exhaust system sags or hits the bottom, the following options are possible:
- the resonator or exhaust pipe is fixed at the wrong angles;
- engine mounts sagged.
In the first case, it is enough to loosen the clamps and install the parts correctly. In the second case, the engine mounts will have to be replaced. So:
- First, disconnect the pants from the resonator. If problems arise, as in the case of the resonator, given the fact that the pants are replaced less often than other parts of the muffler, and the heating temperature of the connection during engine operation is quite high, we use an angle grinder.
This is interesting: Replacing the cylinder head gasket (cylinder head) of a VAZ-2107 (injector, carburetor) with your own hands
Mounting for a carburetor engine. Nearby is the injector pants mount
- After removing the resonator, unscrew the four nuts securing the exhaust pipe to the manifold.
Unscrew the nuts securing the pants to the manifold, take out the gasket
- Be careful not to strip the studs to avoid unnecessary work replacing them. It is recommended to immediately treat them with a “liquid wrench”, otherwise we cut off the nuts using a grinder
- Working with a grinder, we cut the nut diagonally so as not to damage the thread of the stud. Then we simply knock it down using a chisel or flat screwdriver
- When installing the pants, replace the old gasket, then screw them to the exhaust manifold
- We connect the pants with the resonator and compress the flaring using a clamp.
If after replacement the exhaust system is raised under the bottom or sags:
- First, the receiving pipe and resonator are fixed at the wrong angle. We simply rotate the resonator and achieve the correct position of the system
- Second, the engine mount sagged. We change the engine mount.
Fasteners
Separately about fasteners - suspension pads and clamps. It is recommended to change them every time you change any part of the exhaust system. So:
- If the clamp looks like new at first glance, do not forget about metal fatigue. The thread “floats” over time, the clamp no longer holds the connection tightly, exhaust gases leak through and create additional noise. You will have to crawl under the car to change one clamp, and this, you see, is extra work.
- A simple inspection often fails to assess the level of wear on cushions and rubber belts. By installing old cushions with rubber belts in place, you risk losing the muffler as a result of their breakage. Considering that the price of a pillow or belt is much less than the price of a muffler, it is better to replace them immediately to avoid unnecessary costs.
Removing and installing the muffler
To dismantle the “glushak”, repair it, and then return it to its place, follow this sequence of actions:
- Drive the car into the inspection hole. Stop the engine and turn off the ignition. Wait until the exhaust manifold cools down.
- Unbend the hooks of the rubber suspension straps of the muffler.
Using a screwdriver, straighten the hooks of the rubber straps on which the muffler is suspended - Unscrew the exhaust pipe fastening to the rubber cushion.
Unscrew the exhaust pipe fastening to the rubber cushion with a wrench - Loosen the clamp connecting the pipes of the main and additional muffler.
Loosen the clamp between the pipes of the main and additional muffler - Move the clamp to the side and remove the main muffler.
- Loosen the clamp at the junction of the exhaust pipe and the resonator.
- Carefully knock the resonator out of the mount by hitting it with a hammer through the gasket.
Carefully knock the resonator out of the mount by hitting it with a hammer through a wooden spacer - Unscrew the exhaust pipe from the gearbox.
Unscrew the exhaust pipe from the gearbox bracket - Bend the stoppers and unscrew the exhaust pipe from the manifold.
Carefully bend the stoppers and unscrew the exhaust pipe from the manifold - Pull the pipe off the studs.
Install the new muffler in the opposite order of removal. However, do not use a used gasket. Before assembly, treat the pipes at the places where they are connected with clamps with graphite lubricant.
The muffler of “classic” VAZ cars, according to the manufacturer’s recommendations, cannot be repaired. If a malfunction occurs in any element of the exhaust tract, the part must be replaced with a new one.
DETAILS: Instructions for replacing the generator on a VAZ 2107-2101 with your own hands
In fact, motorists often prefer to repair holes burned in the muffler - the most common defect - by welding.
The occurrence of “fistulas” is indicated by a change in the sound of the engine and the appearance of smoke from under the car. To troubleshoot, place the machine on a platform and inspect the elements of the exhaust system.
If the cause is a burnt gasket, remove the muffler and replace it. When you have an assistant, you can do without removing all elements of the system. Proceed in the following order:
- Unscrew the pipe fastening to the gearbox.
- Unscrew the nuts securing the exhaust pipe to the manifold.
- Together with an assistant, pull the “pants” off the pins while simultaneously rotating the bend of the resonator pipe.
- Replace the gasket, install the pipe in place, tighten the fasteners.
A welded muffler usually lasts less than a new one. But welding is also cheaper than buying. Usually, if it is necessary to repair a muffler by welding, they turn to professionals. If you have the equipment, you can do the work yourself. For this you will need:
- welding machine;
- blanks for patches made of sheet metal 1–2 mm thick;
- a piece of pipe of the same diameter as the failed one;
- grinder with cutting disc for metal;
- metal brush;
- sandpaper;
- heat-resistant paint for metal.
To repair the muffler, follow this sequence:
- Remove the muffler from the vehicle.
- Using an external inspection, determine the location of the malfunction and the extent of the damage.
- If there is a large hole in the muffler body, evaluate the condition of the internal parts. It is possible that repairing the external surface will not bring the desired restoration of the functions of the muffler without replacing the internals. In this case, it is advisable to contact professionals or simply replace the faulty part with a new one.
- Cut out the burnt area. From the blank, make a patch larger than the damage. Weld the patch over the hole with a continuous seam.
- If there is damage at the junction of the pipe and the muffler body, cut out the defective area, replace the damaged part of the pipe, and weld the repaired pipe to the muffler with a continuous seam.
- Clean the repaired muffler from dirt and rust, paint the part with two layers of heat-resistant paint.
This is interesting: How to train the throttle valve of a Nissan Almera Classic
DETAILS: Changing the Honda SRV 2 oil. Photos, instructions on how to change the oil in a Honda CR-V engine
How are knocking and muffler position related?
If the muffler suddenly starts knocking on some parts of the car, find the source of the extraneous sounds. Usually the reason lies in stretched rubber fasteners. After replacing them, the knocking will stop.
Sometimes a knock appears after work related to removing the muffler. In this case, extraneous sounds are a consequence of installation errors. Round pipes at the joints with clamps can be slightly rotated relative to the correct position: more or less than required, pushed into each other.
To eliminate knocking, restore the optimal position of the exhaust system elements.
Sagging mufflers can be “treated” using similar methods—by replacing rubber bands and correcting the position of joints.
Video: repairing a sagging VAZ 2106 muffler
Muffler design for VAZ 2101/2107/2109/2110/2015
Despite the fact that the principle of operation of all VAZ muffler classics and later models is the same, they still have design distinctive features.
For example, consider the muffler design on a VAZ 2101.
The product has three cameras, the general structure is presented below:
- Upper half-body;
- Thermal insulation;
- casing;
- Partitions of the right and left chambers;
- Inlet pipe;
- Front partition;
- Perforated exhaust pipe;
- Perforated pipe internal;
- Perforated intake pipe casing;
- Rear partition;
- Semi-hull lower;
- Exhaust pipe;
- Front exhaust pipe;
- Main muffler;
- Suspension strap;
- Pillow suspension;
- Grazing pipe.
Muffler design of late models using the example of a VAZ 2110.
- Reception pipe;
- Bracket;
- Clamps;
- Resonator;
- Suspension cushions;
- Main muffler;
- Exhaust pipe;
- Perforated rear resonator tube;
- Posterior partition;
- Front partition;
- Perforated front resonator tube;
- Frame;
- Front perforated pipe;
- Inlet pipe;
- Outlet pipe;
- Frame;
- Posterior partition;
- Middle partition;
- Rear perforated pipe;
- Front partition.
Replacement
First prepare the tools:
- WD-40, or another similar composition (even brake fluid or used oil will do).
- Bulgarian.
- A set of keys.
- Hammer.
- Pliers.
- Wide flathead screwdriver.
- Graphite grease.
First, you need to place the machine on an overpass or pit and ensure normal lighting of the workplace. Sequence of operations.
- Find the connection point between the main muffler and the resonator (near the rear axle).
- Moisten the WD clamp connecting the main muffler to the resonator. After 15-20 minutes, lightly tap it with a hammer. Do the same with the pipe connection.
- Remove the clamp, using a screwdriver to help pull the flaring of the silencer off the flaring of the resonator.
- If the flaring petals cannot be flared, cut them off with a grinder, under no circumstances touching the resonator pipes.
- Disconnect the muffler from the resonator, using light blows with a hammer if necessary.
- Disconnect the muffler from the suspension belt and three cushions.
- Replace the old part with a new one in the reverse order. Make sure that the pipe from the resonator fits completely into the flared muffler pipe.
- Press the connection point tightly using a clamp.
- It is advisable to purchase new pillows and install them when assembling the structure. Treat joints and threads with graphite lubricant. This will protect them from moisture penetration and save them from corrosion.