In April 2011, a pilot batch of 1000 elastic belts 1118-1041020-07 manufactured (Germany) was installed. These Kalinas do not have an alternator belt tensioner, all problems caused by its absence are solved, like the Lada Granta. On other Lada Kalina cars, the alternator belt tensioner is present.
Required tools: socket wrench “8”, wrench “19”, head “13”, head “17”. Disconnect the negative terminal of the battery. Then:
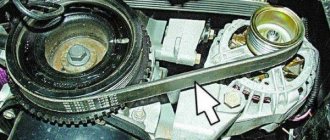
- We hold the belt tensioner pin with a 19mm wrench, put a 8mm wrench on the hexagon of the adjusting pin, and turn it clockwise. The tension will weaken.
- Remove the Kalina generator belt from under the tension roller, and then from the generator pulleys and crankshaft.
- Press the lock of the generator pre-excitation wire block. Disconnect the connector from the voltage regulator connector.
- Unscrew the nut securing the wire lugs to terminal “B+” using a “13” socket. Remove them from output.
- Unscrew the lower mounting bolt of the generator using a 17mm socket and remove it. Remove the nut from the generator bracket.
- Unscrew the nut of the bolt of the upper mounting of the generator, using a 13mm head.
- Remove Kalina generator
Generator Lada Kalina
Lada Kalina cars are equipped with three-phase generators that produce alternating current; to produce direct current, a rectifier unit is included in the generator circuit.
AvtoVAZ equips VAZ 1118 cars with generators of the type 5132.3771
or
9402.3701-06
, there are many different manufacturers producing spare parts for VAZ cars.
The generator for the Lada Kalina can be of different power; the industry produces current sources of 85, 100, 90, 115, 120, 135 Amperes.
Among the most famous manufacturers of VAZ parts are:
- Pramo;
- StartVOLT;
- KZATE;
- LKD (China);
- Eldix (Bulgaria);
- ISKRA (Slovenia);
- BATE (Belarus);
- Bosch.
We change bearings in Lada Kalina
The rectifier units present in the designs of generator sets of the AvtoVAZ model range have received a considerable number of negative reviews during operation. This statement is also true for the Lada Kalina we are considering. These modules can break down even after a mileage of 10 thousand km, which requires repair or replacement of the device. It has also been revealed in practice that the cause of most malfunctions is the generator set bracket. However, bearings can also fail prematurely. It is gratifying that the owners are able to cope with such a problem on their own.
To repair the generator module, it will require preliminary disassembly. For this purpose, we “grab” the tips of the stator cables with a screwdriver and slightly pull them out of the springs present in the diode bridge. Next, you need to unscrew the bolts holding the bridge itself. In addition, unscrew the connecting bolt.
Having disassembled the body of the LADA Kalina generator set, we resorted to checking the integrity of the rear bearing. Here you will need to twist its outer ring. If it rotates without noticeable difficulties or sounds, and is not inclined to emit play, then we ascertain the serviceability of the bearing. When the slightest signs of wear are evident, we change it without hesitation.
Replacing bearings
AvtoVAZ cars are very often subject to fair criticism from the owners of cars produced by this company. The Lada Kalina model was no exception to the general rule. Almost all current converters installed on cars of this brand break down after 10 thousand kilometers, after which the generator requires repair or replacement.
As practice has shown, the cause of many breakdowns is not only the bearings, but also the Kalina generator bracket. Car owners often fix this problem on their own. Doing this with certain skills is not so difficult.
To repair the generator, it is necessary to disassemble it. To do this, use a screwdriver to hook the tips of the stator wires and pull them out a little from the springs of the diode bridge. Then unscrew the bolts that attach the diode bridge. After this, the connecting bolt is unscrewed.
After disassembling the generator, check whether the rear bearing is in good condition. To do this, you need to twist its outer ring. If it rotates easily, without noise or rattle, and there is no play, then the bearing is in good condition. At the slightest suspicion of a malfunction, it is better to replace the bearing.
Next, you need to dismantle the Kalina generator bracket. Using a screwdriver, the stator is picked up and removed from the device casing. The bracket includes a bearing, which should also be checked. If a malfunction is detected, the part must be replaced.
The front bearing of the unit is rolled into its casing. Although AvtoVAZ does not recommend changing it, it would still be more advisable to do so, because otherwise you may then need to buy an expensive new generator for Kalina.
The bearing is removed by removing the pulley and spacer plug. After this, the rotor is removed from the rubber using a hammer, and the front casing of the unit is clamped in a vice. The bearing is carefully removed.
Replacing a generator on Kalina
There seems to be nothing complicated about removing and replacing the generator on a Lada Kalina...
To replace the generator with a 16-cl. Kalina you will need a warm garage with a pit and a set of keys: 13, 19; heads: 8, 10 and 13.
Be sure to remove the terminal from the battery.
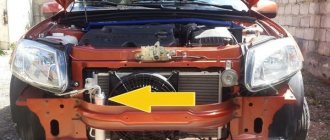
Remove: the plastic engine protection and the washer reservoir (after all, it would be better to unscrew a few extra nuts than to suffer later). So remove the connectors from the washer motor and use keys “8” and “10” to unscrew the nuts securing the barrel. The barrel is screwed in two places.
Then remove the alternator belt and remove the “gene” chip.
If there is engine protection at the bottom, then remove it too. Then disconnect the generator wires.
The wires are fastened with two bolts (it’s not difficult to reach the top one, and the second one from the bottom from the hole with a head and a key set to “13”, just for this it was necessary to remove the tank).
Remove the generator from the Kalina from the bottom, and if it is an 8-valve, then pull it out from the top.
By the way, be careful not to lose the nut when unscrewing the lower bolt, which is installed on the other side.
Of course, you can remove the generator on Kalina without a hole, using the keys to climb up from above, but this will be much more difficult to do.
etlib.ru
Signs of generator failure
To diagnose the generator set, it is not necessary to remove it. Here are some typical symptoms of breakdowns:
- The presence of a hum and whistle from the generator indicates that the bearings are damaged. If you start it, the rotor may jam and the belt may break.
- Whistling, short-term ignition of the charging control lamp - the alternator belt on the Lada Kalina is worn out, or it has low tension. If the lamp is constantly on, there may be a break.
- If the charging lamp is on, this means that there is no voltage at the generator output. The reason may lie in the windings, voltage regulator, slip rings, diodes, wiring.
Troubleshooting should begin from the simplest to the more complex. It is possible that the cause of the generator failure is a break in one wire. But it is quite possible that there is a break in the rotor or stator winding. When making repairs, the generator connection diagram should be at hand.
How to remove the generator on the LADA Granta
The “Grants” generator has to be removed for various reasons: for repair, maintenance, modification of the unit. You can do this yourself if you know how to remove the generator on the Grant. Depending on the modification of the car (8 or 16 valve engine, presence of air conditioning), the procedure for dismantling the generator has its own characteristics, so it is worth considering each option separately.
How to remove a generator on an 8-valve Grant without air conditioning
To work you will need:
- socket wrenches for 8, 10 and 13;
- mounting blade.
Before removing the generator on a Grant without air conditioning, you should disconnect the ground from the battery by removing the negative terminal. The procedure is as follows:
- unscrew the 2 rear engine protection mounting bolts;
- unscrew the 4 front engine protection bolts;
- remove the engine protection (mudguard) from the car;
- disconnect the wiring block from the generator;
- remove the protective cap of the nut holding the power wire;
- unscrew the nut and disconnect the generator power cable;
- unscrew the top nut securing the “Grant” generator;
- press out the generator with a mounting spatula and remove the upper mounting bolt;
- unscrew the lower bolt securing the generator;
- move the generator away from the engine with a mounting blade and remove the lower mounting bolt;
- move the generator towards the right mudguard;
- remove the generator belt from the unit pulley;
- pull out the generator;
- Remove the alternator belt from the crankshaft pulley.
To put the LADA “Grant” generator in place, you need to perform the steps in reverse order.
Important: when installing the generator belt, make sure that the pulley grooves and the groove tracks on the belt match.
How to change the generator on a 16-valve Grant
The generator mount on the 16-valve Granta variation is distinguished by the presence of a belt tensioning mechanism. Therefore, the procedure for replacing the generator on this model is slightly different. To work, you will need socket wrenches 8, 10 and 13. As when dismantling the generator from the 8-valve Granta, before starting work you need to remove the ground terminal from the battery to eliminate the possibility of a short circuit.
Removal, disassembly and installation of the generator VAZ (Lada) Kalina 1117 2004-2013
Tool:
- Driver for socket attachment
- 7mm wrench attachment
- 8mm wrench attachment
- Knob attachment 13 mm
- Knob attachment 17 mm
- High nozzle on the wrench 24 mm
- Hex key 8 mm
- Pipe wrench
- Medium flat screwdriver
- Marker
- Mandrel
- Large hammer
- Double jaw puller
- Soldering iron
- Electrical tester
- Rear bearing diameter guide
Parts and consumables:
- Wood block
Removing the generator
1. Disconnect the wire terminal from the negative terminal of the battery. Remove the generator belt. By pressing the lock of the block of the generator pre-excitation wire, disconnect the block from the voltage regulator connector.
2. Using the “13” head, unscrew the nut securing the wire lugs to the “B+” terminal and remove them from the terminal.
3. Using a 17mm socket, unscrew the bolt of the lower mounting of the generator and remove it. Remove the nut from the generator bracket.
4. Using a 13mm socket, unscrew the nut of the bolt for the upper mounting of the generator.
5. We remove the generator.
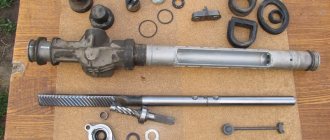
Disassembling the generator
1. We disassemble generator 5132. 3771 to replace the voltage regulator, rectifier unit, rotor, stator and bearings. Using the “8” socket, unscrew the three nuts securing the casing.
2. We remove the casing.
3. Remove three metal washers from the casing mounting studs.
4. Using a slotted screwdriver, unscrew the two screws securing the voltage regulator terminals.
5. Using the “8” socket, unscrew the two nuts securing the voltage regulator.
6. Remove the regulator.
7. We use a marker to mark the relative positions of the generator covers.
8. Using a 7-point socket, unscrew the four bolts holding the covers together.
9. Remove the back cover with the stator assembly.
10. If the stator does not come out of the front cover, pry it off with a screwdriver from different sides relative to the front cover. We put a high “24” head on the pulley fastening nut and through its hole insert a “8” hexagon into the hole of the rotor shaft.
11. We unscrew the pulley fastening nut, holding the tool head with a pipe wrench or in a vice. Remove the spring washer. We remove the pulley.
12. Remove the spacer washer.
13. Push the rotor shaft out of the front cover.
14. Remove the cover.
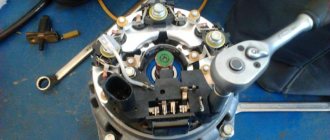
15. To replace the front bearing, use a slotted screwdriver to unscrew the four screws securing the bearing pressure plate.
16. Remove the pressure plate.
17. Use your hands to push the bearing out of its seat.
18. We remove its bearing. If it is not possible to push out the bearing, we knock it out using a mandrel or tool head of a suitable diameter.
19. To replace the rear bearing, use a two-jaw puller to press the bearing off the rotor shaft.
Warning:
When performing this operation, the puller screw should be pressed exactly into the center of the shaft so as not to damage the plastic insulator of the rotor slip rings. To install the puller grips, two flats are made on the plastic rotor bushing.
20. If it is necessary to remove the rectifier block or stator, we unsolder the six terminals of the stator winding from the terminals of the rectifier block.
21. Having unscrewed the three fastening nuts with a “8” wrench, remove the rectifier unit and stator. Using a tester, we check the stator and rotor windings for open circuits and short circuits to the housing.
22. We assemble the generator in reverse order. To install the rear bearing, we support the front end of the rotor shaft on a wooden block, and press the bearing onto the rear end of the shaft with a mandrel or a piece of pipe of a suitable diameter, applying force only to the inner ring of the bearing.
23. If the front bearing cannot be inserted into the generator cover, press it with a suitable tool head, applying force to the outer ring of the bearing.
The article is missing:
- High-quality photos of repairs
Source: https://wiki.zr.ru/179_Repair_Kalina
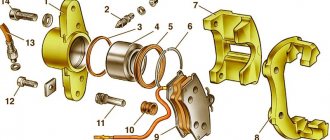
Generator disassembly and repair
Bracket for mounting the unit
Repair is carried out by dismantling the generator and voltage controller. Using a flat screwdriver, you need to hook the tips of the stator wires and slightly pull them out of the spring connections of the diode bridge of the generator. Using a 8mm spanner you need to unscrew the 3 bolts that secure the diode bridge. In this case, be sure to write down or remember the layout of the insulating and support washers. After this, you need to unscrew the screw of the connecting bolt using a 12mm wrench.
To determine the technical suitability of the rear bearing, you need to lightly shake it and twist the outer ring. If the bearing rotates easily, without stopping, and there is no noise or large play, then everything is fine with it. If at least one of the above deficiencies is detected, you will need to replace the bearing with a new one.
Proceed to dismantle the Kalina generator bracket. Having marked the required placement points with a marker, pick up the stator with a screwdriver and carefully remove it from the rear casing of the generator. The generator bracket includes a bearing, the technical suitability of which must be checked using the same method as described above. If any faults are found, it must be replaced.
The automobile plant does not recommend changing the front rotor bearing, since it is rolled into the generator casing. Nevertheless, replacing it would be the most expedient solution, since the price of a new generator significantly exceeds the cost of the bearing. If you need to change the front bearing, you need to unscrew the nut fastener using a 24mm socket wrench. In this case, you will need to support the pulley with a service wrench (pliers). Next, you need to dismantle the pulley with the spring and washers, and then remove the spacer plug. Carefully press the rotor out of the front bearing using a rubber hammer. To do this, you will need to put the pulley fastener on the rotor shaft of the Kalina generator bracket at the same level as the end.
The front casing of the generator must be tightly clamped in a vice. Select the most suitable frame from the cup puller set and carefully displace the bearing, which is located in the landing opening of the front trim. Clamp the rotor and soft spacers in a vice and force the rear bearing off the shaft using a multi-function puller of the correct size.
Generator repair
You can check the stator and rotor windings for breaks without removing the generator from the car. To do this, you need to remove the rectifier unit.
To complete the work you will need:
— three- or two-jaw puller;
homemade mandrel from a cup puller kit.
Disassembly
1. We remove the generator from the car.
2. Remove the voltage regulator.
3. Using a screwdriver, we remove the ends of the stator winding leads from the spring-loaded contacts of the rectifier unit.
4. Using an 8 mm spanner, unscrew the three bolts securing the rectifier unit (remembering how the insulating and thrust washers are installed).
5. Using a 12 mm wrench, unscrew the contact bolt nut.
You can check the condition of the rectifier unit and stator windings without further disassembling the generator. It is enough to carefully bend the terminals of the windings to the sides. The check procedure is the same as shown below.
6. Remove the rectifier block.
7. Using a marker, we mark the relative positions of the front and rear covers of the generator (to simplify assembly).
8. Using an 8 mm socket wrench, unscrew the four bolts holding the front and rear covers of the generator together.
9. Using a slotted screwdriver, carefully push the generator covers apart.
10. We remove the back cover, take out the contact bolt (with an insulating washer on it) and the plastic bearing bushing.
To determine the technical condition of the rear bearing, rock it from side to side and vigorously rotate its outer ring. The bearing should not have significant play, the ring should rotate freely without jamming or extraneous noise. A faulty bearing must be replaced.
11. Using a marker, we mark the relative positions of the stator and the back cover.
12. Using a screwdriver, remove the stator from the back cover of the generator.
13. To determine the technical condition of the front bearing, hold the pulley with your hand, rotate and rock the front cover from side to side.
If the bearing seizes, has significant play, or makes a lot of noise when the cover rotates vigorously, it must be replaced.
The manufacturer does not recommend replacing the front rotor bearing, since the bearing is rolled into the front cover of the generator. But, given that the cost of the bearing is significantly lower than the cost of a new front cover and, moreover, the generator assembly, it is advisable to press out and replace the faulty bearing.
14. If it is necessary to replace the front bearing of the generator, use a 24 mm socket wrench to unscrew the pulley mounting nut, holding the pulley with sliding pliers.
15. Remove pulley 3 with spring and flat washers 2, spacer sleeve 1 from the rotor shaft.
16. Using a hammer with a rubber striker, we press the rotor out of the front bearing (to do this, attach the pulley mounts to the threads of the rotor shaft flush with the end).
17. If it is necessary to replace the front bearing of the generator, install the front cover in a vice.
18. Having selected suitable mandrels from the cup puller set, we press the bearing out of the mounting hole of the front cover.
19. Having secured the rotor in a vice with soft pads on the jaws, using a universal puller of a suitable size, press the rear bearing from the rotor shaft.
Examination
1. By applying ohmmeter probes to the contact rings of the rotor, we check the field winding for absence of a break. The resistance of a serviceable excitation winding should be 5-10 Ohms.
2. By connecting the ohmmeter probes to any slip ring and to the rotor, we check the field winding for a short to ground. If the rotor winding is working properly, the ohmmeter should show an infinitely high resistance.
3. Alternately connecting the ohmmeter probes to the terminals of the stator winding, we check the stator windings for the absence of a break. If there is no break, the ohmmeter will show low electrical resistance.
4. By connecting the ohmmeter probes to any terminal of the winding and to the stator, we check the stator winding for a short to ground. If there is no short circuit, then the ohmmeter should show infinitely high resistance.
We replace the faulty rotor and stator.
A working semiconductor diode conducts electric current in only one direction. If the diode does not conduct current or conducts current in both directions, then it is faulty.
5. We connect the probe of the negative terminal of the ohmmeter to the terminal of the diode, and the probe of the positive terminal to the body of the diode being tested (or to the plate into which it is pressed). A working diode should not pass current (the resistance tends to infinity).
6. We swap the tester's screws. If the diode is good, the ohmmeter should show electrical resistance.
7. We similarly check the other diodes of the rectifier unit.
Assembly
Before pressing the bearing into the front cover of the generator, it is necessary to check the bearing seat and, if necessary, use a knife or scraper to restore the chamfer where the edges of the hole remain jammed. When pressing the front bearing into the cover, force must be applied only to the outer race of the bearing.
1. Having selected suitable mandrels from the cup puller set, we press the new bearing into the front cover of the generator until it stops.
2. Applying light blows with a hammer through a drift, we restore the rolling of the bearing in the cover.
3. Using a tube of a suitable diameter (you can use a 19 mm deep socket), press the rear bearing onto the rotor shaft until it stops.
Before installing the alternator rear bearing, make sure the shaft is securely clamped in a vise. Place a wooden block of a suitable size under the rotor shaft so that when pressing it does not damage the front rotor impeller. To avoid damage to the bearing, impacts should only be applied to the inner ring of the bearing.
Further assembly of the generator is carried out in the reverse order of disassembly. At the same time, we combine the marks applied to the covers and the stator of the generator. Finally, tighten the tension bolts evenly, crosswise, in several half-turn increments. By tightening the bolts, we make sure that the rotor rotates easily (sticking of the rotor can be caused by misalignment of the covers). Before installing the plastic casing, we make sure that the leads of the stator windings are securely fastened.
Generator Lada Kalina - disassembly and defect detection
As standard, Lada Kalina cars are equipped with generators of option 5132.3771 or its modification 9402.3701-06. Both power units
are three-phase alternating current generators with an electronic regulator and an alternating voltage rectifier unit.
At the moment, such generators are considered to be fully reliable, but they are not immune from malfunctions; accordingly, some basic knowledge about how to repair and diagnose them would also be useful. Otherwise, if the voltage generated in the car’s electrical system differs from the specified values or is easily unstable, then most often this
indicates a malfunction of the voltage regulator or that the brushes have worked and do not fit tightly.
With diligence and some skill, all these
It is enough to fix the malfunction. More complex failures are also subject to repair, implying, for example, replacement of failed rectifier diodes, stator or rotor. Checking the condition of the voltage regulator During the preliminary check of the non-specialized functionality of the voltage regulator, you need to open access to a good terminal of the generator (for which we move the protective rubber cover). Then we start the engine and wait until it warms up until it reaches normal idle speed. The measurement is made between the good terminal and any nearest stable ground and should be in the range of 14.5 to 15.1V.
Lada Kalina generator repair do it yourself
I have a generator KZATE 9402.3701-14. There have never been any complaints about his work. The only thing I noticed was that when the revs drop from high to xx, the light dims, but then returns. Well, I think it’s not critical, I won’t bother again. I’m driving home from work on Friday, the traffic is terrible, but I’m not in a hurry. I looked, the light sank so much that the tidy dimmed and the speed of the stove slowed down...CHECK fell out. Well, my goodness, we’ve arrived. What to do? The main thing is to give in to the speed and the norms. What a mess. Well, I think once it’s the weekend, I’ll take off the gene and see how much it costs. I read the drive. Many thanks for the posts about the generator to comrade Aless43 and comrade I-vento. Their posts Repair by Aless43 and Repair by I-vento helped me a lot.
All work was carried out in the parking lot in front of the house at an ambient temperature of 15...-18 degrees by one person. Unscrew the engine protection. Two 10mm bolts with a 17mm hexagon. I found them to be different in length... Naturally, I forgot which one was where. As a result, I put the long one on the left, the short one on the right. Remove the washer fluid reservoir. We remove the air vents. We disconnect any of the battery wires, I removed the positive one. From above, through the hood, I reached out to the generator with my hand, removed the rubber cap, and disconnected the excitation wiring. It's with a lock! You can feel it with your finger. Easy to remove. I connect the head extensions, unscrew the 13 nut, and remove the power wire. Now from above. I loosen the lock nut 17 of the tensioner, and use an open-end wrench 8 to release it; you need to tighten it to release it. I decided to check the tensioner bearing. To do this, use a 13mm head to unscrew the bolt holding it and remove it. The bearing rustled disgustingly. Verdict: Replacement! Rozhkov unscrewed the generator from above at 13, inconvenient yes, but possible. Using a 13mm head, I unscrewed the long bolt securing the generator from below. I recommend screwing the nuts onto the bolts right away, because you’ll get very confused. Next, with the generator cover forward, I take it out through the bottom. This requires skill and it is developed quickly. I managed to pull the gene out with both hands. It looks something like this:
The air conditioner hose gets in the way, but it is flexible and does not freeze in the cold. I was dressed well, but my toes were frozen. I quickly collect the tool, take the gene and go to the apartment. Native RN:
Stock, bad brushes. Compare with new.
I did the troubleshooting quickly. I wash, change clothes, go to the car market. Cash is running short. Why won’t they install a Sberbank ATM at the car market? I'm sure he will be in great demand. I buy RN 849.3702 for 300 rubles.
I buy a tensioner pulley with a bearing assembly and a jar of lubricant for 500 rubles.
Along the way, I listened to a lecture on bearings. The competent grandfather was caught in a stall in front of the entrance. He talked about the markings, what restrictions there are during operation, and showed the fake and the original. He gave away the bearing for free if I answered at least one of 10 questions about bearings. Of course I didn't answer. A charismatic grandfather. I will come to him again if I need bearings. And then my money ran out. I only found out in pavilion No. 8 the price of rings - 350 rubles! Surround yourself...What should I do? I decided to do everything humanly, for myself, for centuries, so to speak. Moreover, I asked the hawkers, but they didn’t have any. And then they started telling me that no one was changing them. And you can't. And you'll lose your alignment. The generator will break, rip, evaporate. Only one SUPERMASTER is taken, and then for as much as 1000 rubles! Still, grandfather was right. There are only ignoramuses all around. I spat in their faces (mentally, of course, otherwise they could be snatched off by a lula) and left.
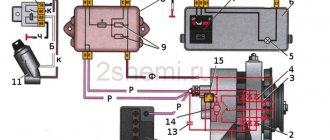
How to replace the voltage regulator and check its serviceability on a VAZ 1117-VAZ 1119?
Checking the voltage regulator for serviceability:
1) At the beginning of the operation, you will need to find where the generator itself is located and after you find it, move your hand to the side with the rubber cover indicated by the red arrow, this cover covers the “B+” terminal; in simpler words, this is the positive terminal and it comes from the generator to this terminal (By the way, it is also indicated by a blue arrow) you will need to connect the positive wire of the voltmeter and after connecting it, throw another wire (Minus wire) coming from the same voltmeter to ground (The places where you need to connect the wire , indicated by a green arrow), after the operation has been completed, a DC voltmeter will show you the voltage in the vehicle’s on-board network.
2) After everything is connected, start the engine of the car and turn on the headlights, when the engine is started, let it run for a while (About 15 minutes) and after this time has passed, at medium speed engine, measure the voltage in the on-board network, which you should have in the range of 14.4-15.1 V.
Note! If this voltage is either more or less, then replace the voltage regulator with a new one!
3) Now, as for the capacitor, to check whether it works or not, you just need to use a megohmmeter to connect the leads that go from it to the contact of the capacitor; when connecting, your resistance should initially decrease and then become infinite (What kind of infinity do you have on the device? it’s very easy to understand, for this, without connecting anything, first look at the numbers that the megohmmeter shows, for example, if it shows 0, then this will be infinity), if this is what happened, then in this case the capacitor is fully operational and does not require replacement, otherwise, replace the capacitor with a new one.
Determination of malfunction and replacement time
Determining a faulty alternator belt is quite simple. Let's look at the main indicators:
- Whistle in under engine space. It appears when you increase the speed of the gas pedal, and the current in the bot network increases.
- Tightening the belt had no effect and the whistle remained.
- Cracks or elasticity in the belt.
Bad alternator belt, bad - teeth torn (torn off)
Frame deformation, eversion.
The crack on the alternator belt is clearly visible
All these malfunctions indicate that it is time to replace the alternator belt on Kalina. Otherwise, it may break at the most inopportune moment.
Torn belt on one of the Kalinas
Generator replacement
The process of operating a car is often not ideal, and often during a trip some part, system or element may fail. One of the problems of the Lada Kalina is the breakdown of the generator.
It is worth noting that even factory generators, despite the long service life specified by the manufacturer, fail at an unexpected moment.
Therefore, if an important component breaks down, it has to be replaced or repaired. Usually, they turn to specialized service stations for the procedure, but if necessary, the replacement can be done with your own hands.
DIY generator replacement
Usually, even factory generators on Kalina serve for quite a long time and do not require replacement, of course, unless you come across a car with a factory defect of this device. If this electrical equipment unit fails, it will have to be replaced. Although this is not difficult to do, it will take at least an hour, especially if this is your first time doing this procedure. So, we will need the following tools:
- Open-end or ring wrenches for 8, 13 and 19
- Small and large ratchets and heads for 8, 13 and 19 for more convenient and faster work
- Wrench with extension
Guide to replacing the Kalina generator yourself
So, let's proceed to a very detailed description of all the types of work that need to be performed. First of all, we need to loosen and release the belt tensioner and then remove it. So be sure to check out this Alternator Belt Replacement Guide first. After this, you can proceed directly to removing the device from the car.
Before carrying out any repairs related to electrical equipment, be sure to disconnect the battery by removing the negative terminal from it.
First, we disconnect the plug, which is secured with a plastic latch, just lightly press it and pull it to the side, it will come out without any problems:
And the wire terminals that are under the rubber protective cap, pry it off and unscrew the nut:
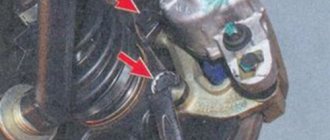
Then we unscrew the nut securing the upper part of the Kalina generator, this is clearly shown in the photo below. You can first move it with a knob, and then work with a ratchet handle:
And tapping the protruding bolt a little so that it moves, remove it from the back side, as shown in the photo below:
Next, we proceed to the lower fastening bolt, and proceed by analogy, only if necessary, hold the nut on the reverse side, since it can scroll:
Be careful when removing this rod as there are bushings there. Hold them immediately so that they do not fall and get lost. And holding the generator body with one hand so that it does not fall, we remove this bolt with the other hand:
Now almost everything is ready and you can safely remove this device from the engine compartment, turning it slightly from side to side, finding the most convenient position for its removal.
To replace the generator on the Lada Kalina, we purchase a new one and install it in the reverse order of removal, putting all the bushings in place in the same places as they were. The price of a new generator ranges from 4000-5000 rubles, so you will have to fork out a little.
ladakalinablog.ru