How to remove the cylinder head without errors. Stages of work
- Firstly, if you are going to repair the engine, then you must drain the coolant.
- Then you need to remove the camshaft, since the cylinder head bolts are located under it. And it is simply impossible to get to them without removing the camshaft.
- It is also necessary to disconnect the coolant supply tube to the head. It is located on the right rear side of the engine, as shown in the photo below:
And disconnect the tube, moving it slightly to the side:
You also need to disconnect the plug from the temperature sensor, which is shown in the photo:
Now everything is ready. You can begin to unscrew the bolts securing the cylinder head to the engine block. In this case, we use a fairly powerful wrench with a head:
Once the bolts have been loosened, you can use a ratchet handle to complete this procedure several times faster:
After all the head bolts have been unscrewed, you can lift it by grasping the front part, or whatever is more convenient for you:
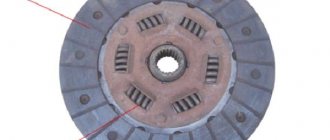
Head milling
There are several cylinder head malfunctions that you cannot fix on your own. When the engine overheats systematically, the aluminum cylinder head becomes deformed. The perfectly flat surface of contact between the head and the engine block ceases to be so.
This leads to the gasket between the block and the head starting to leak. Replacing it with a new one does not solve the problem. In this case, grinding the adjacent surface may be the solution. Milling is performed on a special machine, which allows the work to be completed with perfect precision.
In the conditions of your garage, it is unlikely to carry out such a procedure yourself. Using a hand sander (as some garage “kulibins” advise) for this purpose means completely ruining the adjacent surface. In this case, repairing the cylinder head will lead to a complete replacement of the head - it is impossible to grind it indefinitely.
Disassembling the cylinder head, lapping valves VAZ 2106
| EXECUTION ORDER | |
| Using a 10mm wrench, unscrew the two nuts securing the pipe... |
| ...and remove the pipe. |
| Using a 13mm wrench, unscrew the two nuts securing the double pipe... |
| ...and remove it from the block head. Sealing gaskets are installed between the pipes and the head. |
| We place an improvised stop (a nut, but preferably a wooden block) under the valve. |
We dry out the valve (see Replacing the oil seals of the gas distribution mechanism).
| We remove the valve from the guide sleeve. |
| Apply lapping paste to the valve plate. |
| We install the valve in place. We put a lapping device on the valve stem. |
Pressing the valve plate against the seat, we turn it alternately in one direction or the other.
| If necessary, for easy access to the outer valves, use a 13mm wrench to unscrew the two outer studs, having previously locked two nuts on them... |
| We continue grinding the valve until a smooth matte rim appears on the seat and chamfer of the valve plate. |
After thoroughly washing, we install the valve in place, replacing the oil seal cap (see Replacing the oil seal caps of the gas distribution mechanism).
| Use a 12mm socket to unscrew the bushing... |
| ...and remove it along with the adjusting bolt and locknut. If necessary, we replace them. |
| Use a metal ruler to check the mating plane of the cylinder head. The permissible gap is 0.15 mm. |
Video about “Disassembling the cylinder head, lapping valves” for VAZ 2106
Grinding in valves of the cylinder head of
a VAZ 2106 Replacing Seals and Grinding in Valves (Part 2)
Repair of VAZ head (classic). Do it yourself!
Grinding in the valves
After preparing the seat, the next stage of repair awaits us - grinding in the valves. To do this you will need a special lapping paste. A small layer is applied to the valve, then the latter is inserted into the head. A piece of rubber hose (of such a diameter that it is difficult to fit) is placed on the valve stem.
Then place the free end between your palms and begin, rubbing your hands, to rotate the valve in different directions. The abrasive paste will do its job, and the repair of the cylinder head valve can be considered complete.
In what cases is it necessary to remove and repair the unit?
There may be several reasons for repairs, let’s consider them in order:
- The first and most common reason for which it is necessary to remove the VAZ 2106 cylinder head and repair it is wear of the gasket. The sealing gasket wears out over time and holes may appear in it, which can result in antifreeze getting into the engine fluid and oil into the coolant.
- The appearance of microcracks in the cylinder head structure. In this case, it is necessary not only to remove the cylinder head of the VAZ 2106, but to have special equipment that will allow for high-quality repairs.
- Broken guide bushings. Failure of these elements requires urgent replacement of components.
- The need to repair the head seat or replace it.
- Replacement of the camshaft or the need for its repair and troubleshooting.
In fact, there may be many reasons, but we have given the most common and most frequently encountered in the case of VAZ 2106 cars. You can find out more about how repairs and dismantling, boring and modification of the cylinder head on a VAZ 2106 occurs below.
Sorry, there are no surveys available at this time.
When is it necessary to puff?
Unfortunately, not everyone understands how important this point is. And even more so, not every motorist understands what the tightening order should be and how this procedure occurs. But this does not mean at all that you should not be interested in this, because every owner of a VAZ 2106 should understand how important this is. After all, the wrong torque and tightening order can subsequently cause the vehicle owner to fail in the cylinder head. And this, in turn, will entail considerable financial costs.
Tightening the cylinder head pins
Previously, this procedure fell on the shoulders of technicians at service stations, because it was performed during the technical inspection of the car. However, later this need for maintenance was canceled, so now it is a concern for motorists. To understand how important it is, consider cases when you need to tighten bolts and observe the order and timing of this action:
- If engine oil begins to leak from under the cylinder head. Sometimes this is due to a worn head gasket, but it can also happen because the head screws have become loose. This is evidenced by an oil stain that appears at the junction of the head and the block.
- After disassembling the VAZ 2106 internal combustion engine, you first need to maintain the order and tightening torque of the screws. If this procedure is not followed, problems are guaranteed for your car.
- In addition, experienced drivers advise beginners to carry out this procedure from time to time, preferably every two to three thousand kilometers. After all, mechanics at service stations periodically encounter cylinder head bolts that become loose during engine operation.
2106 cylinder head bolt tightening diagram
Accordingly, if you disassembled the head or saw an oil stain at the junction of the cylinder head with the block itself, then you need to tighten the screws.
Malfunctions when removal and installation of the cylinder head are required
There are a number of malfunctions due to which the cylinder head of the VAZ “six” has to be removed from the car for further diagnostics or repairs. Let's look at them in more detail.
Gasket burnt out
The following signs indicate that the cylinder head gasket has failed (burnt out or was punctured):
- the appearance of leaks or gas breakthrough at the junction between the engine block and the head. With this phenomenon, extraneous noise appears in the operation of the power plant. If the outer shell of the seal ruptures, traces of lubricant or coolant may appear;
- formation of an emulsion in motor oil. This happens when coolant gets into the oil through the gasket or when a crack forms in the BC;
The formation of an emulsion indicates that coolant has entered the oil. - the appearance of white smoke from the exhaust system. White exhaust occurs when coolant enters the combustion chamber of the engine. In such a situation, the liquid level in the expansion tank gradually decreases. Untimely repairs can lead to water hammer. Water hammer is a malfunction that is caused by a sharp increase in pressure in the sub-piston space;
If the gasket is damaged and coolant is leaking into the cylinders, thick white smoke will come out of the exhaust pipe. - entry of lubricant and/or exhaust gases into the engine cooling system. You can detect whether lubricant has entered the coolant by the presence of oil stains on the surface of the liquid in the expansion tank. In addition, when the seal of the gasket is broken, bubbles may appear in the tank, indicating that exhaust gases have entered the cooling system.
The appearance of air bubbles in the expansion tank indicates exhaust gases entering the cooling system
Video: Damage to the cylinder head gasket
Damage to the cylinder head mating plane
The following reasons can lead to the formation of defects in the mating surface of the block head:
- long-term operation of the power unit;
- motor overheating;
- poor quality coolant.
Defects of this kind are eliminated by processing the plane, with preliminary dismantling of the head.
Damage to the mating plane using the example of the Kalina cylinder head
Cracks in the block head
The main reasons that lead to the appearance of cracks in the cylinder head are overheating of the engine, as well as improper tightening of the mounting bolts during installation. Depending on the nature of the damage, the head can be repaired using argon welding. In case of serious defects, the cylinder head will have to be replaced.
Overheating of the engine can lead to a crack in the cylinder head.
Wear of guide bushings
With a high mileage of the engine or the use of low-quality engine oil, the valve guides wear out, which leads to a violation of the tightness between the seat and the valve plate. The main sign of such a malfunction is increased oil consumption, as well as the appearance of bluish smoke from the exhaust pipe. The problem is resolved by replacing the guide bushings.
Valve seat wear
Valve seats can wear out for several reasons:
- use of low quality fuel;
- long engine mileage;
- Incorrect ignition setting.
The malfunction can be solved by straightening or replacing the saddles. In addition, the ignition system must be checked.
Seat defects lead to a loose valve fit and loss of combustion chamber tightness.
Broken spark plug
Quite rarely, but it happens that as a result of over-tightening the spark plug, a part breaks off on the thread in the spark plug hole. To remove the remains of the cylinder head spark plug element, you need to dismantle the threaded part and unscrew it using available tools.
CPG malfunctions
If there is a problem with the cylinder-piston group of the engine, the cylinder head also has to be removed. The most common failures of the CPG include:
- increased wear of cylinders, rings and pistons;
- piston damage;
- occurrence of rings.
If the cylinders are worn excessively, the engine is completely disassembled to replace the piston group, as well as to bore the internal cavity of the cylinders on a machine. As for the damage to the pistons themselves, although they rarely burn out. All this leads to the need to dismantle the cylinder head and replace faulty parts. If the rings are stuck, normal operation of the cylinder and the engine as a whole becomes impossible.
If the rings are stuck, normal engine operation is disrupted
Ring sticking - rings are stuck in the piston grooves due to the accumulation of combustion products in them. As a result, compression and power are reduced, oil consumption increases and uneven cylinder wear occurs.
When Bolts Need Replacement
Before you begin tightening the bolts, you should inspect them. A visual assessment of the condition is not enough; it is necessary to check the fastener parameters. He must:
- have dimensions 12/120 mm;
- be with intact thread;
- have no curvature along the entire length.
Some mechanics recommend regularly screwing new bolts into the cylinder head. Others adhere to the rule that replacement should only be carried out if the fastener is screwed into the socket tightly. It is best not to skimp on bolts, since using a component that is obviously stretched increases the risk of its metal breaking. The consequences of this are almost unpredictable; in most cases, it will be possible to restore the operation of the power plant only with the help of specialists.
Replacing the cylinder head gasket of a VAZ 2106
Replacing the cylinder head gasket of a VAZ classic on an engine with a chain drive is generally a fairly simple job; the main difficulty is aligning the crankshaft and camshaft marks during assembly. If the marks are set incorrectly, the engine will not work normally, or may not start at all.
You can change the cylinder head on a “Classic” without a pit or a lift; before performing work, you should prepare the necessary tools and a container for draining the coolant. From the tool you will need:
- a set of car keys;
- slotted and Phillips screwdrivers;
- pliers;
- knob with extension;
- head 19 (for old style bolts) or multi-faceted head 12 (for new type bolts);
- hammer;
- mount.
We replace the PGBC on engines 2101/03/06 as follows (on a carburetor engine):
- turn off the ignition, put the car in neutral gear and on the handbrake;
- remove the terminal from the battery;
- drain the antifreeze from the radiator, also from the cylinder block. Even if the coolant is gone, there is still some left in the radiator;
- unscrew the nuts securing the air filter housing, remove the housing to the side;
- disconnect the gas rod and choke cable from the carburetor;
- free the block head from the water pipes (radiator and upper stove);
- discard the vacuum brake booster hose;
- unscrew the four nuts securing the exhaust pipe of the muffler;
- disconnect the high-voltage wires from the head;
- remove the distributor (you don’t have to dismantle it, but it will get in the way);
- disconnect the gasoline hose from the carburetor;
- remove the valve cover and place it aside;
- unscrew the 13 mm bolt with edges securing the cylinder head;
- remove the chain tensioner, unscrew the camshaft gear fastening;
- we throw the chain off the sprocket (gear), the chain can be dropped down, and then it will not be difficult to get it;
- unscrew the camshaft nuts (key 13), remove the shaft,
- pull off the cylinder head mounting nuts, unscrew the bolts and remove the cylinder head. In order not to lose the rocker, it is better to remove them from the head.
After dismantling the head, we carefully protect the surfaces of the block and the cylinder head itself; there should be no irregularities on them. During assembly, all parts are installed in place, but there are some features:
- so that the installed gasket does not slip on the surface of the block (if there are no guides in the block), the gasket can be carefully spread over the entire surface with lithol;
- before installing the cylinder head, install the piston of the first cylinder at TDC (at the top point);
- in order not to remove the chain from the pallet, you can fasten the chain to the shoe;
- Having installed the cylinder head, we place the rocker, making sure that they are all in their places;
- Tighten the cylinder head bolts evenly, from the middle, in several steps, in the order as in the figure below;
- We adjust the camshaft so that it is aligned with the fourth cylinder (the pin on the flange is located almost opposite the upper bolt on the body, picture below);
- after installing the camshaft, a sprocket with a chain is installed, and then the marks are aligned exactly, but first you need to tighten the chain with a tensioner;
- Before installing the tensioner, it should be recharged - loosen the central cap nut, recess the plunger, and tighten this nut;
- after assembling and tensioning the chain, the timing marks must match - the mark on the crankshaft pulley is located opposite the large mark of the chain cover;
- the alignment of the camshaft marks is indicated by arrows below in the figure;
- Having completed the assembly, fill in antifreeze and start the engine, check how it works.
When is it necessary to puff?
Unfortunately, not everyone understands how important this point is. And even more so, not every motorist understands what the tightening order should be and how this procedure occurs. But this does not mean at all that you should not be interested in this, because every owner of a VAZ 2106 should understand how important this is. After all, the wrong torque and tightening order can subsequently cause the vehicle owner to fail in the cylinder head. And this, in turn, will entail considerable financial costs.
Replacement process
If signs of damage to the gasket are detected, it should be replaced immediately.
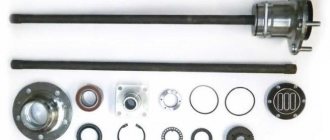
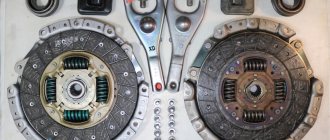
Set of tools
To carry out the replacement procedure you need to prepare:
- set of wrenches;
- pliers;
- screwdriver;
- torque wrench;
- coolant container;
- clean rags.
A set of necessary tools
The car must be washed before replacement to prevent dirt from getting into the disassembled engine.
Step-by-step removal and repair guide
- Removing the cylinder head is a critical step in our case. Before you begin removing and modifying the cylinder head, you need to drain all the antifreeze from the engine, and also remove the air filter along with the carburetor. Before doing this, disconnect all pipes and hoses of the system in advance. To carry out the work, you will need a standard set of tools, something that every driver should have, including wrenches, screwdrivers, and so on.
- When the carburetor is removed, it is necessary to begin dismantling the cylinder head cover, as well as aligning the marks on the crank pulley disk and the camshaft. In addition, the marks on the camshaft disc must match the mark on the housing. Read more about this in the video and photo.
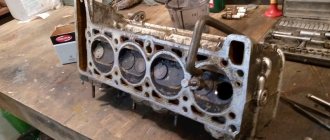
- The next stage of dismantling will be to loosen the chain tensioner and remove the support washer. You need to sharply remove the screw and dismantle the cylinder head sprocket. You should also dismantle the VAZ 2106 camshaft along with the housing. Next, the rockers are removed, after which all high-voltage cables from the spark plugs are disconnected and the screws that secure the cylinder head itself are unscrewed. Next, the cylinder head is removed for repairs and first cleaned of deposits and carbon deposits.
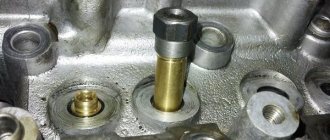
Replacing the plug
New plug installed
- Replacing the plug can be a bit of a hassle, as you'll see in the video. Corrosion and deposits can make it difficult to remove. Use a hex wrench, but first spray the screw generously with VD-40. This does not always help, but it may be advisable in your case.
- If it was not possible to unscrew the plug in this way to replace it, you will have to drill it out. To do this, several holes should be drilled around the perimeter of the plug (drill through without fear, there is a thick wall under this plug, so you will not damage the unit). The main thing in this matter is not to damage the thread.
- The next step is to install the plug. There is nothing complicated about this issue. Before installing the plug, you will need to completely clean the threads of carbon and deposits; for this you can use a sharp object like an awl. Only after the threads have been cleaned can the plug be installed.
Replacing guide bushings
Installing bushings in the cylinder head
- Use pliers and a clamp to remove the bushings. When the elements are removed, measure their outer diameters; in practice, it is usually 0.05 mm less than the factory ones.
- To install failed bushings, you will need a hammer with a mandrel and motor fluid; you may need to heat the metal, for which you can use an electric stove.
- After the bushings are heated (if necessary), they are lubricated with oil to make them fit easier.
- When all eight bushings have been replaced with new ones, you need to wait some time until the cylinder head cools down. In this case, the inner diameter of the bushings must be turned so that the valves do not dangle inside, but at the same time they can move freely and do not jam.
Countersinking the head saddle
Scheme for seat countersinking
- As you can see from the video, replacing the cylinder head seat can cause some difficulties.
- You need to cut the metal layer in a circle, a detailed diagram is given above.
- After this, the cylinder head must be cut at an angle of 120 degrees until a round edge appears.
- Then you need to make a working chamfer up to 0.2 cm thick. This is done so that the valve rubs tightly.
Replacing Valve Guides
Critical depletion of guide bushings occurs at a mileage of 150-200 thousand km. You can do the cylinder head repair by replacing the bushings yourself. To replace them you will have to dry out all the valves. Then, using a mandrel to knock out the bushings, remove them from the head body.
It will be a little more difficult to install the new bushings in place. For correct and easy installation, you should use a temperature imbalance - heat the block head (this expands the metal, and therefore the bushing seat), and cool the new bushings to a negative temperature. The head body in the right place should be heated to 100 degrees.
This can be done using an electric stove, placing the cylinder head on it so that the work site is in the zone of maximum heating. Having lubricated the new bushings (cooled in the freezer of a regular refrigerator) with machine oil, we drive them into the mounting sockets. If you follow the recommendations for temperature preparation described above, the bushings will fit in easily, like clockwork.
After the metal has cooled, the bushings must be expanded to a diameter that allows the valve to move without jamming or distortion. In this case, the work must be done so that the valve stem does not dangle. To perform this procedure, you need a special tool - a reamer. The peculiarity is that they need to work only on one side, turning the reamer to the end. A big mistake is to bore the guide bushing on both sides - you will end up having to change the bushing again.
Remember that cylinder head repair is a complex process, the slightest inaccuracy of which can result in wasted nerves and money. As a rule, an oversight makes itself felt after assembling and starting the engine. This does not always happen immediately, but certainly within the first thousand kilometers.
Installing the cylinder head
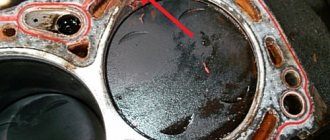
Now a few words about installing the cylinder head back onto the block. Firstly, be sure to replace the gasket, since it is installed only once. Of course, you must first clean the block and the surface of the head from traces of old gaskets. I did this using a special Dutch-made Ombra gasket remover, applying this liquid to the entire surface of the cylinder head:
As a result, after about 10 minutes of waiting and careful work with a regular clothes brush, you get a fairly noticeable result. For comparison, I decided to do it as follows: I cleaned the first three combustion chambers with various means, from gasoline to WD-40, and the last one with this special tool. You can see the result clearly:
After all this is done, you can begin to install the cylinder head back. In order to do this, you will need a special torque wrench, since these bolts must be tightened with a certain torque in the following order:
- First technique: moment of force from 33-41 N*m.
- The second is from 95 to 118 N*m.
It is also worth noting that the following order must be observed:
We install all the removed parts in the reverse order and finally assemble the VAZ 2106 engine. This is how you can remove the cylinder head yourself and install it back. I wish you success.
Self tightening
As mentioned earlier, tightening the cylinder head bolts is not that difficult. However, so that this process does not turn out to be difficult for drivers, it is necessary to take into account the importance of this procedure and carry it out strictly according to the scheme, which can be found on the Internet resource.
To get started, you will need to prepare only one, but very important tool (a torque wrench), without which it will simply not be possible to tighten the bolts. Of course, such a tool cannot be in the arsenal of every car owner, so you will have to buy it or rent it at a service station. The bolts are tightened in the following sequence:
- First of all, you need to inspect the external condition of the fasteners. If their condition does not satisfy the car owner, then experts do not recommend tightening them, but using a new set of pins, which can be purchased both on the automotive market and in a specialized store. You need to choose bolts from a reliable manufacturer; when purchasing, be sure to pay attention to the quality of the thread. Before starting the procedure, the threads of the pins are lubricated with automotive lubricant, regardless of which element will be used: new or used.
- The tensioning process itself for the VAZ-2106 is similar to other VAZ models, but if you are considering a Niva, then experts recommend carrying out such work in two stages, after first familiarizing yourself with the diagram, which can be downloaded on the Internet. The diagram shows the exact sequence of tightening the bolts; all pins have their own individual number, so that car owners independently and strictly in order tighten the required elements.
- Using a torque wrench, you need to tighten all the bolts strictly according to the diagram. When performing this action, you should monitor the pulling torque, the indicator of which can vary from 3.4 to 4.0 kgf*m:
- The first to be tightened are the two elements located in the center of the head;
- then tighten the two upper bolts and two lower ones, which are located on the side of the middle clamp;
- The left outer bolts are tightened, and then the two right ones. You should not tighten only the element that is marked No. 11.
- After the first stage of tightening, according to the diagram, is completed, experts recommend repeating the entire operation again in exactly the same sequence. Making sure that when tightening the bolts, the tightening torque does not exceed 11.5 kgf*m.
- At the end of the tensioning process, you need to tighten the pin at No. 11, using the same torque wrench, making sure that the tension of this element does not exceed 4.0 kgf*m.