Objectively, the carburetor installed on Oka cars has a simple design. And if you use it correctly, then no problems should arise.
The main thing here is to respond to changes in a timely manner, and also not to waste time and effort.
The carburetor is the main working element of the engine on the VAZ 11113. Depending on the period, different modifications were installed on the Oka. But in general their device was the same. The difference was observed only in certain settings.
Device
Oka first appeared on the Russian market in 1987. The production continued until 2008.
The first was the VAZ 1111 version. This is a car with a 2-cylinder engine and a 0.65-liter engine.
Then an updated version of the VAZ 11113 appeared. It has been produced since 1995. Here the engine already had a volume of 0.75 liters.
For the first version of Oka, a DAAZ 1111 carburetor was developed. For the subsequent modification with a 0.75-liter engine, carburetors of the DAAZ 11113 series were used. Then they were slightly adjusted.
Objectively speaking about the old carburetor is almost pointless. There are fewer and fewer cars with it. Yes, and the settings are carried out in the same way as on the updated version.
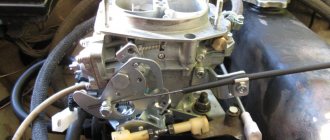
The DAAZ 11113 carburetor is a device that creates an air-fuel mixture in factory-specified proportions. This ensures stable operation of the internal combustion engine, regardless of the currently selected mode.
The body is made of 3 elements:
- top cover;
- the main part that comes with the float chamber;
- the lower part where the throttle valves are located.
The device itself is two-chamber. Sequential opening of existing throttles is provided.
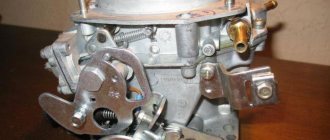
Structurally, it is worth highlighting the following components:
- GDS. This is the main dosing system. Works in all available modes. It consists of diffusers, fuel supply jets, as well as air jets in both chambers.
- XX. This is the idle system. Serves to maintain stable operation of the internal combustion engine at minimum speed. Helps you use fuel wisely.
- Economizer. Helps enrich the air-fuel mixture when the speed increases and the engine operates under a fairly high load.
- Acceleration pump. Its main task is to work smoothly without noticeable failures. Even if the driver presses the gas pedal sharply.
- Starting device. Aimed at stable starting of the car engine in any weather.
- Float chamber. Ensures that a constant level of flammable liquid in the carburetor is maintained so that the engine runs stably;
- Transitional system. Helps to accelerate smoothly, eliminating jerking when the secondary chamber opens.
Each component of the system has its own specific task.
To set up and adjust the unit, special adjusting screws are used. Tuning is also carried out by selecting jets and changing the angles of the throttle and air dampers.
Cleaning the carburetor from carbon deposits and dirt
Most carburetor problems occur due to poor quality fuel. This is what causes plaque and soot to appear. It also causes blockages in the fuel channels. To eliminate all this, you will have to use a special cleaning fluid for carburetors. It is a spray can. The cylinder is usually accompanied by a set of nozzles for flushing the carburetor channels. There are many manufacturers of fluid, but HG3177 fluid is especially popular among car enthusiasts, allowing you to perfectly flush the carburetor in a few minutes.
Carburetor flushing fluid HG3177 is very popular among car enthusiasts
Tools and Supplies
- rags;
- several toothpicks;
- a piece of thin steel wire 30 cm long;
- compressed air cylinder;
- protective rubber gloves and glasses;
- set of open-end wrenches;
- flat screwdriver;
- carburetor cleaning fluid.
Sequencing
- Once removed from the vehicle, the carburetor is completely disassembled.
Completely disassembled and prepared for cleaning, the DAAZ 1111 carburetor for the OKA car - All clogged channels and holes are carefully cleaned using toothpicks. And if the carbon deposits are too strongly welded to the walls of the fuel channel, then steel wire is used to clean it.
- After preliminary cleaning, a nozzle with the thinnest tube is put on the can of liquid. Liquid is poured into all fuel channels and small carburetor openings. After this, the device should be left alone for 15–20 minutes (the exact time depends on the type of flushing liquid used and to clarify it, you should read the information on the can).
The thinnest nozzle for a can of carburetor cleaning fluid - After 20 minutes, the fuel channels are purged with compressed air from a can.
- All other contaminated carburetor parts are treated with liquid. The spray is sprayed without a nozzle. After 20 minutes, the parts are thoroughly wiped with a rag and the carburetor is reassembled.
How it works
The operation of the carburetor in question on Oka cars is based on the same principle as similar systems on other wheeled and widely used vehicles.
- First, fuel from the float chamber enters the well through the fuel system to form the air-fuel mixture.
- The nozzles then transfer the mixture to the diffusers of the main component, that is, the carburetor.
- The device responsible for idling takes gasoline from the wells. It follows the jets and forms a mixture with oxygen in specified proportions.
- Air coming from the second and first carburetor chambers is also added to the components.
- When the throttle is opened slightly, the gasoline mixture moves into the chamber. If the fuel fluctuates, the economizer regulates this phenomenon and stabilizes engine operation.
When ignited, the air-fuel mixture creates a force that allows the crankshaft to rotate and thereby set the wheeled vehicle in motion. In this case it is Oka's car.
How to clean a carburetor
Before you start adjusting the carburetor on the Oka, you must clean it. It is pollution that is the main reason for unstable engine operation on these machines.
The carburetor unit becomes clogged over time. Especially if you use low quality fuel. Dirt penetrates the jets, as well as the fuel channels.
This may result in the following symptoms:
- loss of idle speed;
- the engine does not gain speed;
- the effect of engine tripping occurs;
- fuel consumption increases;
- Black smoke comes out of the exhaust pipe.
In many of these situations, major repairs are not necessary. It’s enough just to clean the system and then start adjusting the carburetor on the Oka 11113.
Practice shows that most often the HDS channels become clogged when the engine does not gain speed when the damper of the first chamber is opened. Although the idle speed does not disappear.
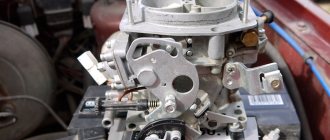
Here you should remove dirt using compressed air without removing the carburetor.
The meaning is this:
- turn off the Oka engine and raise the hood;
- remove the air filter housing;
- use a pump, blower or compressor to blow out the channels from the GDS;
- start the engine;
- check the stability of its operation.
If the behavior has become normal, then the filter is put in place and the machine continues to be used. If not, then you need to blow it again.
How to adjust the fuel level
Another important point on how to properly and completely tune a simple carburetor installed on an Oka car.
Sometimes the owners of this domestic small car are faced with such a problem. The fuel level in the float chamber decreases. It turns out to be noticeably smaller than recommended. This causes the mixture to become lean. As a result, the car accelerates with difficulty, fuel consumption increases, etc. If the level increases, then the appetite also increases. In both situations, you need to adjust the position of the float.
Self-adjusting the fuel level in the carburetor of Oka cars should not cause any particular difficulties. It is important to remember the following. When the carburetor fills with fuel, this indicates problems that have nothing to do with adjustment. Most likely, the locking needle does not fit tightly enough to the seat. The problem with the situation is that adjusting the fuel level will not in any way correct the situation in the carburetor of the Oka small car. You will have to completely change the locking mechanism in the chamber.
When the level is low and there is not enough gasoline in the chamber, a simple adjustment will help correct the situation. You don't need any special skills to work.
The instructions are presented as follows:
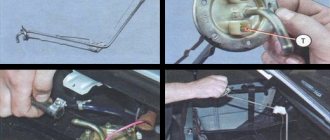
- remove the air filter cover;
- disconnect the choke cable;
- disconnect both fuel hoses, that is, the supply hose, as well as the return;
- unscrew the 5 screws that secure the top cover;
- check the condition and remove the cover along with the gasket to the side;
- arm yourself with a caliper or a cut piece of a ruler;
- measure the distance between the upper edge of the housing and the surface of the fuel;
- Normally, this distance for Oka is 22-23 mm;
- if the actual data differs, you need to bend the float tongue to one side;
- bend the tongue until the distance corresponds to the norm;
- If the adjustment is successful, return the cover and filter to their place.
Now you understand how you can adjust the fuel level inside the carburetor float chamber on the Oka yourself. But you need to remember one thing. When making adjustments, the locking needle may fall out when removing and installing the cover.
Maintenance, adjustment
Thanks to its simple design and minimal amount of electronics, the Oka carburetor is a fairly reliable unit. But to keep it in full working order, periodic maintenance is required.
Signs that the Oka carburetor needs repair are the following symptoms:
- Difficulty starting the engine;
- Unstable operation at XX;
- The occurrence of dips, jerks under load, sudden opening of the throttles;
- Power drop;
Since problems with the ignition system have the same symptoms, it would be a good idea to check its performance together with the power system.
The main disadvantage of the carburetor is the presence of a large number of channels and components with small cross-section holes, which over time become clogged with debris and resinous deposits contained in the fuel are deposited in them.
Carburetor maintenance involves complete disassembly, washing and purging of channels, jets, and tubes. At the same time, it is not recommended to use metal objects (needles, awls) for cleaning, so as not to affect the cross-section of the holes, although the use of wooden objects (toothpicks) for cleaning is allowed.
For mild contamination, special products also help. products for cleaning carburetors, the use of which does not require dismantling and disassembling the unit - washing is carried out with the carburetor installed and the engine running.
Possible breakdowns of the unit include:
- Failure of the solenoid valve;
- Accelerator pump diaphragm rupture;
- Wear of the mounting holes of the throttle axles;
- Warping of the throttle body plane due to uneven tightening;
There are not so many settings for the DAAZ “Oka” - the level in the float chamber and the idle speed are regulated.
The first operation is performed like this:
- Remove the cover;
- We measure the height of the protrusion of the top of the locking needle above the plane of the lid, holding the lid strictly horizontally (so that the needle “looks” down). The normal protrusion height is 10 mm. If the indicator does not correspond, you need to add a gasket under the needle seat;
- Put the cover in place;
- Manually pumping the pump pumps fuel into the carburetor (you need to fill it completely);
- Remove the cover;
- We measure the distance from the surface of the fuel to the upper plane of the body. With normal adjustment, this figure should correspond to 23-24 mm. If the distance is greater or less, we adjust it by bending the tongue on the float (to reduce the quantity, bend it up, and to increase it, bend it down).
The XX speed adjustment is carried out using a quality screw. Work should be performed with a warm engine and with electrical appliances turned on (to create a load). The essence of the adjustment comes down to the fact that you need to rotate the screw to achieve engine speed at 800-1000 rpm.
VAZ Oka with a 0.75 liter engine is a popular small passenger car of the nineties and 2000s, which won the hearts of many motorists due to its maneuverability, fairly high cross-country ability and efficiency. But fuel consumption could not always be the same; it largely depended on how the Oka 11113 carburetor was configured.
Currently, these small cars are still on the roads of our country, and spare parts for cars are in demand. Also for Okushka they sell carburetor units (CU) of various modifications, repair kits, jets, gaskets and other parts; they can be bought in specialized stores, and the adjustment and repair of the fuel system is carried out not only by specialists, but also by many car owners themselves.
How to stabilize idle speed
Several symptoms indicate problems with idle speed:
- idle speed disappears altogether;
- the engine behaves unstably at low speeds;
- The engine stops spontaneously and stalls.
In certain situations, such phenomena require removal of the carburetor. And this is a troublesome matter. But first, it makes sense to try to solve the problem without dismantling it. Purging is applied.
To clean the idle air system channels, you must:
- turn off the engine;
- remove the air filter cover;
- disconnect the power cable;
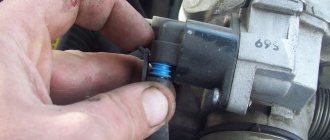
- unscrew the solenoid valve from the XX system;
- close the channel with your finger in the area where the solenoid valve was disconnected;
- start the engine of the car;
- give gas;
- let the power unit run for a while;
- Blow out the jets and valve with compressed air;
- return everything to its place;
- connect the power wire;
- use the quantity screw to add speed and start the internal combustion engine.
If the cleaning was effective, then the engine will run when idling. But the speed will be increased.
Then you need to tighten the quality screw and adjust the fuel mixture. Tighten until the internal combustion engine begins to reduce speed and show slight signs of failure.
Next, unscrew the quality screw a little. Until the engine starts running stably. Using the quantity screw, set the idle speed to normal. For Oka cars this is about 850-900 rpm.
In a situation where purging does not give the desired result, you will have to dismantle the carburetor, disassemble the element, and also thoroughly clean it.
Installation of Solex on Oka
It is often possible to achieve fuel economy and more stable engine operation by repairing the carburetor, replacing the repair kit, and making proper adjustments. But not all owners of small cars are satisfied with the dynamics of the engine and its throttle response, so some drivers perform tuning - install a Solex control unit from cars 2108-09. The price of this unit is relatively low, and many can afford this installation, but it will require some additional parts and minor modifications. Spare parts needed:
- thick spacer for the carburetor;
- 2 thin gaskets;
- clamps;
- fuel pipes (if necessary).
In any case, you will need to do something with the air filter housing: either upgrade an existing part, or purchase it from the VAZ-2108 (09) model. It's all about price, and if you want to save money, then it is better, of course, to modernize. Replacing a standard carburetor unit with a Solex is done as follows:
- remove the old HRSG (dismantle the air filter assembly, disconnect the fuel hoses, gas draft, choke cable, unscrew the four fastening nuts);
- We install thin gaskets on the collector platform, and a spacer between them;
- fasten the Solex with four nuts;
- we attach the gas rod, there should be no problems, adjustments are usually not required here;
- connect the EMG wire;
- We secure the fuel pipes with clamps; if there is no return line on the machine, we install a plug on the corresponding fitting
- the choke cable will need to be “thrown over”, otherwise it will not be long enough;
- Having connected and installed everything except the “air”, we pump fuel into the float chamber with a gas pump, and try to start the engine.
Idle speed adjustment should be carried out only after the internal combustion engine has completely warmed up; idle speed is adjusted by tightening and unscrewing the quality and quantity screws. First, by using “quantity,” we raise the speed a little (to about 1000), then we tighten the quality screw until the engine runs quieter and small interruptions appear. We “add quality” a little, turning the screw a little, and using “quantity” we achieve speed within the standard range of 850-900 rpm.
Finally, we install the “air” in place and conduct tests on the road. If fuel consumption seems high, or the idle speed is not satisfactory, idle speed can always be adjusted on site, without removing the air filter housing.
Didn't find the information you are looking for? on our forum.