After repairing the brake system on a “classic”, air must be removed from the hydraulic circuits. Bleeding the brakes of the VAZ 2106 should ensure effective braking of the car on all four wheels. The de-airing procedure should be carried out after each intervention in the brake mechanisms, resulting in depressurization of the system and the entry of air into it. The work is carried out according to a specific algorithm, changing which may disrupt the functions of the system.
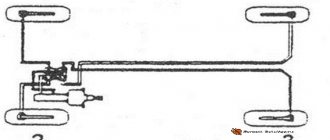
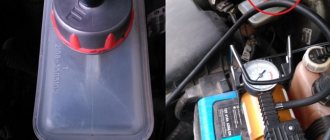
1 – hose for bleeding the brakes; 2 – vessel for brake fluid.
Bleeding the brakes on a VAZ 2106
After repairing the brake system on a “classic”, air must be removed from the hydraulic circuits. Bleeding the brakes of the VAZ 2106 should ensure effective braking of the car on all four wheels. The de-airing procedure should be carried out after each intervention in the brake mechanisms, resulting in depressurization of the system and the entry of air into it. The work is carried out according to a specific algorithm, changing which may disrupt the functions of the system.
1 – hose for bleeding the brakes; 2 – vessel for brake fluid.
Brake system design 2106
Today we are going to bleed the brakes, but we will briefly recall the design of the brake system of this car so that the actions are reasonable and deliberate. And so that stupid questions do not arise about which wheel the system needs to be bled from. Now let’s remember its design, and then all questions will automatically disappear.
The brake system of the six, like all Ladas, is hydraulic, dual-circuit. This means that all hydraulics are rigidly divided into two independent branches. There are about a dozen schemes for organizing brake system circuits, but the Italians settled on parallel. This means that the front and rear wheels brake in pairs.
This was done so that in the event of damage to one of the working brake cylinders, at least two wheels would brake as if nothing had happened. It’s a convenient and safe system, but unfortunately, not everyone knows about it, which is why such questions arise. The brake lines are filled with brake fluid, and the system is sealed. Brake fluid has a special composition that allows it to transfer kinetic energy with virtually no compression losses. Ideally, with complete and reliable sealing, the system is eternal and if it is not overheated, air will not get inside. And if it overheats, then the brake fluid begins to boil, releasing air bubbles. In this case, without visible violations of integrity, the system becomes airy and must be pumped.
Crankshaft selection
We won’t touch the nameplate power, since the increase will be symbolic, but it will affect the dynamics. All that remains is to choose a human crankshaft, and this is not an easy task. If you buy a used one, there is a chance that you will run into a shaft with hidden defects - cracks, bending or too much wear. And if the shaft has been restored, then you can end up with poor-quality surfacing of the journals. If you are not sure of the quality of such a crankshaft, it is better to look for a new one. A good quality crankshaft will not shine like chrome.
This is how low-quality shafts made of raw, unhardened steel are prepared for sale. The necks of a good cemented shaft will be matte with a characteristic tint, and it should be packed in oil paper and lubricated with grease. And, of course, with the marking 2103-1005020.
Bleeding the brakes when using a medical syringe
The sequence of actions is as follows:
- Brake fluid is drawn into the most ordinary medical syringe.
- The syringe is connected (hermetically) to the cap of the brake fluid tank. To do this, you can use sealants or mechanical seals if you don’t have time to wait for the sealant to dry.
- Place a bottle under the leakage area and unscrew the fitting.
- We press on the syringe plunger, thereby creating pressure. Thus, pumping brake fluid into the system.
- In turn, a trickle of brake fluid along with air should appear at the exit point.
In order to be completely sure that there is no more air left in the brake system, in this simple way you should push absolutely all the fluid through the system.
What will you need for the job?
To carry out the work, assemble the following tool:
- Find a small transparent jar. You can cut a 0.5 liter plastic bottle.
- You will definitely need a transparent tube - the one installed in the front window washer system is ideal.
- Brake fluid (necessarily the same brand as was poured earlier).
- Penetrating lubricant WD-40. She will need to process all threaded connections.
- Crimp type wrench for brake system.
- Keys for "8" and "10"
You may also need pliers, a jack, shoes and other tools.
Nuances of pumping
During the deflation process, it is also recommended to check the condition of the brake discs, pads and hoses. It is important to make sure there are no damages, cracks or other defects. Be sure to pay attention to the rear drums. The brake pads located near them need periodic adjustment. Without the latter, efficient operation of the circuit is impossible.
If the system is pumped correctly, then an absolutely identical force will be applied to each side of the car. When a VAZ moves away from the straight line during braking, this means that there is air in the circuit. Ignoring this sign is very dangerous.
Please note that drift to the right indicates the presence of bubbles in the brake elements located on the left, etc.
The weaker the locking on one side is, the more powerful the car is pulled in the opposite direction.
On the VAZ-2106, pumping begins from the front circuit, and upon completion of work, switches to the rear circuit.
If partial deflation is necessary, then it is done along the entire axle, and not at all along one of the wheels installed on it.
Dismantling and replacing the gas turbine engine requires full bleeding of all circuits.
It is advisable to work in pairs with an assistant - it is quite difficult to carry out all the procedures alone, because you will have to simultaneously press the brake pedal and loosen the fittings on the caliper.
Leveling procedure
And now in more detail about how to bleed the brakes on a VAZ-2106. First you need to bleed the rear wheels:
- Install a transparent tube on the bleeder fitting of the right wheel, its second end should be lowered into a jar of brake fluid - this way you can control the air leaving the system.
- The assistant must press the brake pedal all the way several times, and then lock it in the pressed position.
- Loosen the fitting - the liquid will flow through the tube, and the pedal will fall to the floor.
- Repeat steps “2” and “3” several times until air bubbles stop flowing through the tube.
Removing air from the hydraulic drive
Bleeding the VAZ 2106 brakes should start like this: first, bleed the front circuit, and then the rear circuit. Partial bleeding is carried out only along the axles of the car, but not along the wheels. Removal and installation of the master brake cylinder ends with complete removal of air along all axes. When bleeding the brakes, it is recommended to work together with an assistant, since it is very difficult to do it alone.
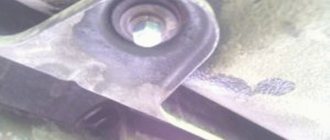
At the same time, you will need to press the brake pedal and relax the caliper fittings. To ventilate the front axle, the car is lifted and the wheels are removed. After this, check the fluid level in the GTZ tank and put a rubber or silicone tube of a suitable diameter on the caliper air fitting.
Its other end is placed in a glass container, into which a little working fluid is poured so that the end of the tube is immersed in it. First you need to slightly loosen the fitting with a size 8 wrench; if this fails, then use WD fluid to clean the threads.
After the preparatory work, you should press the hydraulic pedal 4-5 times, then keep it pressed, and at this moment release the fitting on the caliper. As a result, liquid will be released along with air into the jar. Subsequently, with the fitting released, it is necessary to press the pedal sharply until the air bubbles completely disappear from the tube.
To guarantee, usually press 2 times after the last bubbles appear. The pedal is again kept pressed, the fitting is tightened, after which a control pressure is applied and the next wheel is moved on. After pumping the front axle, work on the rear axle begins.
It is more convenient to carry out manipulations on a lift or inspection pit; in this case, you can do without removing the wheel. The operating algorithm is identical to the procedure on the front axle. It is important to control the fluid level in the tank, since with intense circulation, air may enter the gas cooler.
Then the work will have to be repeated all over again. There is a bleeding method in which you press the pedal 4-5 times with the fitting closed, and then squeeze it out and unscrew the fitting. Then they tighten it again and press the pedal another 4-5 times. Several cycles are carried out in this manner.
Return to contents
Bleeding the brake system of VAZ 2106
Before starting work, you should remember that the brakes on the VAZ 2106 are pumped in a certain order: the right wheel at the rear is pumped first, then the left wheel at the rear, then the right wheel at the front and the left wheel at the front. Violation of this order will result in air remaining in the system, and all work will have to be started again.
In addition, you should pump the brakes with the help of a partner. Doing this alone is very difficult.
Sequence of operations
First, preparation: the car should be driven onto an overpass or into a viewing hole and put on the handbrake. This will make it easier to access the brake fittings.
- The car hood opens. The plug is unscrewed from the brake reservoir and the fluid level in it is checked. If there is not enough fluid, it is added to the mark on the tank.
Video: pumping the brakes of a VAZ 2106 alone
Causes of problems with bleeding the brakes of the VAZ 2106
Sometimes the driver is faced with a situation where the brakes on a VAZ 2106 simply do not bleed. Here's why this happens:
- violation of the pumping order. This is the most common reason for unsuccessful bleeding of brakes on the “six”. Novice drivers forget that the brakes on the VAZ 2106 are dual-circuit, and therefore it is very important to follow the pumping schedule. And if you start pumping from the front wheels, and not from the rear, then it will simply be impossible to expel all the air from the system;
- poor quality brake fluid. It's no secret that in the modern market of fuels and lubricants there are a huge number of counterfeits, and, as a rule, the products of the most popular brands are counterfeited. Brake fluid is no exception. If the driver is “lucky” to buy just such a liquid, then its viscosity can increase greatly over time. In especially severe cases, the fake brake fluid thickens so much that its consistency begins to resemble grease. Of course, in this case there can be no talk of any normal bleeding of the brakes. The brake system will have to be disassembled and thoroughly cleaned.
So, the life of the driver and his passengers depends on the condition of the “six” brakes. Therefore, maintaining them in good condition is his direct responsibility. Fortunately, most troubleshooting operations can be done independently, in your garage. All you need to do is strictly follow the recommendations outlined above.
Preparation for repair
Before bleeding the brakes on the VAZ-2106, you need to do preparatory work. For this:
- Place the car on the inspection hole. With its help, bleeding is more convenient - access to the fittings is easier.
- Treat all fittings with penetrating lubricant and wait 10-20 minutes, more if possible.
- Make sure all bleeder fittings are unscrewed. To do this, you need to use a spanner or crimp wrench - you cannot use an open-end wrench, as it will only damage the edges.
- Make sure there is enough fluid in the expansion tank and add if necessary.
- Make sure there are no leaks in the system. If there are any, eliminate them.
The presence of foreign objects in the expansion tank is unacceptable - this will lead to damage to the master brake cylinder and clogging of the pipes.
Self-pumping using the example of a VAZ-2110
On the Lada “Ten” everything is done in the same way as on the VAZ 2108-21099 models, since the design of the brake system is the same. Therefore, let’s look at how to bleed the brakes on models 2110-2112 yourself, without help.
To do this, you will need to use one additional element - an aerator, which you can buy or make, and a rubber hose with ends on both sides for connection to the nipple.
A homemade aerator is a lid from a “classic” brake reservoir (without a built-in sensor), into which a nipple from a tubeless wheel is installed.
The essence of pumping yourself is very simple and it is done like this:
- The car is immobilized. A bleeding hose is put on the fitting of the brake mechanism that is being pumped;
- The aerator is screwed onto the brake reservoir, and one end of the hose is connected to it. The second one is put on the nipple of an inflated car wheel (for example, a spare tire);
- Unscrew the fitting half a turn. In this case, the air pressure from the spare tire will begin to squeeze out the liquid. All that remains is to monitor when liquid flows through the tube without air bubbles, and tighten the fitting;
This way all mechanisms are pumped. The air pressure of one wheel is enough to completely bleed the system;
But there is one nuance in this - the pressure supplied to the tank should not be very high (no more than 1 atm). Otherwise, there is a risk of the lid falling off or the tank being damaged.
Bleeding the brakes using the described methods is also applicable for more modern VAZ models - 2114-2115, Priora, Kalina. And all because the design of the brakes is completely identical.
REPLACEMENT
Some drivers don’t even know where to fill the brake fluid in the VAZ 2114 (even though the VAZ brake fluid reservoir is visible), not to mention the rules. DOT-4 needs to be added only if its level in the tank has dropped below the halfway point between the MIN and MAX marks. To do this, simply unscrew the tank cap and fill it to the top mark. The brake fluid volume should not exceed the maximum mark.
Do not under any circumstances mix products from different manufacturers and brands. This may lead to system failure, which will adversely affect your financial situation when contacting the service. Be sure to ask an expert how to add brake fluid.
In general, if all necessary conditions and rules are observed, everything is done quite simply. Any measures to normalize the operation of a car require certain tools and special clothing. This should not be forgotten, since contact with human skin of chemicals contained in fuels and lubricants is extremely dangerous to health.
But whatever one may say, in the quest for durability and reliability of your car there is nothing you can do. The acquired skills can be applied not only to the VAZ 2114, but also to other models of the domestic automobile industry. For example, the VAZ 2115 has an absolutely identical device.
( 1 rating, average 4 out of 5 )
How to bleed the brake system on a VAZ 2107 yourself
If the brakes do not work well, then while driving the risk of an emergency on the road increases, as a result of which all road users, as well as the driver and passengers, are exposed to danger. Therefore, it is necessary to ensure that the brake system (TS) functions flawlessly and to bleed it after repair and maintenance work to replace the working fluid or if air pockets form in it.
Reasons for performing the brake bleeding procedure
Bleeding is performed to remove air from the vehicle. This procedure is necessary after replacing the brake fluid (BF) during routine maintenance work or if it has changed color. Typically, on a VAZ 2107, a complete replacement of the TZ is done after three years. The procedure consists of stages: draining the old fluid, filling in new fluid and bleeding the brake system.
For the VAZ 2107, the manufacturer recommends using TJ DOT-4, its volume is 0.382 liters. It is recommended to add the same liquid that was previously filled. The TJ must meet the manufacturer's recommendations. It contains special additives that protect metal parts from corrosion. Over time, the liquid loses its properties; foreign particles enter it, which have a destructive effect on the elements of the system. These are several reasons why the TJ needs to be replaced. After which it is necessary to bleed the system.
In addition, pumping is mandatory:
- if parts were replaced or dismantled;
- after tuning;
- if the brake hoses are worn out, the vehicle is depressurized;
- The fuel fluid level in the tank has dropped below the minimum.
When the hoses are disconnected, air pockets may form in the hydraulic drive. The danger of its presence in a vehicle is that it makes braking unreliable. When the driver presses the brake, the brake pads on the wheel with air pockets in the circuit do not work, and it continues to spin.
You can tell that there is air in the hydraulic drive by the behavior of the brake pedal and the following signs:
- if you press it several times and at first it presses lightly, and then each time it becomes harder;
- the pedal stroke increases;
- the pedal often falls to the floor;
- braking distance increases;
- When braking, the car pulls away from the direction in which it was moving.
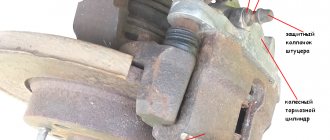
Bleeding is carried out using rolling fittings located on the brake units of each wheel. On the front wheels they are located on the caliper and covered with a cap.
In order to carry out the procedure correctly, you need to know that the vehicle of classic VAZs consists of two independent circuits. One includes the front wheels under the driver and passenger. In the second - the rear ones. If one of the circuits fails, the other continues to operate. If air has penetrated into one circuit, then you need to pump it out, but do not touch the other. This situation may arise when repairing the brake unit of one of the wheels.
Step-by-step instructions for the procedure
To carry out pumping work, two people will be needed. One goes down under the car, working with the brake system mechanisms. The other is in the cabin, pressing the brake pedal at the command of the person below. During work, you need to monitor the level of fuel fluid in the tank; it should always be at the maximum. If the level is below the minimum, air may enter the vehicle from the tank and the pumping procedure will have to be repeated.
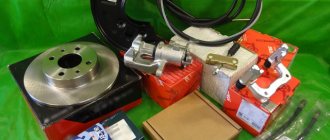
To work you need to prepare:
- a set of spanners and open-end wrenches;
- jack;
- special crimp type wrench for brake pipes of the system;
- anti-recoil devices;
- supports;
- a hose of the required diameter made of rubber, plastic or nylon;
- transparent container for draining waste;
- fresh TJ.
When pumping, a certain order must be followed. Bleeding activities begin with the wheels that are located farthest from the master cylinder (MBC), and then on other wheels as the distance decreases. Therefore, they pump the wheels one by one: first the rear ones - right and left, then they move to the right one in front and end with the left one under the passenger.
To bleed the brakes at the front, it is necessary to suspend the front wheels and dismantle them, since otherwise you will not be able to get to the fittings. To work on the rear brakes, you need to go under the car. Therefore, it is advisable to install it on an overpass, lift or inspection hole. Before bleeding, you should inspect the brake system for leaks. If the tubes are cracked or there is any mechanical damage, the damage must be repaired and worn parts replaced.
Let's sum it up
Tuning a car's brake system is a very responsible job. Unsuccessful modernization of the appearance of a vehicle or its interior will only affect the unpresentable appearance of the car. A mistake in upgrading your brake system could cost you or other road users your life. Take responsibility for modifications that affect the vehicle's braking system. Buy only certified high-quality spare parts from reputable manufacturers. Proceed to independently improve the brake system of your car only if you are completely confident in your abilities and capabilities.