The breathing valve, or breather, is designed to allow the car to communicate with the atmosphere. Its task is to release gases and equalize pressure in the internal and external planes. When the car's mechanisms are not working, it is this that allows air to penetrate into the cabin. And it performs these functions despite its location - on one of the axles, engine or gearbox. But it saves the corresponding mechanisms from malfunctions.
Engine breather
The breather valve prevents oil leakage from the crankcase. The breather releases air and gases that form the cylinders of the head unit. This happens due to the intake of air from the atmosphere after the driver stops and turns off the ignition. The breather also prevents dirt from getting inside the engine, which is why they are widely used on SUVs.
Like other mechanisms, breathers are prone to clog and accumulate dirt, as well as malfunction. Devices need to be checked periodically and measures taken for timely replacement. Operation of damaged or clogged engine breathers leads to deterioration in operating efficiency and excess pressure in the internal plane. The oil from the crankcase is just waiting for this, preparing its escape. And this absolutely cannot be allowed.
What is a breather for and where is it installed?
The main task of the breather is to reduce pressure in the crankcase. Since gases accumulate in the crankcase while the engine is running, they create high pressure over time. and if you do not bleed them off in time, the engine may stop working due to the high pressure supporting its pistons. In this case, the gas will begin to look for an exit route and will exit through any other hole. To prevent this, a similar valve is installed. In addition, the breather reduces the temperature inside the engine and provides ventilation. Therefore, directly by the operation of this unit one can judge whether there are problems with the operation of the engine. If there is a problem, gray smoke like exhaust may come out of the hose. In normal mode this should not happen. And clear and almost imperceptible smoke should come out of the unit. The breather is installed in the engine itself, or inside the structure of the rear and front axles, as well as in the gearbox.
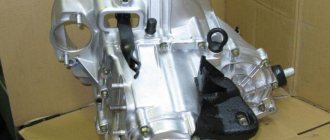
Breather at the checkpoint
All types of gearboxes must be protected from contamination. A dirty mechanism slows down its operation and makes it impossible to smoothly shift certain gears. The breather is installed on the crankcase cover.
A faulty transmission breather will not be able to withstand the increase in pressure inside the housing. This will lead to destruction of the bearings. During each inspection, clean the breathers and replace them if necessary.
How does it work and why should you clean it?
The functions of the breather, regardless of its location, always remain unchanged. Typically, such a device has a filter that prevents dirt, dust and moisture particles from entering the motor. In more understandable terms, the device allows the structural units to breathe and prevents the possible leakage of working fluids. As for the operating principle of the breather, since the oil in the crankcase heats up during operation of the power unit, this leads to an increase in temperature. Then the air begins to expand and creates pressure. This pressure must be relieved, otherwise the oil liquid inside will begin to flow out through the seals and seals. But when cooling, quite the opposite, the pressure in the crankcase quickly drops and air begins to escape through all the holes. To somehow prevent this, it is necessary to equalize the pressure on the motor. And this is done by installing a breather. Over time, dust and dirt accumulate in it, causing it to stop working properly. Because of this, problems begin with pressure and this leads to oil leakage. If the breather is very dirty, it must be replaced with a new one. but before installation, it is definitely recommended to clean it and clean its installation location.
More information about what a breather is will be discussed in this video:
Published: November 02, 2021
Difficult to eliminate causes of oil leakage from the gearbox
To eliminate an oil leak, you will have to spend time and sweat. The reasons require the participation of car repair specialists, but if you set a goal, you can cope without them.
Replacing oil seals.
If the obvious causes of oil leakage have been eliminated, but leaks continue to appear with enviable frequency, the seals are examined.
Special rubber seal in a metal frame. Serves to prevent leaks and oil on the moving elements of the engine and gearbox.
Long-term use of the oil seal wears out the rubber base. Oil pressure does not hold. If the oil seals have been replaced recently, you need to think about the quality of the oil used.
The replacement procedure is as follows:
- oil is drained;
- the wheel bearing mount is dismantled;
- the bolts securing the ball joint are unscrewed;
- the steering knuckle is retracted;
- the axle shaft is dismantled;
- remove the oil seal using a regular screwdriver;
- Before installation, the oil seal is lubricated with oil;
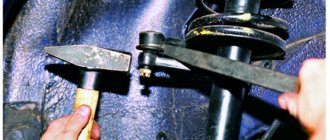
- Installation of the cuff is carried out by lightly tapping the hammer through the mandrels.
Dismantling
Replacing drive seals for VAZ 2109 and VAZ 2108 involves removing the drives and draining the oil from the gearbox , so we will need... Tools:
- Keys for seventeen and thirty (with a long knob);
- Container for drained oil (volume of at least three liters);
- Installation;
- Screwdriver;
- Tools for pressing in a new oil seal (hammer and mandrel)
Of course, in order to press in a new oil seal, you can use the body of the old one, but, believe me, this is not very convenient, so it is advisable to select the necessary mandrel according to the diameter of the oil seal, for example, by taking a suitable piece of pipe for this.
System assembly
After cleaning the breather is completed, you need to assemble the crankcase ventilation system. When installing the glass in place, you need to carefully align its tube with the seat. Next, a pin is screwed in, which is tightened with an open-end wrench to 13.
Before installing the breather cover, a paronite oil pan gasket is placed on the seat, which prevents gases from escaping from the system. After each disassembly of the breather, it is better to replace it, additionally treating the seating area with heat-resistant silicone, which will increase the reliability of the connection. The breather is put with a cut on the hole in the glass tube to form a channel for installing the oil level dipstick. A washer and a special nut with a rounded head are put on the stud, which is clamped with a wrench; when tightening, you do not need to pinch the nut so as not to strip the thread.
After this, the hose is put on the carburetor and the main hose. It must be inspected first, and if it is cracked, it is better to replace it with a new one to avoid excess air being sucked in. At the entrance to the air filter or in the hose itself, experts advise placing a special metal brush called a flame arrester.
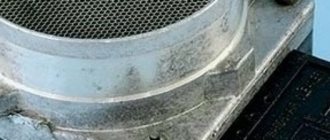
It retains oil well, which may be contained in crankcase gases and enter the air filter, clogging it. As a result, the quality of the air-fuel mixture decreases and engine stability is lost. This is especially important for cars with high engine mileage; used oil and emulsion are deposited on it and flow back into the crankcase. When choosing this part, it is better to consult with specialists so that the wire from which it is made is of high quality and does not break, getting into the crankcase.
Preventative work
Some motorists are wondering: why clean the breather? This is done in order to avoid problems with the operation of car components; it is necessary to clean the breather in a timely manner. Such actions will allow you to maintain the permissible pressure level, and as a result, stable and trouble-free operation of the car. It is recommended to carry out cleaning at every technical inspection (MOT), and in some cases even more often. The cleaning process itself looks like this:
- removal of pipes and hose. All pipes and hoses coming from the “breathing valve” are removed; in some models you will also need to remove the air filter housing;
- removing the breather cover;
- cleaning work. Now you can begin cleaning the valve cap and tube.
- installation work. Assembly is carried out in reverse order.
This is how cleaning is done. The procedure is quite simple, and you can do it yourself with your own hands, without the need to visit a service center.
Sources
- https://prometey96.ru/tyuning/sapun-kpp.html
- https://7gear.ru/news/sapun.html
- https://shokavto.ru/chto-takoe-sapun-v-avtomobile/
- https://AvtoNov.com/%D1%81%D0%B0%D0%BF%D1%83%D0%BD-%D0%B4%D0%B2%D0%B8%D0%B3%D0%B0% D1%82%D0%B5%D0%BB%D1%8F-%D1%87%D1%82%D0%BE-%D1%8D%D1%82%D0%BE-%D1%82%D0%B0 %D0%BA%D0%BE%D0%B5/
- https://kalina-2.ru/remont-vaz/sapun-korobki-peredach-vaz-2110
- https://avto-kontinent.ru/vesta/sapun-korobki-peredach-vaz-2110.html
- https://DriverTip.ru/osnovy/chto-takoe-sapun-v-avtomobile-kak-rabotaet.html
Why do you need to clean the valve?
The external conditions created during the operation of the breather valve often lead to the accumulation of dust and dirt in it, which interfere with its normal functioning. Because of this, excess or, conversely, insufficient pressure occurs, leading to oil leakage.
If situations arise when oil is thrown through the unit, first of all you should check whether it is clogged. To prevent oil from being thrown out, you need to remove the valve for cleaning or replacement.
The breather should be replaced with a new one in cases where it is too contaminated, and before installing a new unit, it is recommended to thoroughly clean the place where it is installed, which will avoid rapid contamination again. Breathers of other important components of the car also need to be cleaned in a timely manner to prevent car malfunctions.
Necessary tool
To clean the breather on a VAZ engine, check and replace the hoses, you don’t need any special skills or specialized equipment; a standard kit is enough. To complete the work you will need:
- set of keys No. 7-13;
- flat and Phillips screwdrivers;
- washing liquid, kerosene will do;
- container where washing will take place;
- rags;
- breather gasket;
- heat-resistant silicone-based sealant;
- if necessary, a set of new hoses will be required - separately for the carburetor and injector.
This tool can be found in any garage, so there are no problems with its selection. It is better to take rags that do not separate into individual elements, since during washing they can get into the engine.
Why is there smoke coming from the breather?
There can be only one malfunction of the breather: it began to poorly pass accumulated gases, comparing the pressure inside the engine with atmospheric pressure. But the smoke coming from it can say a lot:
- The cylinder oil scraper rings were stuck or worn out. Simple decarbonization using traditional methods or special chemicals will not help here, so you will have to disassemble the engine.
- Likewise, if one/several exhaust valves burn out. A simple compression test will help determine this.
- Oil seals. Just replace them when it's time or they show signs of increased wear.
- The shaft seals, which allowed oil vapors to pass through, were worn out. Change them without hesitation, preferably without shelving them.
- The oil in the engine is old and needs replacing for a long time. No comments: as practice shows, repairing the “heart” of a car is tens of times more expensive than replacing it.
- White smoke on a hot engine - coolant enters the lubrication system. You'll have to look for where exactly the leak is.
- Oil overflow. In an internal combustion engine, it is just as dangerous as underfilling: engine wear/fuel consumption increases significantly, so check its level with a dipstick on a level surface when the engine is well warmed up. Then you will see how well the technicians at the service station (or you yourself) performed its replacement/topping up.
- The oil is of poor quality/not suitable for the car/counterfeit. There is only one way out - replace it. Likewise, if you filled up with fuel at an unknown gas station: just don’t do it again.
- Finally, the breather itself clogged from time to time, not working at 100%. Simple cleaning and preventive maintenance will eliminate this.
An impressive list of different situations. And there is no doubt that if your car’s breather is smoking, you have definitely found your case among them.
Important
The breather is an important element that helps the car operate properly, but to prevent breakdowns it is recommended to clean or change it in a timely manner.
A faulty valve can lead to various problems:
- risk of gearbox leakage;
- rapid wear of synchronizers and much more.
Regular cleaning of the valve will help protect the oil from deterioration in its lubricating and protective properties, and therefore will extend the life of the iron horse for a long time.
Troubleshooting
The first thing you need to pay attention to is the color of the exhaust, blue or black smoke, a sign of burnt valves or problems with rings. Next, you should check the compression in all cylinders. The value on gasoline internal combustion engines should be within 11-13 MPa. Disconnect the pipes from the valve covers, air intake and breather
Assess the degree of contamination. If the pipes are very dirty or clogged with oil deposits, use gasoline to clean them or a special carburetor cleaner. Check the condition of the oil separator. Unscrew the required bolts to get to this unit. Remove the oil separator and assess its condition. If necessary, clean or rinse followed by drying. Inspect and, if necessary, flush the breather valve. There are situations when the valve gets stuck, resulting in exhaust gases entering the crankcase and creating excess pressure. Remove the part and wash it; in most cases, this will resolve the issue of squeezing oil out of the breather.
Helpful advice! To distinguish stuck rings from a burnt-out valve, it is enough to perform several manipulations. After checking the compression in the cylinders, determine the cylinder with the lowest value. Then inspect the spark plug of this cylinder; if the rings are lodged in this cylinder, the spark plug will be covered with a thick oil layer. If the valve is burnt out, the spark plug will appear normal without any major abnormalities.
Why does crankcase pressure increase?
Having noticed oil leaks in the engine compartment and/or a decrease in the oil level in the crankcase, it is necessary to accurately determine that the diesel engine is breathing. This can be done in the following way. It is enough to unscrew the oil filler cap on a warm diesel engine. If you notice bluish smoke coming from the throat, then the problem is obvious.
Cylinder piston group and cylinder head
The main reason that a diesel engine is breathing is the wear of the cylinder-piston group. During the operation of the internal combustion engine, scuffs form on the cylinder walls, the cylinders themselves gradually break and acquire a changed shape of the walls, and the piston rings wear out or break. As a result of heating, the thermal gaps between the piston and the cylinder walls become too large.
In addition to reducing the efficiency of the seal, wear of the rings and their coking are imposed, which deprives the rings of mobility. In such conditions, engine oil enters the combustion chamber abundantly, and the diesel engine emits blue smoke. Also, the gases formed during the combustion of the fuel-air mixture and the engine oil entering the cylinders actively fill the engine crankcase.
If the diesel engine is very worn out, then a major overhaul is necessary, which will mean boring the cylinders, replacing pistons, rings, etc. Accurate diagnosis of CPG problems requires measuring compression to determine the spread of indicators across the cylinders.
In the event that the diesel engine does not breathe much and the malfunction is only at the initial stage (wear of the cylinder walls is within acceptable limits), some auto mechanics resort to the method of decarbonizing the piston rings. This measure is considered temporary, since further long-term operation of the unit after decarbonization of the rings should not be expected. The best solution would be to replace the rings with new ones.
A diesel engine can also vent due to wear of valves, guide bushings, valve seals, etc. Similar to piston malfunctions and ring decarbonization, timing problems can only be effectively eliminated by comprehensive repairs. Replacing valve seals alone does not have a lasting effect.
Engine crankcase ventilation system
Second on the list of main reasons why a diesel engine is breathing is a clogged crankcase ventilation system. The symptoms of a decrease in the throughput of this system resemble wear of the CPG: increased consumption of engine oil, diesel smoking with blue smoke, etc. In some cases, it is possible to normalize engine operation and eliminate excess oil consumption by cleaning the breathers.
Easy to fix oil leaks from the gearbox
An attentive driver who cares for the car can quickly detect an oil leak. Measurements are taken of oil droplets on the asphalt surface. The appearance of oil indicates that there is a problem that needs to be solved. Ignoring the problem in the future will cost a lot of time and money.
Oil leaks appear on the surface of the gearbox housing. If you don't look closely, they are hard to notice. As the amount of oil increases, droplets appear.
After parking the car, small black oily puddles form on the asphalt. You need to drive the car onto a viewing hole or lift. It will make it possible to quickly find the location of the leak and fix the problem.
Loose nut on transmission oil drain.
A common cause of oil leaks, it can be eliminated in less than 5 minutes. When changing the oil in the gearbox, they were in a hurry and did not act carefully. After a while, a loose nut is discovered. Oil oozes through the drain hole and leaves marks on the road surface.
Vibration increases the leak, as the nut moves away more and allows more oil to pass through. Some unlucky drivers managed to completely pour the oil onto the ground during the day. If you don't notice the problem in time, you can end up with a jammed transmission.
The oil dipstick is not inserted correctly.
Drivers do not pay attention to the correct installation of the oil dipstick in vain. Often causes oil leaks. A skewed dipstick does not close the channel tightly enough. When heated, oil leaks out.
If leaks are found on the gearbox housing, you need to carefully inspect the position of the dipstick. To eliminate the leak, it must be corrected.
Reverse sensor.
It is mounted in the gearbox and causes oil leakage if not tightened sufficiently. The driver’s actions are the same as when the nut on the drain is not tightly tightened. You need to tighten the reverse sensor and all the leaks will stop.
Excessive amount of oil.
Experts say that overfilling the gearbox with oil is much worse than underfilling it. An excess amount of oil fluid creates excess pressure in a confined space.
The sealing elements of the gearbox receive additional stress. They cannot withstand the pressure of oil if they are worn out. Excess oil comes out. The problem can be solved by draining the excess amount.
Leaking through the lid.
The cause of the malfunction is wear of the sealing material. To eliminate oil leaks from the gearbox, change the gasket. If chips and cracks are found, use epoxy resin. Levels any damaged surfaces.
The above reasons can be simply and easily eliminated if they are detected in a timely manner. Does not require material costs.
Sealing element on the drive.
It is impossible to replace the seal on the drive yourself. The gearbox must be removed and special equipment is required. To carry out the work, contact service station specialists. A short video will tell you about stopping a leak on the way from the gearbox.
Oil leaks from the gearbox can be eliminated on your own. It is necessary to accurately determine the cause of the leak. Every driver is interested in solving the problem so as not to tempt fate and risk the transmission.
Changing the gearbox oil on a VAZ 21099
It should be noted that changing the oil in gearbox is one of the important points of car care. The oil ensures uniform lubrication of the rubbing parts of the box and also serves as a coolant, removing temperature from the heated surfaces of the parts.
The oil change in the gearbox on a VAZ 21099 should be done every 75 thousand kilometers or at least every four to five years. Do-it-yourself gearbox repair on a VAZ 2110 (photo, video. Note that 3.3 liters of oil can be poured into a 5-speed gearbox, and 3.0 liters into a 4-speed gearbox. The factory provides direct advice on using oil in the gearbox .
Recommendations:
— Reksol T (80W-85; GL-4) — Volnez TM4” (80W-90; GL-4) — Omskoil trans P (80W-85; GL-4/5)
Changing the oil in the gearbox , like changing the oil in the engine, is done “hot”, that is, immediately after a trip, when the oil is warm and in a more liquid state. This work is carried out on an inspection pit or a lift.
The upper mark on the dipstick is the optimal level of transmission oil in the gearbox; it is not recommended to pour above the indicated mark, since in this case oil may leak from the gearbox. The bottom mark on the dipstick is the minimum permissible level, after which it is necessary to add oil to the box. If this is not done or not noticed in time, you can cause irreparable damage to the gearbox parts, after which it will very soon fail.
How to clean the breather
Every caring car enthusiast carefully monitors the technical condition of his vehicle and tries to carry out minor repairs and preventive maintenance in a timely manner. For example, it is necessary to clean the breather as it becomes dirty, since it helps remove gases from the engine crankcase. At a car service center, they will ask you a considerable amount for this simple procedure. However, why pay for something you can do yourself?
You will need
- Cotton gloves, wrenches, screwdrivers, wire. polyethylene.
Instructions
1
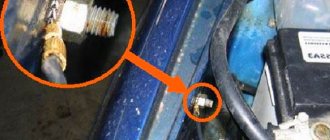
To begin, select the location where you will perform the cleaning procedure. If the weather is dry, then everything can be done right outside. But it’s still better to find a garage with good lighting. Set the car to the parking brake. Turn off the ignition. Open the hood and find the breather . To do this, you can use the operating manual for your car, which should describe in detail the structure of the engine compartment. Typically, the breather is a small square-shaped box to which two pipes are attached. One of the pipes connects the breather to the monoinjector, the second to the air filter.
2
Remove the upper air filter housing. Don't forget to turn off the power to the on-board power supply system. To do this, remove the negative terminal from the battery. This is necessary in order to avoid short circuits and electric shock. After removing the air filter, you will see the intake manifold, it needs to be removed. Under the intake manifold you will see a breather , which is usually attached to two bolts.
3
Unscrew the two bolts and carefully remove the breather . Remove the cover from it. Underneath it you will see an oil separator, which is secured with a pin. You need to unscrew the small nut on the stud itself, but not all the way, since it is impossible to put it back on without removing the pan. The tube needs to be cleaned. To do this, use a cleaning rod. It can be made from wire of the desired thickness. Examine the breather for cracks or other defects. There is a small brush at the end of the pipe that extinguishes the flame if there is insufficient compression. It also needs to be cleaned.
4
After completing all the procedures, you need to reassemble the breather in the reverse order and check its functionality. To do this, start the engine. Carefully remove the cap that covers the oil filler neck. Cover it tightly with a thin piece of polyethylene and secure with an elastic band just below. Polyethylene should not swell. Otherwise, it indicates the presence of pressure. If there is no pressure, then cleaning the breather was successful. A slight pressure can only be created when the accelerator pedal is pressed.