Purpose of the device
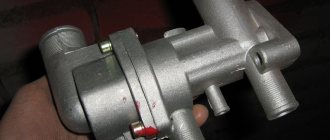
Thermostat for VAZ-2114 car
Essentially, a thermostat is a large valve whose task is to allow (or, conversely, not to allow) coolant into the car radiator .
When the car's engine has just started, it remains cold for some time, as does the coolant. During this period of time, the thermostat valve is closed, so that the coolant is directed in the so-called small circle. And when the engine temperature reaches 90°C, the valve in the device automatically opens and the coolant begins to circulate in a large circle and enters the radiator. Thanks to this operating scheme, the engine temperature is kept at a constant level, and overheating is eliminated.
Is it worth the bother?
Thermostat 21082 is a one-piece design, securely attached to the cylinder head. Fewer connections on clamps, no intermediate hoses - less chance of leaks.
In the future, replacing the thermoelement will require less manipulation - unscrew 3 bolts and disconnect 2 hoses. You can even get by by disconnecting one hose if you get creative. Replacing the thermoelement becomes much more convenient.
Another advantage is the reduced diameter of the bypass hole, which (as they say) affects the engine warm-up speed and increased flow through the heater, although logically the increase in flow is unlikely to be significant.
Well, the size of the thermostat frees up space in the area above the gearbox.
In addition, in the circuit with thermostat 21082, the expansion tank is included in a small circle, and not in a large one as in circuit 2108.
Reasons for replacement
As mentioned above, the thermostat is a valve, and therefore it can get stuck open, closed, or in between. This is the main reason for replacing thermostats on the VAZ-2114, and each case of jamming of the device is dangerous in its own way.
- If the thermostat valve is stuck in the closed position, this will cause the engine to heat up very quickly (especially when the car is used in the summer), since the coolant will constantly circulate only in a small circle.
- If the valve is open all the time, another problem arises: the engine will take a very long time to warm up to operating temperature. And in thirty-degree frost it will be almost impossible to warm up the engine, since the liquid circulates in a large circle all the time and simply does not have time to warm up to the required temperature.
- If the valve is stuck in an intermediate position, this can lead to engine problems.
How to check the thermostat on a VAZ 2114 and replace it
Before you begin troubleshooting, the thermostat must be checked. There are three verification methods that are recommended to be used comprehensively.
- You need to start the car and warm up the engine for 10 minutes. After opening the hood, check the upper and lower radiator pipes; they should be equally warm. If the pipes overheat, the thermostat does not work correctly (the valve is stuck in the intermediate or closed position);
- It is necessary to start the car and check the temperature of only the upper radiator pipe. The pipe should remain cold only until it is optimally warmed up (up to 90 degrees). If the pipe remains cold after reaching the optimal temperature, the thermostat is faulty (faulty thermostatic element, the valve remains in the closed position);
- It is necessary to dismantle the device, and then place the thermostatic element in a metal container filled with water. Gradually heating the liquid to the optimal temperature (85-90 degrees) watch how the valve operates. When heated to the specified temperature, the valve should open, but if the valve remains in place, then the cooling system will not work normally. This means that the thermostat is faulty and needs to be replaced.
Of course, the third method of checking the thermostat, which includes several steps, is the most effective and most labor-intensive. As a rule, instead of such a check, the thermostat is usually replaced. Taking into account the fact that the part is relatively affordable, it is easier and faster to replace the element, especially if the thermostat has not been changed before for 50-60 thousand km. mileage and more. The main thing is to purchase a quality product to replace it.
Please note that it is a good idea to check the new thermostat for functionality before installation. The third method discussed above is perfect for checking. The fact is that sometimes faulty thermostats are found among new spare parts. To avoid possible problems, testing the thermostat before installing it on the machine is highly recommended.
- Now let's look at how to change the 2114 thermostat yourself. Replacing a VAZ 2114 thermostat includes preparatory work, dismantling, installation and testing of the cooling system for functionality.
Necessary materials and tools: a new thermostat, a container for draining the coolant, a pair of clamps, a hose 45-60 cm long with an outer diameter of “19”, a tee, a set of keys.
Replacing thermostat 2114, algorithm of actions performed:
- Having placed the car on a viewing hole or raised it on a lift, wait until the engine cools down;
- use the “18” key to unscrew the air filter mounting screws;
- Using a screwdriver, loosening the clamps of the cooling system of the air duct of the throttle pipe and crankcase, unscrew the fastening screw of the bracket and throttle drive cable;
- Having disconnected the electrical connector, remove the rubber cushion of the filter housing from the hole in the bracket and remove the air filter;
- Using the “13” key, unscrew the fastening bolt of the ignition module to the clutch housing and to the block;
We also recommend reading the article on how to modify the cooling system of the Lada Kalina. From this article you will learn about ways to refine the Kalina SOD. - loosen the lower fastening bolt with the “17” key and move the module to the side;
- unscrew the plug on the block using the “13” key;
- Unscrew the radiator drain plug by hand and drain the coolant into a prepared container;
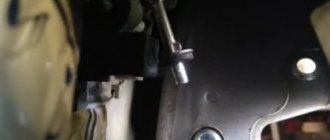
- dismantle the thermostat by loosening the four clamps of its pipes;
- Having disconnected the connector, use key “19” to unscrew the temperature sensor, and use key “13” to unscrew the fastening nut of the “mass” wire of the controller;
- unscrew two more nuts and remove the block of pipes;
- Install a new thermostat and reassemble in reverse order.
Troubleshooting
Before changing the thermostat, you need to make sure that it is the one that is faulty. The ways to do this are listed below:
- The engine starts and warms up for 10 minutes. Then the hood of the car opens, and the hand is carefully brought first to the upper and then to the lower radiator pipe. If the thermostat is in order, these pipes will not burn your hand and their temperature will be approximately the same. If the temperature of the pipes differs so much that it can be felt by a simple touch, then the thermostat is faulty.
- The engine starts, after which the hood immediately opens and the hand is brought to the upper radiator pipe. When the thermostat is working properly, this pipe remains cold until the engine reaches operating temperature, that is, about 10-15 minutes (in the warm season). After this time, the pipe heats up very quickly and noticeably. If this does not happen, the thermostat is faulty.
- And finally, the most time-consuming diagnostic method: the device is removed, placed in a container with water and a thermometer, after which the water is heated until the valve in the thermostat clicks. The temperature at which the valve operates is detected and based on it, conclusions are drawn about the operability of the device (in a working thermostat, the valve operates at a temperature of 90-95°C).
Tips before starting the procedure
- Before you begin removing the thermostat on a VAZ 2112, be sure to ensure that it has completely cooled down after operation.
- The thermostat is removed when it is replaced due to unstable engine temperature conditions (overheating, insufficient heating). To carry out this procedure, completely draining the coolant is not necessary.
- To check the condition of the thermostat, start the car engine and touch the lower radiator hose, at first it should remain cold, and only after the coolant temperature reaches about 90 degrees, the hose will begin to gradually heat up. If there is no such reaction to the manipulations performed, remove the thermostat from the car and check its functionality; if defects are detected, it must be replaced with a new one.
This is interesting: How to replace the battery in a BMW key fob
Which thermostat to choose
To answer this question, it is important to understand one thing: saving on this device is strictly not recommended. A faulty thermostat leads to engine overheating. And overheating entails a lot of problems, the elimination of which can be very expensive. There are 2 brands of thermostats for the VAZ-2114, proven over the years, the quality of which car owners always speak well of:
- LUZAR (Lugansk Automobile Radiator Plant).
Thermostat for VAZ 2114 from LUZAR - WEEN (Poland).
Polish thermostat from WEEN
It is strongly not recommended to buy Chinese-made thermostats for the VAZ-2114 (in particular, BAUTLER); you should also refrain from purchasing devices from PRAMO (Russia, Vladimir), despite the fact that Polish thermoelements are installed there. Both of these brands, although they work, are not durable.
Dismantling
First, remove the old thermostat, outlet pipe (part 2108-1303014-10) and 2 short intermediate hoses - all this will no longer be needed. Next you need to deal with the pump supply pipe. The 2108 has a pipe “with a hook”, and the 21082 thermostat requires a shorter pipe, “without a hook”. You can replace the standard pipe with a pipe from either a VAZ-2110 or a VAZ-2112 (part 1303055). It was not possible to find out exactly which model the pipe was needed from - there is a fair amount of confusion in stores. When purchasing, you should carefully look at the correspondence of the fasteners and pipes on the pipe, incl. long heater pipe on the right - their presence and direction may differ.
But there is another option: shorten the standard pipe without even removing it. To do this, you need to cut about 45 mm from the pipe. This can be done with a metal file (namely, a piece of a file, without a handle), without removing the pipe. This will be the most time-consuming operation, but quite feasible. To simplify this procedure, it is worth removing the expansion tank and adsorber. This is the option we will use. Looking ahead, I note that the option with a cut pipe works perfectly, including leaks. no in winter.
This completes the dismantling. You can clean the connections and check the hoses.
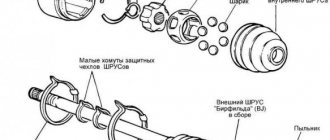
Springs
The design includes two springs. They help the valves “return” to their original position after the coolant has cooled, reliably isolating the two circulation circuits of the system from each other.
The thermostat itself is placed in a cylindrical housing with three pipes. Two are connected to different circulation circuits, the third to a water pump (pump).
Video showing how a thermostat works and is made:
Repair. Yes or no?
As a rule, when the thermostat fails, it immediately comes to replacing the element. But can it be repaired?
Homemade treatment method
In principle, this can be done. But you don’t always have to count on results. This is because the repair consists of applying several medium blows to the body using a simple screwdriver. Sometimes this allows the valve to open. If this method does not help, you have no choice but to replace it.