Replacing outer and inner CV joints on Lada Kalina
CV joint (constant velocity joint - approx.) or popularly just a “grenade”, is designed to transmit torque to the wheels of a car. CV joints can be internal or external, and the devices themselves are quite simple in technical terms and consist of a ball bearing that rotates transversely to its axis.
In the video, replacing CV joints on a Lada Kalina:
Failure of the CV joint on the Lada Kalina is a very common occurrence, and the main reason for its failure is torn anthers. Because, together with dust and water falling under them, the lubricant turns into thick mud, and it is no longer able to fully perform its functions.
Replacing the outer CV joint
In the process of replacing the outer CV joint
The work of replacing an outer or inner CV joint is not very difficult and can be done by any motorist who has at least once repaired a car with his own hands. And in order for the repair to be easier and faster, you need to prepare the following tools:
- Socket heads for “17” and “30”.
- Driver or ratchet.
- Extension for the wrench.
- Jack.
- Wheel chocks.
- Hammer.
- Vise.
Step-by-step disassembly procedure
After you are convinced of the malfunction of one or another CV joint, you can begin to work.
- First of all, we tear off the mounting bolts from the wheel and the hub nut, then we set the wheel chocks under the rear wheels. (To make it easier to tear off the nuts, it is better to use an extension for the wrench - approx.).
- We put the car on a jack and hang the wheel.
- We remove the wheel and, for greater reliability, place it under the car next to the jack.
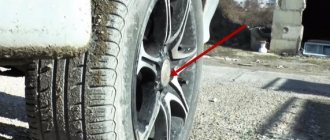
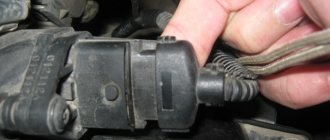
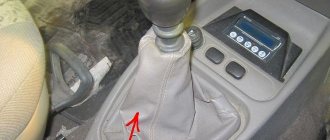
- Now that this picture appears before you, all that remains is to unscrew the 2 bolts that secure the ball joint to the steering knuckle.
Unscrew the bolts marked with a red marker on both sides.
CV joint VAZ. Lada grenade. Comparison of different manufacturers
They counterfeit everything related to the AvtoVAZ assembly line. Any part purchased at a car store can be a counterfeit...
BEWARE OF FAKE! CV joint LADA Image. features
CV Joint Review
(grenades) for VAZ 2108-2115.
Without causing strong blows, the CV joint will move out of place
If the internal CV joint is supposed to be replaced, then work 1 to 6 should be performed as well, after which, using a pry bar, we remove it from the gearbox and take out the entire assembly.
How do you understand that the CV joint boot needs to be replaced?
- Everything is very simple, you drive into a pit and check the boot, if there is no damage on its surface and the boot is “dry” (no traces of oil), you can safely continue driving from time to time, performing this simple check procedure.
- Sometimes problems with the CV joint boot manifest themselves in a different way, for example, during a sharp start, a single crunch or knock may be heard in the area of the front wheels. For some, a crunching sound occurs when turning the wheels while driving. In such cases, you most likely won’t get away with just replacing the boot and you will have to change the entire “grenade” assembly.
Well, let’s finish this brief excursion and move on directly to the troubleshooting process, but first, prepare the tool.
You will need:
- Jack, hammer, wooden block;
- Keys to “17”, “30”;
- Mount, spray can;
- Flat-head screwdriver, special pliers for installing clamps;
- New boot + CV joint grease, graphite grease, kerosene or similar flushing fluid.
Signs of CV joint failure
The first signs of a faulty grenade are crunching sounds in the area of the front wheel on turned out wheels when starting to move. When the fault is severe, noise appears at less significant loads.
The anther begins to crawl
In order to prevent such damage in advance, you should periodically inspect the anthers from the outside for cracks and integrity in general.
Diagnosis of the condition of anthers
To check the serviceability of the car's boots, an external inspection is carried out and the condition of the front suspension components is diagnosed.
If there is no damage to the upper shell, there will be no traces of lubricant leaks on the surface of the boot and the car can continue to be operated in the same mode. It is advisable to carry out diagnostics regularly, which allows timely prevention of premature failure of CV joint mechanisms. When the vehicle accelerates rapidly, extraneous noise may occur in the front wheel sector, which may indicate an internal malfunction in the suspension components and require urgent diagnosis and repair with replacement of faulty parts.
Some of the main reasons for the failure of CV joint elements are:
- poor-quality lubrication or lack thereof due to boot failure;
- the presence of defective parts in the CV joint mechanism, as a result of which the seal of the boot is compromised;
- potholes and pits that form on the roadway, which leads to damage to the protection of the mechanisms and suspension elements of the car;
- energetic driving style, which leads to increased load and premature failure of units;
- destruction or violation of the tightness of the anthers during vehicle operation.
Video about replacing a grenade boot:
On a note!
Constant velocity joints, which are sold in the store in sets, include grease, a boot and all the necessary clamps in their sets. Pay special attention to this fact so as not to overpay for additional spare parts and accessories.
I had to change more than one CV joint. Of course, I had to tinker with the first one for a couple of hours, since I didn’t really know all the subtleties, but I changed the subsequent ones almost with my eyes closed.
I bought a grenade for viburnum. The assembly includes the grenade itself, a finger guard and clamps. You can change it in an hour without rushing, it can be done faster. But why rush in such a matter?
"Lada Kalina" is a front-wheel drive car in which the engine and gearbox are located transversely relative to the body. The drive to the wheels is carried out through the main gear. Torque is transmitted through constant velocity joints (simply CV joints, or “grenade”). There are several of them - internal and external. Despite their reliability, these elements can fail. Well, let's look at how to replace a “grenade” on a Kalina, what tools are needed for this and what are the signs of a malfunction.
Replacement algorithm for Lada Kalina
- We install the car on a level area.
- We install wheel chocks under the rear wheels and “ turn on ” the handbrake.
- Loosen the wheel bolts.
We take a flat-head screwdriver and remove the protective cap located on the hub. Now we take off the hub nut. To loosen the hub nut you need a good wrench and a long lever. - Jack up the car and remove the wheel.
Hole for the jack in the diagram. - We unscrew the bolts that secure the ball joint to the steering knuckle.
Unscrew the upper bolts securing the ball joint. - Now you need to unscrew the hub nut.
Next, remove the thrust washer. The nut is visible. - To remove the outer “ grenade ” from the hub hole, you should turn the Kalina’s front wheels to their extreme position. See about replacing the front wheel bearing here.
- Unclamping the clamps, move the rubber boot to the middle of the axle shaft.
- We take the CV joint puller and dismantle it. Some car enthusiasts try to make do at this stage with improvised means, but it is better to buy a puller for 200 rubles .
It's easier. Factory CV joint puller. Homemade CV joint puller. We remove the CV joint using a homemade puller. - We remove the boot. We remove the old layer of lubricant from the outer CV joint, and then wash the part in gasoline. If the hinge shows serious signs of wear, such as chips and cracks, then it should be replaced. Serious play is also a reason for replacement . Old grease on the CV joint. Cleaned CV joint. New lubricant on the CV joint.
- We put a new boot on the axle shaft. Apply lubricant and install the part on the axle shaft. To do this, lightly strike the joint shank using a wooden hammer. As a result, a characteristic click should be heard, indicating that the part is in place. We clean the axle shaft from old grease. We put on a new boot.
- We put the boot on the hinge and secure it with clamps.
After fixing the clamps, we begin assembling the drive.
The boot replacement is complete. We carry out the final assembly of the unit.
Device
In terms of their design, the inner and outer CV joints are very similar.
- Half shaft.
- Clamp and boot.
- Clip.
- Hinge housing.
- Separator.
- Ball.
- Retaining and cone ring.
- Spring washer.
Thanks to this device, the elements are capable of transmitting torque to the wheels at an angle of up to 45 degrees (not only in the horizontal, but also in the vertical plane).
How to determine a breakdown?
The grenade is a ball bearing, the cages of which have transverse grooves. Due to this, the angle between the driven and driven axle shaft changes. Thus, the CV joint not only transmits torque, but also changes the angle between the axle shafts. In view of this, over time, it develops. In places where the parts do not fit tightly, backlash and extraneous noise are formed. In fact, this is accompanied by a characteristic crunch. It occurs due to large wear on the balls that move along the grooves. The crunch can appear both during straight-line movement and when turning. In the latter case, most likely, the external grenade of the Kalina requires replacement. This sign should not be ignored, since the bearing may fall apart at high speed.
Let's get to work. Dismantling the CV joint
First of all, put the car on the handbrake (or install anti-rollbacks). Then we remove the wheel bolts and hub nut. The latter may not be supplied, so we use an extension cord. Next, place the car on a jack, lift its front part and remove the wheel. Then we find two bolts that secure the grenade to the steering knuckle.
Now we twist the steering wheel to its extreme position (so that the disc looks out of the wheel arch). Pull back the steering knuckle along with the shock absorber strut. Next, remove the outer part of the hub with the external “grenade”. If it is tight, you can use a hammer. But you need to hit through a wooden block, otherwise the part will be seriously damaged.
Next (if it is an external hinge) remove the old boot and clamp. Now you need to get the “grenade” itself out of the hub. To do this, you can use a puller or hit the CV joint with a hammer. In this case, you need to rotate its axle shafts.
If it is intended to replace the internal “grenade” on the Kalina, all operations are carried out in a similar way. The only thing is that the part is removed from the box using a pry bar, without hitting it with a hammer.
Carrying out work to replace the boot
To perform the work of replacing the boot, you need tools and spare parts:
- new boot, graphite lubricant, liquid to remove contaminants;
- spoiler key;
- mount;
- keys for x 30, and for x 17;
- jack for lifting a car;
- hammer, screwdriver;
- special pliers designed for installing and replacing clamps.
We place the car on a level surface, fix its position using wheel stands and a hand brake. Next, we perform a set of operations, following a certain sequence:
- Using a wheel wrench, unscrew the wheel nuts (not completely). Using a jack, lift the car, unscrew the nuts completely and remove the wheel. When carrying out repairs in compliance with safety regulations, we install a metal stop for this purpose, which protects against injury in the event of a breakdown or failure of the jack.
- Using a screwdriver, remove the protective tip from the front axle.
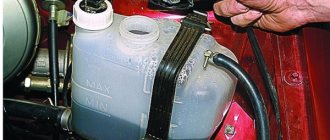
- Drain the oil from the gearbox. To do this, place a container to collect liquid under the drain hole and unscrew the plug. We wait some time until the oil is completely removed from the gearbox.
- We unscrew the two bolts securing the ball joint to the steering cam.
- To do this, unscrew the hub fixing nut, depress the brake pedal and perform the operation (to press the brake pedal, the help of a partner is required).
- We remove the thrust washer and use the steering wheel to set the wheel to its extreme position to ensure full access to the components, remove the outer CV joint from the hub, having previously secured the drive shaft using additional fasteners.
- Using a pry bar, we remove the inner CV joint from the gearbox.
- Next, fix the drive shaft using a clamp (in a vice or using clamps) and carefully remove the fixing clamps using a screwdriver.
- Carefully, so as not to damage, knock the inner and outer CV joints off the drive shaft.
- We clean the “grenade” from dirt and dust, wash it in kerosene, and diagnose the condition of the mechanisms. If all the mechanisms of the “grenade” are in full working order, we carry out operations to completely assemble the unit.
- Carefully install the new boot, introduce a special lubricant (graphite grease) into the outer CV joint housing and mount the drive shaft, moving it forward until it stops with full fixation (a click should sound). It should be noted that the volume of lubricant for the outer CV joint must be at least 40 cc.
- We remove the clamp from the outer boot, crimp it to remove the “air cushion” and tighten the clamps on both sides.
- We lubricate the CV joint with graphite grease first, replacing the inner CV joint ring and carefully placing it in the gearbox.
- We install the shaft into the semi-axial gear and carefully, using a wooden block, move it along the axis until it is completely fixed.
- We assemble the entire assembly by replacing the retaining rings and performing the operations in reverse order.
The process of replacing anthers on a Lada Kalina requires a number of complex operations and knowledge of work technology, so the best option is to decide to seek help from a service center to replace the CV joint protection. Qualified craftsmen will carry out the entire range of repair work in a shorter period of time in compliance with the manufacturer’s regulations. A correctly installed boot should be used for 2 years or provide a mileage of 40 thousand km.
How to extend the resource?
Typically, these bearings travel 250-300 thousand kilometers or more. They have a very durable construction. However, there are several factors that can significantly reduce their durability. This is the condition of the anther. It is because of this that water, dust, and sand get inside. As a result, the lubricant turns into a thick abrasive, which has a destructive effect on the bearing. How to prevent this? During operation, you should periodically check the condition of the boot on the CV joint. If it has cracks or tears, it needs to be replaced immediately.