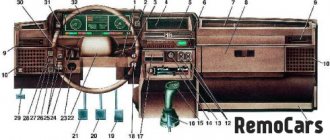
Why it might not work
The device is a simple device consisting of a metal rod and a socket to which wires are connected, where it is inserted. Inside the VAZ 2105 cigarette lighter itself there is a thin nichrome spiral. By pressing the button, the driver puts the device into working condition, the contacts close, and current begins to pass through the thread, heating it. After 15-20 seconds, the temperature reaches its maximum, the thermal relay is activated, returning the cigarette lighter to its place. Due to age or improper use, the device may break. If the cigarette lighter on a VAZ 2105 does not work, you should check the following places.
- The appearance of plaque. If liquid gets onto the contact points of the cigarette lighter, rust can appear, and long periods of inactivity can lead to the formation of oxides. This will disrupt the normal operation of the contacts and may also cause a short circuit. It is necessary to periodically remove the cigarette lighter, and then inspect its contact points for oxides or foreign deposits. If necessary, you should arm yourself with sandpaper or a file, with which you can remove the rust, reaching the metal base.
- Loose connector. Some VAZ models are equipped with an old-style cigarette lighter with a long tip. The plugs of modern electrical appliances are not designed for such a socket and quickly loosen it, bending the fixing tendrils. To repair, you need to pull out the rod and then tighten the elements inside the cartridge. Before this, you should de-energize the circuit by disconnecting the terminal from the battery or pulling out the fuse.
- Faulty backlight lamp. There is a light around the nest, making it easier to find at night. Age may cause the cigarette lighter bulb to burn out. In this case, it is necessary to dismantle and replace the faulty element with a new part.
- Burnt cigarette lighter coil. Due to constant heating and cooling, the thread located inside the cigarette lighter simply burns out, breaking the circuit. You can try soldering the ends, but this idea is impractical - it is better to change the entire cigarette lighter.
- Faulty fuse. Each segment of the vehicle's electrical network is protected by a special element. It burns out when the current exceeds the maximum value, protecting the cable insulation from melting and the cigarette lighter wiring from burning out. The maximum permissible parameter for this section is 10 amperes. Repairing such a fault is simple - under the hood of the car there is a mounting block where you need to get to and change the part.
- Short circuit. If the cigarette lighter fuses start to burn one after another, this means that there is a short circuit running through the network. We turn off the engine, turn off the ignition, and then measure the battery voltage. Then turn on the ignition and take measurements again. A difference in readings of more than 0.5 volts indicates the presence of a “short”. We arm ourselves with a tester and look for a faulty cord that should be replaced.
- Broken cigarette lighter wiring. The VAZ 2105 is an old car, the wires of which may fray or solder joints may fall off. It is necessary to inspect the cables - no melted insulation, creases or breaks are allowed. It is worth ringing the cords with a tester, setting it to measure resistance. All soldering points must be restored using a blowtorch and tin, and broken wires must be replaced with intact ones.
The fuse must have blown
An element can fail for various reasons. Most often this is a short circuit or connecting too powerful devices. This segment is protected by a 12 amp fuse. This means that the maximum power of the connected devices is 120 Watts (P=I (12 volts) *A (10 amperes). A hint that it is the protective element that needs to be changed will be a non-working socket for a portable lamp or a faulty clock.
Replacing the VAZ 2105 cigarette lighter fuse is simple - you need to get to the mounting block, pull out the element and install a new one. It is located under the hood, on the right side along the direction of the car (see photo). There is a diagram on the top cover, and inside there are tweezers that make it easy to pull out parts. We remove element number F6, rated 10 amperes.
The old-style mounting block contains ancient cylindrical fuses. New models are equipped with modern knife parts. When installing, be sure to install a fuse with a rating of 10 amperes. Otherwise, if a short circuit occurs, the cables will overheat, the insulation will melt, and there is a risk of fire in the wiring.
Fuse box VAZ 2104 2105
Where is the VAZ fuse mounting block located: 2104, 2105 (carburetor, injector)
The mounting block is located in the engine compartment on the right side and is attached to the front panel. The mounting block is closed on top with a lid on which symbols for the purpose of the relay, fuse numbers and the circuits they protect are printed. Most of the vehicle's electrical circuits are protected by fuses installed in the mounting block.
| F1 | 10 | Tail lights (reversing lights). Heater motor Warning lamp and rear window heating relay (winding) |
| F2 | 10 | Electric motors for the windshield wiper and washer pump. Windshield wiper relay |
| F3 | 10 | Spare |
| F4 | 10 | Spare |
| F5 | 20 | Rear window heating element and heating relay (contacts) |
| F6 | 10 | Cigarette lighter. Portable lamp socket |
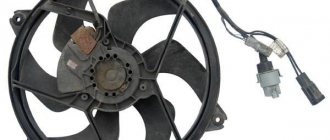
| F7 | 20 | Sound signals and relay for turning on sound signals. Engine cooling fan motor and motor switch relay (contacts) |
| F8 | 10 | Direction indicators in hazard warning mode. Switch and relay-interrupter for direction indicators and hazard warning lights in emergency mode |
| F9 | 7.5 | Generator voltage regulator (on vehicles with G-222 generator) |
| F10 | 10 | Turn indicators in turn signal mode and corresponding indicator lamp. Turn signal interrupter relay. Turn signal indicator Tachometer Fuel level indicator. Coolant temperature gauge. Voltmeter. Fan motor activation relay (winding). Battery charge indicator lamp. Indicator lamps for fuel reserve and parking brake activation. Warning lamps for emergency drop in oil pressure and insufficient brake fluid level. Indicator lamp for turning on the parking brake. Indicator lamp for covering the carburetor air damper (for a carburetor engine). Electric fan thermal switch. Carburetor pneumatic valve control system Generator excitation winding (generator 37.3701) |
| F11 | 10 | Rear lights (brake lamps). Body interior light |
| F12 | 10 | Right headlight (high beam). Winding of the relay for turning on the headlight cleaners (with the high beams on) |
| F13 | 10 | Left headlight (high beam). Indicator lamp for high beam headlights |
| F14 | 10 | Left headlight (side light). Right rear light (side light). License plate lights. Engine compartment lamp Indicator lamp for turning on side lights |
| F15 | 10 | Right headlight (side light). Left rear light (side light). Cigarette lighter lamp. Instrument lighting lamp. Glove compartment lamp |
| F16 | 10 | Right headlight (low beam). Winding of the relay for turning on the headlight cleaners (with the low beam on) |
| F17 | 10 | Left headlight (low beam) |
Connection diagram of the mounting block:
P1 — relay for turning on the heated rear window; P2 - relay for turning on headlight cleaners and washers; PЗ - relay for turning on sound signals; P4 - relay for switching on the electric motor of the engine cooling system fan; P5 - headlight high beam relay; P6 — headlight low beam relay; A - the order of conditional numbering of plugs in the mounting block blocks. The outer number with the letter “Ш” in the plug designation is the block number, and the inner number is the conventional number of the plug. The plugs of the blocks without color marking are conventionally shown in brown
Location of relays and fuses in the mounting block: 1 - relay for turning on the heated rear window; 2 — place for installing a relay for turning on headlight cleaners and washers (the relay is installed on some manufactured cars); 3 — mounting jumper in place of the relay for turning on sound signals (in a variant, a relay is installed); 4 — mounting jumper in place of the relay for turning on the electric motor of the cooling system fan (in a variant version, a relay is installed); 5 — relay for turning on the high beam headlights; 6 — relay for turning on low beam headlights;
F1-F17 - fuses (circuits protected by pin-type fuses are indicated in the table above).
Electrical equipment that consumes high current during operation is connected through relays that protect switch contacts from overload. To replace pin fuses and relays, special plastic tweezers are provided in the mounting block.
Fuses of different ratings are painted in different colors; In addition, the fuse is marked with a numerical value of the current for which it is designed (rated value).
The color of the fuse body and its correspondence to the rating 20A - Yellow 15A - Blue 10A - Red
7.5A - Brown
Self-removal and installation of the VAZ 2105 cigarette lighter
During the work process you will need a set of tools. To replace the cigarette lighter of the VAZ 2105 model you need:
- knife;
- screwdriver;
- gloves.
To repair the cigarette lighter you will need:
- soldering iron;
- pliers;
- insulating tape;
- tester;
- heat shrink tubes;
- spare parts.
The following are instructions on how to remove the cigarette lighter.
- Cigarette lighter VAZ 2107: device, fault diagnosis and replacement
- We open the electrical circuit of the car. To do this, you will need to open the hood and remove the negative contact from the battery. You can also remove fuse F6 from the mounting block.
- We dismantle the facing panel.
- Open the ashtray and unscrew the mounting screws.
- Disconnect the wire block.
- Remove the housing with the light bulb from the cigarette lighter. To do this, you need to squeeze the fixing antennae and pull up.
- Use a flat-head screwdriver to pry the socket out, removing it from its seat.
Now you can start repairing or replacing the VAZ cigarette lighter. Assembly and installation of the device follows the reverse procedure for removal.
Rules for safe use of the cigarette lighter
The device requires some care. To avoid the need for an unscheduled cigarette lighter replacement, you should adhere to the following rules:
- It is prohibited to connect devices with a total power of more than 120 watts (compressors for inflating wheels, kettles) into the socket;
- It is prohibited to install a fuse designed for a current greater than 10 amperes or install paper clips or wires instead of a protective element;
- It is not allowed to close the contacts with a screwdriver or other metal objects;
- It is periodically necessary to carry out preventive work, cleaning the contact areas from plaque or oxides, and bending the fixing tendrils.
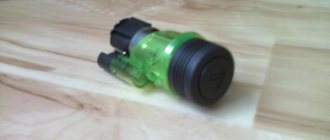
Installation of Euro cigarette lighter VAZ 2105
The standard format of the device is already outdated. The old connector does not fit well with the plugs of modern electrical appliances. Therefore, many owners replace it with a Euro-type cigarette lighter for the VAZ 2105. The cost of a device of this format is 600-900 rubles. It fits perfectly into a regular place and also provides reliable fixation.
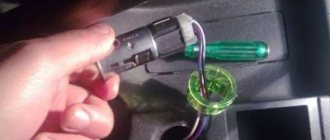
The replacement process is carried out as follows.
- Remove the terminal from the battery.
- We dismantle the facing panel.
- Open the ashtray and unscrew the mounting screws.
- Disconnect the wire block.
- Remove the housing with the light bulb from the cigarette lighter. To do this, squeeze the locking tendrils and then pull up.
- Use a flat-head screwdriver to pry the socket out, removing it from its seat.
- We install a new Euro sample cigarette lighter. If necessary, it is worth modifying the seat with a file, expanding it to the required diameter.
- We are making a connection.
- We assemble and check the functionality of the unit.
It is important to remember the connection diagram. In total, three wires come to the device: two pluses (heating the coil, backlight), ground, powered through the car body. A detailed video on how to remove the cigarette lighter on a VAZ 2105, replacing it with a Euro version is presented below.
New cars > Cigarette lighter >
Did you like the material? Share with your friends:
Have questions about car repairs? Ask them in the consultation section, to do this, click on the link below.
auto mechanic
- Replacing the cigarette lighter VAZ 2107
There are two ways to replace the cigarette lighter on a VAZ 2105, but before you start working with any electrical appliances on the car, disconnect the negative wire (ground) on the battery.
First method: First, you need to remove the installed cladding panel. Then open the ashtray, take a shaped screwdriver and unscrew the fastening screws - remove the ashtray from the central panel.
Secondly, having disconnected the electrical wiring, unscrew the round nut on the back of the cigarette lighter.
Thirdly, remove the spiral from the cigarette lighter and the body of the light bulb (to remove the body with the light bulb, squeeze and pull up, the antennae will shrink and it will come out), and then remove the back cover.
Fourth, use a thin flat screwdriver to remove the cigarette lighter and the backlight ring.
Assembly is carried out in reverse order. Install the backlight ring with the cigarette lighter. Then insert the back cover of the cigarette lighter, take the housing with the light bulb and, squeezing the antennae downwards, stick it in place. Install the spiral and fiber washer and, holding it, apply special thread glue to the threads - tighten the round nut at the back of the cigarette lighter. Connect the cigarette lighter wiring plug. Install the ashtray on the central panel - tighten the fastening screws and install the facing panel. Connect the negative wire (ground) of the battery. Check the operation of the devices and the cigarette lighter. All the work is done through the hole in the ashtray and therefore not everyone can get their hands through it.
There is a second method that is more labor-intensive, but also effective:
Remove the steering shaft housing by unscrewing the five screws using a flat-head and shaped screwdriver. Remove the plugs from the instrument panel (the dashboard where the speedometer is located) and unscrew the screws to remove it, disconnect all the wires and the speedometer. If there is a headlight hydraulic corrector, remove the handle from it, unscrew the fastening nut and remove it from the instrument panel.
Unscrew the screws and remove the lower parcel shelf on the passenger side and the storage compartment (glove compartment). Remove the handles from the heater control levers (to do this, at the junction of the handle with the lever, use a thin screwdriver or knife to bend the lower part of the upper and middle handles, and the upper part of the lower one) and remove the lining of the heater control levers. Remove the radio panel by unscrewing the fastening screws.
- We replace the cigarette lighter on a VAZ-2112 with our own hands: take it out and change it!
Remove the four screws securing the bottom of the center panel. And through the holes in the glove box and the dashboard, unscrew the four screws securing the upper part of the central panel. Having disconnected the top insert on the central panel, move the panel towards you and unplug the plug from the cigarette lighter.
Remove the cigarette lighter as in method one. Reassemble in reverse order. Install the cigarette lighter by placing the housing with the bulb and tightening the rear round nut. Connect the plugs to the cigarette lighter and begin assembling the central panel. Push the center panel into place and tighten the four screws securing the center panel through the holes in the glove compartment and dashboard. Also tighten the bottom four screws securing the center panel. Screw on the top insert of the center panel.
Secure the radio panel by tightening the fastening screws. Tighten the screws, replacing the lower parcel shelf on the passenger side and the storage compartment (glove compartment). Install the handles on the heater control levers and its trim. Headlight hydraulic corrector - tighten the fastening nut and install it on the instrument panel, place the handle. Connect all the wires and the speedometer of the dashboard, screw it on and install the plugs. Install the steering shaft housing.
Connect the negative cable of the battery, check the operation of all devices and the cigarette lighter. Whenever working with electrical equipment of a car, follow safety precautions!
If the cigarette lighter stops working, then the most likely reason is a blown fuse, of which there are several. The nest itself also often burns out. Or maybe a foreign object just got into the cigarette lighter. To find out what the problem is on your car, read the article.
When looking for the reason why the cigarette lighter does not work, always start by checking the fuses and then move on. The table briefly shows the locations where fuses are usually located on popular brands of cars. Although, of course, it is best to use the diagram specifically for your car.
| Automobile | Where to see |
| Toyota | The fuse corresponding to the diagram is marked CIG, most often 15A in the block under the steering column. |
| Ford (Focus, Fiesta) | The fuse is in the block under the glove compartment (for Ford Focus - F109 for 20 A). If you have two cigarette lighters and one of them works, the problem is in the socket itself, because there is only one fuse for both devices. |
| Renault (Logan, Duster, Megan) | Fuse F33 (15A) marked “notes” (because it is also responsible for the radio) in the cabin unit (on the left side of the dashboard). Also, Renault cars require tight contact between the plug and the “antennae” - the socket could burn out. |
| VAZ | Fuses in the mounting block under the hood, voltage at the cigarette lighter connectors, mounting block tracks. |
| Nissan | Fuses (usually 15A) in the interior block are marked CIG FUSE or CIGAR. In cars with a cigarette lighter and socket, there are separate fuses for each device - look at both. |
| Kia | 15A fuse in the mounting block to the left of the steering column, marked in the shape of a cigarette and labeled C/UGHTER. In cars with a cigarette lighter and socket, there are separate fuses for each device - look at both. |
| Chevrolet (Aveo, Lacetti, Niva) | A 15-20A fuse is in the block near the steering column (for Aveo T300 - F34, T250 - F13, for Lacetti - F19). |
Where are the fuses on other cars - look on our website, and you can find out the reasons in the comments
If the problem of a non-working cigarette lighter cannot be solved by replacing the fuse (it is intact), then you will find the answer below in more detail about universal methods for checking and troubleshooting. But to find out the reason why the cigarette lighter stopped working, figure out how it works and how it works. After all, it often intersects with the radio and even the clock.
How the cigarette lighter works and its connection diagram
The main element of the cigarette lighter is its socket, into which both heating elements and plugs of various devices powered by a 12V network are inserted. Ground from the battery is supplied to the socket, and the plug has a positive contact. When you insert a connector into a socket, the circuit is completed and power is supplied to the devices.
How does a car cigarette lighter work?
Cigarette lighter power circuit
If there is a backlight, it is powered by a separate wire suitable for the socket. Power is supplied through wires, which, on the one hand, are connected through a chip to the mounting block with fuses, and on the other hand, through another chip, to the terminals of the cigarette lighter housing.
To avoid short circuits, the cigarette lighter socket always has a fuse in the fuse box. It also has another additional fuse on the body. By the way, the backlight has a separate fuse.
An important point - why does the cigarette lighter constantly work when the ignition is off? This is not a malfunction, it is a feature of its connection according to the diagram. For example, this is how the cigarette lighter works in VAZ Classic, VAZ-2114, Lada Kalina, BMW E34-E36, Skoda Octavia Mk2, SEAT Leon I and some others. But this doesn't always happen.
The cigarette lighter does not work when the ignition is turned off in VAZ-2115, BMW E39 and newer, Volkswagen Touareg, Opel Corsa and others. By the way, judging by the forums, in the same LADA models, the device may or may not work when the ignition is turned off.
It is interesting that car owners are looking for both how to turn on the cigarette lighter constantly and how, on the contrary, to turn it off when the ignition is off. The first want to be able to charge devices or use electrical appliances without turning on the ignition, while the second don’t want to turn off the DVR every time. But, in order to prevent current leakage, after turning off the ignition, it is advisable to stop supplying power to the cigarette lighter.
Injection If
The engine in the VAZ is equipped with an injection system, and the ignition system follows the same principle.
Thanks to the sensors installed, the controller collects information and, having processed it, controls the operation of the power unit. According to a special program (determined) by firmware, the required amount of fuel for each cylinder so that the engine operates at its optimal level is determined. mode, injection time and spark formation for each cylinder. Based on the quality of combustion of the fuel assembly, the volume of fuel and the ignition timing are adjusted. On the 21041 VAZ injector, the electrical circuit is similar to the 2104 VAZ.
Locations of problems and reasons why the cigarette lighter stopped working
As can be seen from the operating diagram, the cigarette lighter will stop working if the contact breaks or deteriorates anywhere in the electrical circuit. Therefore, if the cigarette lighter does not work, the reason may be this:
- there are foreign objects in the cigarette lighter socket that interfere with contact or lead to a short circuit;
- the socket burned out as a result of a short circuit, due to the fact that there is no tight contact between the antennae and the plug inside - either the contacts became bent over time, or the plug was loose, or the contact was lost when driving on a bumpy road;
- the fuse in the fuse box has burned out;
- the fuse on the cigarette lighter housing has burned out;
- there is no voltage supplied to the cigarette lighter plug: the wires are disconnected or burned out;
- the tracks in the mounting block have burned out (a common problem on the VAZ-2114 and VAZ “Classic”).
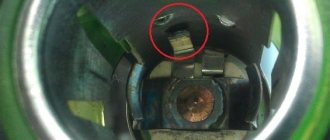
Burnout location in the cigarette lighter socket
This element is responsible for lighting the cigarette lighter, which often fails
The main problem with most electrical appliances that we connect to a socket is the lack of a clear global standard for plugs and sockets. This is why short circuits occur, which kill the cigarette lighter.
The second global reason is that many electrical appliances connected to the cigarette lighter (compressors, vacuum cleaners, refrigerators, etc.) consume current above 20A, while on average it is designed for 15-20A. So often the system can't handle it and burns out at its weakest point, which is usually the fuse.
An option to solve the problem is to cut off the cigarette lighter plug on powerful devices, attach crocodile pliers and connect directly to the battery.
By the way, it's a bad idea to connect the radio to the cigarette lighter. Although it does not consume as much current, it still takes some of it, and when connecting powerful electrical appliances, the likelihood of burnout is higher. Yes, and the radio may be damaged.
Also, do not exclude from the list of reasons the usual breakage of wires due to physical wear or vibration.
↑ Repair and replacement of the cigarette lighter on the VAZ-2107
Repairing the cigarette lighter, just like replacing it on a VAZ 2107, is identical to other domestic models due to the similarity in details, so the method can be used not only on this car.
First you need to figure out what tools you will need:
- screwdrivers of different types;
- pliers;
- small forceps or tweezers;
- soldering iron;
- a flashlight or lamp that can be moved;
- insulating tape;
- gloves.
↑ Repair sequence
- The first step is to de-energize the vehicle. This can be done by removing the negative terminal on the battery. Next, you need to find the car fuse socket inside the car and make sure there is good access to it. To do this, you can move the driver's seat back as far as possible, since according to the standard it is located in the central part.
- Next, you need to remove the cartridge from the socket and remove all unnecessary objects and fragments using tongs, and illuminate the surface with a flashlight during the process.
- After this procedure, you need to inspect the fuse itself, which can be found in several places: under the dashboard, hood or driver's seat.
- Once you find the fuse box, you need to find the right one. Its location is indicated in the operating instructions or on the hidden part of the hood.
- When you find the part you need, check its jumper. This is a very important part, so if it burns out, replacement is required.
If changing the part does not solve the problem, use another method.
- Remove the cigarette lighter, grab the edge with pliers and gently, without applying any force, pull it out to avoid damage to the wiring.
- Inspect the item. If a tear or poor quality connection is detected, use a soldering iron and repair the wires.
- You should also carefully inspect them for abrasions, which must be isolated.
- Once you are sure that the part is working properly, return it to its place.
All this information will help you if the cigarette lighter does not work.
What to do when the cigarette lighter does not work
As already stated at the beginning, the most likely reason for a cigarette lighter failure is a blown fuse. Therefore, we take out the manual for your car, look for the fuse diagram and find the one that is responsible for powering the cigarette lighter socket. It can be either separate or combined with other systems (often it is marked in the form of a cigarette or the inscription Cigar).
“Ring” the desired fuse with a multimeter or test lamp to see if it is working. If there is no device, and the fuse itself does not have obvious signs of burnout, try replacing it with a similar one and checking the cigarette lighter. If it works, change the fuse. No - we are looking further.
Never install a fuse designed for high current instead of the standard one. This will not make the cigarette lighter operation more fault-tolerant - the circuit will simply break in another, weaker place. And this can even lead to a fire in the electrical wiring!
Ringing cigarette lighter contacts using a multimeter
The second place that is quite easy to check is the cigarette lighter socket. Carefully inspect it for foreign objects or burn marks on the sides. Further actions will require disassembling the panel and removing the cigarette lighter socket, as well as the presence of a multimeter or at least a test lamp. Don't forget to first remove the negative terminal of the battery!
Disconnect the chip with the cigarette lighter connector from the body and ring the contacts (if necessary, turn on the ignition). If voltage is present, carefully inspect the housing. There may be plaque or oxide on the terminals and connectors of the cigarette lighter, which can be removed with a cotton swab dipped in alcohol (wait for it to evaporate before turning on the device). If this does not help and the socket is clearly burnt out, then only replacing it will help.
The next element that needs to be carefully inspected is the fuse on the cigarette lighter housing. Most often, it has a 90-degree curved shape and connects the cigarette lighter contacts. If it burns out, the problem can be solved using a soldering iron or replacing the housing. In most cases, it is enough to solder or screw a piece of wire (aluminum with a cross-section of 1.5 mm2), which will close the contacts and act as a fuse.
Do not use copper wire, it can withstand high currents. The wire should be aluminum or tin. Otherwise, there is a risk of burnout or fire in the electrical wiring!
If, when the fuse is working, the “ringing” of the chip with connectors indicates a lack of voltage in the network, then the problem is either in the wires or in the fuse mounting block, in which the conductive paths burn out. Moreover, in domestic cars it is most likely tracks, and in foreign cars it is wires.
To finally verify this, you can go in two ways:
- Disassemble the mounting block and inspect it for damaged tracks. Don't forget to take pictures of how it was originally. If the tracks are damaged, they need to be soldered.
- Find the electrical diagram of the car, find the connectors that come out of the mounting block to the cigarette lighter and ring them. If the voltage goes out and the cigarette lighter does not work, you will have to change the wire, which is quite difficult. If there is no voltage, the problem is in the mounting block.
What to do if the cigarette lighter on VAZ cars does not work?
Since the cigarette lighter socket most often refuses to work for owners of domestic cars, below are some useful tips specifically for VAZs.
Start by inspecting the fuse. It is located in the mounting block in the engine compartment - the exact location can be seen in the diagram of your model:
- VAZ-2104, 2105, 2107 - F6 (8A/10A)
- VAZ-2115, 2114, 2108, 2109, 21099 - F7 (30A) or F4 (20A)
- VAZ-2101-2103 and 2106 - F1 (16A)
- VAZ-2110 and all “family 110 - F6 (15A)
- Lada Kalina and Granta - F20 (15A)
- Lada Priora - F13 (15A)
- Niva, Lada 4x4 – F14 (16A)
- Vesta - F41 (20A)
- Largus - F19 (10A), F20 (7.5A) and F38 (15A)
- Xray (XRAY) – F33 (15A)
Ringing the cigarette lighter fuse using a homemade tester on a VAZ 2107
To determine if the cigarette lighter is faulty on a VAZ, ring the block (black - minus, red - power supply plus, white - plus when the lights are on)
If the fuse is working, also check if there is voltage in its socket.
By the way, often the cigarette lighter fuse is also responsible for other electrical appliances in your car (for example, a heater fan, a washer motor, a light in the glove compartment). Therefore, if several devices fail at once and you know that they are “hanging” on one fuse, this is definitely it.
The next step is to check if there is power at the cigarette lighter terminals. If your cigarette lighter only works when the ignition is on, turn the key in the lock. When the multimeter does not show 12 volts, then the problem is most likely in the tracks of the mounting block. Disassemble it and solder the burnt tracks. Well, if the multimeter shows that there is power, you need to change the cigarette lighter housing itself.
What to do if the cigarette lighter light does not work
As mentioned above, the cigarette lighter light has a separate fuse and a separate wire to supply current to the light bulb or LED. Therefore, first check the corresponding fuse, and if it is ok, disassemble the cigarette lighter and check the wire - most likely it just fell off. There is nothing to burn out here, so the problem can only be in these two places.
Content
The name “car cigarette lighter” is extremely outdated; the time when it was used for its direct and sole purpose has passed. In a modern car