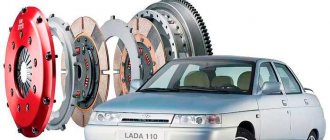
On all cars produced by the Russian automaker AvtoVAZ, including the most popular model in our country, the Lada Priora, the clutch is activated thanks to a mechanism called a clutch cable. This special mechanism is very important in the car control system and is sometimes called a clutch. Those car owners who prefer to carry out replacements and repairs in the car in a timely manner and with their own hands will be interested in studying this material, in which we will tell you about this device and how the clutch cable is replaced and other nuances.
About working on the clutch cable on LADA Priora
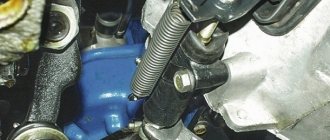
Initially, on domestic passenger VAZs with a rear-wheel drive system, the clutch was engaged thanks to an ordinary hydraulic system. The principle is exactly the same as that of the brake drive: all the pressure from the main cylinder is supplied to the so-called working cylinder. Only modern cars, such as, for example, the Lada Priora we are considering, received a front-wheel drive system; the specialists of the automobile manufacturer abandoned this principle of operation of the device in question, which greatly facilitated maintenance. The company has developed a reliable and very simple system for engaging a car clutch using a cable, now it is the main one in the entire system. The principle of the rocker arm, so to speak, is applied here, that is, when pressing the lower part of the corresponding pedal while sitting in the car, its working part, located at the top, passing through the rod (the so-called base), certainly begins to go in a completely different direction, plus everything else at this time she pulls the cable straight and, of course, behind her.
The second end of the cable is located on the drive fork of the clutch system. When the pedal is pressed, the clutch is released, thus directly enabling shift/on. transfer.
The principle of operation of the flexible drive of the Priora coupling
On the first models of Russian VAZ passenger cars, with rear-wheel drive, the clutch was engaged using a hydraulic system. That is, as with the brake drive, when the pressure from the master cylinder is transmitted to the working, actuating mechanism. When developing a new series of VAZs with driving front wheels, this scheme was abandoned. A simple and reliable system for engaging the clutch mechanism using a special cable was developed. The principle of the rocker arm works here. When you press the lower part of the pedal, the upper working area, through the base (rod), goes in the opposite direction and pulls the cable along with it.
The other end of the flexible connector is attached directly to the clutch drive fork. When you press the pedal, the clutch disengages, making it possible to engage or change gear in the box.
Clutch cable device in Priora
In order for the drive to work properly and stably, the core (cable) is located inside a special casing, completely fixedly fixed. As mentioned above, one end of the cable is attached to the clutch fork, as you understand, on the gearbox, and the other end is located in the cabin near the pedal. Each end is equipped with a fastening device. The ends are very different from each other, and it is simply impossible to confuse them in any way. There is also a rubber coupling; it is installed in the body in the hole where the cable goes into the compartment where the engine is located from the car interior.
So, the device consists of the following elements:
- In duplicate, fasteners for the casing.
- Clutch cable.
- Fastening element for fork.
- There is a special loop for the pedal.
- Rubber casing to protect the interior opening.
As you already understand, the core is located inside a hard shell, where it moves under the influence of return springs and the pedal itself. Thanks to this, its stable operation is ensured.
Priora diagnostic connector
Priora doesn't start well when hot
How does an automatic cable tensioner work?
In the release drive on the VAZ 2170, there are no gaps as a concept, hence the name - backlash-free clutch. The ratchet mechanism serves to compensate for the working length of the cable as the driven disk linings wear out
To understand the process, it is important to accept the following data:
- During operation, the driven disk wears out and its linings become thinner - as a result, the release bearing and basket springs shift towards the gearbox.
- Accordingly, the fork at the place where the cable is attached moves towards the radiator.
- The spring located on the bushing of the adjusting mechanism is compressed at this time and tightens the clamps of the cable tip.
- As a result, the tip is pulled out of the driver, due to which the wear of the disc linings is compensated.
For those who don’t yet know how to adjust the clutch on a Priora themselves, it is important to take into account the moment when the linings are new. In this case, when releasing the pedal, the ratchet bushing will only lightly touch the bracket without releasing the clamps
Therefore, the toothed tip of the cable will not move relative to the housing.
What are the main faults in the Priora clutch cable?
When the clutch cable on a Lada Priora is already in a state close to failure, or even possibly has failed, the driver will immediately feel it. When an attempt is made to engage the clutch in order to shift or engage a gear. Main types of breakdowns:
- The drive fastener to the pedal or probably the fork is broken. Always at such a moment the pedal will fall to the floor.
- The cable is disheveled. In this case, it is almost impossible to press the clutch pedal.
- The cable has broken. In this case, the pedal also falls freely.
All this indicates that it is time to conduct a thorough check of the drive on the Lada Priora. Each of the above malfunctions indicates that the clutch cable needs to be replaced and everything can be done even with your own hands. There is no point in replacing individual parts.
If you need to service your all-wheel drive, then you need to contact specialists and they will carry out preventive work for you; a car with all-wheel drive requires constant monitoring of the units.
Malfunctions and their symptoms in the clutch drive of front-wheel drive VAZs
If the clutch cable is in poor condition, or has already failed, this is immediately noticeable when you try to engage the clutch to operate the gearbox. The most common breakdowns are:
- break of the cable itself;
- ruffling of the clutch core body;
- failure of the drive fastener to the fork or pedal.
If the fastener or cable breaks, the pedal falls freely, and if the core becomes ruffled, on the contrary, pressing becomes very difficult. If these signs appear, it is necessary to urgently check the drive.
Changing the clutch cable on a Priora
As we said, replacing the clutch cable in your LADA Priora is possible with your own hands, the most important thing is to know how to change it correctly. Read more about this.
To replace you will need the following tools:
- The keys are ordinary 8“/17“.
- Pliers/screwdriver/pry bar.
The replacement begins with dismantling the old drive, and you need to start from the interior of the LADA Priora. You will have to do everything with an assistant. Algorithm of actions:
- Slowly release the clutch fork. In this case, an assistant removes the cable fastening bracket from the pedal.
- Unscrew the fastening of the casing near the pedal. Use key 8 for this.
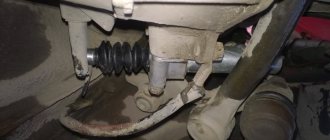
- Let's move on to the engine compartment, and using a screwdriver you should carefully pull out the seal there and pull the cable out there.
- We disconnect the negative terminal of the battery, since the work will be carried out next to the starter drive.
- Remove the air filter. Access to the cable fastening is now open.
- Using a 17 key, we easily release the shell latch. Thus, the core will be weakened and the tip in the fork at the point where the clutch is engaged can be freely removed.
- Remove the casing from the groove. This is all that is required for the drive to become free.
- Let's go to the salon. Let's start installing the new device. At this stage, the assistant must pull the cable from the engine compartment into the passenger compartment. Before starting installation, lubricate all open areas of fastening the tips and the core itself.
- We place it properly in the cabin, secure the tip mechanism, of course, to the pedal.
- Attach the casing.
- We press out the fork and attach the clamp directly to the fork.
- We put it in the place where the casing is supposed to be fastened, directly on the gearbox. Using a 17 key, we adjust the tension of the device in question.
- We fix the seal that was previously removed from there in a special hole in the passenger compartment.
- We put a device such as a car air filter in its rightful place.
Step-by-step instructions for replacing the clutch
First you need to remove the gearbox (see removing the gearbox)
1. In order to maintain balancing during installation, mark the position of the disk housing in relation to the flywheel (see gallery below).
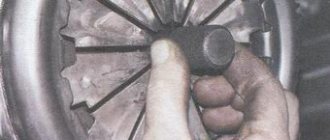
2. Find a hole in the clutch pressure plate and mount a mandrel there. If suddenly you don’t have a mandrel, you can dismantle it without it, you just need to hold the clutch driven disc when removing it.
3. Unscrew and remove the 6 bolts that connect the flywheel and the clutch pressure plate housing. Using a screwdriver, try to fix the flywheel without allowing it to rotate. When you tighten the bolts during installation, do it gradually, moving from one bolt to another and making no more than one turn of the wrench at a time.
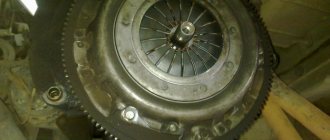
4. Dismantle the clutch housing with the pressure plate.
5. The driven disk is dismantled together with the mandrel.
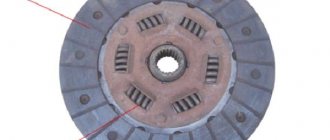
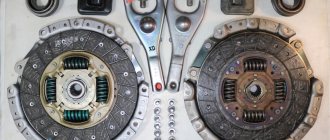
6. Check the condition of the driven disk and replace it if you notice the following defects:
• presence of cracks on its parts; • the rivet heads are recessed by less than 2 millimeters and the rivet joints are weakened; • the surface of the friction linings is oily; • damper springs in the hub sockets are broken or loose; • disc runout exceeds 0.5 millimeters; • visible warping of the disk has been detected.
7. Carefully examine the surface where the friction of the pressure plate and flywheel occurs. If visible signs of wear, overheating, deep scratches, nicks and scuffs are detected, we replace the defective components.
8. Check the condition of the pressure plate. If the following defects are present, replace it:
• cracks on the disc spring; • in places where there is contact between the clutch release bearing and the spring petals, visible wear is noticeable; • the contact points between the clutch release bearing and the spring petals are located in different planes.
9. Inspect the compression spring support rings. The presence of signs of wear and cracks is unacceptable; in this case, the pressure plate assembly will have to be replaced.
10. Before installing the clutch, it is necessary to check the rotation of the driven disk along the splines of the gearbox input shaft. If there is any jamming, remove it or replace the defective parts.
11
When installing the driven disk into the pressure plate housing, make sure that the protruding hub part is directed towards the pressure spring.. 12
The driven disk is installed using a mandrel.
12. The driven disk is installed using a mandrel.
13. When installing the pressure plate housing, place the part on the three alignment pins, screw in and tighten the bolts that secure the housing and flywheel together (evenly from one bolt to the other, no more than one turn per pass).
14. We take out the mandrel.
15. Install the gearbox.
16. We adjust the clutch, not forgetting to install its lower end on the gearbox.
At this point, the replacement of the clutch on the Priora is completed, road tests can be carried out sovetyavto.ru
Installing a new element
You need to start assembly from the Priora's interior, although you can only feed the cable from the engine compartment. When it is already placed in place in the cabin, attach the cable end compensation mechanism to the pedal. Attach the casing. Then, pressing the plug, secure the clamp for the plug.
Having installed the housing mount on the gearbox in place, use a 17 key to adjust the correct tension of the device.
Attach the rubber seal to the hole in the passenger compartment and replace the air filter. That's it, replacement of the flexible clutch drive is done.
In the video, the process of dismantling the Priora clutch cable:
Tens clutch adjustment
The VAZ 2110 car needs mechanical correction when replacing the clutch disc or cable. The duration of activities to adjust the VAZ clutch takes only a quarter of an hour with a minimum of tools: a ruler and two open-end wrenches.
When performing adjustment work on a VAZ 2110 car, the control check criterion will tell you how to adjust the clutch. This is the pedal stroke, determined by the distance from the floor carpet to the fixed placement of the lever. The reason for adjustment actions is the pedal stroke is greater than 160 mm. Even a novice car enthusiast can easily notice when the pedal level becomes higher. An experienced driver immediately identifies non-specific operation of the drive.
To do this, you should follow a number of sequential techniques in accordance with existing recommendations:
- Under the hood, you need to loosen the lower cable end holder.
- By turning the adjustment part, you should reach the size of the test limit (stroke) from 12.5 to 13.0 cm.
- Perform verification, which consists of three consecutive presses on the lever.
- Remeasure the distance.
- If the last measurement is within the specified range, you can tighten the locknut.
Once again, please note that adjusting the “ten” clutch is within the power of a novice young car enthusiast. The given methodology, compliance with all the above recommendations will lead to a confident, fast and reliable result.
A minimum of tools and time classifies such work into the category of simple repairs.
The clutch cable transmits force from the pedal, when pressed, to the fork. The fork presses on the bearing, which acts on the petals of the diaphragm spring. As a rule, the clutch cable on a VAZ 2110 is replaced if it breaks or is greatly stretched. The reason is often the operation of the car in extreme conditions. This problem occurs on “older” cars (with good mileage), which the owners drive almost all year round. However, this can also happen “suddenly”, quite unexpectedly and for unknown reasons. The cable can also “sour” if the machine is used extremely rarely. You can replace the clutch cable on a VAZ 2110 yourself. This is not a complicated operation and does not require any professional tools or specific knowledge from you, although only basic technical skills, a standard tool and a little patience. Our instructions will help you.
How to install
Before installing a new cable, you need to thoroughly lubricate both the bushing and pin on the pedals. The plastic composition Litol-24 is best suited for this.
Then the end of the cable is threaded into a hole located in the bulkhead of the engine compartment on the passenger compartment side of the car so that it ends up in the engine compartment. The rubber cover is also tucked in there.
The gear tip driver is put directly onto the clutch drive pin and secured with a bracket.
The end of the shell is secured with a nut to the pedal bracket. Make sure that the fixation is secure. It is unlikely that anyone will like to, if something happens, climb there again due to a poor-quality connection.
Next, under the hood, the lower part of the shell is stuck into a special hole on the gearbox bracket.
The leash is screwed onto the end of the cable (there is a thread there) - the latter should protrude approximately one turn outward, but no more.
Now comes the time to adjust the clutch drive. Upon completion of this process, the pedal is pressed all the way two or three times and then the setting is repeated.
The working surface of the tip driver must be treated with the above-mentioned lubricant.
All that remains is to make sure that the entire mechanism is now working properly and install all previously removed parts in place.
You can learn more about the process in the video below: