Repair of voltage regulator relay on VAZ 2107
Usually the fact that the VAZ 2107 has a voltage regulator is remembered when a problem arises with charging the battery.
To be completely precise in the definitions, the voltage relay comes to mind immediately as soon as it turns out that, despite the presence of charging, the battery is almost completely discharged. Let's take a closer look at why a voltage regulator is needed in a VAZ 2107 car. Without going into the intricacies of electronics, the voltage regulator is designed to regulate the voltage at the generator output depending on the engine operating mode. It is quite natural that as the speed changes, the voltage level also changes. And if it drops to 12 volts or lower, the battery stops charging.
Therefore, if you suspect a malfunction in the VAZ 2107 charging system, you must first check the voltage at the battery terminals. This can be done using a regular voltmeter or multimeter (tester). In normal mode, the voltage should be approximately 13-14 volts. If it falls below 13, you should pay attention to the relay; it may need to be replaced.
Depending on the type of generator used in the car, the regulator can be internal three-level and external. The internal one is built into the generator and is usually used in VAZ 2105 and 2107 cars, while the external one is used in earlier classic models and is located in the engine compartment on the left arch.
Depending on the type of regulator, replacing it has its own characteristics. Replacing the external regulator is no problem. Using a size 8 wrench, unscrew the two fastening nuts and disconnect the wires from terminals 15 and 67. The new relay is installed in the reverse order. After checking that the wires are connected correctly to the terminals of the regulator, and that its body is in reliable contact with ground, you can start the engine and measure the voltage again to ensure that the fault has been eliminated.
The internal three-level one is somewhat more difficult to change due to limited access to the generator. But, despite this, the task is quite doable even without removing it. Replacing the regulator, as in the case of an external one, comes down to disconnecting the wires and unscrewing two mounting screws using a Phillips screwdriver. After this, the relay is removed from the generator housing. Installing a new regulator occurs in the reverse order. After assembly, the voltage level is checked.
It should be noted that the regulator is not always replaced due to its failure. Recently, more and more often, car enthusiasts have resorted to replacing the generator along with the relay from an old model to a new one. This kind of tuning becomes possible thanks to the complete interchangeability of both models. The reason that prompts car owners to take such a step is the high efficiency that distinguishes the three-level regulator from the standard one.
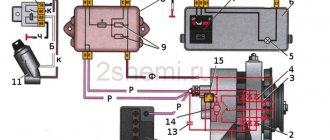
New type relays provide the required voltage level in automatic mode. Plus, it has a wider adjustment range than the standard one, so the battery receives an optimal charge. Under such conditions, the service life of the battery is significantly increased. In the schematic diagram of the electrical circuits of the VAZ 2107 shown below, the relay is indicated by the number 7.
Types of devices on Priora
The regulator installed on the Priora does not cope with its functions at peak loads. If the car has an air conditioner, then in the summer the electrical voltage often sags and the battery does not charge. Therefore, many drivers decide to replace the standard device.
Three-level
A replacement option is to install a three-level voltage regulator on the BATE Priora generator. The device allows you to select one of three operating modes:
- The minimum one, which provides a generator voltage of 13.4 V, like the standard one. The mode is suitable for the warm season.
- The second mode allows you to output 14.3 V and is used in cases where conventional electrical voltage is not enough.
- The maximum mode is suitable for use in winter. It allows the generator to produce 14.8 V.
For the BATE 90 A generator installed on the Priora, a three-level regulator is available that can replace the standard one without additional alteration or adjustment.
Remote
Installing a three-level regulator in its original location is not always effective. It is located in close proximity to the engine and gets very hot, which affects performance.
This problem can be solved by installing an external voltage regulator for the Priora generator. This is a three-level device, in which, unlike the standard one, the brush and working units are made separately and connected by conductors.
The brush block is installed in its usual place, and the regulator is fixed in any convenient accessible place to the vehicle's ground.
Thermally optimized
Any regulator lowers the charging voltage as the temperature rises. This is necessary to prevent the electrolyte from boiling in the battery. But the trouble is that the unit and the battery are located in different places under the hood. The device gets very hot and reduces the voltage, regardless of the temperature of the battery.
Replacing the voltage regulator on a Priora. Photo source: https://www.drive2.com/l/9306556/
The thermally optimized model does not have this drawback. It includes a temperature sensor, which is installed on the positive terminal of the battery. It maintains the required charging voltage depending on the temperature of the electrolyte, and not the unit itself.
Checking the VAZ 2107 voltage regulator relay
If you suspect a malfunction, you should check the voltage directly at the battery terminals. If the voltage is below 13 or greatly exceeds 14 volts, there may be several reasons:
- voltage regulator relay malfunction;
- generator breakdown;
- poor contact in the electrical connections between the battery, alternator and relay.
The serviceability of the VAZ 2107 charging relay can be checked by disconnecting it from the vehicle’s on-board network. This is easy to do with the external one - just remove a couple of terminals from it and unscrew the nuts securing it to the body using a size 8 wrench. It is more difficult to dismantle the internal relay, but the operation is quite feasible without dismantling the generator. To do this, you need to unscrew a couple of screws securing the relay to the generator housing.
There are three reasons for a relay malfunction:
- poor contact of the relay with the terminals of the brush holder (relevant for new types of relays);
- breakdown of semiconductors;
- open circuit in the device.
To check the VAZ 2107 relay-regulator, you need a voltmeter or test lamp and an adjustable current source with a voltage of 12-22 volts.
To check, you need to connect the minus of the power supply to the relay ground or terminal “W” (depending on the type of relay), and the plus to terminal “B”.
A voltmeter or test lamp must be connected to the brushes or relay output. If the relay is working properly, when a voltage of 12-14 volts is applied, voltage should appear at the output (brushes) (the control lamp lights up). When a voltage of 16-22 volts is applied, the lamp should go out. If the lamp is constantly on, then the relay is broken. If it does not light up regardless of the input voltage, it is broken. In both cases, the relay must be replaced, since it cannot be repaired.
Important: the reason for the lack of charge voltage may be wear or “sticking” of the generator brushes. The brushes must protrude from the brush assembly by no less than 5 mm. With an external regulator relay, this indicator is controlled separately, after disassembling the generator.
Symptoms of a problem
Signs, when they appear, you need to check the voltage regulator relay of the Priora 115A generator:
- after turning on the ignition, the control light does not light up;
- The battery indicator is constantly on, indicating a lack of charging;
- The brightness of the headlights depends on the engine speed;
- the car does not start well;
- At high speeds the dashboard indicators go out.
If the voltage regulator of a Priora generator with air conditioning fails, the battery may not be charged at all or may not be recharged. Both options are bad for battery life.
Replacing the VAZ 2107 voltage regulator relay
If the external relay of the VAZ 2107 generator breaks down, you should replace it with a new one. If the cause of the breakdown lies in the brushes, only the brush assembly must be replaced.
The old internal relay-regulator can be replaced with a new “three-level” one, which provides more reliable voltage stabilization, taking into account the temperature conditions and the load on the generator.
They are called three-level because of three pre-configured adjustment modes that can be switched manually. The switch itself is installed separately from the relay, in a place convenient for the driver and protected from moisture and dirt.
When installing a new relay regulator, you need to pay special attention to the quality of the electrical contacts. If necessary, it is necessary to clean the terminals and nuts securing the external relay to the housing.
To avoid a short circuit, connect the ground wire to the battery only after installing the relay and power wires.
How the relay works
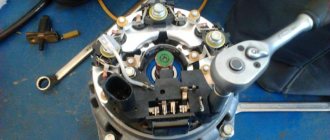
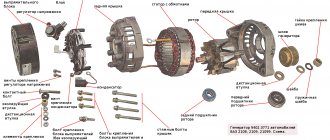
This device on the VAZ-2107 (both carburetor and injector) is located in the same housing as the brush mechanism.
Its main purpose is to stabilize the voltage coming out of the generator. Not so long ago, relays made in the form of an electronic board were sold in stores. It had one drawback - a relatively short service life. Such devices could not be disassembled and were simply replaced with serviceable ones when they broke down.
Modern analogues are slightly smaller in size and use a semiconductor. The old type of relay can no longer be found. The new version is in no way inferior to it functionally and is also capable of reliably regulating voltage in the range from 13.2 volts to 14.8. Exceeding the last value when measured with a tester on the battery clearly indicates a breakdown of the relay.
Signs of brush failure on a VAZ 2107/VAZ 2105 generator
In the event of a generator malfunction, the vehicle's electrical system provides a breakdown indication. When the generator is faulty, the battery lamp icon lights up. But you need to take into account that the cause of the breakdown may be a banal failure of the fuse in the circuit , therefore, after checking the fuse, you must further continue troubleshooting by checking the brushes, rectifier, and voltage regulator.
To check the voltage regulator, you need to connect a voltmeter to the brushes. We connect the “plus” from the 12V battery to the regulator terminal, and connect the “minus” to the “ground” terminal. If there is no voltage, then the regulator is defective and requires replacement.
Sometimes a malfunction or imminent failure of the brushes is indicated by a disruption in the current supply to the car's power supply : the light of lighting fixtures and headlights disappears or dims, the cigarette lighter or radio stops working, the stove stops heating, or the battery discharges too quickly.
What to do if the voltage relay fails?
It happens that the relay fails at the most inopportune moment, when you still have a drive home and the battery is not charging. The battery capacity in economical mode can ensure fairly long engine operation, which will allow you to get to the repair site without any problems. Below we will provide a list of recommendations that will help you drive, as they call it, “on battery power” and not stall.
- If the battery is overcharged, the relay must be disconnected from the circuit. To do this, the contact wires are removed from it and left hanging. In the case of the “ten”, it is enough to unplug the plug with the wire from the generator brush connector. Thus, battery charging is turned off, and further movement will no longer harm the battery.
- Many experts suggest going the other way - turning off the generator excitation winding . To do this, remove the corresponding fuse. However, this can be done if you know where the fuse is located.
- If the battery is weakly charged, then there is practically no reason to panic. To get to your destination, you need to maintain high speeds in order to, at least a little, bring the voltage value to the nominal value. to maintain the speed at 3000 rpm for a few seconds using the gas pedal This will prepare the battery for the next start.
- Avoid using music, power windows, headlights (especially high beams), and other electrical devices unless their use is absolutely necessary. This will save battery power well.
Tips for replacing generator brushes VAZ 2107/VAZ 2105
If you are sure that it is necessary to replace the brushes, then you can change them yourself and without removing the generator. To do this, turn off the power to the battery, unscrew the two screws of the brush assembly holder and change the assembly. In another case, when it is not possible to unscrew the bolts or you need advanced diagnostics of the serviceability of generator parts, it is necessary to remove the generator.
It is forbidden to start a car generator with a disconnected battery. This will lead to a short-term increase in voltage at terminal “30”, as a result of which the parts of the rectifier and the vehicle’s electrical network will become unusable.
To replace the brushes you will need the following tools:
- ring wrenches for “8”, “13”;
- ratchet;
- a set of nozzles “for 13”, “for 10”, “for 17”; "at 19";
- flat and Phillips screwdriver;
- penetrating fluid WD 40;
- vice (if needed);
- new brushes for the VAZ 2107 generator.
The price of brushes VAZ 21013701470 is 34 rubles. Their analogue from UTM with article number HE0703A is 120 rubles.
The price is valid for Moscow and the region for summer 2021.
A problem in the power supply system is indicated by the battery charging arrow. This indicates that when the engine is running, the battery is not charging well.
The voltmeter showed a voltage of 11.2 volts. Ultimately, suspicion falls on the generator.
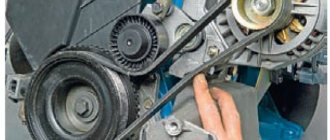
Let's start the renovation. First, remove the terminals and remove the battery.
Using a 17mm wrench, unscrew the nut and remove the adjusting bar.
We move the insulating cover, use a “10” wrench to unscrew the nut securing the wires at terminal “30” of the generator and disconnect the wires.
Disconnect the wire block from terminal “61” of the generator.
Using the socket “19” we unscrew the nut of the lower mounting of the generator.
Remove the drive belt from the generator pulley.
We knock out the bolt and remove the bushing. Please note that in this case the generator will be supported on a bracket.
We remove the generator from the car by lowering it down between the bracket and the front axle beam.
And here is the culprit of the “long journey”: a screw with torn edges.
We install the generator in a vice and use a screwdriver to unscrew the two brush holder bolts.
Reasons for replacement
Relay replacement is needed in the following cases:
- The brushes are worn out. By the way, this is the main reason. The fact is that due to their wear, contact with the relay is lost, so due to lack of power, the generator will stop working.
- A breakdown is observed in the circuit, which leads to an increase in voltage in the system.
- Wire breaks causing loose contacts.
- Damage to the housing or fastenings. This is not something to joke about, as it can lead to an unwanted short circuit.
Relay replacement
Note: It is usually black and is attached to the generator with a yellow wire.
- Disconnect the negative terminal of the battery.
- Unscrew the two bolts securing the generator.
- Remove the yellow wire going to the relay from the generator.
- Remove the relay. Examine it carefully. If the brushes are worn out, replacement cannot be avoided.
- If any of the wires are broken or there are holes on its surface, then you can only get by by replacing them.
Note: you can simply insulate them without even replacing them with new ones. Although the relay is inexpensive - only 70 rubles.
- Check the new voltage regulator, and then attach it to the generator.
- Reconnect the yellow wire and battery terminal.
As noted earlier, you can replace the relay with your own hands. The main thing is to familiarize yourself with the work process in advance so that questions do not arise later. To do this, you can find photos in various auto repair magazines. It’s much easier to use videos, of which there are many on the Internet. Our instructions will also help in this difficult matter. But the price of home repairs will not exceed 100 rubles.
Source: masteravaza.ru
Voltage regulator VAZ 2107 - purpose and first signs of malfunction
The voltage regulator is designed to automatically maintain the current strength so that the voltage generated by the generator is within specified limits, regardless of the rotation speed of the generator shaft (from the engine speed) and the current consumption of the car's electrical network. In VAZ 2107 cars, as a rule, an electronic voltage regulator is installed on the generator.
It is extremely rare that some models may come across an old-style device - a relay regulator. They were installed on generators 37.3701, produced before 1996, and on G-222. First, the device is tested on a running car. To do this, you need a voltmeter with the ability to measure DC voltage. The device must be equipped with a scale for values up to 15–30 V and have an accuracy class of at least 1.0. After starting the VAZ 2107 engine, it is allowed to run with the headlights on for 15 minutes at medium speed.
Then the voltage at the generator output is measured. To do this, the positive probe of the device touches terminal “30” on the generator, and the negative probe touches the ground (generator or car - it doesn’t matter, it’s the same thing). The voltmeter should show a voltage in the range of 13.6–14.6 V. If the measurement result is higher or lower than specified, and the vehicle is experiencing systematic overcharging or undercharging of the battery, then most likely the regulator is faulty and needs to be replaced.
Generator brushes - why are they needed?
Quite often (especially in older models) there are cases when, with a sharp increase in driving speed, various seemingly inexplicable things happen: the light of the dashboard or headlights dims, the cigarette lighter and (or) radio work intermittently. Drivers who have not been hardened by many years of experience in the cold lake may mistakenly think about burnt fuses, wiring, or shorted devices. It can take a whole day or more to work through all these versions. But what will be the driver’s surprise when the true cause of the malfunction becomes clear, that the whole essence of the problem is due to some small pieces of black metal called generator brushes.
Based on 9th or 8th grade physics lessons, everyone knows that any generator must include two main parts, one of which is movable (rotor), and the second, correspondingly, stationary (stator). Each part has a copper (in most cases) winding. Under the influence of magnetic force, the rotor begins to rotate, powered by electricity through the armature and two other metal parts. And they are called generator brushes. Due to the constant impact of friction, all parts gradually wear out due to the constant rotation of the rotor. This happens in any case, regardless of the quality of the material of the parts (and it is really strong).
How to determine the malfunction?
If, while warming up the car, you begin to notice strange actions on the dashboard (the voltmeter readings change greatly with minimal engine load or the battery charging light comes on), then this can only mean one thing - the alternator brushes are worn out and need to be replaced.
In some cases, a good warm-up of the engine allows you to “extinguish” the indicator. At the same time, the car drives on the autobahn quite calmly and normally, without any signs of malfunction. But you shouldn’t be such an optimist, because your car may break down at the most inopportune time. Don't forget to check the condition of the alternator winding and belt, although the absence of sparks and smoke suggests that the brushes are the cause of the breakdown.
When is it time to change generator brushes?
The main signs of brush failure on a generator:
- spontaneous shutdown of electrical appliances while the engine is running;
- decrease in brightness or blinking of control lamps and standard lighting equipment;
- voltage drop in the on-board network during operation of the power unit;
- the appearance of extraneous sounds (rustling or squeaking) when the generator is operating;
- turning on the control indicator for lack of charging (the lamp is located in the instrument cluster);
- rapid battery discharge when the car is moving.
Methods for replacing brushes
Unit repair is carried out using 2 methods:
- with equipment removal;
- without dismantling.
The method for restoring the unit depends on the layout of the units in the engine compartment and the condition of the threaded connections. If there is a coating of rust and oxides on the steel elements, it is recommended to remove the electrical machine.
The parts are treated with a special liquid, otherwise the edges of the nuts will be licked off or the body of the bolt will break.
Before replacing the brushes on the generator, you need to prepare:
- wrenches or sockets (size and type depend on the car model);
- screwdrivers with flat and Phillips blades;
- a set of new parts (selected from the catalog depending on the modification of the electric machine);
- a bottle of WD-40 liquid, which allows you to unscrew dirty or rusted threaded connections.
This is interesting: Power steering hums when cold or constantly: causes and repair of power steering
On a removed generator
Algorithm for servicing a unit using the example of a VAZ-2113 car with an 8-valve power unit:
- Stop the engine, engage 1st gear and tighten the parking brake lever.
- Open the hood and disconnect the negative cable from the battery housing (it goes to the car body).
- Loosen the bolt in the lower support.
- Disconnect the patch cables.
- Unscrew the drive belt tension adjuster nut, and then use a mounting spudger to carefully move the generator towards the engine block.
- Remove the drive belt, unscrew the bolt securing the tension bracket to the cylinder block.
- Unscrew the bottom bolt holding the electrical machine to the motor.
- Place the equipment on the workbench and remove the plastic cover, which is held in place by latches.
- Remove the voltage regulator housing, which is secured with Phillips head screws. The unit is attached to the windings using a quick-release block.
- Remove the brushes; parts must be replaced if the remaining length of the graphite elements is less than 5 mm.
- Install new parts and reassemble in reverse order. Adjust the belt tension, and then start the power unit and check the operation of electrical devices. If an on-board computer is installed on the car, the device shows the voltage in the on-board network.
Removing the alternator on other vehicles may require removing the air filter housing or air ducts.
On some foreign-made machines, automatic tensioning devices are used; the body of the electrical device is rigidly bolted to the cylinder block. The owner needs to loosen the belt tension and then remove it from the pulley. On Toyota vehicles, the electrical components are covered by a metal casing secured with nuts.
Under the cover there is a brush block, a diode bridge and a charging control unit (equipped with an aluminum radiator). After removing the brushes, the collector rings are inspected; if there is wear on the parts, you will need to remove the rotor to correct the defect. After assembly and installation, the voltage in the on-board network is checked with the engine turned off and running.
Checking the removed voltage regulator
To clarify the condition of the regulator, it must be removed. It is better to test the device complete with brushes and brush holder. This will allow you to immediately detect:
- poor contact between the terminals of the brush holder and the voltage regulator;
- breaks in the output conductors of the brushes.
Electronic devices are produced already assembled with a brush holder and one-piece brushes. The relay regulator will need to be connected to the removed brushes.
A voltmeter or a 12 V lamp with a power of 1–3 W is connected to the brushes of the device removed from the generator 37.3701. For the regulator from the G-222 generator, the connection is made to terminals “B” and “W”. The “plus” of the power supply is connected to the terminals “B”, “C” (when they exist), and the “minus” to ground. First, a voltage of 12–14 V is applied, and after that – 16–22 V. A sign of the device’s serviceability will be the lamp lighting up (deviation of the voltmeter needle) in the first case and going out (zeroing the voltmeter) in the second.
When the lamp lights up in both cases, this means that there is a breakdown in the device. If in both cases the lamp does not light, then there is no contact between the regulator terminals and the brushes, or there is a break in the device. Another cause of improper voltage regulation can be worn or stuck brushes. They must protrude from the housing of the electronic device or the brush assembly of relay regulators by no less than 5 mm.
Replacing a relay in a VAZ 2109 generator - couldn’t be easier
Relay - regulator assembly with brush holder
All car enthusiasts are very familiar with the problem when in the morning their favorite car suddenly does not start, and the reason is completely banal, a dead battery, and the most annoying thing is that it is completely new. This nuisance is associated with a problem in the operation of the generator and its parts, the most important of which and requiring regular checking is the relay-regulator. As a rule, replacing the VAZ 2109 generator relay solves this problem for a long time, since charging the battery, the operation of the electric generator and the car’s power supply system, and the operation of all electrical appliances depend on its operation. Our instructions will help you cope with this task yourself.
Purpose of the generator and relays in it
The electric generator in the car is designed to:
- To obtain electrical energy from which the battery is powered
- When the normal operation of a car's electric generator is disrupted, the battery begins to discharge, and you won't be able to drive for long after that.
- It happens when the battery is powerful enough to drive you home, but in the morning the car won’t start.
- The electric generator is located under the hood of your car and is powered by a belt drive.
- There are a number of reasons for the breakdown of an electric generator, including worn out brushes, a faulty charging relay, a broken diode bridge and jammed bearings, as well as a break in the circuit of one of the windings
The voltage regulator (relay - regulator) serves:
- To maintain the voltage in the on-board network of the machine within the required limits under any operating modes, such as changes in the rotor speed of the electric generator, surges in electrical load, changes in ambient temperature
- In addition, it performs such additional functions as protecting the elements of the generating set from operation in emergency modes and from overloads, and ensures automatic inclusion of the power circuit of the electric generator or the excitation winding in the on-board network of the machine
Generator check
It is necessary to check the car generator for the VAZ 2109 to find out the cause of the malfunction:
- If there is extraneous noise in its operation, the bearings of the electric generator shaft are most likely worn out.
- Reduced voltage at the “output” of the electric generator means wear of the brushes (see VAZ 2109: replacing the generator brushes yourself) or low tension of the drive belt
- An increase or decrease in voltage at the “output” may be the consequence of a malfunction of the diode bridge of the electric generator
To perform initial diagnostics of faults, you just need to follow these simple procedures:
- Using a voltmeter, we check the voltage at the battery terminals. When the engine is running and the electric generator is working, the voltage at the battery terminals should range from 13.8 volts to 14.5 volts
- Turn on the engine and place your palm against the body of the electric generator to detect vibration. When the wear of the bearings increases, the vibration that is transmitted to the housing of the electric generator will be easily perceptible, and it is simply impossible to confuse it with other extraneous vibration
- We check the tension of the electric generator belt: with the engine stopped, press the belt with your finger - the deflection under the influence of your finger should not be more than 1 - 1.5 centimeters
Before removing the electric generator itself, in order to avoid unnecessary and unnecessary work, first remove the relay located on the body of the electric generator with your own hands and check the condition of the brushes and the relay itself in particular:
- Removing the relay does not require removing the generator from the engine
- The relay in the generator is located at the rear, and is attached to it with just two bolts
- To unscrew them you will need a Phillips screwdriver.
- The bolts should be unscrewed carefully, otherwise you will drop their crankcase protection, and getting them out will become an additional problem
- To finally remove the relay you will need to disconnect the wiring with the “female” contact
Checking the relay status
After removal, you must immediately check the functionality of the relay - the voltage regulator, as well as the brush holder and, just in case, the capacitor removed from the generator:
- To carry out the test, you will need a power source with the ability to switch (change the value) of the voltage
- For example, a charger for your battery will do
- A standard voltage test light will also come in handy.
- We connect the control light to the brushes of the relay-regulator
- Then we connect the voltage to 12V, connecting the minus to ground, and the plus to the terminal of the relay - voltage regulator, as in the photo below
- The indicator light should light up
- Now we increase the supplied voltage to 15-16 Volts
- The indicator light should then go out
Such a test will show us if the light did not go out when the voltage increased, or if it even came on in the first case, then replacing the relay on the VAZ 2109 generator with brush holder assembly is inevitable.
Connection diagram for power supply and test lamp to the relay-regulator to check its serviceability
If everything is in order with the relay-regulator, all that remains is to check the condition of the brush holder, to do this:
- It is necessary by pressing your fingers to first check the ease of movement of the brushes themselves in their seats (grooves), and then measure the amount of protrusion of the brushes
- This value must be no less than 5 millimeters
- Marks from various mechanical damages - deep scratches, chips, cracks - are not allowed to appear on the surface of the brushes.
- Brushes with defects, damage, or that do not correspond to the permissible length should be replaced (separately or assembled with the relay, if the price suits you)
Brushes with defects
We complete the test by identifying the condition of the capacitor (if necessary). To check, we need a megohmmeter or a regular multi tester turned on in resistance measurement mode up to 1-10 MegaOhm:
- Turn on the device, which will show the resistance value tending to infinity
- Then connect the leads from the tester to the capacitor, observe at the moment of their connection, the resistance should decrease, and after that the resistance again tends to infinity
- If you observe this phenomenon, know that your capacitor is working properly
- Otherwise, buy a new one and replace it
- Install the generator relay back into the VAZ 2109
This completes the check of the relay-regulator, everything is as simple as shelling pears, just in case, you can familiarize yourself with the video material on this topic.
Replacing the voltage regulator VAZ 2107
If the regulator is faulty, the brushes are worn out or stick, then the device must be replaced. It cannot be repaired. For a relay-regulator in case of brush failure, it is sufficient to replace only one brush assembly. Usually they change it to a new electronic one, but you can install a three-level one, like 67.3702-02. They provide better voltage stabilization than standard regulators, taking into account the ambient temperature and vehicle operating conditions.
They are called three-level because they contain 3 voltage regulation modes. Their selection is carried out manually with a switch on the regulator, which is installed separately from the generator itself in a convenient protected place. The device is connected to the generator by wires through a brush assembly, which is supplied complete with the regulator.
Malfunctions: Tired of installing a 3-level voltage regulator
Hello! After a small problem with the generator https://avtomarket.ru/journal/VAZ/2107/35838/ and replacing the burnt-out voltage regulator with a new one, I seemed to be happy, but after a couple of days it failed again. The voltage began to jump to 16.8-17 Volts, as measured by a multimeter, and a lamp for a problem with the engine lit up on the panel, which threatened to cause the entire electrical system to fail.
I removed the generator again, but now I took it to a mechanic I know to check, he confirmed my guesses that the regulator had burned out again and needed to be changed. This company may just have been defective.
Having thought about disassembling half the machine again next time, I decided to install an external regulator or, as a last resort, remove a standard tablet. But I remembered, having scoured the Internet, people gave advice to buy a three-level regulator from Energomash, so I went to the store and bought it. It is packed in a box, by the way, each generator has its own and has a different brush assembly, as I understand it.
It comes with a 1 year warranty. It differs from the standard “pill” in that the brush assembly is sealed off from the relay, and it is located in a small black box with a switch, and they are connected through wires.
There are 3 voltages on the regulator: low 13.6 V, nominal 14.2 V, and high 14.7 V. Depending on the ambient temperature, the state of the battery and consumers, it is switched manually via a toggle switch.
Without thinking twice, I installed the brush assembly in place; in the rear plastic cover of the generator it is necessary to cut off one edge to bring the wires out.
How to remove a generator on a VAZ 2114 and 2115 Available methods
Lada 2107 Arkano-mobile Samara Logbook Replacing the heater tap in a VAZ 2107 with a tap from a VAZ 2108 with its removal from the passenger compartment under the hood
- The terminal is removed from the battery; this should be done for all work on the car’s electronic systems;
- The car is jacked up, the right wheel is removed;
- The mudguard is unscrewed;
- Remove connector block D from the generator;
- After that, using a 10mm wrench, unscrew the wire from terminal B++. The wires are removed;
- The generator adjusting screw is loosened. The belt is removed. The screw should be completely unscrewed. Remove the tension bar;
- Using a 17 socket, unscrew the 3 screws securing the generator bracket to the cylinder block;
- The generator is removed;
- Remove the bracket, to do this the nut is unscrewed, this is done with a 13 key. The screw is removed.
- Unlock the cover fastening latches and remove it;
- Use a Phillips screwdriver to unscrew the 2 screws securing the voltage regulator;
- The block of wires from the regulator is disconnected, and it is finally removed from the generator;
- Using a 10mm wrench, tighten the nut securing the capacitor wire. Next, unscrew the screw securing the capacitor itself;
- We remove the diode bridge. To do this, unscrew the screw securing the block with a Phillips screwdriver. Next, unscrew several screws securing the winding terminals. There are insulating washers on the screws;
- We remove the winding leads and remove the diode block;
- While holding the head from turning with a gas wrench, use a hexagon to unscrew the pulley;
- Using a Phillips screwdriver, unscrew the 4 screws holding the covers together;
- We mark the position of the covers relative to each other. Separate both halves;
- We remove the stator;
- We clamp the cover with the rotor in a vice. We knock it out with a punch;
- All that remains is to remove the bearing using a puller.
AutoFlit.ru