Do-it-yourself replacement of the VAZ 2115 wheel bearing
Problems with the brake system or wheel bearing can be diagnosed by characteristic squeaks or knocking noises in the front (wheel area). If the brake system is in order, you will need to diagnose the wheel bearing and replace it if necessary.
To check the wheel bearing, you need to compare the temperature of the wheel rim at the end of a long trip on the side where the squeaks and knocks are coming from. If the disc is too hot, it means the pads are sticking or the wheel bearing is faulty. The latter can lead to wheel misalignment, which usually leads to friction.
To check everything more thoroughly, you need to use a lift or jack.
Raise the tire that is causing some doubt with a jack and rock its lower part, holding it with both hands. If you feel play and a dull knock appears, the wheel bearing needs to be replaced.
Do-it-yourself replacement of the VAZ 2115 wheel bearing
If while driving your car you often hear a characteristic creaking or knocking sound in the front part, in the wheel area, this may indicate problems with the brake system or a failed wheel bearing.
If the first option with the brakes is not confirmed, then most likely the wheel bearing will need to be replaced. To make sure the “diagnosis” is correct, perform a simple diagnosis.
To check the wheel bearing you do not need to have any special devices. To do this, it is enough to compare the temperature of the wheel rim after a long trip, from the side from which squeaks and knocks are heard. If the disc is very hot and cannot be touched, this indicates that the pads are seizing or the wheel bearing has failed. A faulty wheel bearing causes the wheel to become misaligned, causing friction.
A more accurate check is made using a lift or jack.
Jack up the suspect wheel, then grab the bottom of it with both hands and rock it slightly. If, when rocking, you feel play and hear a dull knock, this will mean that the hub bearing needs to be replaced.
Today we’ll talk about how to replace a VAZ 2115 wheel bearing with your own hands, but before that, a few words about the tool.
You will need:
- “30” wrench for unscrewing the central hub nut;
- Puller for pressing out/pressing in the wheel bearing;
- Circlip pliers (or pliers);
- Jack.
Wheel bearing for VAZ 2114: diagnostic and replacement instructions
Experienced car owners know that the chassis needs to replace the wheel bearing from time to time. And it’s good if the car owner worked ahead of the curve. It is much worse when a howling bearing ultimately leads to a serious accident. Today we will talk about how to replace a wheel bearing on a VAZ 2114.
- A little about the device and functionality
- Bearing diagnostics
- Replacement instructions
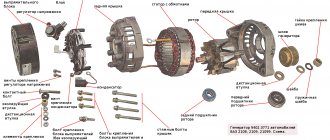
A little about the device and functionality
The main purpose of the part is to ensure uniform rotation of the car wheels. Given the name of the part, it is easy to guess that wheel bearings are the connecting link between the hub and the axle to which the brake disc and wheel are attached.
The design of the part fully corresponds to the classic type of rolling bearings. These are two metal rings into which conical rollers are pressed, protected from the body by a durable rubber insulator.
Unlike foreign competitors, domestic bearings are created using outdated HUB technology. They are quite difficult to install, require very precise tightening torque and require plenty of lubrication.
The operation of the mechanism lasts for several years. It is recommended to change a spare part for a VAZ 2114 approximately once every 100 thousand kilometers. But negative operating factors can accelerate the wear process:
- Bad roads. The entire force of the shock load falls on this mechanism of the system. Over time, the metal gets tired and the bearing begins to fail.
- Aggressive reagents. In Russia, in order to save money in winter, aggressive chemicals are often used to remove ice from roads.
- Sudden temperature changes. In winter, owners of warm garages unknowingly shorten the service life of many metal parts, for which sudden temperature changes when leaving and entering the garage create a large load.
Bearing diagnostics
Let's talk about how to check a wheel bearing.
An indirect sign that you need to pay attention to the bearing on the VAZ 2114 is the appearance of a characteristic hum or hum from one of the wheels while driving. Typically, the noise increases at high speeds, making it easier to hear on the highway.
The driver, being in the cabin, is not always able to correctly determine the source of the noise. For example, a hum from the left wheel may be perceived as coming from the right. Or vice versa. To accurately determine by ear where the damaged bearing is located, you need to watch how the sound changes when turning when the mechanism is subjected to a higher load. If the sound disappears when turning right, but appears when turning left, the right bearing has worn out.
Diagnostics is carried out in the following way.
- We raise the car so that the wheel being diagnosed is hanging out.
- We rock it with our hands, holding the top part.
- We turn the wheel by hand.
- Pay attention to the smooth deceleration of movement and to extraneous sounds.
- An emerging backlash may also indicate a problem.
Replacement instructions
Replacing the rear wheel bearing on a VAZ 2114 is carried out as follows:
- Loosen the wheel bolts and wheel locknut before jacking up the vehicle.
- Raise the car using a jack. Tighten the hub nut completely and remove the wheel. Unscrew the mounting bolts on the drum.
- Remove the drum. If it is rusty, pre-treat the joint with WD-40. If after this the drum still does not budge, use long pins. Screw them into the holes and tighten them one by one until the part moves out of place. You can gently help with a hammer by tapping it on the back side.
- Unbend the stopper and unscrew the locknut. If it is tight, use a wrench extension.
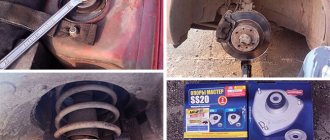
- Using a universal puller, press the hub.
- The inner race remains on the shaft, and the outer part of the bearing remains in the housing. If you want to replace the pads at the same time, you need to remove the axle mounts.
- Now it's time to demonstrate the entire mechanism.
- As a rule, the rear part of the axle is attached to the brake shield. To dismantle you will have to use a hammer.
- Remove the wheel bearing race using a universal puller. If the brake system does not need to be changed, this operation can be performed directly on the vehicle's axle shaft.
- We place the hub on bricks or bars, as shown in the photo. Use a hammer to knock out the old rear wheel bearing.
- Be sure to remove dirt and wash the hub in gasoline. Clean the axle shaft in the same way. Use thick lubricant to treat the seating surface. Place the new bearing in the hub bore. Mounting chamfers will help avoid distortions.
- Press the bearing with your hand and press it in about 3 millimeters. Place the old bearing on top.
- Using the side of the hammer, carefully hammer the part inward. If the process is difficult, you can cool the bearing in the freezer and warm up the hub.
- Once the rear hub bearing is in place, you can install the circlip. For this purpose, round nose pliers are used. Don't forget to lubricate the axle first.
- Carefully attach the assembled mechanism to the trunnion. Be careful to avoid distortions. Then place a washer on the threads and screw on the hub locknut.
- Using a nut, press the hub onto the axle. Tightening torque: 220 N*M. Place the drum, secure it and screw the chassis.
As you can see, replacing a bearing is a rather complicated and time-consuming task. You need to have a special tool. Sometimes it’s easier to ask a car service for help.
Self-replacement of the VAZ 2115 wheel bearing
1. Put the car on the handbrake and install wheel chocks or place stones.
2. Remove the mounting bolts.
3. Remove the wheel.
4. Install the jack and hang the wheel.
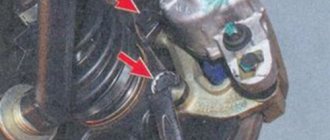
5. Using a “30” wrench, remove the central nut securing the hub.
6. Disconnect the drive shaft CV joint from the hub and remove the caliper along with the disc.
7. Remove the two mounting bolts that secure the ball joint to the lower arm.
8. Disconnect the lower suspension arm from the steering knuckle and move the lower part of the shock absorber strut aside.
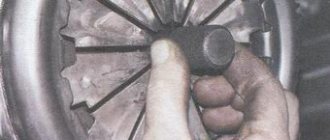
9. Using a suitable extension, knock the hub out of the steering knuckle. For this it is better to use a special puller.
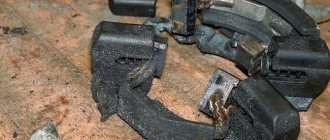
10. Using special pliers, remove the outer retaining ring of the hub bearing, then the inner one.
Good advice: Fix the steering knuckle on the lower arm by connecting it to the ball joint arm, in this position it will not interfere with you.
11. Install a special puller on the steering knuckle.
12. Install the outer snap ring into the steering knuckle using pliers.
13. Install the puller with the new wheel bearing on the steering knuckle, slowly tightening the power nut of the puller, press the bearing into the seat in the knuckle until it stops.
14. As a rule, when the hub is knocked out of the steering knuckle, the inner race of the bearing comes out with it. Therefore, if you have the necessary puller for this, then with its help you can easily remove the ring, but if you don’t have it, then you will have to use a grinder to remove it. In the second case, you need to be extremely careful not to accidentally damage the hub, otherwise you will have to change it as well.
15. Install the hub onto the puller, thread the puller into the steering knuckle. Place the puller against the inner ring of the bearing and press the hub into the bearing. If there is no puller, the bearing can be driven in using a tool and a hammer.
16. Take snap ring pliers and install the inner snap ring.
Further assembly is carried out in reverse order. After the wheel bearing has been replaced, I recommend doing a wheel alignment.
Replacement
First, let's set priorities. If you just want to save money, so you do the work yourself without any experience, then this is a wrong decision that can lead to dire consequences. If you have experience and certain knowledge, you can safely do the repairs yourself.
In any case, we recommend watching the training video instructions, where you will be told in detail about all the nuances of such work. This way you will gain additional experience and useful knowledge.
After this, we proceed directly to the work of replacing the wheel bearings. There are several ways. We will tell you about each of them in more detail, and you will decide for yourself which option suits your skills and capabilities.
- The first method involves carrying out work without removing the steering knuckle from the car. But here you will definitely need a special puller to dismantle the bearings. The advantage of the method is that there is no need for subsequent wheel alignment adjustment. But this is the most inconvenient way. To press out and reinstall the wheel bearing, we recommend driving the car into an inspection hole.
Puller
- The second method will require removing the steering knuckle. A workbench will also be useful for removing the bearing. In this case, you will definitely break the collapse. If you don’t want to go to a service station after repairing yourself, use a couple of tricky tricks: Before removing the lower bolt of the strut and steering knuckle, apply marks;
- One mark will allow you to determine the position of the bolt;
- The second mark will be responsible for the position in the steering knuckle strut;
- During the reassembly process, try to ensure that the marks match each other as accurately as possible. This method allows you to simultaneously make adjustments to the chassis and check the condition of the components.
The third method will require removing the bearing along with the stand and dismantling it using a vice. This method is complex compared to others.
It remains to press out the element
Before work, do not forget to turn on the handbrake and place wheel chocks under the wheels to avoid accidental movement of the vehicle.
- Remove the strut, knock out the tie rod ends and unscrew the fasteners of the upper support to the body of your car.
- Position the jack so that it does not become an obstacle during operation. It all depends on your personal understanding of comfort.
- The wheel bolts are unscrewed, after which the nut of the desired bearing is removed using a 13 mm wrench.
- Using a 17 mm wrench, you dismantle the caliper, which is secured with wire to prevent sagging on the brake hose.
Dismantling works
- After this, the brake disc and ball joint are removed.
- The hub will now be knocked out of the steering knuckle, giving you access to the damaged bearing.
- All that remains now is to press out our problematic element using a puller.
- If you do not have a device such as a puller, use a metal tube whose diameter is slightly smaller than the diameter of the bearing.
- Clean the landing site, treat it with lubricant, after which you can install a new spare part.
- Reassemble in reverse order. Do not forget to simultaneously check the condition of various components, lubricate, change gaskets as necessary.
As you can see, there is a lot of work to do. Do not rush to conclusions regarding the ease or difficulty of such a task. If you want to do everything quickly, efficiently, without having any experience, contact the service station. Otherwise, be prepared to spend a whole day, or even more, on repairs.
Source: luxvaz.ru
Replacing the wheel bearing of VAZ 2115, VAZ 2110 on your own
Welcome, friends, to the DIY car repair website. Sometimes, after using the car for a long time, the front wheel bearing begins to hum.
The problem is not fatal, but still requires repair. Many owners of VAZ 2109, 2110, 2115 are thinking about replacing the bearing in a garage on their own.
This type of repair, of course, cannot be called easy, but if you have a little skill and tools, then replacing the VAZ 2115 wheel bearing will not take much effort.
How to check a wheel bearing?
The procedure is quite simple and banal: after a long ride, you need to touch the part of the wheel where the extraneous sound comes from. If it is hotter than the other side, this is the first sign that the bearing needs to be replaced.
It is possible to carry out diagnostics in more detail. Raise the car with a jack, first unscrewing the wheel bolts. Place the wheel chocks and fully raise the side you are checking.
Then you need to take the wheel and rock it with maximum effort. If there is a dull knock, you need to ask a friend to apply the brakes. Carry out the procedure again, if the knocking noise disappears, then the wheel bearing needs to be replaced.
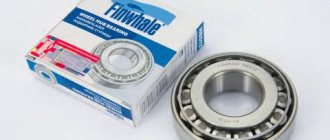
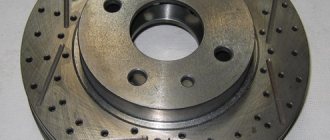
Which bearing is better to choose?
This part can be either Russian or foreign made. Many craftsmen recommend Vologda bearings, which are not of poor quality, and Samara bearings.
The quality is not bad, and the price is much lower. It is not recommended to buy Chinese counterfeits. The wheel bearing measures 64/34/37 millimeters.
As for the tools, if you don’t have a puller for removing the front or rear wheel bearings of VAZ cars, and especially if you don’t have any repair experience at all, then in this case you shouldn’t start work and you need to contact a service station.
Although if you have at least some skills, then the bearing can be knocked out using improvised means.
You will also need a socket wrench (head) for thirty and keys for seventeen and nineteen.
Price for replacing the front wheel bearing of a VAZ 2114
The cost of the original wheel bearing (21083103020) is from 445 to 700 rubles. You can also choose equally reliable analogues:
- SKF (VKBA 1306) - 1400 rubles;
- Fenox (RTBB12066O7) - 450 RUR;
- Kraft (KT 100505) - 520 rub.
The SKF bearing is considered the highest quality, the service life of which is significantly longer than other options.
In Moscow, the price for replacing the front wheel bearing on a VAZ 2114 can range from 1200 to 2500 rubles. In rare cases, small service stations offer a replacement service from 500 rubles.