There is nothing perfect in the world. This becomes especially clear when it comes to modifying (upgrading) the stove on a VAZ 2110. No one wants to freeze in a car in winter, not to mention the windows covered with ice. Upgrading the VAZ 2110 stove becomes for motorists not just a momentary whim, but a cruel necessity dictated by the harsh Russian frosts.
Modification of the VAZ 2110 stove
In order to withstand the imperfections of the world in the form of the VAZ 2110 heating system, it will be enough to arm yourself with a tube of silicone or sealant, polyurethane foam, simple plumbing tools, and also a certain amount of patience. Without theoretical foundations, of course, there is no way either.
- Modifying the stove, simple techniques
- Refinement of the air duct system of the VAZ furnace, dismantling the standard installation
- Sealing the cracks in the front panel of the torpedo air ducts
- Modernization of the VAZ stove damper
- Modernization of the heating system for rear seats and driver's feet in VAZ cars
- Refinement of the thermostat and its connection diagram
- conclusions
Modifying the stove, simple techniques
Modernizing the VAZ 2110-2112 stove is a thorough and multifaceted process. If you don’t have the time or opportunity to fully remodel the stove system, but you need a positive result in the shortest possible time and with minimal effort, because winter is almost upon us, you can try to listen to the following advice.
- 1. The easiest way to increase the air flow of the heater for heating the feet of the front seats in the cabin is by blocking the heater ducts for the rear ones. Any tool at your disposal will do. Thus, you sacrifice the comfort of your passengers, but is this really important if, for example, you prefer to drive alone;
- 2. A similar result can be achieved by blocking the air channels of the central deflector oven by cutting a suitable plug from a sheet of aluminum. Obviously, in this case, the heat flow directed to the side windows and other furnace ducts in the car increases.
Stove damper tens
- 3. Often, standard VAZ 2110 door seals are not enough for reliable sound and heat insulation. Simply gluing additional insulating tape around the perimeter (for example, from K-Flex) can significantly improve the comfort inside the VAZ interior with minimal time and money investments;
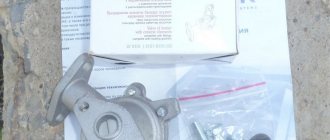
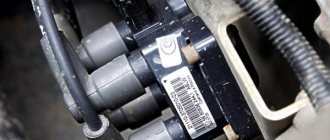
- 4. Replacing the 5-hole thermostat with a more modern 6-hole thermostat, which controls the engine cooling and heating system in VAZ cars. These thermostats are completely interchangeable, so there should be no problems. A 6-hole thermostat is technologically more advanced, and therefore the heating of the stove radiator in a car will be more efficient. Such pleasure costs about 350 rubles.
Upgraded thermostat
Which heating radiator to choose?
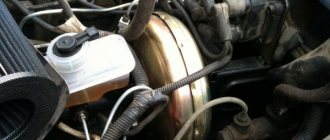
The main source of heat in the car interior is the radiator, which modern manufacturers produce from two materials - copper or brass, and aluminum. Which heater radiator is better - copper or aluminum for a VAZ 2110 - 2112 remains to be seen, since not only the efficiency of the heater, but also comfortable driving in winter depends on this choice.
Advantages of an aluminum radiator
To find out which heater radiator is better to install on the seven, let’s make a comparative comparison. To do this, you need to find out all the advantages and disadvantages of the two types of stove heat exchangers. First, let's figure out what the pros and cons of aluminum units that are installed on classics from the factory.
- Cost is one of the main advantages of such devices, since it is precisely because of the low price that many choose models made of aluminum alloy. The price difference between copper (brass) and aluminum devices can be up to two times.
- Large selection - these models are more popular, despite some of their disadvantages. The reason for this popularity is their price, but you often have to make sure that it is better to buy a copper unit for the stove. Among the advantages, heat transfer should also be noted, however, practice shows that heat transfer rates are significantly inferior to brass devices.
It is important to know: For “ten and twelve” manufacturers do not produce three-row heat exchangers made of aluminum, which actually causes low heat transfer. Only two-row ones are produced.
Advantages of copper heater radiators VAZ 2110 - 2112
Now let’s find out why a copper stove radiator is better than an aluminum one. The advantages of these units include:
- Thermal conductivity - even if we take into account the fact that copper ones are only called such, since they contain much more brass than copper, they have high thermal conductivity. It is this indicator that is fundamental when choosing a heat exchanger from which you can get more heat to heat the interior.
- Easy to repair - even the slightest mechanical damage can be repaired at home. Moreover, after soldering work, the unit can last a long period of time (which also depends on the quality of the soldering). The entire radiator is made entirely of plastic without the use of plastic.
- Not only are the plates made of copper, or rather a brass alloy, but the body itself is also made of a similar material. This is a big advantage, because due to this design, operational parameters are increased.
Three-row versions of radiators are produced. This brings more heat into the cabin. With so many advantages, one wonders if these devices have any disadvantages.
It is necessary to note some disadvantages of the copper heat exchangers under consideration. They also exist, and sometimes play a decisive role in choosing the appropriate units. The main disadvantage is the cost, which is 2 times higher than the price of aluminum analogues. It is precisely because of the big difference in price that most car owners give preference to aluminum competitors, having never experienced copper heater radiators on a VAZ 2110 - 2112
We recommend: Changing the oil in the VAZ 2113, 2114, 2115 engine
Refinement of the air duct system of the VAZ furnace, dismantling the standard installation
If you have a little time and desire, modifications to the VAZ 2110 stove can be done much more thoroughly, namely:
- sealing the cracks in the front panel of the torpedo air ducts;
- modernization of the car stove damper;
- modernization of the heating system for the rear seats and driver's feet, installation of corrugated heating ducts.
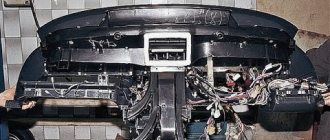
All this will certainly result in the desired result and significant heat transfer from the stove, but first you need to remove the dashboard along with the dashboard and heater air ducts, for which you need to:
- 1. Remove the floor tunnel lining cover and the interior heating air ducts of the VAZ 2110, and then the body itself, screwed with self-tapping screws to the bottom of your car;
- 2. To remove the instrument panel, you will first need to dismantle the glove box by unscrewing it from its hinges and turning off the glove box light;
- 3. Through the formed niche, unscrew the mounting bolts of the instrument panel;
- 4. Having unscrewed all the fastening screws of the panel in its upper and lower parts, as well as on the controller bracket, we can finally remove the instrument panel from the mounting studs;
- 5. In order to remove the panel from the car interior, you will need to disconnect the electrical connectors for connecting the devices.
Important points
When replacing a heating fan on a VAZ 2107, you should remember several important nuances, neglect of which can ruin all the work. Here they are:
when bending the plastic latches on the central panel and on the cigarette lighter panel, there is no need to apply much effort, since these latches are made of the same fragile plastic as the heating fan
They break very easily, especially if repairs are made in the cold; You need to be very careful when removing the motor after opening the latches. Behind it there are wires with contact blocks
If you pull such a wire carelessly, its terminal block may crack, since it is very thin. It is not possible to find this spare part for sale. Therefore, cracked pieces of plastic will have to be glued together using universal glue. All this can be avoided if you act carefully and slowly.
So, it is quite possible to change the stove fan on the “seven” with your own hands. Even a novice driver who has some understanding of the operation of automobile heating systems can do this. All you need to do is be patient and follow the instructions above exactly.
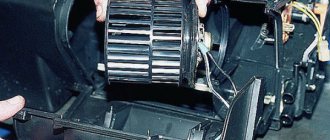
In rare cases, VAZ 2107 owners need to replace the heater fan. Unlike other models, the VAZ 2107 has a more extensive blowing system, therefore, replacing the fan motor is somewhat more complicated. But don’t despair; complicated doesn’t mean impossible. Simply replacing it will require a few additional movements, that’s all.
Completing this task will require a minimum of tools and equipment:
- Key to 7;
- Key for 10;
- Flat screwdriver;
- Phillips screwdriver;
- Round nose pliers.
To begin work, it is necessary to remove the instrument panel of the VAZ 2107. Without this, it is not possible to gain access to the heater fan housing. Next, the shelf and glove box will be removed. The preparatory activities have been completed, you can proceed to the main task.
Using a 7 key, release the casing of the cable for controlling the air dampers of the stove, and remove the cable loop from the lever.
Using a 10mm wrench, unscrew the nut securing the heater housing and the right and left air ducts. Using a flat-head screwdriver, very carefully remove both air ducts from the stove body.
If one of the elements of the blowing system is damaged, they should be repaired or replaced immediately. Using the same screwdriver, remove the latches that hold the fan on the heater radiator.
Now you can remove the fan from the heater housing, after first disconnecting the wire terminals from the resistor. To replace the motor, you must first remove the impeller. To do this, use round pliers to remove the retaining ring and adjusting washers. The impeller is now held on the shaft only due to a tight fit. We carefully remove it, trying not to damage the blades, because replacing the impeller was not planned.
Use a flat-head screwdriver or pliers to remove the spring plates holding the fan in the housing.
You can remove it by first threading the power wires through the holes. Usually, if the fan motor is faulty, simply replace it with a new one.
In rare cases, it may be necessary to disassemble it, for example, to clean the commutator or lubricate dry bearings.
Installation of a new engine is carried out in the reverse order, as is the assembly of the fan, heater housing, and air duct system. Before installing the fan, it is recommended to check its functionality by connecting it directly to the on-board network of the VAZ 2107. This will help avoid unnecessary work in case there was an error in the connection diagram or you received a defective (non-working) fan.
When disassembled, access to the heater radiator and valve of the VAZ 2107 is available. You should take the opportunity to inspect and diagnose them for damage, leaks, and signs of possible failure of the valve. This will help avoid unnecessary work, such as removing the instrument panel, disassembling and assembling the stove body, etc. If problems are detected with the radiator or faucet, they are also replaced.
Sealing the cracks in the front panel of the torpedo air ducts
The main problem with good blowing of side windows is the presence of a large number of cracks in the dashboard air duct system, which should only be sealed, thereby reducing heat loss and significantly increasing the pressure of the air flow for blowing the side windows of the car.
Heater duct routing
You will need silicone or anti-squeak (modelin). We seal around the perimeter all the cracks in the upper and lower parts of the torpedo panel. Also, do not forget to “silicone” all the mounting holes. At this point, you can consider the first stage of work completed.
Modernization of the VAZ stove damper
The problem with the stove damper is that the cracks in the housing are not properly sealed. As a result, regardless of the position of the damper, the flow of warm air is significantly lost, passing not where we would like it.
Furnace damper modernization
You can combat this by installing an additional seal (the same model and double-sided tape will serve you well). After removing the factory seal, completely glue the entire valve body, eliminating any gaps. You also tape the damper itself. Thus, you have significantly reduced losses in the air flow directed to the driver’s face, legs and windshield.
But to seal the gap at the beginning of the channel for blowing the driver's window, a conventional seal will not be enough. It is recommended to use polyurethane foam to reliably seal unwanted air channels, thereby eliminating significant losses.
Modernization of the heating system for rear seats and driver's feet in VAZ cars
Laying corrugated heating ducts
As for the module for distributing air flow to the driver’s feet, front seat passenger and rear part of the cabin, this also has its own factory flaws. They are also associated with insufficient sealing of cracks. You can fight with modelin or silicone, as in the case of a torpedo, if you do not want to disturb the factory aesthetics of the parts.
Airflow for rear passengers' feet
It would be much simpler and more reliable to cut off the ill-fated Christmas tree that distributes air flows and use three separate 40 mm corrugated pipes for heating ducts. What do you gain in this case:
- you get reliable sealing of the channels;
- three corrugated hoses take up much less space, which greatly simplifies access to the VAZ 2110 electrical wiring system, located there (there are really a lot of wires and access to them is extremely difficult).
Corrugation gasket for heater
We also remove the partitions of the old air distribution system. We seal the hoses using polyurethane foam. It should also be taken into account that the textured internal coating of a corrugated hose can cause whistling and howling of air, so we do not make the pipelines very large.
Instruction No. 1
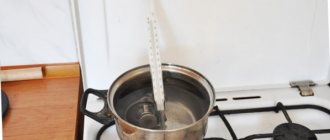
It often happens that the engine temperature does not rise to the optimal temperature during operation. For example, on the body of a thermostat device, 90 degrees is marked, and the temperature is not higher than 85. This problem can be solved with the help of a simple modification - modifying the rod. The fact is that in the process of opening the thermostat, the rod rests against the cover. If you expand the special recess in the lid, the thermostat will operate later. Therefore, it is easier to replace the rod with a bolt of the appropriate size.
- Pull the rod itself out of the cover.
- Drill a through hole at 4.5.
- Cut the internal thread to 5.
- Select the bolt length with a margin.
- Place a lock nut at 5 and a washer with an elastic band to seal.
- Reinstall the thermocouple.
- Fill with antifreeze.
- Check in practice, adjust the beginning of the opening of the large circle to 89 degrees.
Now the temperature will remain 90-92 degrees, as stated on the thermostat housing.
Refinement of the thermostat and its connection diagram
The previously discussed modernization of the VAZ 2110 stove by replacing a 5-hole thermostat with a 6-hole thermostat is not least related to the diameters of the bypass channels of the devices that regulate the flow of Antifreeze between the small cooling circuit and the radiator of the heating system.
The standard size of the bypass channel on a 6-hole thermostat is 11 mm, and on a 5-hole thermostat the hole is measured with a diameter of 16 mm. Regardless of what type of thermostat you have installed, you can always further adjust the flow of coolant. Thus, the interior of the VAZ 2110 will warm up better at idle engine speed.
It is recommended to use an aluminum pad to set the bypass diameter in the range from 4 to 6 mm. It is worth understanding that in this way we slightly increase the engine warm-up time. But the cabin will become really warmer.
When reinstalling the thermostat, swap the connections of the pipes coming from the expansion tank and coming from the radiator of your car's heater. Now there is no longer any need to cover the radiator with cardboard in winter; the VAZ 2110 heating system will work perfectly in any weather.
How does CO work?
CO scheme
- On the 8-valve injection VAZ 2110, the cooling system operates due to coolant forcedly circulating through it. When the engine heats up, excess pressure arises, which is released through the exhaust valve.
- For the 16 valve injection VAZ 2110, the cooling system has an optimal operating temperature in the range of 90-95 degrees Celsius. And the valve is activated when pressure occurs with indicators from 1.2 to 1.4 kgf/cm2.
- When the excess pressure is released, the engine returns to normal temperature and the intake valve is turned on. This happens cycle after cycle.
- If the pressure balance is disturbed, overheating occurs, the consequences of which can be various types of breakdowns, including the need to completely replace the power unit.
- Due to the operation of the thermostat and electric fan, the VAZ 2110 maintains the required constant operating temperature. There is a sensor on the cylinder head that transmits information about the current coolant temperature to the control unit.
- A command is sent from the coolant temperature sensor to the cooling system, which begins to work in order to reduce engine heating.
- If there is electronic injection in the car design, it also has a special sensor that sends a message to the electronic control unit about overheating of the power unit.
- The pump supplies coolant, distributed by the thermostat.
- When you turn on the engine, it needs to warm up to operating temperature. To do this, the thermostat directs the coolant through a small circuit, without including circulation through the radiator. The small circuit includes: Heater for warming up the interior;
- Carburetor heating unit (naturally, only on carburetor VAZ 2110);
- Heating of the throttle unit;
- Intake manifold.
We recommend: Tuning wheels: do-it-yourself welding and lighting
conclusions
Thus, through far from the most complex manipulations, you can achieve a truly amazing effect. Just sealing the cracks of the VAZ 2110’s thermal channels can improve the temperature balance inside the interior of your car, not to mention a lot of simpler and more reliable methods.
Before you jump into upgrading your heating system, it’s still worth checking the operation of the stove itself. Do not forget to change the air filter of the VAZ 2110-2112 furnace every 15 thousand kilometers. Poor heating of the interior can also be caused by a faulty fan or a leaking coolant radiator.