Replacement
The work must be carried out using the necessary tools. There are two options for replacing the wheel bearing - with subsequent wheel geometry and without its need. The replacement is similar for all VAZ cars (front-wheel drive).
Tool you will need:
- Ratchet with head "7", "10", "13", "17", "19" or E30;
- A key for unscrewing the CV joint or a head at “30”;
- Powerful flat head screwdriver;
- Gas torch or wheel bearing puller;
- Hammer;
- Steering wheel end puller (may not be needed);
Replacement with subsequent wheel geometry
- You need to start by unscrewing the CV joint nut; the car should be installed on a horizontal plane with the steering wheel turned slightly to the side. Using a wrench, unscrew the grenade nut counterclockwise.
CV joint is a Constant Velocity Joint (not to be confused with lubrication). Colloquially it is called a "grenade". It got its name because of the presence of a large number of balls inside and its appearance similar to a combat grenade. There is also CV joint grease -3 and 4, used to lubricate this joint.
- We jack up the car and secure it so that it does not roll or fall off the jack. Remove the wheel;
- Separate the brake pads using a flat screwdriver;
- We unscrew the caliper from the steering knuckle and hang it by the wire (under no circumstances hang the caliper by the brake hose).
- We dismantle the brake disc by unscrewing the guides.
- Unscrew the two bolts securing the strut to the steering knuckle.
- Unscrew the bolts securing the ball joint.
- We remove the steering knuckle from the car.
- We take out the retaining rings on both sides of the fist.
- Next we need to knock out the old bearing; for this you can use a punch of the required diameter or use a puller.
- Then, once the bearing is removed, a new one must be installed. Pre-install one retaining ring and press in a new one on the opposite side.
- If you have a puller, then carefully press in the new bearing, avoiding distortion.
- If you don’t have a puller, you first need to put the new bearing in the freezer for a couple of hours.
According to the laws of physics from the school curriculum, cold bodies contract, and hot bodies expand. Therefore, a cold bearing will have a smaller diameter than a hot one, making installation easier.
- Next, use a torch to heat the steering knuckle and carefully lower the bearing into it, tapping a little. IMPORTANT, avoid distortion; the bearing should run smoothly without snagging.
You can use an old bearing as a mandrel.
- After the bearing is pressed in, install the second retaining ring and assemble everything in the reverse order.
Replacement without wheel geometry
In order to carry out a replacement without the need for wheel geometry, it is necessary to completely dismantle the steering knuckle assembly with the strut.
- Without removing the wheels from the car, we need to loosen the CV joint nut (grenade) to “30”. To do this, unscrew the grenade nut counterclockwise with a wrench.
- We tuck the car, which is fixed, so that it does not roll or fall off the jack. We remove the wheel.
- Separate the brake pads using a flat-head screwdriver.
- We unscrew the caliper from the steering knuckle and hang it by the wire (do not hang the caliper by the brake hose).
- Remove the brake disc by unscrewing the two guide wheels.
- We unscrew the steering tip mount and remove it from the strut bipod using a puller.
- Unscrew the two ball mounting bolts.
- Unscrew the three bolts securing the strut support to the side member.
- We remove the strut along with the steering knuckle from the car.
The next step is to remove the bearing from the knuckle and install a new one.
- We remove the retaining rings on both sides from the steering knuckle.
- Next, you need to knock out the old bearing; for this you can use a punch with a diameter smaller than the diameter of the bearing or use a puller.
- After the old bearing is removed, a new one must be installed. Pre-install one retaining ring and press in a new bearing on the opposite side. To do this, if you have a puller, carefully press the bearing into place, avoiding distortion. If you don’t have a puller, then you first need to put the new bearing in the freezer for a couple of hours (so that its diameter decreases slightly).
- Next, use a torch to heat the steering knuckle and carefully lower the bearing into it, tapping a little. IMPORTANT: avoid distortion; the bearing must run smoothly without snagging.
An old unnecessary bearing can be used as a mandrel for installing a new one.
- After the bearing is pressed in, install the second retaining ring and assemble everything in the reverse order.
The wheel bearing replacement process is complete.
Replacing the rear wheel bearing on a Priora
Before we begin the repair, the following preparations must be completed:
- Raise the rear of the car with a jack
- Remove the rear wheel
- Remove the brake drum
- Now you can proceed further with the repair. Using a socket and a wrench, unscrew the hub mounting nut, as shown in the photo below.
2. When this is done, you can begin to remove the hub and bearing assembly. To do this, it is most convenient to use a special device - a puller with rotary grips.
3. Now, using a wrench, we turn the puller rod clockwise, thereby pulling the hub off the axle, as it were:
The result of the work done is shown in the photo below.
4. Next comes the most difficult thing - removing the bearing from the hub itself. To do this, turn it over with the inside facing up and clamp it in a vice. Then, using pliers, tighten the locking ring and remove it.
5. And then we turn the hub over to the other side so that the bearing can be “squeezed” out of the hub downwards, or carefully knocked out using a spacer or other available tool. Of course, for good measure, you will need a press, but you must admit that not every car owner has such equipment in the garage.
Personally, in this example, a 30 mm socket was used, and a knob was paired with it to hold it. With small blows of a hammer, the bearing is easily knocked out of the hub.
The result of this procedure is shown clearly below.
6. The inside of the hub must be thoroughly cleaned and a Litol-type lubricant applied to the inside.
7. After which you can replace the bearing - the new one is installed in the reverse order. To press it in, it is convenient to use an old bearing, and carefully use a hammer to install everything in place.
Let's see what it looks like in practice.
Also, instead of a hammer, you can do everything more accurately and correctly by using a vice instead of a press. I think that the meaning of this manipulation is quite clear to everyone. We press the bearing until a groove appears for installing the retaining ring.
8. Again, using pliers, install the ring in its place and you can put the hub on the axle, having previously lubricated it.
Wheel bearing replacement video
The front wheel bearing on the Priora VAZ 2170, as on other VAZ cars, often fails, especially when the mileage exceeds 80,000 km. First there is noise from the wheel, which can increase during acceleration.
Vibration also often occurs, wheel play increases, and in some cases the noise turns into a grinding sound - all these signs mean that the front wheel bearing of the Lada Priora requires immediate replacement. If you delay repairs, the consequences can lead to wheel jamming, which leads to unsafe situations on the road.
This article will tell in detail about the principles of replacing wheel ball bearings (hereinafter referred to as SP) on cars of the VAZ family, in particular on the Lada Priora. The instructions are accompanied by many photos and videos. The material also provides information on how to choose a front wheel bearing for a Priora by number, size, price, and manufacturer.
After reading the article, you will understand that replacing the front wheel bearing is done with your own hands without special skills, experience, or special tools, and the price for repair work of this type in a car repair shop is very high.
Indirect signs of front suspension wheel bearing wear
In this section you will find signs of a bad wheel bearing, as well as how to check the front wheel bearing.
A characteristic sign that the wheel bearing in Kalina needs to be replaced is an extraneous, even noise (humming, humming) from the left or right wheel when driving. As a rule, in this case it intensifies at high speeds (more than 80-90 km/h), so it is most often noticed when driving on the highway.
Due to the noise created by the air flow and when the tires come into contact with the road, it is not always possible to accurately determine the source of the sound. It is noteworthy that from the cabin noise from the right side is often perceived as from the left and vice versa
In this case, it is necessary to pay attention to how the sound changes when cornering, since at this moment there is an increased load on the bearing. Thus, the disappearance of the sound when turning left and its intensification when turning right indicates wear on the left wheel bearing.
Accordingly, the opposite symptoms indicate wear on the right.
How to diagnose the front wheel bearing on a Priora and the causes of failure
At the beginning of the article, signs of a malfunction were already mentioned, if they occur in the VAZ 2170, it is necessary to check the hub assembly. To diagnose a breakdown, it is enough to do several operations:
- Raise the car with a jack;
- Check the play of the suspended wheel with your hands;
- Rotate the wheel and listen for noise;
- Watch several videos on the principle of diagnosing the front wheel bearing of a Priora.
Faulty wheel bearing:
An example of the operation of a failed wheel bearing:
How to check the ball bearing of a wheel hub:
Wheel bearing diagnostics:
vazoved
I drive a LADA VESTA CROSS, Moscow
Then there will simply be no one to pay the fines! This is a Korean tablet video recorder 15 in 1 for Android..
I forgot about fines and Yandex Navigator.
There is FULL HD shooting, radar detector and GPS with 32 satellites. I got it at a reasonable price for such great functionality: HERE
Why does the front wheel bearing of a VAZ 2170 (Priora) fail:
- Expiration of service life;
- Incorrect operation of the suspension, aggressive driving style, road quality;
- Poor quality ball bearing (defect, counterfeit, manufacturing defect);
- Depressurization (dust, moisture, dirt);
- Malfunction of adjacent components (brake disc imbalance, etc.);
- Road accidents, collisions with deep potholes in the asphalt or holes.
What front wheel bearing is in Priora: dimensions, number, prices, characteristics
Before you begin the repair, you need to know which front wheel bearing is on the Priora, as well as which one is better in terms of price, reviews, quality, and manufacturer. The designers at the manufacturing plant included in the design an angular contact double-row sealed ball bearing with lubricant inside (LITOL-24).
According to reviews and statements from VAZ owners, the best option would be original products from VBF or foreign manufacturers: SKF, SNR, SWAG, FAG.
The dimensions of the front wheel bearing, as well as the catalog numbers of recommended manufacturers, are presented in the tables in a similar article on replacing the wheel bearing in a Lada Granta car; look for detailed information there.
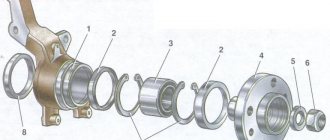
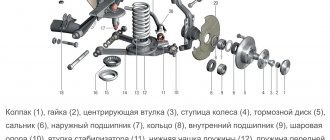
Replacing the front wheel hub bearing
There are two ways to replace a bearing. The first is by removing the steering knuckle assembly, the second is without removing it from the car. The work is shown on the right wheel bearing. The left wheel hub bearing is replaced in the same way. We remove the wheel.
Using a screwdriver, remove the protective cap from the hub. We install the wheel and tighten the two bolts that secure it. We lower the car onto its wheels.
Use a bevel to straighten the dented collar of the hub bearing nut in two places. Apply the parking brake, engage first gear and place shoes under the wheels.
Use a 30mm socket to loosen the hub bearing nut. The nut is tightened with a large torque, so the head and driver must be strong enough to transmit the necessary force. We hang up the front part of the car (namely both front wheels, because otherwise the anti-roll bar interferes with dismantling, pushing the suspension elements up). We remove the wheel. Unscrew the hub bearing nut completely...
...and remove the puck. Remove the front wheel brake disc (see “Removing the front wheel brake disc”). Disconnect the right wheel drive from the hub (see “Removing the front wheel drives”). In order not to disturb the wheel alignment angles, you can replace the bearing without removing the steering knuckle. To do this, connect the ball joint to the knuckle...
...and compress the hub by striking it through a soft metal drift. You can also compress the hub using the front wheel brake disc.
We pass M12 × 1.25 mm bolts about 130 mm long through two diametrically opposite holes in the disk and screw them into the holes of the hub to a depth equal to its thickness. By sharply hitting the bolt heads with a disk, we compress the hub. Then use a cup puller to press the bearing out of the knuckle, as shown below. If it was not possible to remove the hub in this way, remove the steering knuckle. To do this, unscrew the nuts of the bolts securing the shock absorber strut to the steering knuckle, remove the bolts (see “Removing the shock absorber strut and disassembling it”) and remove the steering knuckle.
We install the steering knuckle on the jaws of the vice and press the hub out of the knuckle through a mandrel or head of a suitable diameter, applying force to the end of the hub.
We remove the hub from the fist. In this case, the outer part of the inner ring of the bearing remains on the hub.
Remove the mud ring from the hub.
We insert a blunt chisel between the ends of the inner ring of the bearing and the hub and, striking the chisel with a hammer, move the inner ring.
Use a puller to compress the inner ring of the bearing.
Using circlip pliers, remove the circlip.
Use a cup puller to press the bearing out of the steering knuckle...
...and take it out with the puller.
Remove the bearing from the puller. Clean and lubricate the inner surface of the steering knuckle. Using a needle file, we clean out the nicks from the chisel on the hub. We press the new bearing into the steering knuckle, applying force to the outer ring of the bearing. We install a retaining ring in the groove of the steering knuckle socket. When pressing the hub, we use the puller washer to rest on the inner ring of the bearing. We carry out further assembly in the reverse order, tighten the bearing nut to the prescribed torque (see “Appendices”) and be sure to lock it by jamming the collar. If the bearing was replaced with the steering knuckle removed, then it is necessary to check and adjust the wheel alignment angles at a service station.
The front wheel bearing on the Priora VAZ 2170, as on other VAZ cars, often fails, especially when the mileage exceeds 80,000 km. First there is noise from the wheel, which can increase during acceleration.
Vibration also often occurs, wheel play increases, and in some cases the noise turns into a grinding sound - all these signs mean that the front wheel bearing of the Lada Priora requires immediate replacement. If you delay repairs, the consequences can lead to wheel jamming, which leads to unsafe situations on the road.
This article will tell in detail about the principles of replacing wheel ball bearings (hereinafter referred to as SP) on cars of the VAZ family, in particular on the Lada Priora. The instructions are accompanied by many photos and videos. The material also provides information on how to choose a front wheel bearing for a Priora by number, size, price, and manufacturer.
After reading the article, you will understand that replacing the front wheel bearing is done with your own hands without special skills, experience, or special tools, and the price for repair work of this type in a car repair shop is very high.
Rear wheel bearing for Priora - part price
A new bearing for the rear hub on a Priora can cost differently, and it all depends on the manufacturer:
- QML 636 rub.
- SDR 720 rub.
- ANDYCAR 690 rub.
- VBF 1050 rub.
- AvtoVAZ 980 rub.
Of course, you can buy the cheapest bearing for the Priora, but it is not a fact that it will safely last the period you expect.
The appearance of a dull knock in the rear wheel, especially pronounced when driving over rough terrain, indicates wear of the rear wheel hub bearing on a Lada Priora car. In addition to knocking, wear is also indicated by the presence of a howling noise when moving. To finally make sure that the bearing is faulty, you need to hang the rear wheel and try to rock it with both hands; if there is play, you will immediately feel it by characteristic knocking sounds. As a rule, this bearing does not require adjustment, but if play is detected, you can try tightening the hub nut; if this step does not help, then we proceed to repair.
To perform dismantling work, prepare a standard set of tools and perform the following sequence of actions:
- Loosen the wheel bolts, but do not remove the wheel itself.
- Remove the plastic decorative cap of the hub nut, and then unlock the retaining ring.
- Using a socket with an extension, loosen the tightening of the nut.
- Now, having engaged first gear and placing wooden blocks under the front wheels, jack up the car and remove the wheel.
- Unscrew the two guide pins and then remove the brake drum.
- Remove the brake pads.
- Now we finally unscrew the hub securing nut and remove it together with the thrust washer.
- Install a three-pin puller and compress the hub.
- Wash it with kerosene, wipe it, then clamp it in a vice and, using pliers or another suitable tool, remove the locking ring.
- Use a special puller to press out the bearing, then press in a new one and install the retaining ring.
- Reinstall the hub, making sure the final tightening of the hub nut is done after the vehicle is on the ground.
- Check the condition of the brake pads and drum and replace them if necessary.
At this point, the repair work on removing and replacing the rear suspension hub bearing on the Lada Priora car has been completed. Perform subsequent assembly in reverse order.
Sources
- https://for-priora.ru/?p=1610
- https://priora-remont.ru/zamena-podshipnika-zadnej-stupicy/
- https://zubilovaz.ru/lada-priora-podshipnik-stupicy-zadnej-podveski
How to diagnose the front wheel bearing on a Priora and the causes of failure
At the beginning of the article, signs of a malfunction were already mentioned, if they occur in the VAZ 2170, it is necessary to check the hub assembly. To diagnose a breakdown, it is enough to do several operations:
- Raise the car with a jack;
- Check the play of the suspended wheel with your hands;
- Rotate the wheel and listen for noise;
- Watch several videos on the principle of diagnosing the front wheel bearing of a Priora.
Faulty wheel bearing:
An example of the operation of a failed wheel bearing:
How to check the ball bearing of a wheel hub:
Wheel bearing diagnostics:
vazoved
I drive a LADA VESTA CROSS, Moscow
Then there will simply be no one to pay the fines! This is a Korean tablet video recorder 15 in 1 for Android..
I forgot about fines and Yandex Navigator.
There is FULL HD shooting, radar detector and GPS with 32 satellites. I got it at a reasonable price for such great functionality: HERE
Why does the front wheel bearing of a VAZ 2170 (Priora) fail:
- Expiration of service life;
- Incorrect operation of the suspension, aggressive driving style, road quality;
- Poor quality ball bearing (defect, counterfeit, manufacturing defect);
- Depressurization (dust, moisture, dirt);
- Malfunction of adjacent components (brake disc imbalance, etc.);
- Road accidents, collisions with deep potholes in the asphalt or holes.
What front wheel bearing is in Priora: dimensions, number, prices, characteristics
Before you begin the repair, you need to know which front wheel bearing is on the Priora, as well as which one is better in terms of price, reviews, quality, and manufacturer. The designers at the manufacturing plant included in the design an angular contact double-row sealed ball bearing with lubricant inside (LITOL-24).
According to reviews and statements from VAZ owners, the best option would be original products from VBF or foreign manufacturers: SKF, SNR, SWAG, FAG.
The dimensions of the front wheel bearing, as well as the catalog numbers of recommended manufacturers, are presented in the tables in a similar article on replacing the wheel bearing in a Lada Granta car; look for detailed information there.
Deciding on the choice of wheel bearing
I advise you to purchase the bearing only from a specialized automotive store. Thus, exclude the purchase of defective or counterfeit goods.
Please ensure that the bearing is wrapped in oiled paper and is free of dents and rust.
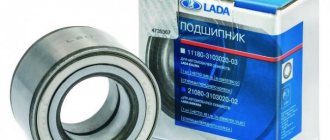
According to the factory catalog, the bearing number is: No. 11180-3103020-00.
The state standard number is as follows: No. 6-256707A1KE12.
The best choice is the Vologda bearing plant VBF.
Among foreign analogues, I recommend the brands SWAG, SNR, SKF.
When choosing, be guided by the numbers: FAG No. 713614030, SKF No. VKBA1414.
Check the dimensions of the part. They should be like this:
- outer diameter - 68mm;
— internal diameter – 35mm;
— width — 37mm.
You have purchased the bearing.
Let's proceed directly to replacing it.