Replacing the outer CV joint of a VAZ 2114
Hi all. We will replace the outer CV joint of the VAZ 2114. This is not a difficult job; if you have the tools, you can do it yourself.
Tools:
- good wrench and head for thirty
- hammer and screwdriver to hit
- pipe
- wooden block
- universal tongs and pliers
Vendor code:
- 2108-2215012 — external CV joint. I recommend installing a CV joint from GKN-Spidan, Loebro.
Step by step replacement
1. Remove the decorative cover of the hub nut and flare it.
2. We rip off the hub nut, if you can’t rip it off, then put the pipe on the knob for the lever.
3. Remove the wheel.
4. Unscrew the 2 ball fastening bolts.
5. Completely unscrew the hub nut.
6. Remove the rubber band securing the brake hose from the groove and pull the hub towards you so that the CV joint comes out of the hub.
7. As a rule, the boot is already torn, so we place the pipe on the inside of the CV joint and knock it out of its seat.
8. Remove the metal ring on the drive shaft. This ring comes with the new CV joint and needs to be replaced.
9. Fill the CV joint with lubricant, it is included in the kit.
10. We put the ring on the drive shaft.
11. We put on the boot, lightly coated with the same lubricant as in the CV joint.
12. We put the CV joint on the splines on the drive shaft and stuff it through a wooden adapter.
13. Move the boot closer to the CV joint and secure one side of the boot with a clamp. Tighten the clamp using pliers.
14. Fix the other side of the boot with a clamp. Tighten the clamp with pliers.
15. Mount the CV joint into the hub. Install the washer and tighten the hub nut. All this comes new complete with CV joint.
16. Fasten the two ball bolts. Use a pry bar to press the lever down and align the ball mounting holes.
Do everything slowly so as not to tear the new boot.
17. Install the rubber band into the groove that secures the brake hose.
18. Install the wheel and remove the car from the jack.
19. Tighten the hub nut.
20. Raise the car and remove the wheel.
21. Roll the nut and install the wheel.
Repair tool
To independently remove CV joints on a nine or any other car, you need to have the following tool on hand:
- A socket wrench for “30” or a socket with a strong wrench.
- Hammer and chisel.
- Balloon wrench.
- Set of spanners and sockets.
- Penetrating lubricant such as WD-40.
- Capacity of at least 5 liters.
- Marker or metal scriber.
- Jack, support and wheel chocks.
You may also need a grinder, drill, drill bits, and other attributes. The work can be complicated if the drives have never been removed - the threaded connections become dirty, which complicates disassembly.
Replacing the inner and outer CV joints on a VAZ 2114
Knocks in the chassis are a frequent companion in life for VAZ 2114 owners. Many elements that can cause knocking, bad roads, and low-quality parts can cause extraneous noise in the suspension.
A common source of the problem is the angular velocity distributor, or CV joint (grenade). The process of replacing a part is simple, so you can change it yourself. The question is often asked which CV joint for the VAZ 2114 is better: regular or tripoid. Among the most common arguments: tripoid is more reliable, but it hums and vibrates at high speeds. The regular one is less reliable, but the car handles better at high speed. However, you can find opposing opinions and arguments on this matter.
There is no clear answer which type is better. Operation in harsh conditions showed that there is no fundamental difference in driving sensations and reliability. The main thing is to buy a high-quality grenade made of well-hardened metal, install it correctly and monitor the safety of the anthers.
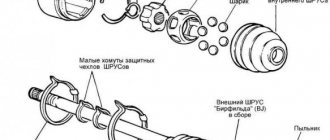
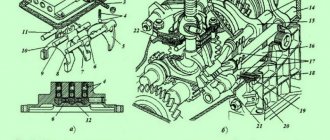
Scheme for disassembling the VAZ 2114 CV joint
Causes of malfunction
Among the main causes of CV joint failure:
- low quality metal and lubricant;
- insufficient amount of lubricant;
- rupture of the boot, entry of dirt.
The CV joint is a moving element, so it heats up when moving. A lack of lubricant or its lack of the necessary properties leads to wear of the hinges and the appearance of extraneous sounds. Due to the rupture of the boot, dirt gets into the grenade, solid particles harm the moving elements.
Fault diagnosis
The VAZ 2114 has 2 external and 2 internal CV joints. First you need to determine which one is knocking. The optimal test would be on a suspension diagnostic stand. If this is not possible, diagnosis by ear is possible.
Two signs indicate a grenade malfunction in a VAZ 2114:
- the sound resembles a crunch;
- It usually appears when turning.
The simplest and most accurate way to do a garage check is as follows:
- Place the car on a flat surface;
- Turn the wheels to one side (to the middle position or a little further);
- Drive off with medium speed. It is worth remembering that starting too smoothly may not reveal a crunch due to insufficient load on the CV joint, and starting too abruptly may lead to the drive flying out of the wheel.
- Repeat the operation by turning the steering wheel in the other direction. The appearance of a crunch indicates a malfunction of the outer CV joint on the side in which the steering wheel is turned.
Visual detection of ruptured anthers will also be a sign of a CV joint failure. If you discover a damaged protection for any grenade, it must be immediately removed, disassembled and cleaned. If there is enough grease and there is no significant wear on the hinges yet, it is enough to replace the boot and fill it with new grease. If the wear of the balls is obvious, it is better to change the grenade.
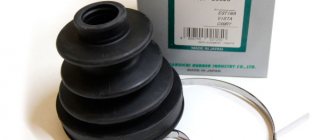
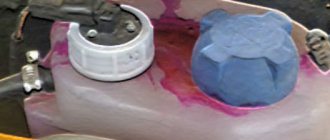
CV joint boot VAZ 2114 with a defect
It is more difficult to diagnose a malfunction of the internal grenade on a VAZ 2114. If it malfunctions, it crunches when starting off in a straight direction, and not when turning. But the same symptoms, for example, include play in the steering rack or wear on the engine mounts.
Sometimes the problem can be diagnosed from the pit by tugging on the drive from the gearbox side: strong play or the appearance of extraneous sounds indicate that the internal CV joint should be replaced.
Replacement
It is better to change a grenade yourself with an assistant.
Algorithm:
- remove the wheel, remove the wheel bolts and the hub nut washer;
- unscrew the ball from the steering knuckle;
- pull out the splined end of the outer CV joint;
- pull out the drive with the internal CV joint from the gearbox;
- if you plan to remove both drives, remove the internal grenade from the drive and insert it into the gearbox so that the differential does not move after removing the second drive;
- remove or cut off the anthers, thoroughly clean all hinges with a special liquid or just gasoline;
- when filling the CV joint, use a special lubricant suitable for these purposes; ordinary lithol does not have the required temperature characteristics;
- the retaining rings of each CV joint and the hub nut must be replaced;
- The inner CV joints are inserted into the gearbox until they are completely fixed; when adjusting, you can use a hammer with a wooden spacer.
It is quite possible to diagnose and replace a CV joint with your own hands. This does not require sophisticated car mechanic skills and engineering knowledge, but it allows you to get in touch with the car, see and feel how it works. Whatever the reason for the crunching sound, you need to check the condition of the grenade as quickly as possible. Delaying this will almost certainly mean bringing the part to the point of complete wear, and timely repairs will allow you to get by with “little loss.”
Replacing the outer CV joint boot of a VAZ 2114
Yesterday late at night I came from the garage, as in that song “Tired, hungry and angry, but very pleased with myself!” Anthers have been replaced. And it was like this.
So for work we need:
- CV boots - 2 pcs.;
- Anther clamps - 4 pcs;
- Hub nuts - 2 pcs;
- CV joint grease - 1 tube;
- Head for 30 (I took it with touch control using a crowbar) - 1 piece;
- Well, and a bunch of other tools (wrench, tweezers, chisel, hammer, vocabulary of obscenities, etc.)
Work plan
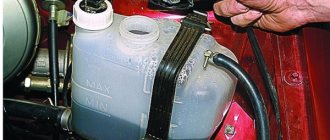
So, let's begin. We remove the cap from the wheel (those who don’t have it have less work), remove the hub nut cap. Unscrew the nut, I used a dowel, take a 30mm socket and loosen the hub nut. Then loosen the wheel bolts.
All this needs to be unscrewed
We jack up the car and remove the wheel, immediately put it under the car (just in case), and unscrew the hub nut.
Unscrewed
We unscrew the bolts securing the ball joint to the steering knuckle (I unscrewed it with a balloon)
Those that are higher
We press the lever down using a crowbar, hold it in this position with your knee, and at this time we move the steering knuckle and pull the drive out of the hub (after turning the steering wheel to the left). Cutting off the old boot
Drive pulled
Well, then it’s time to remove the CV joint from the shaft. I read that it can be removed by lightly tapping the inside. It wasn't like that. I remembered all my swear words, but it didn’t do any good. It was too late to go to the store for a puller, so I took out a welding tool and invented a puller. With his help, the CV joint was removed within five minutes. But I couldn’t do anything with a hammer in two hours.
Here's a simple helper
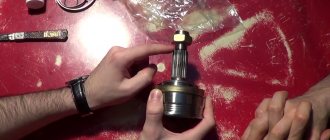
After that, we take gasoline and thoroughly wash the CV joint, at least to this condition
It’s clean, and most importantly, it can be easily tossed and turned in all directions.
Well, then we apply grease inside, put the boot on the shaft and put the CV joint in place. To do this, we screw on the old nut and, with a short but sharp blow of a hammer, drive it until the thrust washer. We put the boot on the CV joint and secure it on both sides with clamps. We put the drive in the hub and attach a new nut.
Collected.
Next, install the wheel, lower the car and tighten the hub nut with the same force as it was unscrewed. And don’t forget to seal it
Energized. I used a dull chisel for this.
We repeat the same procedure on the right wheel. That's basically it, the boots have been replaced, the car is running, I now have a puller for CV joints and invaluable experience in removing them.
How to change the CV joint on a VAZ 2114
Replacing CV joints on VAZ 2115, VAZ 2114, VAZ 2113
In front-wheel drive cars, one of the most problematic areas is the constant velocity joints. Abbreviated as CV joint or "grenade". The CV joint is a kind of ball bearing; its races have transverse grooves, which allows you to change the angle between the drive and driven axle shafts. All elements of the CV joint are made of ultra-strong alloys, the wear of which occurs extremely slowly, but, as practice shows, signs of a CV joint malfunction can appear even in a car that has recently left the assembly line of a car plant.
On cars of the VAZ family, it often becomes unusable after
55,000 km .
Causes and symptoms of CV joint failure on a VAZ 2115
The most common reasons:
- low quality CV joints, installation of fakes or defective spare parts;
- lack or poor quality of lubricants;
- damage to the boot and entry of abrasive debris or water into the mechanism;
- aggressive driving style and disgusting condition of the road surface.
One of the signs of replacing a VAZ 2114 CV joint is the appearance of a characteristic “crunch” . This sound can only be produced by balls that roll along grooves, because... have too much output. Working in close contact under constant load inevitably leads to changes in the properties of rubbing parts, their sizes, and the formation of wear.
Where there is no close contact of these elements and extraneous noise appears. The sound can appear at any time, but usually it occurs when turning, sharp acceleration, or overcoming obstacles. There are other signs indicating a hinge failure :
- slight jerks when starting the car or changing dynamics;
- play of the shaft located between the CV joints when trying to move it in different planes.
Ball joint advantages
The six-ball design with compact external dimensions is highly reliable and wear-resistant. The load is distributed over a large contact area, so the CV joint can transmit high-intensity torque without negative consequences for the part.
Also, the ball joint has a large angle of rotation of the cage, minimal play between the elements and, accordingly, low vibration loads when the machine begins to move. The principle of operation of CV joints when the vehicle is moving is modeled in the following video:
Characteristics of the inner ball CV joint with straight pitch grooves:
- Possible bending angle up to 22 degrees,
- Maximum axial movement up to 50 mm.
Indicators of the external hinge “Rtseppa” with radial guide grooves:
- Possible bending angle up to 54 degrees,
- Axial movement is not permitted by the design.