02/11/2021 5,501 VAZ Granta
Author: Ivan Baranov
The fuel filter plays a very important role in the functioning of the Lada Granta power unit. If it were not for this small detail, the engine life would be reduced several times and would not operate at full capacity and with frequent interruptions.
It is to ensure that only clean fuel enters the combustion chamber that a special purifier is installed. It is designed quite simply, but its importance is difficult to overestimate.
Car Lada Granta
It is important to know that replacing the fuel filter of a Lada Granta is a very simple process, for which you should not go to a service station and pay extra money. Any driver, after reading our article and watching the video, will be able to cope with this simple job on his own.
[Hide]
When is it necessary to change?
According to the instructions, the fuel purifier should be changed every 30,000 kilometers or as it becomes dirty. The latter is especially relevant for our conditions. Firstly, the low quality of the gasoline itself and, secondly, the unsatisfactory quality of transportation and storage containers. That is why, in order for the power unit of your car to operate steadily and reliably, we recommend replacing it every 10,000 km.
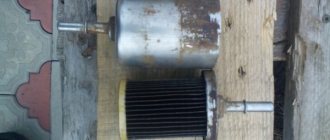
New fuel filter
How to choose the right fuel filter
The standard cleaner on the Lada Granta liftback, like on the sedan, is black and opaque. Inside there is paper filling in the form of an accordion. This design does not allow for full and timely detection of cell blockage or foreign objects getting inside.
A good solution was provided by third-party manufacturers, including foreign ones. They made the structure transparent. Which is convenient and practical to use. The driver can open the hood at any time and assess the degree of clogging, replace the Lada Granta Liftback fuel filter with a new one as necessary.
The issue of quality and originality remains important. Lack of information from owners, fraud by sellers, and a wide range of products mislead an inexperienced driver. To minimize the possible risk of buying a counterfeit, always check the catalog part numbers with the actual data in the operating instructions for your car. However, the manufacturer cannot list all verified suppliers, so the list will be limited.
In this case, use the services of official representative offices and dealers. Do not purchase parts or components at unusually low prices, since cheapness is a sign of low quality.
| Article/index/EOM | Price, rub.) |
| LADA 2123-1117-211 | from 250 |
| LYNXauto LF-1122 | from 300 |
| WEEN 140-2167 | from 350 |
| PURFLUX EP180 | from 350 |
| MULLER FILTER FB229 | from 400 |
The above list is not exhaustive and is presented for informational purposes only. May be supplemented with new catalog items as new products are released.
Causes of fuel filter failure
The fuel at our gas stations is not cleaned as it should be - it may contain dust particles or other contaminants. All this debris ends up in the fuel filter, which does not allow it to pass further into the system. But over time, as pollution accumulates in it, it ceases to cope with its responsibilities. This is very dangerous because it can cause damage not only to many components of the fuel system, but also to the power plant.
If you delay the change, problems may arise with the injectors, valves, and ultimately the engine will refuse to work at all. That is why it is important to know the symptoms of fuel barrier contamination, and if detected, replace this part in a timely manner.
Where is the fuel filter installed?
As standard, the purifier is mounted above the fuel tank, on the right side, closer to the threshold of the body. Some car tuning enthusiasts practice moving the filter to the engine compartment, having previously lengthened the fuel supply lines.
However, such a configuration is not entirely correct, at least from a security point of view. The location of the source in an area of elevated temperature conditions is unsafe.
What's the best way to change?
It is better to carry out the replacement yourself, because it is a simple process, and the service station will charge you a decent amount for it. In addition, if the vehicle is actively used, such a procedure will have to be performed frequently.
This video shows how the replacement occurs.
Tools
- new cleaner;
- keys;
- container for gasoline;
- screwdrivers;
- tweezers for removing the fuse.
Fuse removal tweezers
Stages
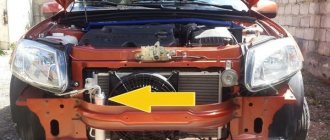
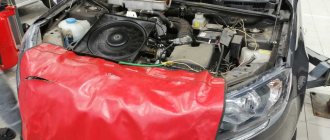
On almost all Lada Granta car models, the fuel filter is located to the right of the tank next to the rear wheel. It is held in place by mounting clamps. Getting to it is not difficult, but you will have to jack up the car if there is no hole or lift.
Fuse box cover
The required element is indicated by a red arrow
- So, first of all, we drive the vehicle into a pit or lift it with a jack.
- Since the fuel in a vehicle is always under a certain pressure, it must be relieved before intervening in the system.
- This is done simply. Turn off the ignition. Find where the fuse box is located.
- Remove the cover.
- Using the Granta electrical system diagram, we find the location of the fuel pump fuse. In the photo, the red arrow points to it
- Using tweezers, remove it.
- Now we need to start the engine, let it idle until it stops due to running out of fuel.
- Turn on the starter for a few more seconds. All pressure in the system has been released.
- We find where the fuel cleaning element is located. To make it easier for you, it is mounted on the gas tank near the right threshold of the body.
- Squeeze the clamps and pull the fuel pipe off the cleaner fitting.
- We also pull off the second tip of the fuel pipe from the second filter fitting.
- Now you need to slide the fuel purifier out of the bracket.
- Let's take it off.
- There may be some gasoline left in the filter; it must be drained into a previously prepared container.
- We install the new filter in the reverse order of removal.
- Please note that the arrow on the body indicates the direction of movement of the fuel, in our case - to the front of the vehicle.
- We put the tips on the fittings until the latches snap into place.
- We check how well the filter is secured, whether it is wobbly or loose. It is located between the stops, which are obstacles to its displacement.
- Replace the fuse.
- Turn the ignition key. The car may not start immediately, as it will take some time for the fuel to reach the combustion chamber.
- We look to see if gasoline is leaking at the junction of the fuel filter with the system.
Fuel pipe tip
Removing the second tip
Pull out the cleaner
Removing the old cleaner
When installing a new one, pay attention to the arrow on the body
New filter barrier
Replacing the Lada Granta fuel filter in a couple of minutes Leave a comment
Good day to all! In this article we will tell you how to replace the fuel filter on a Lada Granta. This procedure is very simple, so you can do it yourself without trips to a car service center. In addition, by doing the work yourself, you can save additional money, which can be directed in another direction. When do you need to change the fuel filter on a Lada Granta and how often should you do it?
Maintenance regulations require replacing the VAZ Granta fuel filter every 30,000 km. However, it is better to reduce this figure if the car uses low quality fuel. Or the main signs of a clogged fuel filter began to appear, which will be discussed below.
Signs of a clogged fuel filter in Lada Granta
If the fuel filter is clogged, the first thing you will notice is a floating idle speed. The engine will not run smoothly, but intermittently due to lack of fuel. Secondly, starting the engine will be difficult. Most often, you will need to press the gas pedal additionally when starting the engine. Thirdly, you will feel a loss of power. The car will respond more slowly to pressing the gas pedal.
These are the main signs, when they appear, you should first change the fuel filter. So, from words to action.
Which fuel filter should I choose to replace on a Lada Granta?
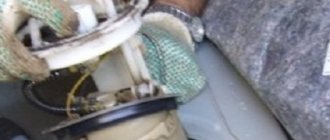
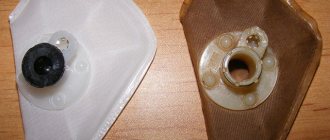
A fuel filter with a fitting (clip) is installed on a Lada Granta car. The fuel filter does not have a thread, i.e. secured using quick-release fasteners. The appearance of the filter is shown in the photo below:
Original filter number:
21230-1117010-82
Using this number you can easily find a list of analogues if you do not want to overpay for the original.
Replacing the Lada Granta fuel filter - step-by-step instructions
The fuel filter on the Lada Grant is located next to the fuel tank at the rear of the car. Replacement work is best done in a pit or overpass.
1. Relieve the pressure in the system. There are two ways to go.
1.1 You can pull out the fuel pump fuse, which is located under the front console at the passenger's feet. Then start the car. After 1-2 minutes, the engine will stall because the fuel line will run out of fuel.
1.2. Or you can relieve pressure from the fuel rail by pressing on the valve with a sharp object.
2. Disconnect the fuel supply hoses from the filter. This is done very simply. Just press the lock and pull the hose to the side. Be prepared for the fact that gasoline will remain in the filter and it will inevitably spill. There is no need to be afraid of this, just be careful.
3. Remove the filter from the bracket and install a new one in its place. Everything is very simple. However, you need to install the filter in the correct position. To do this, there is an arrow on the filter that shows the direction of fuel movement. This is the position we place the filter in. If you are in doubt, just turn on the ignition for a second and see which hose the fuel flows from. Place this hose in the direction of the arrow, i.e. to its beginning.
4. We snap the latches and we can say that the replacement is considered complete. Before starting the engine, turn the ignition key several times, but do not start the engine. This is necessary to expel air and pump fuel into the system. After starting the engine, make sure the system is tight.
Attention! If you pulled out the fuel pump fuse, don't forget to put it back in place!
That's it, replacing the Lada Granta fuel filter is complete. Thank you for your attention and see you again on our website. And below you can watch a video of replacing the Lada Granta fuel filter:
We also recommend that you look at the website:
Changing the oil in the Lada Granta automatic transmission Do-it-yourself replacement of the Lada Granta cabin filter Oil in the Lada Granta automatic transmission
How to replace the fuel filter on a VAZ 2190
Fuel filter KAMAZ
Removal: 1. Lada Granta, this is one of the cars on which you can replace the filter without using any tools (You just need your hands), Lada Kalina, by the way, also applies to such a car, before starting the replacement, you must relieve the pressure in the fuel system (How is this to do, read the article: “Relieving pressure on a VAZ”), and when the operation is completed, crawl under the car and begin removing the fine filter from the car.
2
First, disconnect the fuel pipes from the filter and, by the way, pay attention to how the filter is positioned (Which direction the arrow is pointing, which is drawn on the filter), when installing a new filter, the arrow shown on it should be directed in the same direction, about fuel pipes, in order to disconnect them you will need to press the clamps that secure them (see photo 1), after disconnecting the fuel will flow out of them (it is best to pour it into some kind of container, there will be little of it) and we immediately warn you, be Be careful, the fuel pipes are made of plastic and therefore break easily (If something happens to them, the pipes must be replaced immediately), as soon as the pipes are disconnected, remove the fine filter from the bracket in which it is located (see
photo 2) and replace the old filter with a new one.
Note! There are rubber sealing rings inside the fuel pipes; if they crack and thereby lose their tightness (i.e., gasoline will flow through them), then replace them with new ones; getting them out is quite difficult, because they are located deep , therefore, we recommend that in this case you immediately replace the fuel pipes assembled with tips; they don’t cost much, but there will be a 100% chance that gasoline will not leak through the O-rings and everything will be sealed!
Installation: In short, there is nothing complicated in installing a new filter, the main thing is that it is installed correctly (It has an arrow indicating the fuel directions) and also, when you install the filter, connect all the fuel pipes until they snap into place, see if it fits well , move it, make sure that after the first hit of a bump, the filter will not fly out of the bracket, then start the car and check for any leaks through the fuel pipe connections; if necessary, insert the fuel pipes all the way or replace them with new ones .
Additional video: Watch the video on replacing the fine fuel filter, it shows everything in detail so that you will 100% not have any questions.
Replacement process (photo)
First you need to reduce the pressure in the car's fuel system. Normal pressure in the fuel system is at least 3 atmospheres, so if you remove the filter right away, you and everything around you will get dirty with gasoline. You can use two ways to reduce the pressure in the fuel system.
- It is necessary to remove the fuse that controls the operation of the fuel pump. Its number in the mounting block is F21, capacity 15A.
The 5th one from the top is the fuel pump fuse. For ease of removal, there are special tweezers in the mounting block. It is red on top.
- Or lift the back sofa, find the fuel pump and remove the power terminal from it.
We recommend: Step-by-step replacement of the VAZ-2112 pump 16 valves
In all cases, you then need to start the car and wait until it stalls.
- Next, we climb under the car body and use a flat-head screwdriver to unclip the two latches. Most likely you will have to tinker, since there will be a lot of dirt from below, plus, it often rains heavily in Russia, therefore, the filter clamps may become sour.
Fuel pump mounting (FASTENERS)
- We remove the filter from the grooves; it is advisable to wrap it with a cloth, as there will be gasoline residues in the hoses.
Factory fuel filter
- We put on a new one. Observing rotation, there is a directional arrow on the fuel filter for this purpose.
Rotation on the filter
- We connect the fuel pump to the electrical circuit (either a fuse or a connector, depending on which method you chose to de-energize the fuel pump).
- We do a test run of the engine. To do this, turn on the ignition, but do not start it. We wait 5 seconds and turn on the ignition again. We wait 5 seconds and try to start the car. Pauses of 5 seconds are necessary for the fuel pump to build up pressure in the fuel system.
The fuel filter replacement is complete. If you have the necessary tools and conditions in the form of a pit or a lift, the replacement should not take more than 30 minutes. Car service centers or dealers will ask you for at least 500 rubles for this service.