Tuning the instrument panel of VAZ 2114
Today, many car enthusiasts are interested in tuning the VAZ 2114 panel. This is explained by its design, which is perfect for this activity.
In general, if we talk about the 2114th model, it should be noted that it is one of the last, well-designed and executed models of the VAZ “family” of cars. For most, do-it-yourself VAZ 2114 tuning in general, and interior improvements in particular, is just a matter of replacing seat covers.
However, this is a deep misconception; there are many objects in the salon that can be beautifully updated. Throughout the history of the VAZ 2114 brand, it was believed that interior tuning is a large-scale, multi-level complex of work, which consists of many different actions to improve various elements and, of course, among others, the instrument panel.
Operating procedure
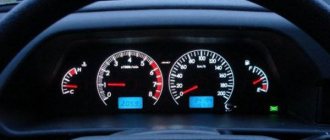
How many light bulbs are there in the dashboard of a VAZ 2114
Replacing the backlight on a VAZ 2114 begins with purchasing a set of LED lamps in the color you need. On the instrument panel, there are several sensors and indicators that require a certain number of diodes to ensure their normal visibility for the driver, especially at night. Therefore, before buying a set of lamps, calculate the required number of LEDs for each device. For example, a brake sensor requires 3 bulbs.
Location of light bulbs on the dash
It is advisable to buy with a reserve, at least 5 - 10 lamps more. Since, during installation, you can damage one of the circuits and the LEDs will not work. This often happens to those who are doing this work for the first time.
You need to start work by removing the instrument panel, as well as turning off the resistance. Next, carefully remove the old backlight bulbs from the factory sockets. On the reverse side of the VAZ 2114 panel, there are special sockets designed for installing LED backlight bulbs.
After the old backlight is removed, carefully grind off the heads of the LED lamps to the required size. If this is the first time this work is being done, then you will most likely need spare diodes. Next, when the heads are prepared, they need to be installed on the instrument panel. Replacement of light bulbs must be carried out strictly according to the same polarity as in the standard version.
After the diodes are in place, they need to be secured. Do not under any circumstances use screws for this. Scotch tape is also not suitable for this type of thing. When choosing a fastening element, you need to assume that it will heat up a little. Silicone glue is ideal for this. It will not damage the surface of the panel, thanks to its soft consistency, and will securely secure the light bulbs in the sockets.
Now, you need to check the quality of the work done. To do this, without putting the panel in place, turn on the ignition and look at the result. If everything works as it should, then the replacement was made correctly. If there are any inconsistencies, then you most likely have violated the polarity of connecting the backlight bulbs on the VAZ 2114. To fix the problem, you will need to find the connection diagram and double-check whether all the bulbs are in their places. If, after turning on the ignition, the backlight does not light up at all, then you need to check the integrity of the wires. The wires installed on diode lamps are quite thin and can easily break under the insulation or even break completely. So, be careful when handling them.
When you have made sure that all the light bulbs on the VAZ 2114 are working correctly, you can begin assembling the panel. To do this, all the backlight wires are brought out onto the board and carefully attached using a soldering iron. They should also be attached to the board in a certain sequence, otherwise the backlight may not work. If the wires are too long, they should be shortened so that they do not bend and do not fall into the grooves of the latches between the dashboard and the dashboard during installation. Otherwise, the wires will easily get damaged.
When connecting the pointer drive, also make sure that they are not deformed. Now, the instrument panel can be inserted back into the grooves and fixed with screws. The indicator arrows must be set with the ignition off, at the zero mark. Next, the last check: turn the ignition key, and if everything works, then the replacement procedure was completed correctly, and the new backlight will please the eye. Well, if something doesn’t work, then most likely you damaged the wires when installing the panel on the dashboard. In this case, disassemble everything again and check the integrity of the wires.
Comprehensive modernization of the VAZ-2114 instrument panel: first steps
Most often, a set of works to improve the dashboard of a VAZ 2114 is important and necessary, but at the same time, an interesting and serious task. The main task is to choose the right details and decorate them beautifully. It is always better to think through all actions related to various updates in advance, in advance.
Subsequently, this will avoid unnecessary mistakes and disturbing fuss. The right decision would be to draw up a work plan that you will follow and thanks to which you will not make mistakes, and the whole process will be a complete pleasure for you.
Ideas for tuning and modifying the shield
What tuning ideas can be used to modernize the tidy:
- Buy a new electronic panel. This tuning method is considered one of the most expensive, especially since its implementation will most likely require changing connectors. The cost of such devices is usually high.
- Buy or make inserts yourself and install them on the gauge scales in the dashboard. Such inserts can be purchased in online stores or developed independently. A significant disadvantage of this method is the need to completely dismantle and disassemble the shield, as well as disconnect the arrows from the sensors. This method is one of the simplest.
- Install LED bulbs to illuminate the device. In this case, you will also need to disassemble the dashboard, but the process of implementing this method is simpler. You will not need to remove the arrows from the sensors - you will only need to disconnect the old lamps and install diode lamps instead. When purchasing new LEDs, you need to be careful that the base of the replacement lighting sources is identical. If the bases do not match, you will have to solder the light bulbs. Instead of individual lamps, you can purchase a diode strip.
- The most painstaking option to implement and the cheapest option in terms of cost is to paint the arrows, as well as the numbers and divisions on the sensors with fluorescent paint. In combination with LED lighting, this will improve the brightness and contrast of the dashboard.
Tuning the dashboard can be performed in the following sequence:
- First you need to disassemble the car “device”. Every car enthusiast should know how to remove the instrument panel of a VAZ 2114. There is nothing complicated here, everything is quite clear, and the process itself does not require special skills or knowledge.
- Then it is necessary to refine the elements and parts. There can always be many nuances here. They depend on what you want to change and improve in your car. Everything should be thought through very carefully.
- At the end, you need to install the remade, updated “socket” into place.
Instructions for replacing the tidy yourself
How to change the control panel with your own hands:
- First, disconnect the battery from the network and unscrew the three screws with a Phillips screwdriver. These screws secure the left screen to the center console.
- The overlay is dismantled, as well as the protrusion located in its lower part, after which it can be removed from the bracket.
- Using a Phillips screwdriver, you will need to unscrew 5 screws located in the right cover, after which the screen itself can be dismantled.
- Next, you need to disconnect the connector with wires from the cigarette lighter, and also disconnect the block from the backlight bulb of this device.
- Then the niche for small items must be removed by pushing it from the inside. Using a Phillips-head screwdriver, you need to unscrew two self-tapping screws, and then push the diagnostic socket block into the panel itself.
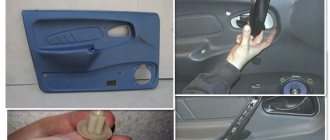
- Using a screwdriver, pry and remove the heater fan switch lever. Then, using a flat-head screwdriver, insert the tool between this lever and the handle, after which the latter can be removed.
- Now, using the same Phillips screwdriver, you will need to unscrew the two screws above the dashboard. The screws located below are unscrewed in the same way. After this, you need to use a screwdriver to pry up and dismantle the plug, and also unscrew the upper self-tapping screw of the control panel lining. Then two more screws located below are unscrewed.
- The tidy trim itself needs to be moved a little to the side. At this stage, we recommend marking the connected wires to the connectors. The pads themselves can then be disconnected. If you need to replace the cover, it can be removed and replaced. The device is dismantled and repaired or replaced, after which it is put back in place in the reverse order.
Photo gallery “Changing PP with our own hands”
How to easily update the “tidy” of a VAZ 2114
Upgrading the 2114's dashboard is actually not as complicated as it might seem at first. Buying such a “device” is quite simple. You should consider what options owners can use to update their VAZ 2114 wardrobe (examples in photos and videos).
1. AMS. This model has several features.
- To begin with, it is worth noting that you can order its design yourself;
- This panel is equipped with an integrated oil indicator, which is missing in the classic version. Its appearance is associated with the very persistent requests of many car enthusiasts to install this “component” as standard.
- This instrument panel looks more interesting due to the colored scales with chrome trim.
2. PRO-SPORT. This “tidy” is designed as an overlay for the instrument panel on the presented model. The updated design of this device gives them an impressive, completely new look. There are two options for its execution: with a light and dark backing. The backlight of the VAZ 2114 panel has a special brightness adjustment, but there is only one color - blue. The scales are glued after installing the insert. This is to give this element of the car an original look.
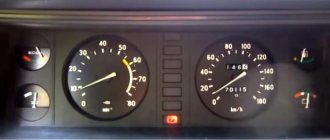
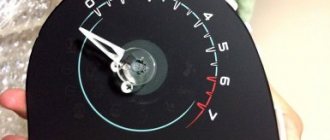
3. AMS-2. The central instrument was the tachometer, which was moved from left to center. The white scales create an overall sporty look for the entire panel. This allows you to quickly read the necessary information from it. The backlight has been redesigned and LEDs are used, with the help of which it is not difficult to read information at night. Installation is recommended to be carried out by qualified specialists, since its installation involves significant “redevelopment” of the classic model.
4. STREET STORM. The main feature of this model is its color design. Nothing was changed in the classic arrangement of instruments,
the emphasis was on the color scheme. The “appearance” of the dashboard has undergone certain changes, however, at the same time, its style fits harmoniously into the existing interior. Another feature of this model should be noted – its backlight. During the day it is light with red symbols. In the dark, you can easily change not only the brightness, but also the color.
5. "North Wind". This model is different in appearance. The developers have shown that even with a standard arrangement of instruments, the entire panel looks dynamic and bright. It clearly shows sporting features. The color of the backlight depends on the shade of the insert scales.
We independently remove the dashboard from VAZ 2113, 2114 and 2115
Do-it-yourself tuning of the VAZ 2114 interior
Usually, removing a dashboard is not difficult for a car enthusiast. But everything changes when it comes to VAZ cars. For some reason, the designers of these cars went to great lengths to make removing the dashboard an extremely difficult task. So is it possible to remove the dashboard yourself? Can. Today we will talk about how to do this.
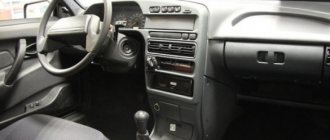
Torpedo device
What is a torpedo? In short, this is the dashboard. The word “torpedo” came to us from the West and has now become firmly established in the everyday life of domestic car enthusiasts.
Dashboard of a VAZ 2115 car
The instrument panels on the VAZ 2113, 2114 and 2115 are almost the same. These are complex collapsible structures made of metal with plastic inserts. In addition, in the panels of this line of VAZ models, engineers actively used polymer film, which covers most of the controls.
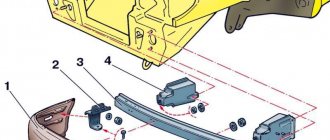
Diagram of the main elements of the VAZ 2115 dashboard
How to remove the instrument panel from a VAZ 2115
Since the instrument panels on the thirteenth, fourteenth and fifteenth models are the same, the procedure for dismantling the dashboard will be considered using the example of the VAZ 2115. But before you begin, you should stock up on everything you need.
Sequence of operations when removing the dashboard from a VAZ 2115
- Using a Phillips screwdriver, remove the screws that hold the left side of the console. The left side of the VAZ 2115 console is removed with a Phillips screwdriver
- After this, the lower edge of the sidewall is carefully removed from the bracket.
- The right side of the console is held on by five self-tapping screws, which are also unscrewed with a Phillips screwdriver. After this, the sidewall is carefully removed. The right side of the VAZ 2115 console is attached to 5 screws
- Now the handles installed on the stove damper levers are removed. This is done manually. The VAZ 2115 heater handles are removed manually
- Next, remove the handle from the fan speed control. To remove it, just pull it towards you. Just pull the handle of the VAZ 2115 fan towards you
- Use a Phillips screwdriver to unscrew the screws holding the dashboard to the brackets. There are 4 such screws (2 to the left of the panel, 2 to the right). Self-tapping screws from the VAZ 2115 panel brackets are unscrewed with a Phillips screwdriver
- Another 4 self-tapping screws are located at the window of the instrument unit (2 under the window and 2 above it). They can also be unscrewed with a Phillips screwdriver. Self-tapping screws from under the instrument window of the VAZ 2115 are removed with a Phillips screwdriver
- Above the instrument panel window, on the right, there is a small plug. It is pryed off with a flat screwdriver and removed. Under it there is another self-tapping screw, which can be unscrewed with a Phillips screwdriver. The self-tapping screw plug on the VAZ 2115 dashboard is pryed off with a flat screwdriver and removed
- After removing all the screws, the instrument block cover is removed. To do this, just pull it forward a little.
- Behind the cover there are wires that are removed from the sockets manually. All instrument wires of the VAZ 2115 are disconnected manually
- After disconnecting the wires, use a 13 mm wrench to unscrew the 2 bolts on the steering bracket. The nuts on the steering brackets of the VAZ 2115 are unscrewed with an open-end wrench
- Next, using a size 8 wrench, unscrew the nuts on the lower bracket mount. The nut on the VAZ 2115 panel bracket is unscrewed with an open-end wrench
- After this, the control unit is carefully removed from the panel, allowing access to the fastening nuts on the dashboard cross members.
- Next, using a Phillips screwdriver, unscrew the last external screw holding the dashboard to the left cross member. The last screw holding the VAZ 2115 dashboard is located at the driver's door
- After unscrewing the last screw, the dashboard is removed. Torpedo VAZ 2115 is removed
Video: removing the dashboard from the tag
In short, no. The dashboard on the VAZ 2115, 2114 and 2113 has a number of design features that are not found on other cars. Its cross members, mounting brackets and console sides are too long. There is nothing like this even on other VAZ models, not to mention foreign cars. But it should be noted that car owners often practice reverse replacement. In particular, a dashboard from a VAZ 2114 can be successfully installed on a VAZ 2109. But in this case, you have to trim the sides of the console and drill new mounting holes on the brackets.
Tuning for your pleasure
The main thing in the process of modernizing any car is efficiency. Every owner would like his car to look original and, at the same time, to feel comfortable in it. Oddly enough, the instrument panel is considered one of the favorite parts for tuning enthusiasts. It can be modified in different ways and, thus, distinguish your own car from a huge number of similar machines.
At the starting stage, it is necessary to prepare the material for work. Replacing a VAZ 2114 panel or its original update requires dismantling the standard panel. It will only be necessary to remove the speedometer protective glass. It is important not to break it. After removing the protective glass, you need to “uninstall” the arrows and indicators.
It is important to be careful as the arrows are very fragile. After that, pull out the standard tab. Then you need to change the backlight bulbs. The standard ones were green, but the purchased ones will be blue. We replace standard light bulbs with purchased ones, then check how they work. After that, install a new tab.
All this will look very impressive. At the end we install directional arrows and protective glass. If you modify your car in this way, it will look very beautiful.
Indicators
The VAZ 2114 injector dashboard indicators play an important role in informing the user about malfunctions
They help prevent errors in the system, so it is important to know which indicator means what. How does the panel work? If any problem occurs, the sensor immediately sends information to the panel, and the driver will see an orange signal light up
- The first icon is an oil lamp, which indicates a drop in the oil level in the crankcase of the engine assembly. If there is not enough oil, this indicator will light up. An icon that looks like a fountain indicates that there is insufficient coolant. If it lights up, there is less than 1 liter in the tank.
- Dome with a key - if it lights up, it means there is not enough coolant in the expansion tank.
- The icon looks more like a belt buckle and indicates that the car doors are not completely closed.
- A light bulb crossed out with a cross indicates that the parking lights or brake lights are faulty. Most likely, one of the devices will need to be repaired.
- A circle with six dotted symbols is a graphical indication of a malfunction in the brake system. Most likely, the pads are worn out and need to be checked and replaced.
- An icon with a man and seat belts is an indicator indicating that the driver has not fastened his seat belt.
The earlier version of the 2114 instrument panel had some other symbols, such as emergency oil pressure, handbrake engaged, Chek Engine light, and several others that indicate minor operating errors, but which are no longer used.
419c7cu-960.jpg
To begin with, the question arises: what is it good for? The old panel was made, to put it mildly, quickly: the steering wheel covers part of the instruments, the “tidy” itself is reflected on the windshield at night, thus turning the road into a computer quest.
Plastic, or rather its quality, does not stand up to criticism. After traveling several hundred kilometers, the entire cabin is filled with an obsessive creaking and terrible roar. Later the glove compartment begins to open. Ventilation is poor and it is cold inside the car in winter. However, all these problems can be solved. However, is it worth buying a car and immediately thinking about repairing it?
Another thing is the Europanel. She looks modern and fashionable. The material is softer and richer. It is certainly less noisy. Ventilation is also good.
Domestic assembly can be felt everywhere. The air flow control levers move slowly and do not reach the edges of the slots. There are also other little things: there is a big gap somewhere, something else falls off, the glove compartment sometimes opens by itself. But in terms of quantity and frequency, this is completely incomparable with the old version.
In addition, several drawers for small items warm the soul. Europanel is a modern and original solution to many problems associated with the “tidy” of domestic cars.
Possible malfunctions: signs and causes
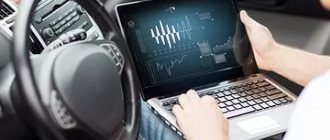
The PCB is an electronic unit, therefore, like any other device, malfunctions may occur in its operation.
What problems may a motorist encounter:
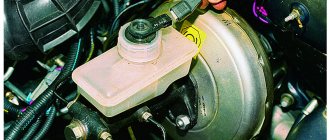
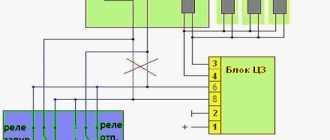
- The instrument backlight has stopped lighting, but all sensors and indicators are working normally. In case of such a problem, the fault must be looked for in the safety device marked F16. This fuse is responsible not only for the backlight in the tidy, but also for the turn signals, light alarm, and reversing lights. Therefore, if the turns and emergency lights work normally, then the reason should be sought in an electrical circuit break or short circuit.
- The tachometer or speedometer is not working correctly. As stated above, in such cases, you must first check the sensors - crankshaft position, as well as speed. If the sensors are working, then perhaps the problem lies in their poor contact with the car’s electrical network or damage to the connection wiring.
- Only some of the dashboard lights do not work, while all controllers function correctly. In case of such problems, the reason most likely lies in the failure of the lamps on the device; if they burn out, the devices should be replaced with new ones.
- The needle on the fuel level and coolant temperature sensors does not rise or has risen to the highest point. If the arrow lies, then most likely the cause should be looked for in the sensors and electrical connection circuit. The DTOZH in the “Four” is located in the cylinder head, and the fuel level controller is located in the fuel pump. Before replacing a failed device, you need to check the functionality of the connection wiring and contacts. If the arrow rises to the highest point, then most likely there is a short circuit in the electrical circuit. To find the problem, it is better to use the services of an electrician.
- If the panel as a whole is working normally, but some controllers are functioning incorrectly or malfunctioning, then the reason should be sought in the electronic circuit. There may be malfunctions in the processor (video author - Sergey Koshkin).