How to check the front wheel wheel bearing on a Chevy Niva
The failure of the unit is indicated by the appearance of a low hum from one of the wheels. The sound does not disappear when cornering and intensifies as the vehicle speed increases.
If you notice this, you should immediately carry out a diagnosis, since if the wheel bearing seizes while driving, the consequences and costs can be very high.
The upcoming replacement of the Niva Chevrolet front wheel bearing is determined as follows:
- the front wheel of the car is suspended with a jack;
- rotate it by hand and check the play.
Signs of bearing wear:
- Extraneous noise and metallic knocking.
- Noticeable play is checked by rocking the wheel perpendicular to its axis.
- Vibration in the cabin when driving.
Before carrying out repairs, for clarity, watch the video of checking the front hub of a Chevrolet Niva:
Video: “Checking the front wheel bearing”
Video: “Signs of a bearing failure”
Signs of trouble
Every driver must understand that a completely destroyed unit will lead to disconnection of the hub. If this happens at speed, the consequences can be disastrous. That is why it is important to recognize the first signs of a malfunction and carry out repair work in a timely manner.
The bearing life can be about hundreds of thousands of kilometers, since all elements are made of durable hardened steel. However, in practice, the node fails much earlier. There are several main causes of failure.
- The manufacturer supplies non-adjustable bearings with a sufficient amount of lubricant, which cannot be said about adjustable ones. It is the lack of lubrication that can cause the unit to quickly fail.
- The oil seal, on the one hand, retains the lubricant, and on the other hand, prevents the penetration of foreign bodies into the separator. Even a small grain of sand can lead to accelerated wear of moving parts.
- The presence of lubricant does not guarantee long-term operation, since everything depends on its quality.
- Prolonged absence of work to adjust the gap will lead to increasing play and subsequent wear.
- Features of the operation of the Chevrolet Niva imply disabling the differential lock when driving at high speed. If you do not follow this recommendation, the bearings will fail.
How to change a wheel bearing on a Niva
The steps to replace the front bearing after removing the nut can be divided into 4 stages:
- Removing and disconnecting the steering knuckle and brake drum along with the hinges, from the strut and CV joint.
- Pressing out old parts.
- Pressing in new wheel bearings (two for each wheel).
- We put the unit back together and tighten the nut and adjust the gap.
For repairs, you will need a standard set of plumbing tools. We also recommend that you familiarize yourself with the structure of the node.
Required set of tools for work:
- A 30mm socket wrench to loosen the nut;
- Screwdriver to unscrew the brake caliper;
- Set of sockets and ratchet;
- Round nose pliers;
- Hammer;
- Mandrel or pipe for pressing;
- Puller with claws (if possible);
- Puller with claws;
- Jack and vice;
- Torque wrench to properly tighten the hub nut.
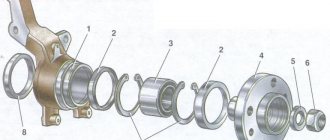
We place the car on a flat surface, engage first gear, remove the handbrake, and put chocks under the wheels. This completes the preparation. Also, before repairing, it is necessary to study the location of the elements of the car’s chassis according to the diagram: (pay attention to the steering knuckle - position 27, bearing - position 9).
Removing the front hub
The first stage begins with the following actions:
- Loosen the wheel and hub nuts. You need to carefully remove the decorative cap, then lift the replacement side and lower it onto the stops. We place wheel chocks under the rear wheels.
- We remove the front wheel using the well-known method, freeing it from the bolts. Next, you need to carefully remove the decorative cap.
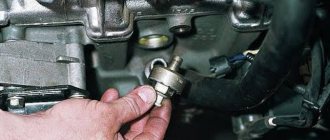
- Unscrew the hub nut. To do this, you need to unlock it with a screwdriver. Remove the cone washer and unscrew the ABS sensor (if equipped).
- After that, the pads are removed and the caliper bolts are unscrewed, and the casing bolts are also unscrewed. The caliper itself, after being removed with wire, is attached to the upper arm.
Next, you need to remove the entire rotating mechanism from the CV joint splines along with the ball joints. To do this, several operations are performed:
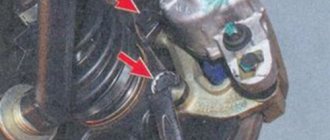
- Press out the steering rod ball pin using a puller, having first unscrewed the fasteners, as shown in the photo.
- Unscrew the pin bolt on the top ball. supports and pull it out of the socket.
- The lower ball joint must be disconnected from the lever by unscrewing 3 nuts.
- Once all the joints are disconnected, you can safely remove the entire assembly and begin replacing the wheel bearing.
Generator bearing: replacement recommendations
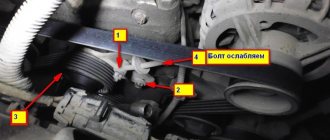
The following recommendations are given for replacing the Niva Chevrolet generator bearing:
- The first step is to remove the generator itself. First, the generator mounts are loosened, then the adjustment bolt is released. The next steps are to remove the belt and disconnect the ground from the battery. We are talking about the negative terminal. It is also necessary to disconnect the wires from the generator itself. The structure is removed through the lower part. Why does the mount itself unscrew?
- After this, the master begins to disassemble the generator. The first step is to remove the pulley. The owner will need a screwdriver to lock the rotor. The main thing is a careful approach to work. The pulley is unscrewed with the appropriate key. You will need to pull back the latches to remove the cover. The part is pulled towards itself. All connections with bolts are additionally processed. Then it will be easier to unscrew them.
- The next steps are to unscrew the screws and remove the voltage regulator unit. You also need to get rid of brushes for a while. The generator cover is disconnected from the starter, otherwise it will not be possible to gain access to the bearings themselves. The main thing is not to damage the winding during such work.
- After complete disassembly of the generator, access to the bearings becomes available. It remains to check the parts for any defects that have appeared, including cracks and chips. Do the parts rotate easily? Is there any play between them? The seats may suffer from wear, so they also need to be inspected.
- Next, you need to knock the bearing out of its seat. To do this, tap the surface with a small hammer. The blows must be strong, but careful, otherwise the result will not be achieved. A piece of pipe of the appropriate size will make an excellent stand. Removing the rear bearings is impossible unless a special puller is used.
- The properties of old and new parts must remain similar. The same attachment is used when pressing into the body. The anchor is where the rear bearing is installed.
- When reassembling, proceed in reverse order.
Below watch a video on how to disassemble and repair a Niva generator.
Removing the gearbox is a mandatory step for those who are interested in replacing a Chevrolet Niva release bearing that has failed. The work is labor-intensive, because you have to remove the drive shaft. It's good to have an assistant.
The following procedure is relevant when replacing the clutch mechanism:
- Installing the car on the inspection hole and removing parts;
- Removing the gearbox;
- If it is necessary to replace the bearing, the part is pulled out. Its base must be disengaged from the fork. The plug is removed from the structure, then the part is easy to remove.
The main difficulties are associated with removing the gearbox. Replacing a bearing is an operation that takes no more than 10 minutes. Before installing a new part, it is recommended to lubricate it thoroughly. The quality of the material used determines how durable the structure will be in the future.
Pressing out and dismantling old bearings
The removed assembly and steering knuckle do not require further disassembly. The only thing you need to do is remove the old oil seal using a regular flathead screwdriver, holding the hub assembly in a vice. It is not recommended to use them in the future; new ones are installed, just like the bearing.
Inside the fist, there are two tapered angular contact roller bearings. They are installed at random and form a hub unit.
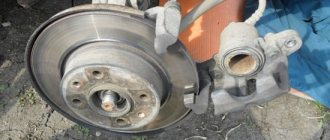
- To begin dismantling, it is enough to separate the brake disc mounts from the wheel turning mechanism.
- Don't forget to remove the seals.
- The small race of the inner bearing can be removed without any problems by hand.
- Next, at the same time, using the adapter, you need to knock out the outer roller bearing race from the pipe, as shown in the photo below.
- After separation, one ring with a separator remains on the hub, and the second remains inside the knuckle. The old clip is pulled off with a special puller equipped with grips.
- The second part of the part is knocked out of the trunnion through a spacer made of soft metal in the form of a rod or carefully with a screwdriver.
- The attachment is placed against the clip and light blows are applied, moving it in a circle.
- After this, the old grease should be carefully removed from the cavity.
Shevik hub design
In order to understand the purpose of a wheel bearing, you need to find out what a hub is. So, this is a structural element of the car that connects the shaft to the wheel. Two tapered bearings are responsible for the operation of the hub, that is, its rotation on the shaft. The main feature of the hub is the ability to adjust the gap or the so-called backlash. But over time, when the car is used, the sliding mechanisms are susceptible to abrasion and this gap increases. Subsequently, this is reflected in the wheels; they begin to vibrate on the axle , which leads to their distortion and abrasion of the rubber. To fix the problem, it is necessary to replace the front wheel bearing.
Bearing design
The front wheel bearing consists of two roller cages (internal and external), which are installed in pairs.
The rollers play an important role in the design of this product. They cause “soft” friction between the wheel and the axle. During friction, the rollers are exposed to mechanical force and a large amount of thermal energy is released (the rollers are heated to extremely high temperatures of over 200 degrees). Not every metal can withstand such temperatures, so the hub rollers are made of special, ultra-strong alloy steel. More detailed information about the manufacturing process can be found on the Internet. If a separator with rollers is used in a dry state, they heat up to extreme temperatures and soon collapse (disintegrate). To reduce the effect of friction and remove the generated thermal energy, special lubricants are used.
Use only special lubricants for sliding mechanisms that are designed for normal operation at high temperatures.
The most common lubricant is Litol-24, which can withstand temperatures above 180 degrees. You cannot lubricate the product with Solidol lubricant, as it can withstand temperatures no higher than 100 degrees.
When to replace?
There are two reasons indicating that the sliding mechanism of the front structure of a Chevrolet Niva car needs to be replaced:
- knocking and increased play of the front wheel manifested in the form of rubber abrasion;
- hum or grinding noise from the front end.
To diagnose faults in more detail, it is necessary to disassemble the mechanism and check the serviceability of all parts. We will replace the front wheel separators with our own hands.
Replacing bearings
Replacement is carried out in stages:
- Removing the front hub mechanism;
- Removing the sliding mechanism;
- Installation of new parts.
- Assembly.
Therefore, we will perform all the actions in order on one front wheel of the SUV; on the second, the actions are similar.
- The Niva Chevrolet car is placed on a flat surface and the front part is raised using a jack. The wheel is removed, and we begin to remove the hub.
- The caliper with pads is disconnected. The process of removing it is described in other sections.
- The adjusting nut of the mechanism is unscrewed from the axle.
- All elements of the front wheel mechanism are removed. The hub is separated from the brake disc by knocking it out. (Detailed description of mechanism extraction will be provided in other articles).
- Now let's move on to extracting the sliding mechanisms. Extract:
- The outer bearing is removed from the brake disc using a puller.
- The oil seal and ring plate are removed from the inside.
- Let's move on to removing the inner bearing. To do this, we clamp the hub structure in a vice and knock out the separator structure from the back of the hole with a chisel.
Use the chisel carefully so as not to damage the hub groove. It is necessary to knock out with successive movements along the separator body.
Before installation, the seat must be cleaned and thoroughly lubricated.
Although wheel bearings have a long service life, like many parts, they are not designed to withstand strong mechanical impacts on the mechanism shaft. And this happens when you get into even a small hole or pothole. The part may not be damaged immediately, but a microcrack may appear on it, which will ultimately lead to a sad outcome. Therefore, control the movement of the car and always monitor its mechanisms.
Installing new bearings in the steering knuckle
It is important to know:
Manufacturers do not lubricate their bearings and rings very generously, so you will have to add the missing amount of grease yourself. Litol-24 in an amount of 40 g is suitable, apply lubricant to the separator and rollers before replacing the Niva front hub.
- We insert a new outer race of the inner and outer roller bearing into the prepared hole of the steering knuckle. We press the clips on both sides, in the same way as they were installed at the factory.
- Next, apply lubricant to the raceways and spread it in an even layer.
- We insert the inner race and close it with an oil seal. Lightly press the boot with a mandrel of the required size. We do the same on the other side, install the clip and boot.
- Now we insert the hub into the steering knuckle, namely into the holes of the installed roller bearings.
- The hub must be inserted smoothly and without distortion. In some cases, depending on the actual mounting diameters, pressing through a press will be required. In this case, a spacer was used.
- Replacement is complete. We install the assembled unit in the reverse order. Read about adjustments below.
If there is no hydraulic press or puller, replace it using a hammer and a mandrel (or using an old ring). This option is not recommended, but is demonstrated in the video for your reference.
- The outer race is inserted into the hub socket and driven without distortion through a wooden spacer.
- For its final landing, you can take a pipe of a suitable diameter or a mandrel.
- Then a separator is placed inside, and the assembly is assembled using the reverse algorithm.
Video: “Method of replacing a wheel bearing without a press”
The procedure for adjusting the bearing clearance:
- After assembling the unit, tighten the locknut to a torque of 19.5 N.*M (or 1.95 kgf.m), turning the hub itself to the sides.
- We loosen it back and tighten it to a torque of 6.8 N*M (or 0.68 kgf.m).
- We check the gap according to the diagram, the limits are from 0.02 to 0.08 mm.
- We lock the locknut by bending the edges.
It is important to know about the adjustments:
We recommend that you visually watch the adjustment process in the two videos presented below.
Video: “Adjusting wheel bearings”
Video: “Diagnostics of the gap in the hub assembly”
Causes and signs of failure of the Chevrolet Niva hub
A broken car hub is usually a serious problem and should not be ignored.
Among other things, a worn hub heats up more when the car is braking, which negatively affects the performance of the car’s brakes. It happens that damage to the hub occurs gradually and, as a rule, this is indicated by an unpleasant sound, accompanied by vibration of the body or weak shocks.
The main reasons for hub failure are :
- careless driving on roads;
- multiple overloading of cars;
- driving on sandy soil or “mud baths”;
- frequent car slipping;
- aggressive driving style with sharp acceleration and braking.
These reasons can have a significant negative impact on the hub housing, outer or inner bearing ring. They are also sources of dirt, moisture and sand getting inside the bearing mechanism, which causes the journal to fail.
What is a non-adjustable bearing and why is it installed on a Chevrolet Niva
The problem with standard wheel bearings is that they need to be constantly adjusted during vehicle operation. If this is not done in time, they will fail, creating a howl or hum when moving. You can save yourself from such problems by installing non-adjustable hubs or double-row bearings.
On sale you can find reinforced, non-adjustable hubs with double-row bearings. According to the manufacturer, this modernized unit has the following advantages:
- there is no need to adjust (the bearing tightening is precisely set during its production);
- no need for regular lubrication;
- eliminates rotation of bearings on the hub;
- eliminates wear of bearing seats on the steering knuckle and hub;
- a ball bearing reduces friction in the hub assembly;
- The service life of the hub is increased due to thickening
A good way to strengthen the suspension is to install non-adjustable double-row wheel roller bearings on the Niva instead of the standard ones. But there is one nuance - such products have a different outer diameter; there are 2 ways to solve this problem:
- 1) Boring the “native” fists for a double-row p/w;
- 2) Insert a set of spacers and fix both roller bearings, making them non-adjustable;
- 3) Buy and supply a ready-made kit.
For options 1 and 3, a SKF bearing marked SKF IVECO BTH-1024 C is suitable. For the second option, you need to purchase a special set of bushings, the installation of which is described in the video below.
Video: “How to make non-adjustable bearings from adjustable bearings”
Reworking the hub and installing a non-adjustable bearing
Such a hub, for an adjustable bearing, can be made from a standard part. It is necessary to bore the hole to the size of the bearing +50 microns (0.05 mm) for interference, and press it into the resulting mounting hole.
- According to the instructions provided, we dismantle the old parts.
- We grind the hub to the required diameter ourselves or order it from a turner in your city.
- We press in a new double-row ball bearing, for example SKF IVECO BTH-1024 C.
- Install the retaining ring.
- We install a spacer (washer) of about 3.5 mm and a seal (the size of the washer is determined using additional measurements).
- The process is complex, so it is recommended to watch it in video format.
Video: “Installing a non-adjustable bearing”
Video: “Installing reinforced bearings”
Video: “Replacing an IVECO bearing”
Now let’s look at the question of choosing a suitable bearing for replacement, both in the case of a conventional replacement and for conversion to a double-row reinforced one.
see also
How to check the hub
- 36 0 22k
Which hub should I buy for a Chevy Niva?
- 0 2 2k
Wheel bearing grease
- 110 4 122k
How to unscrew the hub nut
- 33 0 95k
What kind of hubs are on Shnivy?
- 0 2 6k
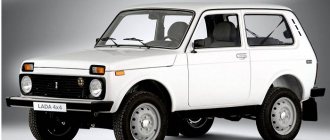
The Chevrolet Niva SUV (VAZ 2123) has proven itself to be a reliable car in off-road conditions. Despite the use of well-known Chevrolet brand parts in the design of the car, some chassis problems remained the same, inherited from the Soviet Niva. Such an important detail as the hub was not spared.
If we talk about the design of the hub, it is a component of the vehicle's chassis that connects the shaft and the wheel disk, and transmits torque from the rotating axis of the crankshaft to the wheel. In addition, the hub (also called the axle) plays an active role in braking the car, since the brake disc is directly attached to it.
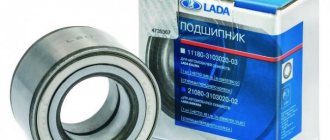
How to choose a replacement part and bearing number
Once you are convinced that the bearings need to be repaired, you should select a hub bearing in the retail chain based on three main criteria (by default, single-row tapered roller bearings are installed - the new kit must have a nut):
- Chevrolet Niva front hub part number: 2007108 (catalog number - 2121-3103020-10, bearing according to GOST - 2007108, foreign equivalent according to ISO - 32008).
- You need to buy two roller bearings in the kit.
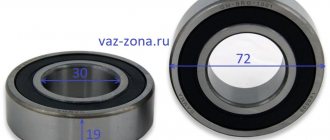
- Dimensions of the Chevrolet Niva front hub bearings: height – 19 mm, internal diameter – 40 mm, external diameter – 68 mm.
- The cost of a new set of parts for the hub, including double-row bearings, as well as suitable manufacturers, are presented in the table below.
Table - Recommended manufacturers, numbers and articles of hub bearings
| N p/p | Manufacturer | Catalog number | Price for 2021, rub. | Additional Information | |
| Dimensions (mm) and parameters | Applicability | ||||
| Standard sets of two bearings | |||||
| 1 | Volzhsky standard, Russia | 2007108 | 200 | Inner diameter - 40 mm; Outer diameter - 68 mm; Width -19 mm; Weight - 0.278 kg; Number of rollers in the bearing - 21 pcs.; Roller dimensions - 7/11x19 mm; Dynamic load capacity - 40 kN; Static load capacity - 52 kN; The maximum rated speed is 7000 rpm. | Chevrolet NIVA trim levels L, LC, LE, GL, GLC. In that case Restyling 2021. |
| 2 | VPZ, Russia | 32008 | 200 | ||
| 3 | SKF, Sweden | 32008X/QSKF | 770 | ||
| 4 | KOYO, Japan | 32008JR | 880 | ||
| Double row bearings (for reinforcement) | |||||
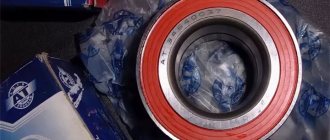
| 1 | OPTIMAL, Germany | 681 923 | 2200 | Inner diameter - 40 mm; Outer diameter - 73 mm; Width - 55 mm; Number of raceways - 2 pcs.; Seal - Yes. | Likewise |
| 2 | RUVILLE, Germany | 4013 | 2480 | ||
| 3 | SKF, Sweden | BTH-1024 C VKBA 3551 | 2300 | ||
It is important to know:
Parts of satisfactory quality last about 20 thousand km, mileage with high-quality products exceeds 30 thousand km. The most popular products from the Volzhsky and Samara plants are labeled SPZ-GROUP. The average price of a wheel bearing is 1000 rubles.