02 September 2015 Lada.Online 25 246 0
The windshield of a car is replaced if it becomes scratched, scuffed or cracked. The process is not complicated, but requires knowledge of certain skills. Replacement of fixed body glazing for all Lada cars (Granta, Priora, Largus, Kalina, Niva 4x4, Vesta or XRAY) and foreign cars is similar, the only difference is in the requirements for glue.
practical guide
To complete the work you will need:
- gun for applying glue;
— string for cutting glue-sealant glass;
— a heated room in which you can leave the car without moving while the glue dries;
— repair kit for gluing glass and a device for applying glue. The set consists of a tube with adhesive-sealant, an activator for degreasing the surface, a primer, a cloth for degreasing and a brush for applying the primer.
Since the materials offered by different manufacturers may vary, you should also read the instructions included with the repair kit before performing the work.
Kits (from different manufacturers) can be supplemented with spacers for glass and a string for cutting the adhesive seam. The string can be purchased separately, but, as a rule, it comes complete with handles.
As a last resort, you can use fishing line or welding wire with a diameter of 0.8 mm from a Kempi-type semiautomatic machine.
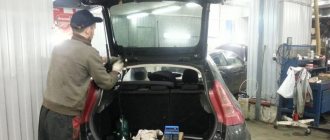
We carry out the work with an assistant.
1. We prepare the car for the work.
2. Remove the air intake grille.
3. Remove the interior rear view mirror.
4. Use a slotted screwdriver to pry off the three rack trim holders.
5. Remove the lower edge of the trim from the instrument panel and remove the trim.
6. Similarly, remove the trim from the right pillar.
7. Having opened the front doors, remove the upper door seal on each side of the car to a level just above the windshield.
8. Remove the plastic trim from the side edges of the windshield.
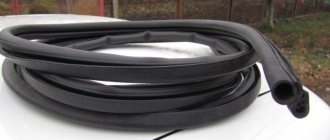
9. Remove the rubber trim from the upper edge of the windshield.
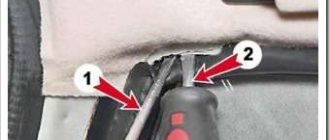
10. Using a screwdriver, remove the two adjusting wedges from the underside of the glass.
11. Using wire cutters, bite off a piece of string about a meter long. We pierce the glue-sealant with a string and bring the end of the string out.
12. We put handles on the ends of the string.
In the absence of special handles, the string can be tied to the handles of screwdrivers or to wooden blocks.
13. Together with an assistant, we cut the glue seam along the entire perimeter of the glass with a string, like a two-handed saw.
14. Remove the glass from the car.
15. Using a sharp knife, carefully cut off the remaining glue seam from the body (the permissible residual seam thickness is no more than 2 mm).
Design features and when it may be necessary to replace the windshield on a Priora
Unlike the Lada model range, starting from the VAZ-2101 and ending with the VAZ-2109, on the Priora the windshield is not attached with a rubber seal, but “sits” on the sealant. This method is modern and has some advantages. In addition to the aesthetic appearance, installing glass with sealant increases the reliability of its fastening. It is impossible to squeeze it out of the passenger compartment with your feet, since it is securely connected to the body part. However, in the event of an accident, you can break the glass itself to get out through the front.
The need to remove the windshield on a Priora arises in a number of the following cases:
- When it is necessary to replace a product due to the unsuitability for further use of the device installed on the vehicle. The reason for this may be damage to the glass in the form of chips and cracks.
- If the seal of the product has been broken. This can be determined by the corresponding signs of drips in the interior in the area where the device connects to the body part. Such phenomena often occur when installing a windshield without following the instructions.
- When to replace gutters. If these parts were installed poorly from the factory, they may come off during vehicle operation. To install them correctly, you will need to remove the windshield.
The need to dismantle the device may also arise if traces of corrosion appear in the front part of the roof or on the side pillars. To prevent further spread of negative consequences, the metal should be cleaned and processed. Usually in such cases, the areas of the body to which the windshield is attached are also affected.
If there is a need to replace the windshield on a Priora, then it is not at all necessary to visit a special service station for this. It is quite possible to do the work yourself, provided you have the appropriate tools. We will consider in detail what tools and materials will be needed to remove and install the windshield on the Lada Priora.
This is interesting! Often on a Priora the windshield is damaged during the removal and replacement of the windshield wiper trapezium.
Removing the rear door glass
We carry out work when replacing door glass. Operations are shown on the left rear door. The glass of the right rear door is removed in the same way. Remove the door trim (see “Removing the rear door trim”). Set the glass to the bottom position.
Remove the inner glass seal.
Using a slotted screwdriver, pry the outer glass seal from the inside of the door...
...let's take it off. Set the glass to the top position.
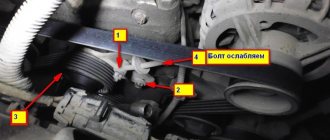
Using the “8” head, unscrew the bolt securing the glass guide...
...and bring the guide down through the technological hole in the inner door panel.
What is needed to replace the windshield on a Priora
On the Priora, the windshield is mounted on a sealant, which somewhat complicates the process of dismantling work. As for installing a new product, it is much easier to do this than, for example, if it were installed on a rubber seal (like on a classic). To dismantle the windshield from a Priora, you will need the following list of tools:
- string - it is important to use a string, and not a fishing line or ropes;
- string holders - special handles;
- awl for removing the windshield. It is distinguished by a specific design - a flat surface of the knife with a cutout in the end part;
- flat-head screwdriver for removing standard glass displacement limiters.
Having such a tool at your disposal, you can not only remove the windshield from the Priora yourself, but also carry out such work at a professional level. However, as you understand, having a special tool does not mean that the work will be done correctly. That is why below are detailed instructions on how to remove the windshield on a Priora.
After dismantling, you will need to install a new product. To implement this process you need the following materials:
- adhesive-sealant on which the windshield will be glued (special set);
- kit for replacing the windshield on a Priora. It includes such elements as side gutters or edging, top sealing rubber and glass movement limiters;
- degreaser;
- new windshield.
After preparing a complete list of tools, you can resort to implementing actions. To do this, we will consider in detail the process of how to replace the windshield on a Priora yourself.
What glass color should I choose for replacement?
It would seem a strange question, especially against the backdrop of the ongoing discussions of traffic police (state road safety inspection) fines in the area of fines for tinting the windshield. But it's not that simple! The car owner should know that they are fined for window tinting applied using film, but the one produced by the factory with a certain amount of darkness is allowed! And this is a very useful thing, especially when driving in places with bright lighting. This protection also helps with sudden glare at night, reducing the risk of an accident. Therefore, moderate factory tinting, and even if it is a color close to the car’s paint, will not only not harm, but will also be beneficial on the road.
Replacement process
Note! First you need to remove the door trim.
Dismantling
So, the door lock pin is manually turned away. This may be difficult to do, so it is recommended to use a Phillips screwdriver. After this, you will need to remove the decorative insert from the inside door handle. Next you need to unscrew 2 screws from the handle and 3 from under the pocket. When turning forward, the handle can be easily removed.
Replacing the side glass in a VAZ 2110
If there are front speakers, they also need to be removed. If there are mechanical window lifters on the VAZ, you need to carefully unhook the fixing bracket with a screwdriver and remove the handle. Usually the casing is secured with plastic pistons, which often break, so it is advisable to buy them with a sufficient supply. Since it is unlikely that the casing can be easily removed, it is recommended to use a screwdriver, but it must be wrapped with electrical tape so as not to scratch the paint.
Explanation: digital symbols on glass
Auto glass receives the following designations:
- ASI M461 DOT 183 - the product complies with the ANSI Z1 standard adopted in the USA.
- E2 43R 001207 – the product has successfully passed tests according to the standards of UNECE Regulation 43.
- ….8 – the number of dots indicates the month, the number – the year (in this case – 2021 or 2008 – this can be determined by the type).
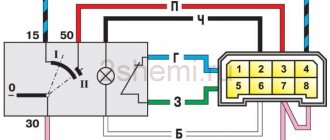
The heated windshield of a Priora car should work correctly. To check this, the following connection diagram is proposed:
A “+” wire must be drawn from the battery to the mounting block, then placed inside the relay block. At the top of the car glass, connect the contact to the negative wire. Route the wires under the casing. From the relay, run the brown wire to the alternator warning light (white wire).
Continue connecting according to the diagram - everything is simple.
Glass types
Previously, the Volzhsky Automobile Plant installed two types of windshields. This is about:
- hardened;
- triplex.
How are they different from each other? The latter is made, in fact, from two layers of glass and a film located between them. Its disadvantage is less transparency. The hardened one does not have this defect, but it is single, and therefore it is easier to manufacture, therefore, the price of this option is lower, as well as the quality.
As practice shows, most car owners still prefer triplex, and at the first opportunity they try to install it instead of hardened ones. Why is this happening? The thing is that the cheaper option has an extremely unpleasant property - when destroyed, such glass simply disintegrates into many tiny fragments. If this happens while the car is moving, then they all end up in the cabin and often cause injuries to both the driver and passengers.
At the same time, thanks to the film, the triplex retains its integrity, even if a fairly large object gets into it. Fortunately, VAZ currently supplies vehicles exclusively with this type of glass.
When purchasing a new windshield at the market or in a store, you should make sure that they sold you exactly triplex. Cheap options, as a rule, are still found in car markets. How to distinguish them? It’s quite simple - multilayer, if you look at it from the side, it has a characteristic structure - the installed film clearly shows through.