07/30/2021 9,678 VAZ 2109
Author: Ivan Baranov
Replacing the VAZ 2109 clutch cable is required if it breaks. Signs that the cable needs to be changed are the appearance of clicks when squeezing the clutch pedal (CP), the pedal falls down and does not rise back, and problems arise in controlling the clutch. The article provides detailed instructions, thanks to which any car enthusiast can change the clutch cable on a VAZ 2109. In addition, a video is attached that clearly shows the entire process.
[Hide]
Replacing and adjusting the clutch cable on a VAZ 2108, VAZ 2109, VAZ 21099
Welcome! Today in this article we will look at the correct replacement of the clutch cable. And also after replacing the cable with a new one, we will describe in detail the steps by which you can adjust this clutch cable.
Summary:
Where is the clutch cable located? Part of the cable is located inside the car, that is, to be more precise, it is connected to the clutch pedal. And the second part of the cable is located on the left side of the engine compartment, for clarity, see the photo below:
Note! The cable, as you already understand, is indicated by three red arrows!
- The arrow under the number “1” indicates the place where the cable continues to move immediately after exiting the hole in the front part of the body.
- And the arrow numbered “3” shows the place where the tip of the cable sheath is screwed to the bracket.
When do you need to change and adjust the clutch cable?
It must be replaced if: • It breaks, if it is deformed and for other reasons that will also be associated with the cable.
Note! Before the cable breaks, it will begin to make various sounds by which you can determine that the cable already needs to be replaced, and the sounds will be like crackling, crunching, etc.
It is subject to adjustment if: • The clutch pedal moves incorrectly, that is, if the pedal moves too little or too much, which does not correspond to the norm.
• It also needs to be adjusted if the clutch pedal is located at a different level with the brake pedal, which also does not correspond to the norm.
Repair and operation of the VAZ 2108 2109 21099 car
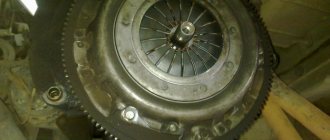
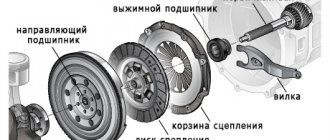
The VAZ 2109 clutch consists of a clutch basket, pressure plate, release bearing, drive foot, release bearing, cable and clutch pedal. The fact that the clutch drive is cable driven, and not hydraulic, like the classic models, is a distinctive feature of the VAZ 2109.
In classic models, when pressed, the clutch pedal presses on the piston of the clutch master cylinder, from which the fluid pressure is transmitted through a tube to the clutch slave cylinder. In the VAZ 2109 everything is simpler; the clutch pedal is connected to the clutch release foot via a cable. The clutch cable is connected to the clutch pedal and is inserted into the engine compartment.
How to replace the clutch cable on a VAZ 2108-VAZ 21099?
Removal: 1) First, using two wrenches, loosen both nuts that secure the cable sheath to the bracket.
2) After this, slightly lift the cable with your hand and remove it from the socket.
3) Next, disconnect the clutch cable lead (Indicated by the red arrow) from the release fork (Blue arrow).
4) When the cable is disconnected from everything in the engine compartment, then go into the car interior, and then use a screwdriver to pry the pedal pin bracket and then remove it.
5) Now disconnect the upper end of the cable from the pedal pin.
6) And as a result, going back to the engine compartment, pull the clutch cable out through the front panel.
Note! The new clutch cable is installed in the reverse order of removal. But just below we have specially prepared instructions on how to install a new clutch cable!
1) In the same way, first insert the new cable through the holes in the shield.
2) After this, in the cabin, install the upper end of the cable on the pedal pin, and secure the whole thing with a locking bracket.
3) In the engine compartment, first place the cable lead on the fork. Then insert the cable between the bracket and then tighten both nuts securing the tip of the cable sheath.
Note! After completing the operation, adjust the clutch cable!
Clutch cable adjustment:
Use two wrenches to make adjustments. Using them, loosen both nuts that secure the end of the cable sheath. And then, by rotating these nuts, tighten the cable so that the clutch pedal travel is “125–135 mm”, and so that it is flush with the brake pedal.
Additional video materials: Would you like more details about replacing and adjusting the clutch cable? If yes! Then, in this case, we have prepared a short video for you, after watching it, you will have no questions left.
Note! Well, if you still have questions, then ask them in the comments and our employees will answer them as soon as possible!
Malfunctions and reasons for their occurrence
But this type of drive is also not eternal and problems with it will only be a matter of time.
Over time, the cable threads corrode and break, which is why at one point when you press the clutch pedal, it remains in the depressed position and does not return to its original position.
For the same reason, it happens that pressing the pedal and returning it is difficult, and a grinding noise can be heard. This is a consequence of the “fluffing” of the cable - rotted metal threads rest against the braid, significantly complicating movement.
All these malfunctions occur for one simple reason - moisture gets inside the braid, which leads to corrosion.
And although manufacturers are trying to combat this problem by applying a polyethylene protective layer over the cable, such measures can only extend the service life.
And here, too, everything is simple - while moving, the cable rubs against the braid and over time the protective layer wears off. Lubricating the cable also provides only temporary protection.
Corrosion is not necessarily the cause of the burst. Very sharp squeezing of the pedal, for example, during a difficult traffic situation when the driver kicks it with all his might, can also lead to destruction of the cable.
In any case, if problems arise with the drive, the cable must be replaced, since it cannot be repaired.
Note that the cause of the failure of the clutch pedal can be not only the cable, therefore, if such a malfunction occurs, first of all you need to make sure that the drive has broken.
The fact is that there are cases when the clutch release bearing control mechanism breaks, which is a much worse problem than the destruction of the cable. After all, in case of such a malfunction, you will have to remove the gearbox from the car in order to repair the mechanism.
But a cable break is a malfunction that can be very easily eliminated if you have a spare element.
And since such a problem on a VAZ can appear at any time, it is recommended to always carry a new cable with you in the trunk.
What will you need?
Another positive quality of the cable drive is the ease of replacement. The whole operation takes about 20 minutes, even for a novice VAZ car owner. Moreover, everything can be done even in the field, with a small number of tools at hand.
For example, let's look at how to replace the clutch cable on a VAZ-2110, and in order to do everything you will need:
- 2 keys for 19;
- 2 keys for 8 and 10;
- Crosshead screwdriver;
- New cable.
All this is enough to carry out the work.
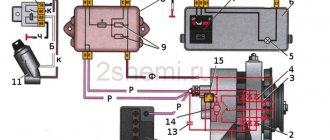
To make it clearer, look at the VAZ 2110 clutch drive diagram.
How to replace the cable on a VAZ-2110?
There are two ways to replace a torn drive, one of which is more time-consuming and requires removing additional elements from the car, but is more convenient.
With the second method, you don’t need to remove anything from the car and everything is done faster, although the ease of execution is worse. At the same time, the algorithm of work for both methods is the same, so let’s look at how everything is done using the first method, it is still more convenient and also does not take much time:
- We place the car on a flat surface or the side of the road (when performing work on the road) and immobilize it with a handbrake or wheel chocks placed under the wheels. Let's see if the cable is really torn, or if the reason for the failure is a broken release bearing fork. For ease of work in the engine compartment, the battery can be removed from the car;
- We release the cable in the engine compartment. If it is torn, then you can immediately pull part of it out of the winding simply by disengaging it from the lever with the clutch fork. In the case when the replacement is carried out due to “fluffing”, then first unscrew the nuts securing the cable braid (they are also adjusting) from the mounting bracket located on the gearbox housing.
We take two keys for 19 and loosen them, after which we take them out through the slot. Then we loosen the two nuts (8 and 10) of the clutch release drive and only after that we pull out the tip, for which we press the fork lever with our hands and remove the cable together with the thrust bushing.
Remove the windshield wiper bracket; to do this, unscrew two nuts. Pay attention to which direction the plane of the bracket is directed;
- Since the drive is removed through the passenger compartment, from the part of the cable running in the engine part, we remove everything that can prevent it from being pulled through the technological hole - the thrust bushing, nuts 19 and washers.
- Let's go to the salon. It is necessary to remove the cable end from the mounting rod on the pedal. To do this, we climb under the dashboard and find a fixing plate that keeps the tip from jumping off the rod. It is located under a protective cover.
To get to it, you will have to hold the pedal in its original position with one hand, and pry the lock with a screwdriver with the other, and this must be done carefully so as not to lose it after removal.
After this, we remove the tip from the rod. It is also advisable to remove and check the plastic bushing installed on the rod, and if signs of severe wear are noticeable, replace it during assembly;
Unscrew the nut of the cable braid fastening bracket located under the panel and remove it from the stud;
We pull the cable into the cabin, and carefully, since on many models wires pass through the technological hole for pulling the drive and it is important not to damage them or tear them away from the contacts;
- We run a new cable through the hole, fasten its bracket, put the tip on the pedal rod and fix it with a plate. If the latch gets lost during the removal process, you can use a thin wire or paperclip;
- We fix the cable braid on the gearbox bracket and then insert the tip with the thrust bushing into the fork lever. At this point, the replacement is completed and all that remains is to make the adjustment;
- Do not forget to lubricate the clutch pedal pin and the driver with LITOL 24 grease or an equivalent.
How to install
Before installing a new cable, you need to thoroughly lubricate both the bushing and pin on the pedals. The plastic composition Litol-24 is best suited for this.
Then the end of the cable is threaded into a hole located in the bulkhead of the engine compartment on the passenger compartment side of the car so that it ends up in the engine compartment. The rubber cover is also tucked in there.
The gear tip driver is put directly onto the clutch drive pin and secured with a bracket.
The end of the shell is secured with a nut to the pedal bracket. Make sure that the fixation is secure. It is unlikely that anyone will like to, if something happens, climb there again due to a poor-quality connection.
Next, under the hood, the lower part of the shell is stuck into a special hole on the gearbox bracket.
The leash is screwed onto the end of the cable (there is a thread there) - the latter should protrude approximately one turn outward, but no more.
Now comes the time to adjust the clutch drive. Upon completion of this process, the pedal is pressed all the way two or three times and then the setting is repeated.
The working surface of the tip driver must be treated with the above-mentioned lubricant.
All that remains is to make sure that the entire mechanism is now working properly and install all previously removed parts in place.
You can learn more about the process in the video below:
Thanks to the clutch cable, you have control over the clutch fork, which can disengage the clutch from the flywheel. The procedure occurs due to the release bearings. Absolutely on all cars, and the Lada Kalina is no exception, a cable is used, since the box is located deep in the front part. The only exception is the classic one, in these cases both the main and working cylinders are used, that is, there is no cable at all. The cylinders themselves work in a completely different way, but we get the same result, the release bearing moves away from the flywheel thanks to the clutch pedal.
If you notice even slight play in the clutch pedal, this most likely means that the cable needs to be replaced. It is possible to make the replacement yourself; there is no need to contact a car repair shop. To do this you need to know elementary theory. The cable is designed to connect two units: the engine and the gearbox. A ratchet mechanism is used to adjust the clutch cable. When the car is running, the disc linings wear out over time, and this leads to loosening of the tension.
There are also cases when the cable breaks completely
For this reason, if you heard suspicious, extraneous sounds when changing gears or noticed insufficient traction or the clutch pedal of the Lada Kalina fell to the floor, it’s time to carry out an inspection, and then replace the cable. Most often, this part breaks at the most inopportune moments, so the problem must be corrected promptly
In order to quickly and reliably cope with cable replacement, a detailed guide is provided to help you, which we will now consider.
Features of replacement for VAZ-2109
The difference between the VAZ-2109 cable comes down to the presence of a special leash for engagement with the fork lever, which is quite large in size, so the cable is pulled out towards the engine compartment and not the passenger compartment.
We will not consider the entire sequence of replacing the drive on a VAZ-2109, but will only go through the key points. Note that the tools required are the same as those indicated above, and the change is made as follows:
Loosen the nuts securing the braid to the bracket on the gearbox and pull it out. Then we press the lever with our hand and disengage the leash;
Under the dashboard, remove the fixing plate and tip from the rod.
There is no braid mounting bracket under the panel, and the braid simply rests against the rear wall of the engine compartment using a special thrust plate. Therefore, we go to the engine compartment and pull out the cable. Installation of a new drive is performed in the reverse order.
The cable broke on the road, what should I do?
It often happens that the drive breaks on the way, and there is no spare cable at hand. In this case, it is possible to drive the car without a clutch due to the presence of synchronizers in the gearbox.
This allows you to change gears while driving without interrupting the transmission of rotation from the engine to the gearbox, although this requires effort.
The main thing in such a situation is to start moving from a place. To do this, turn off the engine and engage 1st gear at the gearbox.
After this, we turn on the starter, which is quite capable of starting the engine connected to the transmission, but the start of movement will occur with jerks. And after the engine starts working, these jerks will disappear.
Shifting gears without a clutch must be done with throttle reversal. That is, we picked up speed, released the gas pedal and moved the gearbox lever to the neutral position.
Then they sharply increased the engine speed (throttled it) and turned on the required speed. But this must be done quickly.
When driving with a broken clutch, it is necessary to choose a route that has as few stops as possible, since this will require turning off the engine every time and starting to move at speed. But the starter will not withstand such “bullying” for long.
How to adjust the drive?
Replacing the clutch cable on a VAZ is not difficult, but this operation is not enough, since it still needs to be adjusted, and for this you will additionally need a regular ruler.
After replacement, the pedal may be higher or lower in level than the others, which is incorrect, they should be in one line.
The clutch is adjusted as you move the pedal. That is, we put a ruler next to it and mark the level of the position of the pedal pad.
After that, squeeze it all the way and make a mark on the ruler again.
Next, we subtract the distance - for a normally adjusted clutch the stroke is 12-13 cm, but 16 cm is allowed, although this value is considered the limit.
On the VAZ-2110, adjustment is made in two places - on the braid fastening nuts (allows you to change its length) and on the tip itself, which engages with the lever.
To do this, a thread is made on it and two 8 or 10 nuts are installed (they change the length of the cable itself). They are exactly what is needed for adjustment.
To perform adjustment work, it is necessary to unscrew the outer nut, since it is a locking nut, and by unscrewing or screwing the inner nut onto the tip, achieve the required pedal stroke, and then lock it.
On the VAZ-2109 there is only one adjustment - on the mounting bracket on the gearbox and the stroke is adjusted by changing the length of the braid.
You can do without a ruler on a VAZ-2110, it is only important to choose the right cable length. To do this, unscrew the locking nut and unscrew the adjusting nut.
Then, moving the thrust sleeve along the tip, you need to find the moment when the release bearing begins to freely move. It will be easy to feel it, since the force on the lever will increase slightly.
All that remains is to fix the position of the sleeve on the tip with nuts and check. Is the pedal in line with the others.
This adjustment will ensure optimal cable tension, and the clutch will not “drive” or “slip”, since the drive is installed at the beginning of the free play of the release bearing.
When the clutch needs adjustment
Adjusting the VAZ 2114 clutch may be required in the following situations: The clutch has been completely replaced. The clutch was repaired and its individual elements were replaced. The clutch travel is too large or, conversely, insufficient.
Photo: Clutch cable VAZ 2109
If everything is clear with the first two reasons, then in the latter case simple measurements should be performed. To do this, you need to measure the distance between the minimum and maximum positions of the pedal (that is, in situations when the pedal is pressed to the floor and when the pedal is freely released). The optimal value of this distance is in the range from 12 to 13.5 cm. If in fact it turns out to be larger or smaller than the specified dimensions, it is recommended to make an adjustment.
If the clutch travel exceeds 16 cm, then you should immediately stop all driving and make adjustments as soon as possible. In addition, in some cases, too much stroke may indicate severe wear of the friction linings located on the driven disk, as well as the need to replace them.
How to replace the clutch cable on a VAZ 2109?
Replacing the VAZ 2109 clutch cable is required if it breaks. Signs that the cable needs to be changed are the appearance of clicks when squeezing the clutch pedal (CP), the pedal falls down and does not rise back, and problems arise in controlling the clutch. The article provides detailed instructions, thanks to which any car enthusiast can change the clutch cable on a VAZ 2109. In addition, a video is attached that clearly shows the entire process.
Adjusting the VAZ 2109 clutch
This operation is carried out in cases where there are shocks or friction when the clutch is engaged, slight slipping of the clutch when the clutch is pressed for a long time, the clutch “drives.”
To adjust the clutch, do the following:
- Place the gearshift lever in the “neutral” position.
- We dismantle the clutch housing.
- We dismantle the bearing. Repair operations should be carried out smoothly and calmly, because the bearing may be defective.
- Rotate the adjusting fastener until the pedal movement is completely adjusted.
- We test the clutch for oil leaks, otherwise the clutch mechanism may slip. To eliminate this problem, it is necessary to treat the coupling with a degreasing compound.
Step-by-step replacement instructions
To carry out the procedure, the machine must be raised. It is best to use an inspection hole, a trestle or a lift, but lifting with jacks will suffice.
Tools
The procedure lasts no more than 15-20 minutes. To carry it out, there is no need for a large number of tools and materials, just prepare:
- new clutch cable (TC);
New cable for VAZ 2109
Stages
Replacing a vehicle with a VAZ 2109 consists of the following steps:
- First, work is carried out in the engine compartment.
- In a VAZ 2109 car, the cable is attached to the box thanks to a metal bracket. In order to remove the part to be replaced from the bracket, you need to loosen the fasteners.
Two vehicle mounting nuts
Pull out the locking bracket from the finger
Adjusting nut 1 and locknut 2
Use it to tighten the vehicle to the optimal distance. If you overtighten, it may tear again; if you do not tighten it as expected, it will not be adjusted.
- unscrew the nut located under the pedal;
- a little lower there is a lock nut that should be tightened;
- Next you need to tighten the first unscrewed nut;
- Now you need to screw the rubber washer onto the fork as much as possible.
The clutch and brake pedal must be at the same level. If the PS is higher, it will wear out quickly.
Thus, the procedure for replacing a vehicle on a VAZ 2109 is not too complicated and can be done at home, which means the car owner will be able to save on car service costs.
Preparing for work
Initially, it is recommended to find a place where it is most convenient to inspect the car and replace the part. Since you will have to work not only under the hood, but also under the car, the best assistants will be a lift, pit or overpass. If you do not have the opportunity to use one of these options, you can simply raise the car using jacks.
Also, before starting work, you need to make sure that you have everything you need at hand. To replace the cable you will need:
- new part;
- set of wrenches;
- screwdrivers.
On average, you can replace this element on a VAZ-2109 yourself in 20 minutes.
Even with careful operation, any part or assembly fails after a certain period of time. The clutch is no exception. On VAZ-2109 and 21099, as well as 2108, the clutch can be replaced in two ways, which we will consider below.
Preparing the tools
- keys: 8,10, 13,17 (two);
- heads: 8 and 24.
Replacing the VAZ-2109 clutch is carried out in several stages: preparation, dismantling the box, replacement and assembly.
After this, unscrew the ball joint mounting bolts with a 17mm wrench and loosen the fasteners of the left lever with a 24mm wrench. On the left brace bracket, unscrew the bolts and turn it down 90 degrees.
- Dismantling the gearbox. Using a 13mm wrench, disconnect the ground from the gearbox. Unscrew the fasteners and remove the lower part of the flywheel housing. Then remove the support and mudguard from the left side of the engine. To do this, first prepare keys for 8, 10 and two for 17. Unscrew the fasteners of the rear engine mount to the body and the gearbox drive clamp, having previously removed it. Finally, unscrew the remaining three bolts and the nut that connects the motor to the box. After this, carefully tilt the power unit and remove the gearbox, which hangs on the wires.
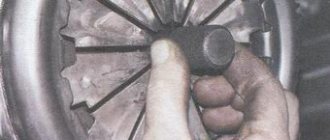
- Replacing the clutch. Using a 8-mm head, unscrew the basket fasteners. If necessary, install new analogues instead of the old release bearing and/or fork. After this, the VAZ-2109 clutch disc is replaced. Use a mandrel to center it.
Second way
The next advantage of this method is that in this case it is not necessary to dismantle the starter, drain the fluid from the transmission, pull out the speed indicator cable and dismantle the angular velocity joints.
The procedure for replacing the clutch disc is quite simple and does not require the use of special tools. First of all, place the car on supports after jacking up the front end. Unscrew the protection and drain the fluid from the gearbox. Then remove both wheels and unscrew the hub nuts.
Unscrew the bots securing the box to the engine and install stops under the transmission. Replace the bearing and, after removing the basket, install a new disc. Subsequent assembly is carried out in reverse order.
You can replace the clutch cable yourself. After all, this procedure is quite simple and does not require special skills or special knowledge. First, unscrew the adjusting nuts and inspect the clutch assembly, remembering well the position of all elements. Carefully remove the lower cable end from the bracket so as not to damage it. Dismantle the leash, which is located directly next to the clutch lever. Remove the stop tube from the pin and disconnect the cable end connected to the pedal. Pull out the elastic pad from the shield so you can pull the tip through. Install the new cable in the reverse order.
How to change the clutch fork
In any case, if the clutch is not replaced as a complete set, but only one element, you should pay special attention to the following:
If you identify any of these defects, try to eliminate it; if this is not possible, simply replace the damaged parts.
Replacing the clutch cable of a VAZ-21099
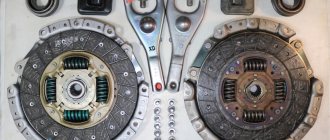
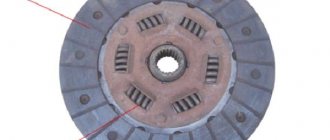
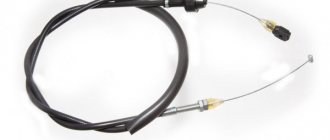
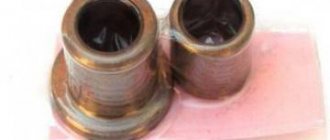
In this article we will talk about replacing the clutch cable on cars of the VAZ 2108-21099 and VAZ 2113-2115 family . The clutch cable is a rather capricious and unpredictable part. It may work without problems for years, but it may break or start squeaking a week or two after installation. There are, of course, more questions about the quality of spare parts. But such unpleasant surprises are common, since no one is immune from purchasing a low-quality part! You will find recommendations for choosing a clutch cable below, but now let’s go through the reasons why you have to change the clutch cable. The first reason is a broken clutch cable (usually this happens near the clutch pedal). Everything is very clear here, the cable has broken, the clutch pedal is dangling back and forth, it is no longer possible to squeeze the clutch and engage the gear. The second reason is the break of several threads of the cable (as in photo 1). In this case, the gears (especially reverse and first) begin to engage poorly. You can temporarily improve the situation by adjusting the cable. It will be possible to get there or move somewhere, but you need to understand that the cable is on its last legs and it’s time to buy a new one. The third reason is the characteristic creaking of the cable when you press the clutch pedal. As a rule, the protective sheath of the cable is destroyed, moisture gets in, corrosion forms and, in addition to an unpleasant squeak, the clutch pedal becomes much harder. Here, not everything is so scary, you can continue to roll, squeak and swing your leg. But! I advise you to put a new cable in the trunk))) Since the squeak is the sound of friction and destruction of the cable. Accordingly, this process cannot last forever.
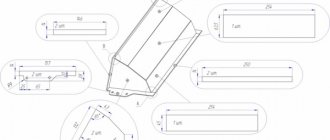
Spare parts . The catalog number of the new clutch cable (with a round tip) for VAZ 2108-2115 is 2109-1602210-10 . The catalog number of the old-style clutch cable (with a rectangular tip) for VAZ 2108-21099 is 21086-1602210 . The differences between the cables are clearly visible in photographs 2 and 3.
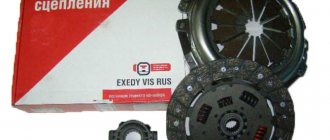
By manufacturer! The choice of cables on the market is quite large, but the only correct choice is a clutch cable manufactured by DAAZ . I do not recommend considering other options. In any case, they will be weaker and less reliable.
Also, when replacing the cable, a plastic clutch cable bushing may come in handy. The catalog number of the plastic clutch cable bushing is 2108-1602096 . It is difficult to find this bushing on sale; it is easier to buy a clutch pedal repair kit, as in photo 4. There is a bushing, a lock (it can be lost or broken when removed), and a tip axle (the chance that it will be useful is small, but just in case in case this part might come in handy)
Necessary tools for replacing the clutch cable : two open-end wrenches 17 (preferably one of them - in a shortened version, see photo 5), socket wrenches 8 and 10, Phillips and flat-head screwdrivers. It would be enough.
Photo report describing the work of replacing and adjusting the clutch cable on a VAZ-21099 car . On VAZ-2108, VAZ-2109, VAZ 2113-2115 cars, the clutch cable is changed in the same way, with the exception of small nuances.
And so we begin. If you have a car with a carburetor engine, then you don’t have to read points 1, 2, 3 and 4.
1) Using a 10mm wrench, unscrew the two fastening nuts of the adsorber frame (Photos 6 and 7) and move it to the side. After removing the adsorber, access to the clutch cable appears. If you wish, you can work through this window. It's possible, but not convenient. That's why…
2) Disconnect the connector from the air flow sensor (Photo 
3) Unscrew the corrugation clamp (photo 9)
4) Unscrew the two bolts of the air filter housing brackets (photo 10). We remove it (photo 11). After this, the clutch cable will be perfectly visible and easy to remove and install.
5) Using a 17mm wrench, unscrew the cable adjusting nuts (photo 12). We take out the cable from the bracket.
6) The cable guide is disconnected from the clutch fork (Photo 13).
7) Next, we climb into the car interior. Or more precisely, under a torpedo. There, first remove the clutch pedal pin retaining bracket (photos 14 and 15)
Disconnect the upper cable end from the pedal (photo 16)
9) Immediately pay attention to the presence or condition of the plastic bushing (photos 17, 18 and 19). The photo shows that this bushing has a cover. We install a new one.
10) We return to the engine compartment. Pull out the clutch cable.
11) We begin installing the new cable. We insert the cable into the hole in the body (photo 20). The rubber buffer should fit into its seat.
12) We attach the end of the cable to the clutch pedal (photo 21). Install the locking bracket (photo 22).
13) In the engine compartment, we put the cable lead on the clutch fork lever (photo 23).
14) Install the cable into the bracket and use the nuts to adjust the position of the clutch pedal (photo 24). The optimal position is when the clutch pedal is at the same level as the brake pedal (photo 25).
After this, press the clutch pedal several times. If the position of the pedal has changed, turn the nuts again and adjust the pedal. Let's press again. If everything is ok, tighten the nuts completely.
Don't forget to put the air filter housing and adsorber in place. If you filmed them, of course)))
All! Replacement of the clutch cable on the VAZ-21099 is completed . Thanks to all!
When using an article or photographs, an active direct hyperlink to the website www.avtorem.info is required!
Did you like the article? Share it on your page!
Reasons for replacement
Typically, on a VAZ 2109, replacing the clutch cable is necessary if:
- The clutch is not working properly. That is, it is difficult for the driver to press the clutch pedal, as a result of which the car is difficult to start.
- The gearbox is also acting up. In addition to the fact that it is difficult to switch, it also makes sounds that are not entirely understandable during its operation.
- The clutch pedal has fallen down and does not return to its original position.
Note: however, these “symptoms” may indicate the presence of other problems, so a complete diagnosis of the car is necessary.
Replacing the clutch cable of a VAZ 2109
All this appears due to the fact that the cable has either broken or fallen off the fork. In the first case, it will need to be replaced. In the second case, you can simply put it in its place, holding it at the same time so that it does not fly off again in the future.
Note: It is better if the cable breaks rather than the fork breaking. Indeed, in some cases, the pedal fails due to a faulty fork, and replacing it costs much more than replacing a cable (a new cable costs about 200 rubles, and a new fork costs about 2000 rubles)
Let's summarize
If the check shows that the free play is normal, but you doubt your competence in adjusting the unit, contact a service station. Incorrect settings can cause rapid clutch failure. If you want to complete the work yourself, you can find the necessary information on the vehicle manufacturer’s website or in its service book
It is important to complete the work in a timely manner so as not to get into an unpleasant situation on the road. Monitor the service life of clutch parts, for example, the service life of the driven disc is 100 thousand kilometers
But, if a motorist has an aggressive driving style, it can decrease by 2-3 times.
Replacing the clutch cable with removing the frill
Replacing the clutch cable on a VAZ 2109
Replacing the clutch cable with removing the frill is accompanied by the following actions:
- Raise the car on a jack, otherwise it will simply be impossible to see the clutch cable itself.
- Unscrew the fastening nut.
Note: you need to look for it directly under the pedal.
- On the pedal rod there is a ring with a corkscrew ring.
- You need to remove the cable. However, this may cause problems with the cotter pin that holds it.
- To remove it, you need to find an 8 key, with which you can easily perform this manipulation.
Replace clutch cable VAZ 2109
- After this, the cable can be easily removed, but it is still attached to the attachment point, so it cannot be removed yet.
- Remove the frill and windshield wiper. Open the hood.
- Under the hood, find the place where the cable is attached. Here you need to unscrew the nut with a 19mm wrench.
- You can leave the old rubber band if it is in good condition. In addition, it is quite difficult to replace it at home, since there are incomprehensible wiring along it (they do not perform any function, so they can be safely removed).
- You need to insert an elastic band into the hole through which the cable passed.
Note: in order not to lose the pin and other bolts, they need to be kept in some kind of box.
- Insert the new cable in place of the old one.
- Under the hood, tighten the fastening bracket.
Interesting. By the way, if the cable breaks right on the road, then it is not necessary to tow the car home. The fact is that it can be started without a clutch. And after that you can even switch speeds. However, you will have to re-gas from time to time.
Replacing the clutch cable without removing the frill
Replace clutch cable VAZ 2109
Replacing the cable without removing the frill is much easier than replacing it, since the second option involves many unnecessary manipulations. To easily replace it at home, you need to:
- Unscrew the cable fastening using a 19 mm wrench.
- Remove the cable end from the clutch fork.
Note: Sometimes this action is unnecessary. It depends on the location where the cable was torn.
- In the cabin, under the pedal, you need to find the cable fastening nut. It is very small, so to remove it you will need an 8 key.
VAZ 2109 clutch cable adjustment
- Unhook the bracket that secures the cable end to the clutch pedal. To carry out this action, you should raise the clutch pedal as high as possible, and then use a screwdriver to hook the clip.
- Pull out the clutch cable. You don't need to tug on it too hard. The point is not that it will tear, it is already torn. You can simply damage the “nest” in which it was located. You need to pull it out directly through the interior.
Note: there may be extra wires in the cable channel that will make it difficult to remove the cable. You can safely tear them out, as they do not provide any benefit. Washers under the hood may also be in the way. In this case, they need to be carefully unscrewed.
- Remove the bracket located on the pedal arm. This will make it easier to remove the cable.
- Slowly insert the new cable into the hole through the interior and into the hood.
VAZ 2109 clutch cable
- You need to fasten everything in the reverse order.
Note: the most difficult part will be to put the tip mounting bracket back in its original place. It's not that easy to get there. This is why many people take off their frills.
- However, the mounting bracket can be returned to its place in another way. You should make a clip from a regular paper clip. With its help you need to secure this bracket. If necessary, you can use pliers.
- It is advisable to lubricate the cable with oil or grease at the end (it does not freeze in winter) to make it more elastic.
Progress
In order to quickly and efficiently replace a frayed or broken cable, you need to take several mandatory steps. We start by working under the hood, here the following actions are performed:
- Loosening of the fastening of the vehicle mounting bracket to the box.
- Removing the lower part of the cable from the clutch release fork.
So, a start has been made, and now we need to return to the salon. The following work is performed here:
- Disconnecting the cable from the pedal. To do this, you need to remove all the floor mats from the interior.
- Removing the lock washer. To do this you will need an ordinary minus screwdriver. Next, the pin connecting the part to the bracket is removed.
- Now you can get the cable itself. There is a special rubber cushion in the engine compartment, and under the steering wheel there is a hole through which the shell will need to be removed. We press on the pillow, remove the shell and remove the old element.
Dismantling work has been completed. Now we move directly to the procedure for installing a new vehicle. Installation begins from the interior. This is done as follows:
- We insert a new cable into the hole, mount its end on the pedal, and secure it with a lock washer.
- We secure the vehicle in the box. This must be done in such a way that the bushing is located on the bracket. Then the thread will be reliably protected.
- We insert the end of the cable into the fork. Here you can lubricate the cable with oil.
New cable installed. However, the work is not finished yet. For full operation of the clutch, it is necessary to adjust the vehicle and the pedal. Adjusting the cable is very simple. It is enough just to loosen the lock nut, ensuring free movement of the adjusting nut. This is what is used to tension the cable. However, be careful not to tighten it too tight. If the tension is excessive, the vehicle will soon break and you will have to carry out all the work all over again, but you also cannot tighten it too lightly. Then the clutch will not be adjusted.
The last step is adjusting the pedal. Under it there is a special nut that needs to be removed. Immediately below it there is a lock nut that is tightened. Then we return the first nut to its place and place the rubber washer on the fork. Please note that the brake and clutch pedals must be at the same level. Otherwise, the clutch pedal will wear out much faster.
Adjustment
VAZ 2109 clutch cable
It is mandatory.
Clutch cable adjustment
VAZ 2109 clutch cable
You can adjust the cable like this:
- Loosen the locknut. This will allow the adjusting nut to move.
- Tighten the cable with the tension nut (pull until the machine wobbles). In this case, you can press the clutch from time to time.
Note: It is very important that the cable is tensioned to the optimum distance. After all, if you tighten it, it will break again. At the same time, if it is not reached enough, it will not be adjusted.
Clutch pedal adjustment
The clutch cable on a VAZ 2109 broke
After any manipulation of the clutch pedal, it must be adjusted, otherwise it will jam. To do this you need:
- Unscrew the nut located under the pedal.
- Tighten the locknut, which is located slightly lower.
- After this, tighten the first nut.
- Tighten the rubber washer to the fork as much as possible.
Note: The clutch pedal should be lower than the brake pedal. If it is higher, it will wear out too quickly.
Replacing the clutch cable can be done right at home. That is, everyone can fix this problem with their own hands. The price for home repairs will not hurt your wallet, as it will be significantly lower than what is offered in car services. However, before you start replacing it, you should review a lot of photos and videos on this topic. Detailed instructions describing this process will also be very helpful.
Adjusting the cable
To adjust you need:
- Loosen the locknut, which will allow the adjusting nut to move;
- Tighten the cable using the tension nut;
- You need to pull until the car shakes;
- During this process, it is a good idea to periodically press the clutch pedal;
- Do not overtighten the cable, otherwise it will soon break again;
- If you do not tighten the cable, the performance of the clutch will leave much to be desired. What to do? Find the optimal balance.
Replacing the cable, clutch disc and other manipulations with the clutch pedal require its adjustment.
Adjusting the cable
Pedal adjustment
To adjust the pedal, follow the following algorithm.
- Press the clutch pedal all the way to the floor and place a tape measure next to it.
- The tape measure also rests on the floor at one end.
- Having fixed the pedal in the lowest maximum position, measure the distance to the floor in the center of the pillow.
- Release the pedal, then measure in the uppermost position. Write down the data or just memorize it.
- Now calculate the amount of free play, that is, the distance from the bottom to the top point.
- When replacing a clutch cable or disc, the indicator is usually more or less than 125-135 millimeters.
- To change the parameter, you need to adjust the length of the cable sheath.
- To do this, lift the hood and find the end of the cable. Use a wrench to loosen the tension on the locking nut that holds the cable to the lever. And tighten the second nut.
- Similar manipulations are carried out until the free play is within the range of 125 to 135 millimeters. Happened? That's it, job done.
Adjusting the pedal
There is nothing particularly difficult about replacing or adjusting the cable. The main thing here is to do everything consistently, carefully and not to rush. It is haste that causes most failures when repairing a VAZ 2109 yourself.