Keeping seat belts clean affects more than just the appearance of the interior. Over time, the internal mechanism becomes clogged and begins to jam, causing problems with fastening. Car enthusiasts are often interested in how to remove seat belts in order to completely remove dust and dirt. It is better to learn in advance about the removal methods, because if you make a mistake, you can damage the winding reel and other parts of the mechanism.
- How to remove a jammed belt
Design and types of seat belts
These devices differ in the number of attachment points. There are modifications from two-point to six-point. Two-point ones are found in older cars; they are attached to the waist on both sides of the seat. Modern cars use three-point belts that evenly distribute the energy of a moving body. Other types are installed on sports cars. Five-point ones are also attached to child car seats.
The design of a modern three-point belt consists of the following elements:
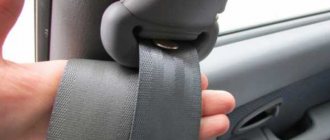
- The strap is made of durable material - it is attached not to the seat, as in sports cars, but to the body. A metal tip is attached to the end; the person locks it before the trip. It has three attachment points - on the threshold, rack and rod. Most models provide the ability to adjust the belt depending on the height of the passenger.
- Retractor reel - allows you to unwind the belt. It is designed in such a way that it is blocked during a sharp jerk. Therefore, in the event of an accident, the belt does not unwind.
- Lock - necessary to secure the belt. It usually sends a signal to the dashboard to remind the driver to buckle up.
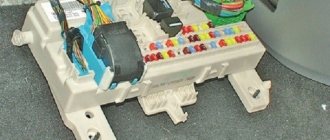
- Tensioner is a device that includes shock sensors. When there is a strong impact, they send a signal to the control unit, which activates the tensioners. To ensure that when the freedom of fit decreases, the belt does not exert excessive pressure on the person, a limiter is installed.
Seat belt
If one of the mechanism components malfunctions, it is necessary to repair the damage as soon as possible.
But repairs can only be made after removing the seat belt. Motorists often have to disassemble this element. This is due to the fact that, like other parts of the interior, it becomes dirty over time. To wash a belt, you must first remove it, and do it correctly.
Some statistics
Vehicles are continually improving with seat belts, with 70.1% of drivers saying their vehicle is equipped with front and rear seat belts.
The proportion of drivers who wear seat belts remains low (less than three-quarters on highways and about two-thirds on other roads), increasing from 39.8% to 46.6% in urban environments. It is clear that drivers are not sufficiently aware of the importance of seat belts, especially at lower speeds; many use them only on highways. The survey results correspond to the results of systematic observation. Control in this regard remains unchanged, as in the year over 90% of respondents stated that in the last three years there had been no sanctions for not using the belt.
The group of drivers who always use a seat belt does not differ in its age structure, and driving rates are the same as in the general sample, but a higher proportion of women (43.7% and 36.1% of women in the whole group).
How to remove rear seat belts
The instructions below show removal on a domestic car. First you need to use a screwdriver to pry off the plug on the bottom bolt that holds the belt in place. This bolt is located near the door, next to the threshold.
The coil is mounted at the rear, on the trunk side. The other two points are attached to the interior. First, unscrew the coil.
Remove the plug from above the chair and unscrew the bolt. This is the top attachment point.
Unscrew the bottom bolt located near the door. After this, you can remove the element that will be cleaned.
Who needs to buckle up and when?
The need to use the device while the vehicle is moving is dictated by traffic regulations. Clause 2.1.2 states:
The driver of a power-driven vehicle is obliged, when driving a vehicle equipped with seat belts, to be fastened and not to carry passengers who are not wearing seat belts.
The need to use the device exists not only for the driver, according to paragraph 5.1 of the Rules:
Passengers are required to wear them when traveling in a vehicle equipped with seat belts...
You can do without this:
- driving instructor, if his student is driving;
- operational service employees traveling in a populated area in a company car, including as passengers.
For all other road users, wearing a seat belt is mandatory.
The following method for unlocking a seat belt after an accident is relevant for many passenger cars. It is not very different from the first method, but there are fundamental differences that need to be mentioned. We will use the Mitsubishi Lancer passenger car as an example. So, let's begin:
- First you need to dismantle and carefully disassemble the strap tensioner. The spring must be secured so that it does not unwind.
- After this, you should disassemble the squib mechanism. Having done this, you will see a rack that has already failed. You can throw it away. If you have a new rack and pinion, you can replace it with the one that broke when the belts were locked. It is advisable to purchase it in advance at a car store.
- After dismantling the gear of the device, you will see some debris from the plastic parts. All this can be thrown away; these elements will not be needed in the future.
- All further assembly must be done in reverse order. If the spring of the mechanism has been unwound, then the strap itself will need to be wound with your own hands. The spring mechanism can then be installed in place.
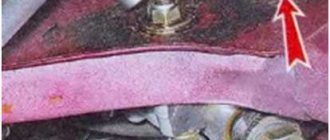
1. The arrow in the photo marks the cut that will allow you to block the spring.
2. After this, you need to disassemble the squib and replace the broken spring with a new one.
3. Broken parts of the mechanism after blocking, which can be thrown away.
We recommend: Replacing the heater fan of a Chevrolet Niva car with your own hands
As you can see, the procedure itself is practically no different. In the second case, the process of unlocking a mechanism of a lighter design is considered. You can see more details about the unlocking process in the video provided below. Please also note that not all vehicles are equipped with the option to unlock the strap device.
This is because some manufacturers are categorically against reusing blocked elements after repair. And this makes sense: after all, this component serves for safety, so some car manufacturers do not recommend experimenting in such cases. That is why sometimes you can see a small compact knife on the straps themselves. It is designed to cut seat belts after an accident.
Also keep in mind that if after disassembling and assembling the devices there are a lot of “extra” parts left, then think three times - is it worth reusing this belt? After all, you no longer have a guarantee that it will function properly. Safety always comes first, so it is better not to skimp, but to purchase new seat belts if necessary. Well, or entrust this matter to specialists who are guaranteed to be able to do everything right for money.
How to remove front seat belts
First, unscrew the two bolts located at the bottom of the plastic box.
Then use a flat screwdriver to pry up and remove the plug. Underneath there is a bolt that needs to be unscrewed.
There is one more bolt left on top of the plastic box, which also needs to be unscrewed. Next, unscrew the top fastening.
Now you need to open the plastic window on the box and pull out the textile element along with the coil.
To remove belts on a foreign car, for example a BMW, you first need to remove the plastic covers. They are attached using four clips, two of which are attached at the bottom. The other two are fixed on top.
The fastening elements are unscrewed using a TORX key.
Then you need to unscrew the bolts of the fixing metal part. In this case, only one bolt can be unscrewed.
The plastic cover is removed using a special tool. You can also pry out the plastic with a regular screwdriver. There will be quite a lot of dust inside.
Now all that remains is to unscrew the bottom bolt.
After unscrewing the bolt, the belt should come out easily.
To wash the belt, the removed mechanism must be disassembled. Next, installation is performed in reverse order.
Useful videos on the topic:
How to remove the front seat belts on a Volkswagen Polo
How to remove the front seat belts on a Toyota Camry
How to remove the seat belt on a VAZ 2110, 2111, 2112
We will tell you step by step how to remove the belt on VAZ models.
First you need to use a screwdriver to pry and remove the decorative trims of the lower and upper seat belt fastenings.
There will be bolts under the covers that need to be unscrewed with a 17mm wrench.
Next, remove the upper belt fastening bracket.
Next, you will need to remove the plastic cover to free the coil. To do this, you need to unscrew several screws on it:
- two on the lower pillar, near the sills;
- one - in the central part of the pillar, near the seat belt guide;
- and another one at the top of the counter.
The cover is removed.
Next, you need to remove the coil - it is located at the bottom of the rack. To do this, use a 17mm wrench to unscrew the bolt holding it in place. Afterwards the coil is simply removed.
All is ready!
How to unlock
Naturally, if the belt is stuck, it is best to turn to professionals. But, if you don’t have enough money, but have a lot of free time, and also if you want to learn something new, you can perform this operation yourself. There are several options that we will now share with you.
Squib with bushing
- First, you need to remove the entire seat belt mechanism. In most cases this does not cause problems. Although in certain cars, to dismantle this device you will have to remove the front wheels.
- Now we are looking for access to the squib (it is the one that blocks the entire system).
- With the mechanism in hand, look for the spring. Carefully unscrew all the bolts to remove it (sometimes it may fly out).
- Next, remove the belt and, without twisting it, set it aside.
- Afterwards you will see the squib shell, which needs to be removed from the belt (use an asterisk key for this purpose).
- The next step: you need to remove the cover of the device (it can be fixed not only with bolts, but also with sealant). In this case, we recommend using a stationery knife.
- In front of you will be a nylon bushing with six copper scraps (they are the ones that block the belt).
- These pieces need to be removed. Do not touch the bushing while doing this.
- Reinstall the squib and screw this device into the mechanism body. It is important that before installing it in place, tighten the belt with your own hands - a few circles will be enough. Why do this? After such manipulations, the spring will weaken slightly.
- Place the spring in its place and secure it.
- The work is completed. If the strap still does not work, it will have to be replaced.
We recommend: Installing a towbar on a Renault Duster with your own hands: installation instructions with photos
Rack
Using a ribbed strip, it will be possible to unlock the belts if they are jammed after a traffic accident.
- Remove the mechanism, and then disassemble the tensioning device.
- Disassemble the squib.
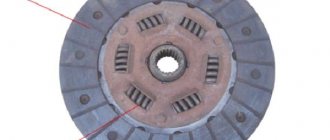
- Next you will see a gear rack (they are already broken, remove it and replace it with a new one).
- Your next steps: after dismantling the gear, you will notice a lot of debris and dirt - they need to be removed.
- Reassemble in the reverse order of disassembly.
.u418104cc03537bad54dbdc7f63650674 { padding:0px; margin: 0; padding-top:1em!important; padding-bottom:1em!important; width:100% display: block; font-weight:bold; background-color:#eaeaea; border:0!important; border-left:4px solid #16A085!important; text-decoration:none; } .u418104cc03537bad54dbdc7f63650674:active, .u418104cc03537bad54dbdc7f63650674:hover { opacity: 1; transition: opacity 250ms; webkit-transition: opacity 250ms; text-decoration:none; } .u418104cc03537bad54dbdc7f63650674 { transition: background-color 250ms; webkit-transition: background-color 250ms; opacity: 1; transition: opacity 250ms; webkit-transition: opacity 250ms; } .u418104cc03537bad54dbdc7f63650674 .ctaText { font-weight:bold; color:#000000; text-decoration:none; font-size: 16px; } .u418104cc03537bad54dbdc7f63650674 .postTitle { color:#16A085; text-decoration: underline!important; font-size: 16px; } .u418104cc03537bad54dbdc7f63650674:hover .postTitle { text-decoration: underline!important; }
How to pull a seat belt out of a reel
When all the bolts are unscrewed, you need to correctly pull the belt. To do this, you need to pull it while holding the coil with your finger. To pull out the end with the stopper, you need to pull harder.
Now you need to carefully pull the strap out of the reel, holding it.
Pulling the seat belt from the reel
In this case, you need to make sure that the spring does not unwind. To do this, place a screwdriver inside the mechanism instead of a stopper. This is very important, since an unwound spring is difficult to put back into place manually.
Reel stopper
How to remove a jammed belt
If during disassembly you cannot pull out the strap, then the reason is that the mechanism is jammed. In this case, it is impossible to pull it out; the belt gets stuck and does not move. To solve the problem, it is enough to use the tools that most car enthusiasts have in their garage.
First, you will need to unscrew the screws on the lower trim of the middle door pillar (if there are no screws on the trim, it may simply be held on by brackets/clips). After this you need to remove the cover. To do this, just lift it and pull it towards you. Next, you need to pull out the belt and lock the mechanism.
Removing the center pillar trim
The next step is to unscrew the bolt that holds the coil in place. Once unscrewed, it can be easily removed.
To prevent accidental winding, the strap is secured with a paper clip. The coil needs to be shaken, the mechanism should shake. It is important to remember where it is. Using a thin wire, it is important to squeeze out the plastic caps. When removing, the pistons must be held, as they may fall and get lost.
Now you can use a slotted screwdriver to pry and remove the cover located on the mechanism side. Under the lid there should be a plastic box with a cylinder, in the middle of which there is a metal ball. The rocker arm of the locking mechanism will also be attached here. The box needs to be hooked with wire and pulled out.
Disassembled seat belt reel
Next comes the check. It is important to check the rocker arm, which should rotate freely on the axle. If this unit jams, then the axle needs to be washed and the clogged dust removed.
After checking the primary mechanism, you need to inspect the main one. It is also under the cover. This unit, made of metal, is located under the plastic gear. You can remove the gear from its recess without using tools. In the middle of the connector there should be a toothed ex class=”aligncenter” width=”640″ height=”480″[/img]
Then remove the paper clip from the belt, while holding it to prevent it from unwinding. The connector of the main mechanism must be cleaned of contaminants, which often cause jamming. To do this, first carefully pour gasoline over it. You need to take the reel while holding the guide. At this time, wind the belt with your right hand, while trying to tighten it.
It is necessary to make several sharp jerks for the mechanism to lock. After the manipulations have been completed, the belt is again installed on the reel. And again you need to wind it several times, while simultaneously tightening it. The performed operations should solve the jamming problem.
More details and more clearly about this process in the video:
Possible problems when removing the belt and after it
It happens that the driver pulls out the belt, but it does not tighten at all. Most likely, the reason is not at all due to incorrect installation of the node. Most often, this problem is caused by a breakage of the spring inside the drum. It is a consumable item and can be easily replaced.
The opposite situation also occurs when the strap jams and does not extend. This means that the internal mechanism lock has broken. Such cases often occur after an accident. Then you need to follow the instructions above, which indicate what to do if it jams.
If the spring unwinds during removal, it will be difficult to wind it back. But it is not necessary to immediately change it to a new one. The coiled spring must be wound in the direction in which its short part is directed.
Spring in coil
How to find the cause of the problem
After removing the reel housing from the stand, you must position it strictly vertically and try to smoothly pull the belt out of the housing. If there is no tilt, the belt should come out easily and when released, retract back.
If you tilt the body, the ball will move and the reel will be blocked. A working mechanism restores its operation after returning to a vertical position. Wedging indicates a malfunction of the ball lock.
This is interesting: Where is the safest place in the car for a child?
If you pull the belt fast enough, the centrifugal lock with the eccentric lever will work, and the reel will also be locked. After release, the work is restored and there should be no interference with smooth pulling.
Work on diagnosing the pyrotechnic tensioner is only available to specialists due to the danger of the mechanism. There is no need to try to test it with a multimeter or disassemble it.