If a driver sets out to give his car an individual appearance, then after some time he will definitely do headlight tuning. The easiest way to change the appearance of car optics is to change the color using paint or film, or make “chameleons”.
How to change the bulbs in the headlight of a VAZ 2170
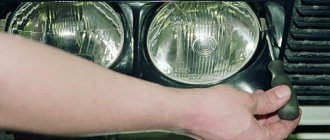
To replace the low beam bulb, wear clean gloves and disconnect the battery.
Then remove the rubber protective cap, which is located closer to the fender.
Carefully disconnect the wires.
- Remove the latch (to do this, press down and remove it from behind the hooks).
- Remove the lamp and install a new one. Installation is carried out in reverse order.
Replacing high beam bulbs is no different.
If you frequently drive at night, especially in bad weather, make sure you always have a spare set of light bulbs in your car. Probably every driver has experienced the fact that one lamp burns out at night and the lighting becomes much worse. You also endanger other road users, since it is difficult to assess the situation during the same overtaking when one of the headlights of the oncoming car is not on.
To replace the bulbs in the rear light, you will need to dismantle it. (see Replacement of the rear light)
Remove the taillight and turn the parking lamp (in the Priora, the parking light is combined with a double-filament fog lamp).
Remove the lamp by turning it counterclockwise.
Install a new one. Make sure that the tabs on the plinth fit into the grooves on the parton. All other lamps are changed in the same way.
To replace the rear license plate lamp on a Lada Priora you need:
The best optics for the VAZ 2110
Unscrew the trunk lid attachment, which is secured with 4 bolts
Remove the socket and change the light bulb.
If you cannot remove the cartridge itself, remove the flashlight itself
To do this, you need to bend the plastic clamp a little (Caution, they are very fragile). After this, you can apply a little more force to unscrew it. Install everything in reverse order
Install everything in reverse order
If you want to change the trunk light bulb, then:
Pull the lantern out of the opening as in the picture below.
- Bend the antennae that hold the lamp and change it.
- Reinstall the lantern in its original location.
At this point the repair can be considered complete. Connect the battery and check operation. If the replacement does not help, then most likely you should check the wiring.
Video on the topic
How to change the light bulbs in the headlight of a Lada PRIORA
During the operation of the car, drivers may encounter minor troubles. For example, at night they notice that the headlights do not light up. If the check does not reveal faulty fuses, then the cause may be a burnt out light bulb.
We are looking for reasons for fogging headlights
Before replacing lamps, make sure the optics are turned off. To replace the lamps in the left headlight of the Priora, there may not be enough free space; to do this, remove the battery. Do not touch the lamp bulb with bare hands; use cotton gloves. If there is dirt on the bulb, it is recommended to wipe the lamp with a swab moistened with a 70% ethyl alcohol solution.
Lada Priora headlights can be of two types:
- High beam and DRL (daytime running lights) are combined. Option A - with two protective plugs.
- high beam without DRL. Option B - with one large plug.
Headlight breakdowns
There are several different typical failures of Priora headlights, such as:
- Fogging;
- Cracked protective glass;
- Damage or burnout of the reflector;
- Broken headlight mount;
- Polishing, etc.
Let's look at each of the reasons.
Fogging
Over time, almost every prior driver is faced with the problem of sweating headlights on a Priora. This is due to the fact that the tightness of the headlight is compromised due to aging of the sealant or loose sealing of the protective rubber covers on the rear side of the headlight.
This problem can be eliminated by dismantling the headlight and gluing the glass, as well as replacing the rubber covers.
Cracked protective glass
When operating a car, it is exposed to various types of influences, both mechanical and thermal, as a result of which damage to the headlights themselves is possible. For example, in the event of an accident, the protective glass of the headlight may break, or if the power of the lamps is incorrectly selected, the glass may melt.
This problem can be resolved by removing the headlight and replacing the glass with a new one. The cost of glass starts from 200 rubles per piece.
Burnout and damage to the reflector
Over time, with intensive use, the headlight reflector can lose its reflective properties or even burn out, which will worsen the luminous flux emitted by the headlight. Also, in the event of an accident, the reflector mounts may break.
The problem is eliminated by replacing the headlight or replacing the reflector, depending on the nature of the breakdown.
Broken headlight mount
This problem occurs in most cases due to traffic accidents. In this case, this problem can be eliminated by gluing the headlight mounts or replacing it with a new headlight.
After a run of 100 thousand km. On a Priora, quite often the headlights begin to become cloudy and yellow, which leads to their unsightly appearance and ages the car. In this case, you can restore the headlights using regular polishing.
As you can see, for all reasons for headlight breakdowns, they must be dismantled.
Below are step-by-step instructions for removing a headlight from a Lada Priora car.
Adjusting headlights using a corrector
You can make adjustments without disassembling the head optics. On the back of the headlight you will find adjustment screws that can be used to lower and raise the light beam. To set it up, you will need to place the Lada Priora on a flat surface opposite a wall or garage - the distance from the headlights to the wall should be 5 meters. Also check whether the corrector is working or not. It is recommended that a person of similar build sit in the driver's seat during the inspection.
The Priora corrector should be set to “0” - only the driver is present in the car. Under the hood you will find the adjustment bolts. While the corrector is working, the second headlight must be covered with thick cloth. The adjustment can be considered complete if lines “A” and “B” pass through the intersection of the inclined and horizontal beams of light, and the upper limit of the light coincides with line “2”.
Tuning priors: tuning headlights, bumpers, body kits 2021.
Painting headlights
Tuning the front and rear lights on a Priora is not limited to increasing the aperture ratio. They can be tinted. But this does not mean that you need to paint the glass - the light will simply become cloudy. The tinting effect is obtained due to a change in the color of the substrate. This is done using high temperature paint.
This is done in the following order:
- The entire block is removed and the backing is removed;
- Wipe off the chrome from the substrate (zero polish will help). Cover the substrate with two or three layers of primer and wait about an hour;
- Apply 4-5 layers of paint over the primer, wait for each layer to dry;
- Assemble the block lights, close all the cracks to prevent fogging;
- After painting, all that remains is to adjust them. The main thing is that the light is not too dim and does not cause inconvenience when driving.
Adjustment after any modification of the optics is performed as follows:
- Place the car at a distance of 5 m from a flat wall (for example, opposite the garage);
- Set the adjusting screws under the hood to “0”. Put a person of similar height behind the wheel;
- The headlights are adjusted one by one; while one is being adjusted, the second one is closed;
- The clear edge of the light should be 10 mm below the top edge of the headlight.
Installation of LEDs and overlays
A fairly simple way to transform your Priora is to buy ready-made “eyelashes” in specialized tuning stores. However, it will be much cheaper to make them yourself. To do this, just take tubes or a piece of plastic (an alternative is vinyl film) and cut them into thin lines with a stationery knife. You can curl future “eyelashes” with your own hands using a hair dryer and soap solution. They are then attached to the car body using double-sided tape, glue or sealant.
The optics are painted glossy black, “angel eyes” are installed on the Priora
For this DIY upgrade you will need:
- disassemble the front or rear headlight, having previously dismantled the element;
- stick masking tape on the outer part of the glass of the optics, which will prevent it from being damaged;
- bend the plastic sides (brackets) of the optics, under which the reflector is located;
- heat the sealed adhesive with which the glass is fixed in the headlight using a household or construction hair dryer and remove the glass;
- remove the reflectors using a Phillips screwdriver. Don’t forget to cover the turn signal lens with tape for protection;
- Apply several layers of black paint to the reflector. This, combined with bright LEDs, will provide a greater tuning effect. Let the paint dry;
- take an LED strip with a cross section of 2.6 mm. Remove the reflector's metallic backing, bend the tape into a circle and attach it using fasteners or glue;
- After the glue has dried (about 2 hours), reassemble the headlight or lantern. Don't forget to re-apply the sealant to the glass.
Headlight tuning, bi-xenon lenses, Laser Lights modules for Lada Priora
Headlight tinting
You can tint the headlights on the Priora yourself using the following means:
- black tint film;
- black spray paint. Unlike film, it is applied in several layers.
In some cases, the headlights on a Priora are tinted not black, but in a different color that matches the shade of the body. You need to understand that applying tinting will worsen the visibility of the road surface at night. Therefore, in order to avoid accidents, such modernization is most often carried out on car lights.
Tinting the headlights on a Lada Priora
To install the tinting yourself, cut out the required section from the film. The glass (reflector) of the lantern is moistened with a soap solution or water, and the film is applied there by heating it with a hairdryer. If paint is used, you will need to remove the glass and apply it to the inside of the lantern. Possible incomplete painting (pasting), but application of a pattern.
Author: Baranov Vitaly Petrovich
Education: secondary specialized. Specialty: car mechanic. Professional diagnostics, repair, maintenance of passenger cars of foreign production 2000-2015. Extensive experience working with Japanese and German cars.
Coloring masks
The next type of tuning the appearance of optical devices is painting the Priora headlight masks. These changes are also not expensive and will not hurt the car enthusiast’s pocket. The mask is a specific insert that is placed inside the headlight structure. The factory version of the mask is chrome-plated. After painting the mask (traditionally black), the appearance of the car will change quite seriously. Therefore, this tuning of headlights on Priora is quite common.
Adjusting the headlights of the Lada Granta
However, there is a difficulty in its implementation, which lies in the need to completely disassemble the lighting device. Since the Priora's headlights are not dismountable, the glass is securely glued to the body using sealant. However, with the right approach, disassembly can be done. After this, the mask is removed from the headlight, cleaned (the chrome coating is removed), primed and painted. Then the lighting fixture is put back together and installed in its original place.
Removing the headlight from the car
The particular difficulty of removing the headlight on a Priora to replace the glass is that the lower edge of the headlight unit is covered with a bumper, and it also controls the glass, and under it there are two lower mounts for the headlight itself. Therefore, whatever one may say, for a trivial replacement, you will have to remove the entire bumper.
Removing the Priora bumper to repair or replace headlights
This action will require both effort and tools. In general, you will need the following equipment:
- Phillips screwdriver;
- flat screwdriver;
- socket wrench with a “10” head.
First you need to unscrew the lower mounting screws. They are located along the lower edge of the bumper and along the edge of the front part of the wheel arch. The Priora has 6 mounting bolts on each side: three on the bottom and three on the fender liners. Next, unscrew the 4 bolts securing the bumper to the upper front part of the body wall - the cross member, and the 2 bolts securing the headlight casing. Carefully inspect the fog lights in the bumper, if installed, for repair or replacement. Remove and set aside the bumper.
Removing the headlight to replace the glass
On top of the front light there is a plate covering it - a casing. It is secured with 3 screws to the upper cross member of the engine compartment. After removing it, you will have access to the upper mounting bolt of the Priora headlight. Since the bumper has already been removed, all that remains is to unscrew the top and 2 bottom screws. That's it, you can carefully move the headlight forward and disconnect the control wire harness from the connector. The Priora headlight has been removed. You can disassemble and replace the glass.
Working with the radiator grille
You have replaced the bumpers - the car already looks more attractive. But we can do even better. Here you can replace the radiator grille. You can make this product yourself from stripes, honeycomb shapes or any other style. There are several different options for this.
You can order a grille replacement without replacing the front bumper. This is very economical, but such a grille cannot always transform the front end so much.
The second method involves replacing the grille along with the bumper. These modifications will greatly affect the appearance and style.
Optics tuning options
Most of the methods listed below can be done by yourself. You will need a minimum number of tools and specific upgrade kits. Today Lada Priora owners prefer:
- Install more powerful optics or headlights with a different shade of light.
- Carry out tuning by tinting reflectors. The rear and front lights can also be dimmed.
- Install additional lighting (angel eyes) - LED strips significantly transform the appearance of the car.
- Linings - among motorists they are better known as “eyelashes”.
We decided to pay attention to the overlay of additional elements and angel eyes. They do not violate the rules, and even a novice driver can install LED strips independently
Installing eyelashes
Issue price: 300-600 rubles.
You will find ready-made eyelashes in automotive stores. But if you don’t want to spend money on tuning, you can make LED eyelashes with your own hands. To do this, you need plastic tubes or a solid piece and use a utility knife to cut the material into thin strips; as an alternative, you can use vinyl film.
Eyelash curling is done using a soap solution and an industrial solution. You can attach eyelashes to the car body in different ways: some people choose sealant, others prefer to use glue or double-sided tape. Use your imagination when creating eyelashes, here is a Lada Priora with purchased components in the form of a drop:
Angel eyes
Issue price: 2500-3500 rubles.
This is not only stylish, but also useful Lada tuning, as LED strips improve visibility on our roads. You can attach strips to the rear or front lights. As with the previous option, you can purchase angel eyes or try to make them yourself.
We'll tell you how to do this tuning yourself. To work, you will need the following materials and tools: LEDs, dichloroethane, a drill that matches the diameter of the diodes. The number of diodes is calculated for one “eye”. You can take plexiglass as the main material. For example, from blinds.
The process goes according to the following scheme:
- We know that headlights have different diameters, so angel eyes should also differ in size;
- Pour boiling water into a suitable container and place a plexiglass rod there. He should lie there until he softens. You need to bend the ring quickly before they harden. The easiest way to do this is to use jars. Small circles can be made using a jar lid, and large circles can be made with a coffee can;
- We take a drill and make holes in the ends for the diodes. As a result, you should get something like this:
- Now we make notches on the circles. The distance between them should be 2.5 mm. We put on gloves and take dichloroethane. One drop should be placed into each niche and carefully distributed along the wall of the workpiece;
- Let's move on to the main step - installing LEDs and connecting elements using wires;
- We dismantle the necessary headlights and disassemble them. Apply masking tape to the outer part of the glass, and then bend the holders. You can remove the glass using a hair dryer; it should come off quickly;
- Install LED strips. For example, “eyes” can be installed instead of dimensions, since new components will fulfill their role. Check that there are gaps between the lenses. We assemble the front or rear lights of the Lada Priora. Tuning is complete.
False eyelashes for Lada
Method 1 is the simplest. To do this, you only need to stick the finished “eyelashes” on the top of the headlight. You can trim the edges with a stationery cutter to give them the desired shape.
Method 2. Making “eyelashes” from film. You will need:
- vinyl film;
- pencil, paper, imagination - for the template.
False eyelashes for headlights
Develop a template of the desired shape on paper and cut out “eyelashes” from the film according to it. Stick the film onto the headlights using a soap solution, like tinting. If headlight light penetrates through the film, apply an additional layer.
Method 3. Making plastic “eyelashes”. This method will require dismantling the optics. Materials needed:
- plastic no more than 2 mm thick;
- marker, sharp knife or stationery cutter.
Remove the headlights, following the instructions for the car. Place a piece of plastic on the headlight glass and shape it by heating it with a technical hairdryer and smoothing it to the shape of the glass. Secure with electrical tape so that it does not move until it cools. Apply the outline of the desired eyelash shape onto the plastic with a marker and cut it out with a cutter. Paint it in the desired color and glue it.
Replacing headlights from A to Z
The toolkit for the procedure for replacing headlights on a car consists of:
- socket wrench to “10”;
- Phillips screwdriver;
- flat screwdriver.
Replacing a headlight on a Priora begins with disconnecting the negative terminal of the battery (the author of the video is the channel In Sandro's Garage).
Replacing low and high beam lamps on Lada Priora
Before removing the headlight on a Priora, you need to remove the bumper. Then you need to remove the headlight covers from above. Next, pressing the latch, the block with wires is disconnected. When the headlights are removed, you can change the bulbs, for example, with Bosch xenon ones. The glass version of the optics can be replaced with a lens one.
The rear lights of Priora 2 are removed in the same way. The upholstery is dismantled and the wires are disconnected. Now you can remove the rear lights of Priora 2.
Tail lights on Priora
To disassemble and replace the headlight glass, you will need the following materials and tools:
- industrial dryer;
- thin screwdriver;
- new glass;
- new lamp;
- sealant.
Before disassembling the headlights on the Priora, you need to place them on a clean, dry surface. Then heat the glass until the sealant begins to melt. Next, the glass should be pryed off with a screwdriver and separated from the body. The next step is to remove the old sealant.
Before changing the light bulb and replacing the headlight glass, the seat must be lubricated with a fresh layer of sealant. Then the glass is carefully placed and pressed firmly. After 12 hours you can assemble the lantern.
In what cases is it necessary to replace and adjust headlights?
The main reason why optics are replaced is their failure and the inability to perform their functions: high-quality road lighting. In addition, the lamps in the lanterns are changed. Bosch lamps are in demand. Bosch brand xenon produces better quality light and has a longer service life.
Bosch xenon lamps
Optics should be changed for the following reasons:
- the headlight sweats, its ventilation is impaired;
- cracks, chips on glass;
- reflector malfunction;
- faults in electrical connectors;
- defects in fasteners;
- tuning
During the replacement process, you can not only restore the functionality of the flashlight, but also improve its performance characteristics by replacing halogens with xenon. Using xenon in lamps, the driver receives better lighting. At the same time, tuning of the headlights is also carried out: lens glass is installed, black headlights look impressive. LED lamps are installed in the parking lamps, as well as in fog lamps.
Front lights with lenses
To make your car tuned, you need to know how to remove the front and rear optics.
Types of tuning
You can remake the Priora taillight in different ways. Some of them are simple to implement, but require certain skills; others may require financial costs. But, in general, we can highlight several of the most basic ways to remake headlights:
- Replacing standard lights with tuning ones;
- Tinting;
- Installation of LED lighting elements instead of standard ones;
- Use of overlays;
Read Installing an additional brake light with your own hands
Let's consider each of the methods separately. But let us immediately note that tuning will almost always require removing the headlights on the Priora.
Priora headlight tuning
Therefore, first, let’s talk about how to dismantle the rear optics from a car. This operation is not complicated, and not many tools are needed to carry it out. All you need are 8 and 10 keys and a screwdriver.
Now about the process itself:
- All work is best done in good lighting. Before starting, you should de-energize the on-board network by removing the terminal from the battery;
- We open the trunk and find special windows in the upholstery in the area where the lights are located. We open these windows;
- We find the connector for connecting the lights to the wiring and disconnect it;
- Unscrew the three nuts securing the headlight unit and, holding it from the outside, remove it;
As you can see, everything is quite easy to understand. And then you can start tuning to improve the rear view of the Priora.
Changing the color of the taillights by painting
First of all, when tuning the rear lights of a Priora, drivers want to achieve an unusual effect, so that the rear lights attract attention and are to some extent provocative. This can be achieved by converting them to the American style - that is, changing the color, repainting the turn signals and all the rear optics in bright red. This is the easiest way to change the appearance of the headlights, and such tuning can be done on any car, not just a Priora.
Replacing the dashboard light
As a result, the lighting will be more uniform and calm.
View gallery
To achieve this, you need to purchase light bulbs and LEDs. The perimeter of the panel should be covered with pieces of LED tape at certain intervals. Then the tape and factory backlight contacts are connected.
It is recommended to replace the display filter along with the backlight. You can simply replace the entire filter, or simply leave the backlight white.
It looks very original on the arrows. To do this you will need 10 CMD diodes. Using a soldering iron, these diodes are soldered into the glass of the panel from the outer part opposite the arrows. Resistance sensors are soldered inside.
Technical modernization
The standard power unit that is installed on the Priora, with proper maintenance and operation, behaves as necessary. But if you approach this issue correctly, then there is every chance of increasing engine power by as much as 40%.
View gallery
The upgrade includes installing a mechanical supercharger, boring the cylinder block, installing low pistons and a high crankshaft. All this will help make the car faster and faster.
Nowadays, tuning the Priora engine with your own hands is as easy as shelling pears. All the necessary components for this can be purchased in specialized stores. In addition, this does not require any knowledge or skills from the driver.
For example, some install, as already written above, a compressor. It pumps a denser mixture of fuel and air into the combustion chamber, thereby increasing power tenfold. But you have to pay for everything - an increase in power will entail increased consumption.
If you think that a compressor is too boring, then here it is - a full-fledged turbocharger.
View gallery
On a Priora car, do-it-yourself tuning can significantly improve the dynamic characteristics.
But now you have strengthened the power unit, what next? And then you also need to strengthen the clutch - only then will you be able to feel all the power without harm to your car.
There are many more different nuances in technical tuning. It is simply impossible to consider them all. Since the car has an ECU, you can do chip tuning and play with some options.
Do-it-yourself Lada Priora tuning: interior, engine, optics - AutoExpert
The first Lada Priora rolled off the assembly line in 2007. A couple of years later, this car became very popular among domestic car enthusiasts, mainly because of its affordable price. At the same time, many car owners strive to give their Priora individuality. Make it look more solid and more expensive. Tuning helps them with this. Let's figure out what this procedure is.
Engine change
The Priora engine provides ample opportunities for tuning. Most often, car enthusiasts bore the cylinder block and install shortened pistons in the engine. Such pistons, in turn, require replacing the crankshaft.
As a result, the characteristics of the engine are completely changed, and its power can increase by 35%. But there is a minus: fuel consumption will also increase. Therefore, not all car enthusiasts decide to undertake such radical engine tuning.
Many people limit themselves to installing mechanical compressors in the engine, which can increase engine power by 10–15%.
Cylinder boring is one of the most labor-intensive engine tuning options.
Another inexpensive way to increase the dynamic parameters of the Priora is to work with a carburetor. In this device, the jets and acceleration pump are changed (most often, parts manufactured by BOSCH are installed in place of standard spare parts). Then fine adjustment of the fuel level is performed. As a result, the car accelerates twice as fast.
Chassis
When it comes to changes in the chassis, the first thing drivers do is remove the standard brake booster and replace it with a vacuum one, always with two membranes. This doubles the reliability of the brakes.
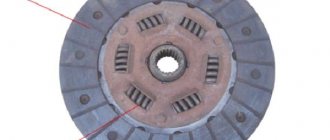
Stiffer springs and ceramic-coated discs are installed in the clutch basket, and a lightweight flywheel is installed on the crankshaft.
This measure significantly reduces the vehicle acceleration time without premature wear of the clutch and gearbox.
The rear wheels of Prioras are often equipped with disc brakes from “tens”
Finally, the rear drum brakes are removed from the Priora and replaced with disc brakes from the VAZ 2110. The drum brake design is no longer used almost anywhere, since it is considered obsolete. Installing a disc system on the rear wheels increases braking reliability and requires virtually no modification.
Tuning the headlights
When working on the front part, many people do their own tuning of Priora headlights. So, you can install eyelashes and lenses. All this has the best effect on the originality and uniqueness of your car.
View gallery
And if you also replace the factory side lights with LED ones, this not only allows you to uniquely style, but also gives a brighter light. You can also convert your turn signals into parking lights. This will expand functionality.
Many people tint their taillights. This DIY tuning of a Priora hatchback, together with a set of original body kit, will make people turn around and stare after your car for a long time.
Dashboard
If you compare the Priora with previous models from AvtoVAZ, the interior is much more attractive. It should be noted that when creating it, the designers used special high-tech plastic, which in appearance resembles a leather surface. The “Lux” package is distinguished by additional modifications that add solidity to the interior.
But, despite all this, tuning the Priora panel with your own hands can significantly change the appearance and also improve functionality.
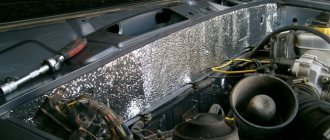
Improvements must begin with the organization of lighting. To complete this task, you will need some tools. It is also worth stocking up on LEDs and reflective foil.
The first step is to remove the panel. In fact, it is very simple - everything is done using an ordinary screwdriver. Then the main instruments are disassembled. Remove the dials, hand and cover.
Many people remove the factory coating from the numbers. And then, when illuminated, they will glow bright white. However, this is too simple and may not be suitable for those car enthusiasts who want to make the interior look solid and expensive.
The method of gluing cellophane inserts of various colors to some panel elements also looks great. To do this, stock up on bags and cut out some sections from them. These pieces must be glued to the back of the panel. For example, imagine the part of the speedometer where the speed limit is marked. It's quite impressive.
Of course, all this is quite banal. And if a car enthusiast can independently dismantle and then disassemble the instrument panel, then the backlight should be replaced.
Alteration or tuning of headlights – Priora
Well guys, let me start by saying that I bought these headlights at the willow tree, there is one place where they are sold. The guys who deal with plastic on a large scale have bumper grilles, etc. At first, when I took the headlights, I was happy, but 3 days after installation, the glass on one headlight became cloudy, not in the area where the lens shines, but completely. I took it back, but three days of use is no big deal.
And what did I hear there? that I probably put Xen in the headlights and it was all because of him! What?! The same person initially told me that xenon can be installed in them, but now he tells me that the manufacturer does not recommend this. He said that he would try to change them, gave the headlight, waited for two weeks. Allegedly, the manufacturer is located in Moscow, and my headlight was sent there for examination.
And finally, calling myself every two days, I heard that the headlight had arrived. I came to pick it up - these idiots got it mixed up and sent me the second left one. Simply gorgeous. I waited another four or five days, and finally the one I needed arrived. Thank you God! By the way, I originally brought two headlights, but they only replaced one for me. And the attitude was not so hot!
Well, having received a new headlight, I decided to disassemble it anyway, since applying paint over chrome is the peak of stupidity of manufacturers, I was promised that everything would be done efficiently - I didn’t see any quality anywhere near it.
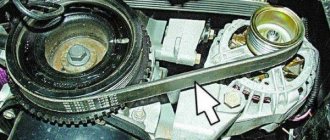
And he began to analyze. First, I removed all the lamps from the headlight, then took out the metal pins - there are only 4 of them in the office. I took a hair dryer and a large cardboard box. I placed a partition between the barrel of the hair dryer and the headlight so that a hot stream of air would not blow on the headlight itself.
I left the headlight to warm up for 15 minutes. After heating, the glass came off the headlights easily. By the way! I forgot to say! in one headlight, which they didn’t change for me, the lens was pressed closely to the glasses, and because of this, the sunlight that fell on it somehow managed to melt the plastic on the glasses.
We will also repair it. and what turned out to be after the analysis? These idiots missed the pin of the electric corrector when assembling the headlight - as a result, the lens rested on the glasses, and as a result, sunlight through the lens melted the plastic. once again, huge respect to the crooked hands - whoever assembles this, with such hands you can only plant potatoes, and even then under supervision)) after removing the glass, a gorgeous view opened up to me in full panorama)) what is called chrome here, in my opinion, is just ordinary paint from a spray can under chromium. By the way, here is the condition of this chrome after a month of use.
I didn’t even think about removing chrome with KROT liquid, since under the influence of a regular degreaser this “chrome” takes on a wonderful roughness for applying primer and paint. By the way, now I only use paint and primer like this.
The only place where, in my opinion, the chrome was in good condition was in the DRL area. I decided to leave it as is. Because at least this place inspired my trust. We seal the area that we need to preserve with masking tape.
Well, in the meantime, we sand and seal with fiberglass putty the place where the plastic has melted on the glasses.
We apply two layers of primer, with breaks between layers of 10-15 minutes, and three layers of paint with breaks between layers of 10-15 minutes. We wait until it dries and remove the masking tape.
And the last jamb is the vertical and horizontal tilt controls. These plastic things failed in the adjustment mechanism.
I refused them because I don’t know that if I bought new ones, they wouldn’t wear out either. cut it off and stuck it in as plugs. I made places at the ends for a flat-head screwdriver.
I cut holes for a screwdriver in the case.
Well, something like this, of course it’s not very convenient to regulate - but it’s quite possible) Something like this))
I haven’t had time to take a photo of how the headlights look on the car now, thank you all for your attention. Good luck to all!)
studio
atelierTuning Priora headlights in the style called “angel eyes” requires not only dismantling the headlight, but also disassembling it.
This will allow you to wear out the “eyes” and tint the surface of the reflector (mask, blender) using black paint. List of materials and tools required to complete the work:
- masking tape, which allows you to preserve the glass during dismantling;
- to remove the blender - a screwdriver with a T20 tip;
- technical hair dryer;
- black spray paint;
- plastic tube;
- a set of LEDs with corresponding resistors;
- aluminum tape;
- glue;
- hacksaw for metal;
- automotive sealant.
There are no limits to perfection
People with indefatigable creative imagination modify the appearance of their cars beyond recognition. In the case of the Lada Priora, this is also due to the fact that its features do not correspond to modern fashion trends in the “sportiness” of the car’s appearance.
You can improve the appearance of the Priora by performing a small and accessible optics tuning in different ways:
- change the shape of the headlight using “cilia”;
- install LED lighting – “angel eyes”;
- paint the headlight reflector black;
- tint headlight glass.
Step-by-step instructions for installing angel eyes
First stage. The headlight is dismantled strictly according to the instructions supplied with the car. Masking tape is glued to its glass, which will prevent damage to the surface during the removal process.
Second phase. If the headlights are from Bosch, then the brackets are bent, and on the headlights produced in Kirzhach there are plastic sides. Next, the sealant is heated using a technical hair dryer and removed. The glass is removed.
Third stage. Use a Phillips screwdriver to remove the chrome reflectors. Tape is applied to the turn signal lens.
Fourth stage. The chrome surface is cleaned with sandpaper and an aerosol primer for plastic is applied to it in two layers. The parts are dried within an hour.
Fifth stage. Black aerosol paint is applied in several layers to a well-dried surface. Moreover, before applying each new layer, the previous one is given time to dry completely. After painting is completed, the tape is removed from the turn signals.
If only tinting of the reflector was necessary, then the headlight can be assembled, for which a layer of automotive sealant is applied to the junction of the body and glass. If the installation of “angel eyes” was also planned, then the work must be continued. To do this, it is possible to use simple gas-discharge tubes, but you can also try to create something completely unique.
This is done as follows:
- Eye rings are bent from plastic tubes or brackets used in blinds. To do this, they are heated using a technical hair dryer, which allows them to be given any desired shape, which should resemble an open ring with “legs”. For each headlight, two rings of different diameters are made.
- As soon as the rings have cooled, transverse notches are applied to them along the entire perimeter. To do this, you can use a hacksaw. There should be a distance of at least 2.5 millimeters between the notches.
- LEDs of the desired color are glued to the ends of the tubes using sealant or glue. The diodes of each ring should be connected in parallel by soldering a resistor into a gap made in one of the wires.
- The surface of the rings facing the headlight body is covered with aluminum tape to avoid reflection of the tube light in the reflective layer of the headlights. The ends of the tubes are completely wrapped with tape.
- The rings are attached to the blender using instant glue.
- The headlight is assembled and installed, while the “eye” wires are connected to the side lighting connectors.
Step by step guide
1. To remove the headlight on the right or left, it is advisable to first remove the front bumper. Or unscrew the part of the bumper where you will change the headlight.
To change the headlight without removing the bumper, you need to unscrew the plastic trim on the headlight. It is secured with four screws.
You also need to unscrew two screws in the area of the hood lock.
Now, when removing the headlight, you will have the opportunity to move the bumper a little to the side and unscrew the mounting screws.
2. Disconnect the headlight power plug.
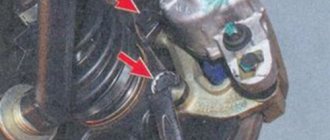
Use a flat-head screwdriver to pry it in the location indicated below and pull the plug to the side.
3. Unscrew the two headlight mounting bolts.
See below for bolt locations.
4. Unscrew the Phillips screwdriver marked below.
While unscrewing the screw, hold the headlight so that it does not fall.
5. After unscrewing the screw, remove the headlight.
6. We take a new one and reassemble it, namely:
- put the headlight in place
- secure the headlight with a screw and two bolts
- connect the plug
Next, depending on the situation, if the bumper was removed, we install it. If you unscrew the covers on the headlights, install them and secure them with screws. Also, do not forget to tighten the two screws near the hood lock.
lens
lens Films of different colors are used to tint headlights, but the most common of them is black.
If desired, you can tune the Priora headlights by choosing the color of the film to match the color of the car body. It should be remembered that with tinted headlights, the power of the luminous flux may change and the illumination of the road section may deteriorate in the direction of travel. You can tint the entire surface of the headlight glass, or some of it. You can also apply some kind of design using paint or film specifically designed for this purpose.
Headlight polishing
During travel, standard headlights are exposed to the mechanical influence of sand, gravel, dirty water from surrounding vehicles, the chemical influence of road reagents, and salt. The surface of the lighting fixtures acquires a yellow tint, becomes matte, and the intensity of the luminous flux decreases. At night, visibility and traffic safety deteriorate. Modern headlights are made of polycarbonate and plastic glass - to polish them you do not have to buy expensive diamond paste, comparable in cost to a new light fixture. A budget abrasive will help improve the situation. Required materials and tools:
- masking tape;
- fabric-based sandpaper (800, 1000, 2000, 4000);
- Sander;
- washing car shampoo;
- polish (for windshield);
- rags.
The polishing process is as follows:
- Wash the headlight using car shampoo and degrease if necessary.
- Dry thoroughly and cover the mating surfaces with masking tape to protect them from damage.
- Starting with a coarse abrasive (800), gradually move to a fine one (4000), using a fraction of each size for 2-3 minutes. After each stage, when switching to a finer grain, the surface to be treated is thoroughly washed.
- Before polishing, rinse and dry the surface.
- Using a foam pad and polishing agent, buff to a high shine.
During the grinding and polishing process, it is important not to overheat the surface being treated. To do this, you should not process one area for a long time, the movements of the grinder should be wave-like and progressive, and each fraction of the abrasive should be moistened
"Priora": do-it-yourself tuning. Working on appearance
It is recommended to start work by modifying the geometric parameters of the bumpers, as well as the hood. You can install universal hood stops. They will help solve the manufacturer's shortcomings.
Bumpers that can be installed on this model can be purchased without any problems at the appropriate stores. Today their choice is available for every taste. For example, the “Sniper” or “I Robot” model are lightweight and made of plastic.
View gallery
You can also purchase fiberglass products. There is an option to order a custom product. The bumpers for your project will easily install onto existing mounts. This does not require any modification or modification. This is an inexpensive, but quite effective do-it-yourself tuning. "Lada Priora" will change before your eyes.
Replacing bumpers will not only completely refresh the appearance of the car. This also allows you to improve some technical parameters. So, simply replacing a bumper with a wide air intake hole can significantly increase the speed at which the engine cools.
To transform the appearance, you can also add plastic trims and spoilers. This will completely change the design of your car.