The wear of the piston group and crankshaft of the vehicle directly depends on the correct operation of the idle air regulator. In cars equipped with an electronic ignition system, this device acts as a regulator of the composition of the combustible mixture at the moment the engine starts. Thanks to the signals sent by the controller, the microprocessor module makes a decision about fuel enrichment. in this case, the regulator ignores the throttle readings and the sensor transmits the corresponding signals along the line. If necessary, a free channel opens in the device through which the air flow passes. Due to this, the car engine speed is equalized while driving or idling.
Signs of sensor malfunction
Before you repair the device, you need to find out where the idle speed sensor is located. It all depends on the specifics of the vehicle, but as a rule, this controller is located on the throttle assembly, under the throttle position control. If the location of the DXX is clear, then you can find it without any problems.
Before checking the idle air control, familiarize yourself with the main faults specific to the part:
- the power unit has become less stable at idle;
- engine speed may increase or decrease for no reason;
- when switching to neutral speed, the engine may simply stall;
- if the power unit starts cold, there will be no increased speed;
- when an additional load in the form of a stove, air conditioner or optics is turned on, the engine speed drops significantly.
Idle speed sensor device
Cleaning the regulator on a VAZ 2114
Cleaning IAC on VAZ 2114
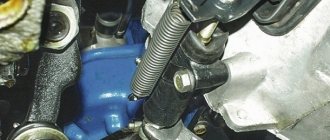
In order to get the sensor, you need to turn off the engine and it is advisable to disconnect the power from the battery. The regulator itself is located on the throttle assembly, just below the damper position sensor, on the injector throttle body.
As a rule, this action can be completely carried out by the car owner himself, since this does not require special skills or tools.
What do you need to prepare?
- Clean cotton rags.
- A small screwdriver.
- Aerosol liquid.
- Any carburetor cleaner.
Removing the IAC
How to clean the IAC on a VAZ 2114 if it is dirty? Cleaning the product begins with its dismantling, by unscrewing the two mounting screws with a Phillips screwdriver. There are also bolts for torx screwdrivers, so before you start cleaning, you need to make sure you have the right tool at hand.
These design changes depend on the year and type of multiport fuel injection system installed. After removing the mounting bolts, you need to remove the idle sensor from its socket in the throttle (accelerator) block.
This action must be performed carefully, since if the unit is dirty, its seating part may stick slightly to the body.
Next, clean the idle air control using a rag and a special aerosol liquid. It is important to consider that in addition to the sensor, you need to clean the mounting socket itself.
IAC check
Posts 1 page 8 of 8
Share112.01.2014 21:20
- Author: Mega-ZZZ
- Mega neon guide
- From: coast of the Black Sea Tuapse
- Gender: Male
- Age: 32 [1987-05-11]
- Posts: 2179
- Respect: +564
- Car: Neon, Stratus
- Year of manufacture: 2000, 2003
- Gearbox type: TH-31 TE-41
- Last visit: 11/24/2018 23:40
- Registered: 11/21/2010
- Spent on the forum: 1 month 8 days
Hello again everyone! Once again we touched on the topic of the ’96 Dodge Neon car. Today we will talk about the idle air regulator for the first neon, the actual essence of the device’s operation is very primitive - by extending and retracting the pin, the air supply to the intake manifold is regulated.
Basically, the regulator cannot be repaired and should not be disassembled.
I’ll say right away - banal spraying in the area of the pin itself does not help lubricant get inside the sensor and does not plan to..
The reason I decided to get to the bottom of the sensor is that nonnon behaves very strangely. I'll post a video later.
actually let's go. looks great from the outside :)
We take a drill and drill holes next to the rivets so as not to damage them, we will still need them!!
we get a kind of reusable corner latch-groove :)
a couple of hammer blows and that's the happiness that's inside.
no matter how scary it is, we bite off the wires
Now you can disassemble the valve
here are his insides
here are the windings of 2 of them, the resistance of both of them was 52 ohms!
here is the rotor itself - here it is a magnet with permanent poles, inside of which there is a thread along which the rod rides.
This interesting little thing fell out of him - maybe it was she who was wedging him.
and I also noticed that it clearly jams when it rotates, I lubricated it with silicone and assembled it in the reverse order
The main thing is not to forget to solder the wiring and everything is great - you can go into battle.
I drilled a hole into the groove and screwed in a screw from some Chinese crap - it holds perfectly and is now not difficult to disassemble.
Then all that remains is to check the windings and everything is great, tomorrow I’ll install it and check it :) by the way, now I’m shooting a video, once I edit it I’ll post it, look how I am as a commentator :)))
Edited by Mega-ZZZ (01/12/2014 21:23)
Share212.01.2014 22:01
- Author: dimmaster
- Veteran neon guide
- From: Moscow
- Gender: Male
- Posts: 954
- Respect: +16
- ICQ: 451717023
- Car: Neon
- Year of manufacture: 2002
- Transmission type: automatic transmission
- Last visit: 10/05/2016 20:15
- Registered: 02/24/2012
- Time spent on the forum: 27 days 10 hours
What was the problem?
Share312.01.2014 22:26
- Author: Mega-ZZZ
- Mega neon guide
- From: coast of the Black Sea Tuapse
- Gender: Male
- Age: 32 [1987-05-11]
- Posts: 2179
- Respect: +564
- Car: Neon, Stratus
- Year of manufacture: 2000, 2003
- Gearbox type: TH-31 TE-41
- Last visit: 11/24/2018 23:40
- Registered: 11/21/2010
- Spent on the forum: 1 month 8 days
it feels like it’s jamming, the revolutions should gradually gradually decrease when warming up, but ours is 1200, then something tries, buzzes, and oops - 600 at once, then it almost stalled, they picked up the gas, it picked up again, then again everything worked as it should - then the car sits at idle and warms up, for no reason at all there is a sharp dip again and suddenly it picks up when everything warms up clearly, because the idle speed is no longer particularly regulated when the engine is warmed up.
I decided that there was something wrong with the IAC,
PS the problem with idle appeared gradually, first in the form of unnoticeable stupidities, then obvious failures in operation..
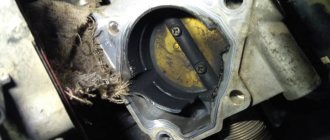
The throttle valve is dirty: reasons
During vehicle operation, throttle contamination is inevitable. At the same time, on a working internal combustion engine, even without regular cleaning, dirt, which leads to certain problems, appears after 25-40 thousand km. mileage The process may be accelerated for the following reasons:
- Use of low quality air filters or loss of air tightness in the intake. For example, it is enough for a crack to appear in the air filter housing or for defects in the air supply pipe to appear.
- Another reason for accelerated throttle contamination is the forced crankcase ventilation system. Some car models with this system are designed so that gases from the crankcase, together with particles of engine oil, are not supplied to the intake manifold, but to the pipe through which air is supplied. The specified pipe is located just in front of the throttle. A certain amount of oil is retained by the oil separator, while the remainder accumulates on the valve.
As a result, due to adhering oil and dust, the damper does not close well, and the device may jam. That is why it is recommended to clean the damper for preventive purposes every 10 thousand km, that is, during a scheduled oil and filter change.
Cleaning Rules
It often happens that cleaning the idle speed sensor can solve the problem of device inoperability. In general, this procedure is quite simple. Therefore, almost anyone can cope with it.
So, how to clean the idle air regulator:
- First of all, the IAC must be disconnected from the wiring.
- Next, take the WD-40 liquid and apply it to a Q-tip. This stick is used to clean contacts.
- Next, take a small Phillips head screwdriver and unscrew the controller latches, there are two of them. If the fastenings are completely missing, this indicates that the IAC is mounted on varnish; if this is the case, then, most likely, the entire throttle will need to be dismantled.
- Dismantle the DXX and inspect it. If there is dirt or traces of motor fluid on the device, then in addition to the regulator itself, you will need to clean the entire throttle assembly.
- Now take a cleaning fluid (you can use carburetor cleaner instead of WD-40) and apply it to the cone needle and spring. Although carburetor cleaner is better for cleaning! Having done this, you need to dry the controller and put it in place. Before installation, make sure that the distance from the device body to the needle is 2.3 cm. If cleaning does not help fix the problem, then most likely you will have to change the DHC.
Controller connection diagram
Preventive measures
In order not to encounter a complete malfunction of the regulator in the future, it is worth periodically carrying out the cleaning process described above. How often to carry out the cleaning process depends on how actively you use your vehicle. If the car is a work vehicle, it is recommended to check and clean the sensor once a year; if you use it only for yourself, once every two years will be enough. But, of course, do not forget about the signs of a part malfunction; if they appear, do not delay. This will help you avoid complete failure of the part and enjoy a quality ride.
Together with you, we come to the conclusion that the part is unpretentious, simple in its functionality and use. Don’t forget: timely detection of a malfunction is the key to overall vehicle productivity. The full operation of the engine depends on the serviceability of each of its components, and if you neglect any part, including the idle speed sensor, this can lead to more labor-intensive repair processes and failure of the entire car.
Reasons for failure of the idle speed sensor
The incorrect operation of the IAC can be judged by the following criteria:
- No or unstable idle speed.
- Turning off the engine while the vehicle is moving at neutral speed.
- When warming up in cold weather, the engine speed does not rise to 1500.
- Also, when you turn on electrical appliances, a drop in speed is possible, but this may also indicate a malfunction in the vehicle’s electrical network.
The most common reason for the failure of the idle speed sensor is oil from the boat exhaust system, in other words, from the breather. When this liquid gets on the sensor needle, coking occurs due to the fact that the throttle mechanism is constantly heated by the water system.
This happens quite quickly and noticeable idle problems appear more and more often, directly depending on the condition of the piston system. In some cases, if the engine is heavily worn, it is recommended to disconnect the breather from the air system and seal the inlet before repairing it. This will not only help avoid frequent cleaning of the idle air regulator, but will also help save fuel consumption, because in addition to oil particles entering the air channel, carbon dioxide escapes from the crankcase, which prevents complete combustion of the fuel.
Another common cause of rough idle is a poorly sealed air system. Most often, the auxiliary pipes on the adsorber and the fuel pressure regulator are damaged; the corrugation in the area of the mass flow sensor (mass fuel flow sensor), which is installed on the air filter cover, may burst.
These faults can only be corrected by replacement. As a rule, when the air channels are damaged, an uneven idle is observed with a characteristic hissing under the hood or when the speed is constantly raised.
If the car has covered a lot of kilometers, more than 50,000, then it is advisable to wash the entire throttle assembly, and based on the results, proceed directly to replacing the idle speed unit itself.
How the regulator works
When the engine is idling, through an additional air supply channel, bypassing the closed throttle valve, the air necessary for its stable operation enters the engine. The cross section of this channel is regulated by IAC. The amount of air is taken into account by the mass air flow sensor (MAF). In accordance with its quantity, the controller supplies fuel to the engine through the fuel injectors.
Using the crankshaft position sensor (CPS), the controller monitors the number of engine revolutions. Depending on the set mode, the IAC operates, adding or reducing the air supply bypassing the closed throttle valve.
When the engine is warmed up to operating temperature, the controller maintains idle speed. If the engine is not warmed up, the controller increases the speed using the regulator, ensuring it warms up at higher speeds.
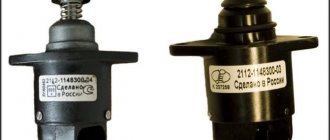
Purpose, device and principle of operation
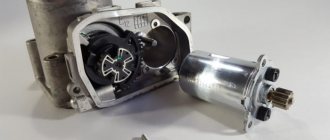
The main components of the idle air control sensor include a cone needle, a stepper motor, a spring and a rod. You can see the insides of the pxx in the image below.
The conical needle is used to change the throughput of the regulator. which affects the amount of air supplied to the engine. The spring is used to create counteraction and eliminate backlash in the operation of the sensor. The stepper motor acts as a drive. Control signals are generated in the ECU, taking into account information from other sensors, for example, the position of the crankshaft or coolant temperature.
The principle of operation of the device is based on changing the cross-section of the air flow channel going into the combustion chamber when the throttle is locked. The stepper motor extends the rod until the tapered needle touches the hole. When you start the machine, the PHH opens the passage, supplying the required amount of air. For a better understanding of the principle of operation of the idle air regulator, you should pay attention to the cross-section of the idle air control shown below.
The operation of the regulator allows for accelerated warming up of the car. When the coolant sensor signals that the engine is operating below the permissible temperature range, the amount of air supplied automatically increases. As a result, the crankshaft speed increases and heating occurs more intensely. Thanks to the pxx injector, you can drive the car immediately after starting the engine, which is not available to owners of carburetor engines.
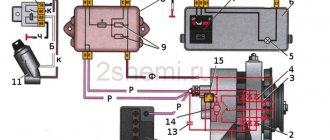
The pxx is located near the throttle sensor. The stepper motor cover stands out strongly against the background of the assembly. The difficulty of finding where the regulator is located only arises if it is located under a common plastic casing that protects the devices from mechanical damage.
avtoexperts.ru
Internal combustion engines include an idle speed regulator or IAC (in common usage an idle speed sensor). The stable operation of the power plant directly depends on the serviceability of this sensor.
The idle speed control consists of a stepper motor with two windings and a spring-loaded cone valve connected to it. The worm gear used in the sensor design converts the rotational motion of the stepper motor into the translational motion of the cone rod.
When receiving an impulse on one winding, the valve stem takes a step forward, and on the other, a step back. At the command of the computer, the valve changes the cross-section of the air channel when the throttle is closed, by extending or retracting the cone.
Symptoms of a problem
When IAC malfunctions occur, the engine starts poorly, the engine begins to operate unstably, the idle speed “jumps” until the engine stops, or the engine speed may hover around 2000 rpm.
The reason is usually coking of the throttle channel or the regulator cone, which for this reason cannot completely block the air supply channel in the throttle valve, or blocks it even when the cone is not fully extended due to a large amount of carbon deposits.
At the same time, the ECU does not always generate an error indicating a regulator malfunction, and therefore it is advisable for car owners to know how to diagnose it on their own.
Main causes of malfunction:
• Mechanical (rod, threaded connections, rivet protrusion);
• Electrical (winding burnout, short circuit);
• Contamination of the inside of the sensor itself (dust, oil, crankcase gases).
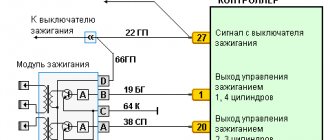
How to check the idle air regulator (using the example of IAC F01R065906 CONTINENTAL series)
An IAC malfunction may not necessarily be caused by the sensor itself. The problem can also be caused by poor contact in its power supply connection or oxidation of the contacts themselves in the receiving chip or sensor.
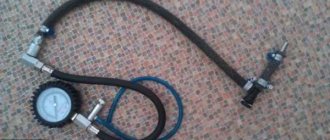
To check the regulator on the engine, remove the terminal block from the IAC, turn on the ignition and use a multimeter (in voltmeter mode) to measure the voltage at the terminal between each of the terminals and the engine ground.
In this case, the voltage at terminals “A” and “C” should be about 12V, and at the terminals “B” and “D” the voltage should be 0.2, 0.4V.
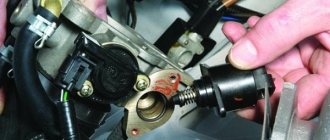
For further inspection, the regulator must be removed from the throttle assembly. The power supply is given, the fastening bolts are removed and the regulator is carefully removed from its seat.
Do not try to press or remove the regulator rod, as this may damage it.
Checking with the regulator removed
The tester switches to ohmmeter mode and checks the resistance between terminals “A” and “D”, then between “B” and “C”, the resistance should be about 53 Ohms, plus or minus 5.3 Ohms.
If, after checking the voltage and resistance, all characteristics match the above data, then the regulator is working.
You can also check the serviceability of the sensor by applying 12V voltage alternately to a pair of contacts “A” and “D” to check the output of the rod and to contacts “B” and “C” to check the return of the rod to its original position.
Methods for cleaning the regulator
No disassembly
With the regulator removed, the outer part of the cone is cleaned using a carburetor cleaner, and the product is also injected into the internal cavity under the cone.
With disassembly of the IAC
The cone is carefully unscrewed from the regulator body and removed. Under the cone itself there is a bushing and a rod spring. A portion of the above carburetor cleaner is injected into the seat of the rod, where its threaded part fits, washing out the deposits that have appeared there. The procedure is repeated until clean cleaner without dirt begins to come out of the hole, which will indicate that the channel has been cleaned.
Next, the threaded part of the cone is lubricated with a light layer of lubricant, a bushing is placed on the cone, a spring and a rod are wrapped into the sensor until the end surface of the rod rests against the regulator body.
The cleaned regulator is installed in its place (the rubber o-ring is first lubricated with engine oil), its fastening screws are installed and the power terminal is installed.
The ignition is turned on and the control unit gives a command to the regulator to calibrate the position of the cone in the throttle valve channel. The cone extends to the end, rests against the throttle channel and moves back to the distance programmed by the ECU.
Next, the engine is started to check its operation in idle mode.
At the same time, when cleaning the regulator, it is recommended to clean the throttle valve assembly to ensure that dirty throttle deposits are removed.
Main aspects of checking IAC
We figured out how to clean the idle speed sensor, now we’ll take the time to diagnose it. Like cleaning, testing can be done at home.
How to check the idle speed sensor:
- Find the IAC and remove it along with the wires. Unscrew several clamps that secure the throttle assembly with the receiver, then move these elements apart by about 1 cm.
- Using a diagnostic tester, check the IAC circuit - now you should make sure whether there is voltage in the network or not. Connect the tester probes to contacts A and D - as a rule, they are marked on the body. Having connected the probes, you need to activate the ignition and look at the results. The best option is 12 volts. If this parameter is lower, then most likely the problem lies in a poor battery charge, and if it is completely absent, then it is quite possible that the problem lies in the control unit.
- Make sure that the circuit is on the IAC itself. To do this, the tester's probes must be connected to pins A and B, and then to C and D, and you need to set the tester to ohmmeter mode. When checked, the diagnostic parameters should be about 53 ohms. Then the same actions should be repeated with other pairs of contacts, for example A and C, and the resistance should tend to infinity (the author of the video is Ivan Vasilyevich).
There is another option; for this, checking the idle speed sensor must be carried out with the IAC removed. Connect the power cable, then touch the end of the needle with your finger (no force required). During shutdown, the regulator should begin to extend the needle fully, so when you turn, there should be a slight push of the finger.
As you can see, in general, diagnosing a device is not that difficult, but for a quality test you need to understand how to use the tester. If you have no idea how to do this, it is better to seek help from an electrician, but in practice, after studying the instructions for the multimeter, there should be no problems with its use. Of course, the tester itself must be working, otherwise the readings will not correspond to reality and you will only get confused.
Sorry, there are no surveys available at this time.
Subtleties of purchasing a new IAC
After purchasing a new regulator, you need to configure it. The injector calibrates itself using the computer, so there will be no difficulties with how to change the sensor. To perform the operation automatically, it is enough to de-energize the injector before installing the IAC.
When purchasing a new regulator, you should pay attention to its quality. The valve and other elements must not have any defects or deformations. The quality of contact soldering must be at a high level. Installation on the seat must occur without distortions, otherwise repairs will soon be required.
The air flow passing through the valve solved the issue of engine operation without load. Now the throttle valve is entrusted with the function of controlling dynamic characteristics, and at idle speed the engine is in full control of the rxx. The ability of the sensor to increase speed allows the car owner not to waste time waiting for the engine to warm up.
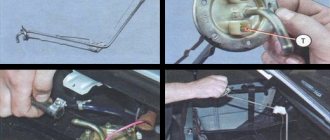
Features of dismantling
As for dismantling the controller, there is nothing difficult about it. Of course, some points may vary depending on the design features of your vehicle.
But in general the withdrawal procedure looks like this:
- First, the ignition is completely turned off. Just in case, to prevent a short circuit, you can disconnect the negative terminal from the battery.
- The next step is to disconnect the regulator's power wiring. Typically this connector is a four-pin output and can simply be disconnected. On some cars, the wiring block can be fixed using an additional fastener - there is nothing complicated here, you just need to disconnect the fastener.
- After this, the regulator mounting bolts are unscrewed and the controller itself is removed.
Installing the sensor in reverse order
Once the sensor and its seat are completely cleaned, complete assembly can begin. To do this, it is important to lubricate the rubber sealing ring with grease or unused oil and carefully install it in its normal place without damaging the integrity of the seal, without which operation of the vehicle will be impossible.
The work is done, now everyone knows perfectly well how to clean the idle air valve. It is safe to continue driving your vehicle.