Clutch in a car and its purpose
The clutch serves to enable disconnection and subsequent implementation of a rigid connection between the internal combustion engine and the gearbox, that is, it is necessary to transmit torque from the engine to the gearbox shafts, from where the torque is transmitted further to the wheels.
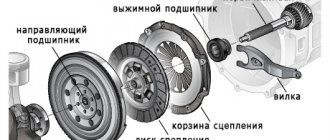
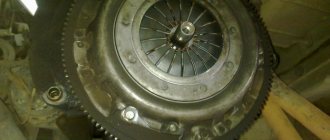
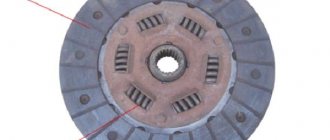
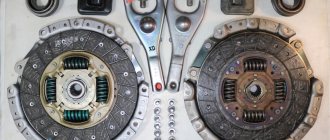
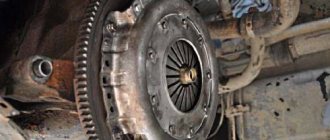
At the same time, the clutch in a car is a complex mechanism consisting of several parts. The main one can be considered the clutch disc, which interacts with the engine flywheel, as a result of which torque is transmitted.
When to press against the flywheel and when not, the driver himself controls by pressing the clutch pedal (turning the clutch on and off). If the disk is pressed, then torque is transmitted. When the pedal is depressed, the disc does not press.
The pedal has three positions:
- extreme upper;
- extreme bottom (disc pressed);
- average, when at a certain moment the disk and flywheel begin to interact.
Before and after the middle position, the pedal has free play. On different machines, the middle position may also be different. But the driver can adjust it to suit himself. In addition, adjusting the clutch pedal travel is important for driving safety and extending the life of mechanisms and individual machine parts.
Clutch design and operation
The clutch is a complex mechanical device installed between the engine and the gearbox, the principle of which is based on the transmission of torque from the flywheel of the crankshaft of the internal combustion engine to the input shaft of the gearbox. In simple words, a clutch is a device that connects or disconnects the transmission of rotation to the gearbox shaft from the engine shaft.
The clutch consists of:
- Flywheel.
- Driven disc (clutch disc).
- Torsion damper.
- Crankshaft.
- Crankshaft bearing.
- Tangential leaf spring.
- Drive disc (clutch basket).
- Release bearing.
- Release bearing fork.
- Guide pipe.
- Clutch slave cylinder.
- Gearbox input shaft.
- Gearbox housing.
- Ball head bolt.
- Damper springs.
- Casing.
- Friction pads (discs) that fit onto the driven disc to soften friction between the flywheel and the basket.
The release or pressure plate rotates constantly with the flywheel. The gearbox input shaft is inserted into a splined coupling, which is located on the driven disk.
There is a single-disc clutch, there is a multi-disc clutch. Multi-disc is installed in automatic boxes.
Features of clutch in automatic and manual transmission
The clutch can be single or double disc. Depending on the principle of operation, it is divided into “wet” (in the presence of oil or lubricant) and “dry”. So, automatic transmissions most often have a multi-plate wet clutch.
Due to the absence of a pedal, the force in the automatic transmission is transmitted by a servo drive, or actuator. The entire installation is controlled using a control unit and a hydraulic distributor. In a manual transmission, two types of clutch operate alternately. Actuators differ in their operating principle:
- Electric (otherwise known as a stepper motor). The control unit constantly receives data on engine speed, and at a certain speed the servo drive receives a corresponding signal. The transmission mechanism disconnects the crankshaft and input shaft.
- Hydraulic – hydraulic cylinder. In the drive mechanism, the oil pump transmits pressure to the distributor, under certain conditions to the servo drive. After changing gears, the pump force decreases.
Main signs of a faulty clutch drive
The clutch in a car serves to connect and disconnect the engine with the transmission, this is necessary to engage a gear, downshifting or upshifting. The connecting unit between the gearbox and the motor can be mechanically or hydraulically driven:
- mechanics are controlled by a cable;
- The hydraulic drive has a main and working cylinder.
Any drive can be adjusted, and with the help of a rod or cable, the clutch pedal (PS) can be raised higher or lower.
Each clutch must have a small free play; if it is too large, then:
- PS picks up at the very end of the pedal stroke, and there is not enough squeezing to change gears normally;
- the car starts to move even if the pedal is at the very floor;
- If the gearbox is in a low position, the gearbox may fail.
If the PS is raised too high and there is practically no free play of the pedal, other problems arise:
- the car slips and accelerates poorly;
- The clutch disc (CD) starts to burn, and it does not provide a reliable connection between the internal combustion engine and the gearbox.
The main signs of a faulty mechanical drive (cable):
- the squeeze is very tight, or when pressed the pedal does not press at all;
- The PS is completely lowered, it lies on the floor;
- The pedal is very easy to press.
The cable drive may have the following causes of malfunction:
- the clutch cable (TC) has soured in the cage, so it is difficult to “move” in it;
- The vehicle has become unraveled, and pieces of wire prevent the cable from moving in the braid;
- the cable simply broke.
The hydraulic drive also has its own faults, and there are signs of a faulty condition:
- the pedal fails the first time, and begins to take off only from the second or third stroke;
- The PS becomes “cotton”, the efficiency of squeezing disappears;
- somewhere in the middle of the stroke the pedal becomes stuck.
Just like in a cable drive, the PS can be pressed very easily or not pressed at all. Main faults in the hydraulic drive:
- working cylinder leaked;
- bypass the valves in the master cylinder;
- All brake fluid has completely leaked out;
- the rod is out of adjustment (the locknut has become loose, the adjustment has been disrupted).
Clutch classifications
Clutch designs may vary. They differ in how they are controlled and in their structure.
Classification by control method
- with mechanical drive;
- with hydraulic drive;
- with electric drive;
- with a combined drive (for example, hydromechanical drive).
In order for a mechanically driven clutch to work properly for as long as possible, you just need to smoothly press and release the clutch pedal.
Classification by type of friction
- dry friction is when friction linings (discs) operate in air;
- wet friction is when the discs operate in an oil bath.
Classification by switching mode
- permanently closed switching;
- not constantly closed switching on.
Classification by the number of slave disks
- one disk;
- double-disc;
- multi-disc.
Classification by type and location of pressure springs
- several cylindrical pressure springs are located around the perimeter;
- The diaphragm pressure spring is located in the center.
When the trip actuator needs checking
The free play of the clutch pedal must be checked and adjusted every 20 thousand km. This also needs to be done if the car starts to move at the very beginning or at the end of releasing the pedal. A correctly adjusted clutch release drive causes the car to start moving when the pedal is released approximately halfway.
This is interesting: Oil scraper rings and caps - replacement if stuck, decarbonization
Adjustment of the drive with hydraulics and with a cable is slightly different. To adjust the hydraulic drive, as a rule, you need a pit or overpass. Cable adjustment is usually done in the engine compartment from above, simply by opening the hood.
How to adjust the clutch pedal?
The clutch pedal is adjusted according to the instructions in the operating manual for your car. I'll tell you how to do this on a VAZ 21010. First, we need a ruler and an adjustment key. Using a ruler, measure the distance from the top of the pedal (rubber pad) to the floor, after removing the mats. The normal distance should be 12.5-13 cm. If you have a distance greater than 16 cm, it is recommended to adjust. The second step is to climb under the hood and tighten or unscrew nut No. 2 (depending on your situation), it is this that tightens or releases the pedal. After you set it to 12.5-13 cm, press the clutch pedal 4-5 times and check the distance from the floor to the top of the pedal again.
Fix the position of nut No. 2 with lock nut No. 1. If you set the clutch pedal lower than the brake pedal, then the clutch will engage almost instantly as soon as you start to release the pedal. If you set the brake pedal higher, then when you release, the clutch will engage at the very end.
This completes your pedal adjustment, it is recommended to check the clutch pedal, even if you did not pay attention to the malfunction and nothing bothers you.
Adjusting the drive with a cable
Measure the distance from the floor to the corrugated plane of the rubber pedal pad; it should be about 16 cm. The accuracy of measurement with a regular stationery ruler will be quite sufficient. If the result of your measurement differs significantly from the distance indicated above, you need to clarify the value of this parameter recommended by the manufacturer of your car and adjust it. If your car uses nuts securing the cable jacket to the box for adjustment, you can increase the distance from the floor by moving the cable jacket from the box towards the pedal. And, conversely, to reduce the height above the floor, move the shirt from the pedal to the box.
After correct adjustment of the distance from the pedal to the floor, the idle value of the pedal, if the clutch parts are in good condition, is within the required limits.
But this definitely needs to be checked. You should measure the pedal stroke without load by holding the same ruler next to it, with one end resting it on the floor. Use your free hand to press down on the pedal until it becomes harder. Determine the stroke value using a ruler as the difference between the readings at the top and bottom points. Then compare it with factory recommendations.
Adjusting the hydraulic drive
To adjust the hydraulic clutch pedal, you first need to make sure that there is no air in the system. In the absence of air inside the system, the pedal should not be soft when pressed, and after releasing it should return to its original position on its own.
If the tests have convinced you that the hydraulic drive is working properly, check the free play of the clutch release fork. For many models, this parameter should be in the range from 4 to 5 mm. What it should be for your car, check with its manufacturer. After this, check the pedal travel without load; for many models it should be within 25–30 mm. If the free play of the clutch release fork is normal, and the idle value of the pedal does not fall within the recommended limits, look for a malfunction in the clutch master cylinder piston pusher or in the clutch release fork.
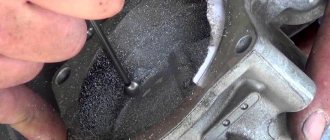
Adjusting the clutch basket feet
The housing with parts that makes up the clutch basket is one of the most important elements of the entire mechanism, which directly connects and separates the disc and the flywheel. Thus, the basket is responsible for turning the mechanism on and off and is a mandatory component of its design. If a malfunction occurs in this unit, the entire system may fail.
The paws in the basket sometimes begin to twitch. In this case, it is possible to adjust them. Let's look at the adjustment using the GAZ-53 model as an example. In general, there are 2 ways to adjust the claw clutch on a work vehicle. Let's look at the first method, which is documented:
- The car is driven into a pit.
- The clutch housing pan is dismantled.
- To access the paws, the fork is removed.
- A piece of wire slightly longer than a match is prepared for use as a measuring instrument.
- By rotating the flywheel, the most loose leg is found, and its height from the surface of the flywheel is measured using a piece of wire.
- The two remaining levers are being adjusted. They are installed at the same height as the very first one. To do this, the nuts located outside next to the legs are turned in the required direction.
- After adjusting all the levers in height, the operation of the mechanism is checked. If the on-the-go check shows normal adjustment, the locknuts on the basket are finally tightened.
- The final step is to put the oil pan in place.
This is interesting: How to wash injectors: washing methods, examples of cleaners
This standard method does not always allow you to fully adjust the clutch due to wear of the needle bearings that connect the paws. In this case, the second, more effective method, often used in car services, can help. In general, the sequence of actions is approximately the same, but the essence of the work here is somewhat different. An assistant will be needed here.
So, the algorithm is as follows:
- A set of automotive probes for adjusting the valves is selected in advance.
- The oil pan is removed.
- Approximately 1.5 mm is obtained from several probes.
- An assistant sits behind the wheel and holds the clutch pedal depressed. At this time, probes are placed under each lever of the basket between the flywheel and the disk. They need to be inserted tightly, with the same force.
- When the gaps are set using feeler gauges, the operation of the mechanism is checked while running.
- If everything is in order, the adjusting nuts are locked and the oil pan is put in place.
If the paws are not too worn, this method will help you adjust the clutch correctly the first time. Naturally, the disk should not be deformed.
Adjusting the double disc clutch
Basically, modern passenger cars are equipped with a “dry” single-disc mechanism. For the operation of most cars, this design is quite reliable and efficient. However, cargo and special vehicles, as well as sports models, require the installation of a double-disc mechanism. Similar to the single-disc design, torque is also transmitted from the flywheel to the gearbox. The only difference is that the double-disc mechanism is capable of transmitting relatively greater torque, while having a much longer service life. Structurally, the mechanisms also differ in the number of driven disks and the presence of an additional spacer between them.
The principle of operation is the same. The pressed clutch pedal moves the release bearing, which in turn acts on the levers, moving the pressure plate away from the driven one. At the same time, the release springs are also released, acting on the intermediate drive disk, which is retracted by the springs of the second friction disk. The second moves at the same pace as the first. Thanks to this, one press of the pedal exerts double force on the mechanism. The reverse procedure when engaging the coupled mechanism is performed in the same way, connecting all the disks in series. The double-disc design can be called an advanced version of the single-disc design, in which force and load are distributed evenly. It is the uniformity of distribution and increased resource that distinguish both of these versions of the “dry” type mechanism.
We will analyze the adjustment of the clutch and its other elements using the example of a MAZ truck. First of all, you should check the gap between the surfaces of the structure. To do this, adjust the distance to which the drive disk is retracted. It is also advisable to check the gap between the adjusting nut and the valve body cover. If necessary, it is worth adjusting these elements.
Next, the flywheel housing is dismantled along with the hatch cover. This is necessary for more flexible adjustment of the output of the middle drive disk. Adjustment at this stage is carried out in several steps:
- the clutch engages;
- The gearshift lever is moved to the neutral position;
- the engine flywheel rotates;
- the locknuts of the adjusting screws are unscrewed;
- 4 screws are screwed into the middle drive disk until it stops.
Then, after loosening the screws one turn, you need to continue rotating the flywheel. All elements are then secured with locknuts. At each stage of adjustment of the MAZ double-disc mechanism, it is necessary to ensure that the adjusted gap does not go astray. To do this, you have to constantly hold the screw using a suitable tool.
How to determine the amount of free play?
Determining the amount of free play is carried out using a ruler or caliper, the main thing is that they fit in size:
- A clearly visible object with a sharp end, for example, a match, is attached to the middle of the pedal sole. This is done in order to facilitate the measurement process.
- The ruler is installed in the plane of movement of the pedal support pad so that changes in the location of the latter can be easily monitored using the scale marked on the ruler.
- Lightly press the pedal with your hand, and then carefully move it until a sharp jump in resistance to the force occurs. After this, use a match to mark the distance traveled by the pedal in millimeters.
After receiving the measurement results, it will be possible to determine whether the clutch pedal requires adjustment or whether it can be done without it.
Reference! For different car models, the value of this indicator will be different. For example, for a VAZ-2101 it will be 35-40 mm, and for modern class B cars this parameter should be in the range from 5 to 14 mm.
Thus, the specific amount of pedal travel for a certain type of car must be checked in the operating manual (the so-called “Murzilka”).
The procedure for adjusting the clutch on different car models
Each car can have its own free play of the clutch pedal, different from others. The specific value of this distance should be found in the vehicle documentation. We will analyze step by step how to adjust the mechanism of some VAZ models.
1. "Lada Kalina"
Follow these adjustment steps:
- Open the hood and release the air filter housing by unscrewing the corresponding mounting bolts.
- Disconnect the mass fuel flow sensor along with the clamp.
- Pull the cable towards you as much as possible, holding onto its threaded part. In this case, the clutch pedal spring may exert resistance, which should be overcome if possible.
- Using a caliper, measure the distance between the fork lever and the plastic leader. The result should be 2.7 cm.
- If the measured value differs from the required value, tighten or loosen the nut with an open-end wrench until the desired result is achieved.
- Take measurements again with the pedal pressed.
- Finally, secure the air filter in place.
2. "Lada Priora"
There are two ways to measure the position of the cable in the Priora. In the first case, when adjusting, you should focus on the pedal stroke equal to 123-125 mm. Another method is to measure the length of the section of cable coming out of the casing - when the pedal is released, this distance should be equal to 2.7 cm. The first method is most often used because of its greater reliability.
3. VAZ-2107
To adjust the engine clutch, you will need to drive onto an inspection hole or overpass. If this is not possible, you can raise the car on supports using a jack.
- Once the pedal free play is adjusted, the next important task will be to adjust the distance between the uppermost position of the pedal and the stop by 0.4-2 mm. To do this, use a 10 mm wrench to unscrew the lock nut.
- If the car uses an injection system, remove the protective shield.
- Next, apply lubricant to the threads of the pusher, having previously cleaned the surface of dirt.
- Be sure to evaluate the stroke of the pusher, since the movement of the release bearing depends on its operation. The distance that the pusher travels should be between 4 and 5 mm. To measure, push the fork back as far as it will go. In order not to exert unnecessary effort, it is advisable to temporarily unhook the spring from the lever.
- Using a 17 mm wrench, adjust the pusher stroke while locking the adjusting nut. Loosen the locknut with a 13 mm wrench.
- Using 8 mm and 17 mm wrenches, respectively, fix the pusher and set the required distance (4-5 mm).
- At the end of the adjustment, tighten the lock nut and evaluate the pedal travel - there should be a distance of 3 cm between the uppermost position and the shutdown position.
This is interesting: Maintenance of Hyundai Solaris - maintenance regulations, list of works, cost, part numbers
4. VAZ-2108, 2109, 2199
The clutch of these models is adjusted as follows.
- Depress the pedal fully and measure the distance between its bottom edge and the floor. Ideally, it should be in the range of 18-20 cm.
- Next, press the pedal all the way with your hand and measure the distance again - it should be 6-7 cm.
- The difference between the measured values will ultimately be 13-14 cm.
- If the obtained value does not fit into the norm, it is worth adjusting the mechanism by tightening or loosening it.
- To adjust, use 2 wrenches: fix the adjusting nut with the first, and unscrew the lock nut with the second. If you want to increase the pedal stroke, the adjusting nut should be rotated clockwise. At the same time, the pedal will lower to the floor.
- After the settings have been completed, perform control measurements. If all distances are correct, tighten the locknut.
5. VAZ-2114, 2115
Adjustment steps for these models:
- The car is placed on the handbrake and the battery is removed to ensure maximum safety during operation.
- Next, the hood opens and the drive cable is located.
- The nuts securing the tip of the found cable are loosened using two keys.
- By tightening these nuts in one direction or another, the distance is brought to the range of 125-135 mm.
- Then the clutch pedal is pressed all the way - at least three times.
- Control measurements are performed and adjustments are repeated if necessary.
If all of the above procedures do not help, you should contact a service center.
How to check and adjust a hydraulic clutch
The operation of a mechanical and hydraulic drive has its own design differences. In this regard, in order to adjust the hydraulic clutch, it is necessary to check the total length from the pusher rod to the fork. According to the standards, it should be about 5 mm.
Then disconnect the spring from the working cylinder bracket. There is an adjustment nut on the rod, by unscrewing which you can change the stroke of the fork to the desired result. The general concepts of changing the working and free play may differ depending on the vehicle manufacturer. Before you begin self-adjustment, you need to read the manual for your vehicle or watch training videos:
As you can see, there are no particular difficulties in adjusting and setting the clutch. However, a beginner should carefully follow all instructions and advice from experts. To get the most effective result, it is better to first become familiar with the operating principle of the clutch mechanism.
What are the consequences of not adjusting the clutch?
Without timely adjustment, the following malfunctions will occur:
- The mechanism will begin to slip, which will result in inadequate transmission of torque from the crankshaft and flywheel to the drive axle and transmission. Even with the clutch pedal fully depressed, the car will either drive very slowly or will not be able to move at all. A burning smell will begin to be felt in the interior of a moving car due to overheating of the friction linings of the driven disk. The ride itself will probably be uneven, with jerks. This malfunction occurs due to the fact that the pedal does not have free play. This can easily be corrected by appropriate adjustment. However, the latter will not do much if there is severe wear on the crankshaft oil seals. In this case, the friction elements of the driven disk may become oily or worn out.
- The clutch “leads”, that is, the disengagement does not occur completely, or when the pedal is released, the friction disc does not move away from the flywheel. The malfunction manifests itself as difficult gear shifting, the appearance of impacts on gearbox gears and synchronizer teeth.
As a result, destruction of these elements is possible. Probable causes of this failure: excessive free play of the pedal, separation of the friction linings, misalignment of the driven disk, air entering the hydraulics.It is impossible to ignore both of the listed malfunctions; this threatens not only a decrease in the car’s controllability, but also increased wear of the friction linings of the driven disk. Among other things, the surfaces of the pressure plate and flywheel wear out quickly.
- Too late or, conversely, early clutch activation is observed. In the first case, the car will start moving only when the pedal is almost released, even if it goes down very slowly. The second option is manifested by the lack of free play of the pedal - the car starts moving when the driver has just started to release the clutch. Before adjustment, it is necessary to find out the exact distance between the floor and the pedal, as well as its free play.