The front suspension is the weak point of any car. Many owners of domestic cars are interested in how to replace the front suspension of a VAZ 2106 with their own hands. There is nothing difficult about this if you follow the instructions and use a good set of tools.
The quality of roads in our country has always not been of high quality, and it especially deteriorates after winter. After the snow melts, numerous potholes and cracks are found in the asphalt. As you know, the VAZ 2106 suspension is designed to soften vibrations transmitted from potholes on the road to the vehicle body. Over time, the chassis wears out and requires repairs, which you can do yourself.
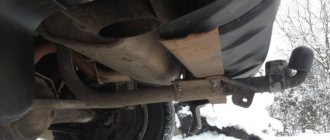
Method for checking the technical condition of the rear suspension
To check the serviceability of parts, the car is placed on an inspection hole or overpass. During a visual inspection, mechanical damage (cracking, ruptures, etc.) is unacceptable on rubber products. If the silent blocks of the rear suspension of the Zhiguli are a rubber mass squeezed out of the eyelets of the rods, they also need to be replaced. Be sure to inspect the attachment points of the rod brackets to the body for cracks. Defective areas must be welded.
To determine the condition of the rubber hinges of the longitudinal rods, put the car on the handbrake and rock the body in the longitudinal direction. Play in the connections will indicate worn bushings. The wear of the longitudinal thrust elements is checked by rocking the rear of the vehicle in the transverse direction. Repairing the rear suspension of a VAZ 2106 does not require special knowledge, but some metalworking skills are still needed.
Replacing springs and shock absorbers
Even if you only have one shock absorber leaking or a spring is cracked, you need to change everything on the front side. There is no need to test the body and the car as a whole, and at the same time yourself. Uneven wear of these elements is a guarantee that the car will become uncontrollable when cornering. To replace the front shock absorber, your best bet is to use a pit. But you can call on your ingenuity to help and do everything on a flat surface, but first you need to dig a small depression. When replacing the front suspension arms of a VAZ-2106, such manipulations with removing the shock absorber are not necessary.
It should be located clearly under the lower arm. Now you need to do a few simple steps - unscrew the rod nut (this fastening is located in the engine compartment). After this, unscrew the two nuts that are located on the lower arm. That's all, you can pull the shock absorber down by pressing the rod all the way. Installation of a new shock absorber must be carried out in the reverse order. As for the springs, they must be replaced if they are damaged or cracked. Comfort and control of the car also deteriorate as a result of the springs sagging. Under the influence of the weight of the car, they decrease in length, which affects the condition of the suspension.
How a faulty suspension affects the movement of the car
The suspension may have several faults. Each of them influences the car’s behavior on the road in its own way.
- Rocking when braking and when starting - this is caused by faulty shock absorbers. Their job is to dampen spring vibrations. In addition, a non-working shock absorber leads to excessive roll of the car when entering a turn at speed.
- Knocks in the area of the rear suspension of the VAZ 2106 indicate wear of the rubber inserts. If the sound occurs at the moment of starting and braking, then it may be the silent blocks of the longitudinal rods. Knocking on bumps indicates the need to replace the rubber bushings of the shock absorber mounts. The third type of knocking occurs when turning, when the rear of the car skids. This indicates the need to replace the longitudinal thrust bushings. Its function is to hold the rear axle in an exact position relative to the body. But the centrifugal force that occurs at the moment of skidding displaces the body relative to the bridge, which leads to knocking.
Suspension faults
It cannot be said that the VAZ 2106 suspension is unreliable, but taking into account the quality of our roads, it is still necessary to carry out diagnostics and carry out repair work from time to time. The occurrence of a particular malfunction can be judged by characteristic symptoms, based on which it will be easier to determine the damaged part.
Knocks
Knocks may appear at different moments when the vehicle is moving, which indicates the following malfunctions:
- at the beginning of the movement. Indicates damage to the rear axle rods or the brackets to which they are attached. The silent blocks themselves may also wear out. First you need to inspect the attachment points of the rods and their integrity, check the rubber-metal elements. Replace faulty parts;
- while driving. With such a manifestation of a malfunction, the shock absorbers and their bushings may fail or the fasteners may loosen. If there is severe wear, ball joints can also knock;
- when the damping system is compressed. A malfunction can occur when the rebound buffer is damaged and can be eliminated by inspecting and replacing damaged elements.
Video: reasons for knocking when starting to move
Pulling the car to the side
There can be many reasons when a car deviates from straight-line motion:
- tires are inflated at different pressures. The air needs to be checked and adjusted;
- Incorrect wheel alignment installation. This can occur when one of the levers, their axes is damaged, or the silent blocks are severely worn. It is necessary to inspect the front suspension, check that the angles are set correctly and, if necessary, adjust them;
- axle deformation. The part needs to be replaced;
- loss of elasticity or breakage of one of the springs. A sagging or faulty spring must be replaced;
- Tires wear differently. If this occurs, the tires must be replaced;
- the balance is off. It is necessary to check the balancing and eliminate the imbalance;
- damage to the rear axle rod, which led to displacement of the unit. It is necessary to inspect the rear suspension and replace the faulty element.
The car can also pull to the side for other reasons not related to the suspension, for example, when one of the wheels is not fully released. In this case, it is necessary to check the brake mechanism and eliminate the malfunction.
- The wheel bolts are loose. It is necessary to check and tighten the fastening;
- Excessive axial play of the front wheels. This sign indicates a failure of the wheel bearings or a loosening of the hub nut. Replacement of faulty elements or tightening of fasteners is required;
- spring damage. The suspension is inspected and the damaged part is replaced. It is recommended to change the right and left springs at the same time, since the height of the new and old parts will be different;
- breakdown of jet rods, free play in bushings. Replacement of faulty elements is necessary;
- wear or lack of lubrication in the ball joints. If excessive wear occurs, the ball should be replaced. If the part has no wear, but creaks, it should be lubricated with ShRB-4;
- damage or wear of the silent blocks of the front end. Rubber-metal elements must be replaced;
- The fastening of the levers or beams has become loose. Fasteners must be checked and tightened if loose.
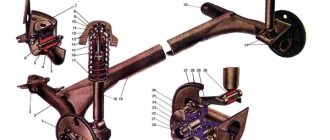
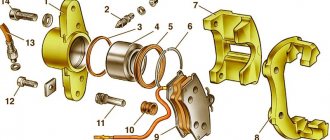
Front suspension elements of VAZ 2106
- 1 – hub bearings;
- 2 – hub cap;
- 3 – nut;
- 4 – steering knuckle axle;
- 5 – cuff;
- 6 – hub;
- 7 – brake disc;
- 8 – protective cover of the upper ball pin;
- 9 – upper ball pin;
- 10 – bearing (liner) of the upper support;
- 11 – upper lever;
- 12 – compression stroke buffer;
- 13 – spring insulating gasket;
- 14 – shock absorber;
- 15 – shock absorber mounting pad;
- 16 – axis of the upper arm;
- 17 – rubber bushing of the hinge;
- 18 – outer bushing of the hinge;
- 19 – adjusting washers;
- 20 – suspension cross member;
- 21 – stabilizer bar cushion;
- 22 – stabilizer bar;
- 23 – axis of the lower arm;
- 24 – lower arm;
- 25 – clip for fastening the stabilizer bar;
- 26 – spring;
- 27 – rubber bushing of the shock absorber spring;
- 28 – lower spring support cup;
- 29 – steering knuckle;
- 30 – lower ball pin race insert;
- 31 – lower support bearing;
- 32 – lower ball pin.
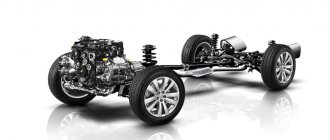
The front suspension is independent, double wishbone, with a coil spring, telescopic hydraulic shock absorber and anti-roll bar.
If you urgently need a car, but yours is under repair, then you can always use the car rental service https://amigorent.ru/ and calmly resolve your affairs while your car is in the reliable hands of the masters.
Checking the condition of rubber parts
The next stage of diagnosis is checking the condition of the rubber bushings in the rods. To do this, you need to lift the car on a lift. Then a pry bar is inserted into the gap between the mounting bracket and the rod. You need to apply force and see how much the rod moves under the influence of force. Large play will be a sign of worn bushings and silent blocks. This procedure must be done sequentially with all rear suspension arms of the VAZ 2106.
A visual inspection of rubber parts can also tell a lot. Worn bushings often have cracks and are also crushed.
Silent blocks
When the rubber part of the silent block wears out, it becomes impossible to perform alignment work. Even if the wear appears slight, it is most effective to replace all silent blocks. You can measure wear by finding out the radial displacement of the outer and inner washers of this rubber-metal assembly.
To do this, place the car on a pit or a lift, remove the wheel and start taking measurements. If the displacement of the outer washer on the upper arm is more than 5 mm, and on the lower arm 7.5 mm or more, such silent blocks must be replaced. If the internal washers are displaced by more than 2.5 mm, they are also replaced.
How is the repair carried out?
Do-it-yourself repair of a VAZ 2106 chassis can include a wide range of works, including:
- Adjusting the bearings on the hubs.
- Replacement of grease and bearing seals.
- Replacement of front suspension shock absorbers.
- Replacing springs in pairs.
- Installing new joints on the upper and lower control arms.
- Replacement of arms, both upper and lower.
- Replacing anti-roll bar cushions on a VAZ 2106.
- Installing new upper or lower supports.
After completing all of these or one of the listed works, it is necessary to have the wheel alignment done in a specialized workshop.
How to diagnose the upper ball joint?
You can’t handle this on your own; call someone for help. You need to depress the brake pedal. This eliminates the possibility of feeling play in the front wheel bearing. While the assistant holds the brake pedal, you need to sharply rock the front wheel. If there is play in the ball joint, you will feel it. The wheel will move freely when pushed forward and backward. In this case, a crunching or squeaking noise may appear, which can be heard from the installation site of the upper ball joint.
Front suspension VAZ-2106: device, features
The front suspension of the VAZ-2106 is of a double wishbone design. Since the car is rear-wheel drive, it works much more efficiently not with the classic McPherson, but with a double wishbone. The MacPherson type suspension has many disadvantages; they outweigh, and significantly, all the advantages of the system. Among the main advantages is that the manufacturing cost is much lower. But double wishbone suspensions have a huge advantage: they perform much better when traveling on rough roads.
Front suspension design
The front suspension of the VAZ-2106, the diagram of which is shown in the figure, is completely independent. The basis of the design is two levers located transversely. The front wheels are fastened using a bolted connection to the hubs. Inside the hub there is a tapered bearing, which is pressed in and secured with a nut. Please note that the nut with reverse thread is installed on the right side. If you are unsure whether you are installing the right nut, look at the edges. One of them should have three dots. We recommend: Car rental
Ball joints
The steering knuckle, to which the tie rod end is attached, is necessary to rotate the wheels. Using steering rods, the wheels are mechanically connected to the gearbox. The steering knuckle is attached at the bottom and top using ball joints. Moreover, their designs are different. The cups of both ball joints are mounted on the suspension arms.
The hinge pins are installed in the holes of the steering knuckle. The levers are fixed to the body using rubber-metal bushings, which are called silent blocks. It is with their help that the front suspension arms of the VAZ-2106 move relative to the body. The price of the lower one is 700-1000 rubles, the upper one - no more than 800 rubles. Ball joints cost 350-500 rubles. a piece.
Suspension check
It is imperative to diagnose the car’s suspension; to do this, install it on a lift or in an inspection hole. In this position, all suspension elements are much better visible. Very often the front suspension arms of the VAZ-2106 fail.
Despite the fact that their design is very reliable, cracks may appear, which will lead to the destruction of the front suspension. The procedures that need to be carried out on the car are as follows:
- Wheel camber and toe adjustments are carried out every 10,000 km.
- At similar intervals, you need to check the condition of your car tires.
- Every 20,000 km, it is necessary to check the play of the front wheels and, if necessary, tighten the nuts on the wheel bearings.
- Be sure to check the tightness of all threaded connections every 20,000 km.
- Silent blocks, stabilizer pads, ball joints must also be inspected every 10-20 thousand km.
The most vulnerable point of the entire suspension is the ball joints. They are practically eternal, if only they are used under normal conditions. In other words, they should not be under heavy stress. And most importantly, the condition of the anthers must be ideal. Make sure that no dirt gets inside the hinges when operating. It is advisable to replace them at the slightest damage to the anthers.
Checking silent blocks
If the silent blocks on the car are worn out, then it will not be possible to set the normal toe-in and camber angles of the wheels. Therefore, it is necessary to repair the front suspension of the VAZ-2106; the price of a set of silent blocks is about 700 rubles. When the rubber part breaks, the lever moves. If there is even slight damage, it is advisable to immediately install new silent blocks. Moreover, you need to change everything at once, in this case the performance of the suspension will become much better and more efficient. And the levers will move normally relative to the body.
Before starting work, you need to place the car on a level surface and secure the rear wheels with wheel chocks. The side of the car on which the diagnosis is being carried out must be raised using a jack and the wheel removed. It is much better if all this work is carried out on an inspection hole or overpass.
You will need to measure how far the inner and outer washers move. The outer ones should move a maximum of 3-7.5 mm for the lower lever and 1.5-5 mm for the upper one. The displacement of the internal washers should not exceed 2.5 mm on both arms. It is quite possible that the radial displacement of the silent blocks in the levers will be too large. In this case, only installing new elements will help.
Diagnostics of the upper ball joint
To carry out the work you need to use help. Place an assistant in the car, behind the driver's seat, so that he squeezes the brake. Only in this case will you eliminate the possibility that during diagnostics you will be able to feel the wheel bearing being displaced.
Use sharp movements to rock the front wheel. If suddenly there is even the slightest play in the ball joint, you will definitely feel it. When pushing back and forth, the wheel will move freely. It is possible that there will be a creaking or crunching noise coming from the upper ball joint.
Diagnostics of the lower ball joint
On the lower arm of the front suspension of the VAZ-2106 there is a ball joint, which is secured with three bolted connections. It is much easier to check the condition of the lower ball joint than the upper one. To work you need a caliper. But if you don’t have it, then a match, a thin needle, stiff wire and a ruler will do. Pay attention to the bottom of the hinge, there is a small plug in it.
It can be unscrewed using a wrench or pliers. You need to install a caliper in the hole. The distance from the edge of the ball joint housing to the steel pin should not exceed 11.8 mm. And if you take measurements using the same match, then you need to install it in the hole, mark the location of the edge of the edge and take the measurement with a simple ruler. If only the lower ball joints on the car are faulty, the best repair option is to replace these joints all around.
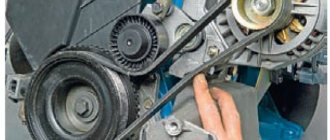
How to check shock absorbers?
If the shock absorbers are damaged, this can be felt when driving. All road surface irregularities are absorbed very poorly, as a result of which the suspension does not work properly. After falling into a hole or hitting a bump, a car begins to sway for a very long time. The shock absorber is attached to the car body and to the lower suspension arm. If it is faulty, the lower arm will not encounter resistance and will begin to move freely. Another sign that the shock absorber has become unusable is the appearance of a leak on its body.
If the seals are damaged, oil comes out. In this case, the operation of the shock absorber strut is disrupted. To assess the condition of the shock absorbers, you need to sharply press on the side of the car body to bring it as close to the ground as possible. Then quickly release. With fully functional shock absorbers, the body will make no more than one upward movement. Otherwise, partial repair or replacement of the front suspension of the VAZ-2106 will be required.
How to replace shock absorbers and springs?
If one shock absorber fails, it must be replaced in pairs. If the shock absorber on the left front side has become unusable, then the right one is changed along with it. Only in this case will the normal operation of the entire suspension be ensured. Similar requirements apply to springs.
If these suspension elements wear unevenly, the car may simply become uncontrollable when cornering. When replacing front shock absorbers, you can use a small hole, but it is better to do everything on a lift or overpass. Sequencing:
- Using a 17 mm wrench, unscrew the nut in the engine compartment that secures the shock absorber rod.
- Remove all rubber cushions attached to the rod.
- Push the shock absorber rod until it fits into the body as far as possible.
- Unscrew the two nuts from the lower arm that secure the shock absorber housing.
- Pull the entire shock absorber down.
We recommend: Engine VAZ 2109, 21093
If the work takes place on a flat surface, then you can dig a small hole under the lower arm, 15-20 cm is enough. The main thing is that the shock absorber can be removed. Or you can drive your front wheel onto a small hill, for example, several blocks of wood.
How to adjust the front bearings?
Very often the front bearings on the front suspension of a car break. It is advisable to inspect them every 10,000 km. Diagnostics and configuration are as follows:
- Use a jack to hang the wheel.
- Remove the dust cap.
- Unlock the nut on the hub.
- Using a 27 wrench, you need to tighten or unscrew the nut.
Please note that you should not use too much force when tightening. Once you have tightened the hub nut all the way, you need to turn it back 60 degrees and fix it by knocking off the edge of the nut with a hammer. The bearings have a cone shape, so if the permissible tightening torque is exceeded, they are destroyed. But they can easily withstand heavy loads, since the rollers and the holder have a very large contact area.
Ball joints
The steering knuckle, to which the tie rod end is attached, is necessary to rotate the wheels. Using steering rods, the wheels are mechanically connected to the gearbox. The steering knuckle is attached at the bottom and top using ball joints. Moreover, their designs are different. The cups of both ball joints are mounted on the suspension arms.
The hinge pins are installed in the holes of the steering knuckle. The levers are fixed to the body using rubber-metal bushings, which are called silent blocks. It is with their help that the front suspension arms of the VAZ-2106 move relative to the body. The price of the lower one is 700-1000 rubles, the upper one - no more than 800 rubles. Ball joints cost 350-500 rubles. a piece.
Do-it-yourself replacement of VAZ-2106 silent blocks video instructions
Silent blocks are used in the construction of cars of all models. They are rubber inserts between suspension parts; they are used to absorb vibration and, accordingly, to prolong the uninterrupted operation of the machine’s chassis. The silent blocks themselves are subjected to very high loads, which leads to their frequent failure.
In this article we will talk in detail about how to replace silent blocks on a VAZ-2106 car, we will provide step-by-step instructions and useful recommendations, thanks to which you can perform this rather complex procedure with your own hands, without involving car service specialists.
Tools and accessories needed to replace silent blocks
First of all, you will need to prepare all the necessary tools. Without them, it will be quite difficult to get to the silent blocks in a VAZ-2106 car and dismantle failed parts. So, for high-quality and convenient repairs you will need:
- special tools for dismantling ball joints, the upper arm, removing and installing a new hinge made of metal and rubber, as well as for unpressing the far steering tips;
- open-end, ring and miter wrenches for 13, 22 and 24 millimeters;
- jack;
- set of mounts;
- a thin and sharp chisel that will allow you to carefully dismantle the lower silent blocks without removing the lever;
- hammer.
Additionally, you will need to prepare the new suspension components that will be installed on the vehicle. Today it is best to buy polyurethane silent blocks, which differ from ordinary ones in their service life increased several times.
But if your goal is to carry out repairs at minimal cost, then you can get by with traditional rubber parts.
Step-by-step instructions for replacing upper control arm silent blocks
If the entire tool is already ready for use, we begin to replace the rubber-metal hinges, which is performed according to the following scheme:
- jack up the car and remove the wheel from the side on which the work will be done;
- unscrew the nuts holding the silent block and the steering tip;
- Unscrew the fastening nut of the ball joint;
- using a special puller, press out the bipod support pin;
- remove the nut holding the upper arm;
- we take out the lever, carefully clamp it in a vice and change the silent blocks using a special device;
- We install the lever in the reverse order. After this, all that remains is to mount the wheel and remove the jack. The same work is performed on the other side.
It is much easier to replace the silent blocks of the lower arm:
- after removing the nut holding the lever itself, we take a special device and press out the rubber-metal hinge;
- We carry out preparatory work. During this process, it is necessary to remove dirt and carefully lubricate the seat for the new silent block, as well as the lever axis and threads. This, firstly, will greatly facilitate subsequent procedures, and secondly, it will ensure stronger fixation of the part;
- press in a new silent block;
- install the steering ends and insert the cotter pins that secure these parts;
- tighten the nuts of the upper and lower arm.
The procedure for replacing silent blocks must be carried out under load. It is best to first seat your acquaintances or friends in the car, and also place a load weighing 40 or more kilograms in the trunk.
The nuts of the upper and lower arms must be tightened until they stop only after the new silent blocks have been installed. Otherwise, serious problems with the operation of the car suspension may arise.
Rear axle gearbox shank oil seal: how to replace video AvtoNovator
For what reasons do the silent blocks of the suspension arms begin to creak and is repair required?
The rear axle gearbox shank oil seal is a seal located on the inside of the axle bearing. Like any oil seal, its main function is to create a seal, or rather, it prevents the leakage of transmission oil, which is located in the rear axle.
The main function of the gearbox oil seal
If depressurization occurs, then all the grease in the bearings is incredibly quickly washed out, and, as a result, they are destroyed. The main sign that the gearbox seal needs to be changed urgently is an oil leak. It is quite easy to detect this; a simple visual inspection is enough: if drops of oil are found on the surface of the gearbox housing, then you cannot hesitate. However, it should be taken into account that a thin oily film does not at all indicate the presence of a leak and is in no way a reason for carrying out repair work.
Please note that it is not always possible to limit yourself to just replacing the oil seal, since quite often it is also necessary to repair the gearbox, and this is best left to professionals. Despite the fact that replacing the rear axle gearbox seal is a rather responsible procedure that requires patience and attention, this does not mean that it cannot be done at home, you just need to strictly follow all the instructions.
Getting close to the rear axle gearbox shank oil seal
First of all, you should start by selecting the necessary tool; for this you will need a torque wrench, a two-jaw puller and, of course, a new oil seal and lubricant. Next you need to proceed in the following order. Place your “iron horse” on an overpass or inspection hole. You need to drain the oil that is located in the rear axle into a special container, now you can climb inside the car.
The first step is to disconnect the propeller shaft from the gear flange, turn on the parking brake and use a socket wrench to unscrew the nut securing the gearbox shank. In order to avoid turning the shank, it is not necessary to use a handbrake; you can also insert two bolts into the holes of the flange, and hold it with a mounting spatula or other suitable tool.
You will need a two-jaw puller to use it to press the shank flange off the gear. Sometimes this can be done without a tool, just with your bare hands, but, more often than not, you can’t do it without a puller.
Replacing the rear axle gearbox seal - the final stage
Everything is ready to dismantle the flange along with the dirt deflector and washer. Using a screwdriver or other suitable tool, pry up the old oil seal and remove it. The next step, of course, is to install a new seal. However, before you do this, it is worth checking the condition of the flange surface, as you can often find signs of wear and corrosion, which can be removed quite easily by grinding.
Now you need to apply grease to the working edge and seating surface of the new oil seal. Using a hammer and a special bushing, we press it into place. Only the blows should be soft and applied evenly over the entire surface in order to avoid unwanted distortions. All the removed parts of the shank are mounted in their original place, and it is advisable to replace the fastening nut with a new one.
Now the rear part of the car is hung out, and the axle shafts are disengaged from the gears. Use a dynamic wrench to tighten the shank nut, while its flange must be held by the bolts. Next, by rotating the flange by hand, we check the resistance; it should be uniform and light, no jamming or clicking is allowed. Finally, you need to check that there is no play.
Removing the lower arm
When a VAZ 2106 chassis is being repaired, it may be necessary to replace the lower front suspension arm. To work, you will need wrenches 13 and 22. First, remove the front suspension spring, and then, using a wrench, unscrew the two nuts that hold the arm to the cross member. Remove it from the cross member bolts without removing the silent blocks, axle and ball joint. If necessary, replace the ball joint or change the lever. Reinstall it in the reverse order of disassembly.
A selection of videos on repairing the chassis of the VAZ 2106
Power plant modernization
The power of the VAZ 2106 power unit does not always suit drivers. Therefore, many decide to improve the engine and related systems. The simplest and cheapest way is to replace the standard exhaust system with a forward flow one and install a zero-resistance air filter. Such an alteration costs about 5 thousand rubles.
To increase power further, an engine overhaul is required. Special tuning kits are available for sale, which include a crankshaft, connecting rods, pistons, camshaft and other elements. In some cases, the cylinder head may need to be replaced. The cost of such tuning starts from 5 thousand. rubles
The most radical way to increase power is to install a motor from a foreign car. Typically, contract engines from foreign car dismantling yards are used for these purposes. The cost of installing someone else's engine starts from 60 thousand rubles.
Modernization of VAZ 2106 suspension
Today, many owners of classic Zhiguli cars are improving their cars and making changes not only to the appearance, interior, power unit, but also to the suspension. VAZ 2106 is a car with a wide field of activity for tuning. The only limitation is the financial capabilities of the owner. Let's look at the main points for modifying the suspension.
Air suspension
One of the options for modernizing the suspension is installing air struts. After implementing such a design, it becomes possible to change the ground clearance and generally increase the level of comfort. The car receives driving characteristics similar to the behavior of imported cars. When installing air suspension, both the front and rear shock absorption systems are subject to conversion. To do this, purchase a kit of necessary items, which includes:
- compressor;
- connecting elements;
- pneumatic struts;
- sensors, etc.
to pneumatic changes in this order:
- Remove the springs from the suspension.
- We cut off the bumper almost completely and make a hole for mounting the air strut in the lower cup and upper cup.
Reinforced springs
They resort to installing reinforced springs on the “six” when it is necessary to make the suspension stiffer, since many are not satisfied with its softness.
Equipping a car with hard spring elements will lead to the fact that when making a sharp turn, there is a possibility that the wheels on the other side will come off, i.e., traction with the road will deteriorate.
Springs from a VAZ 2121 along with a reinforced cushion are often installed on the front of the car. Such elastic elements have a slightly larger coil thickness and rigidity. The rear suspension is mainly equipped with springs from the “four”. In addition to them, dampers from Niva are installed, which will be especially important for those cars that run on gas, since the equipment weighs a lot.
Video: installing air suspension on classic Zhiguli cars
Electromagnetic suspension
Another option for improving a car’s suspension is electromagnetic suspension. The basis of this design is an electric motor. It can operate in damping and elastic element mode. The operation is controlled by a microprocessor. This type of suspension is installed instead of standard shock absorbers. The uniqueness of the design lies in its virtually trouble-free operation. Plus, it has a high level of security. If for some reason the pendant loses power, the system can switch to mechanical mode thanks to the electromagnets. The most popular manufacturers of such suspensions are Delphi, SKF, Bose.
The suspension of the VAZ “six” does not stand out for its complexity. Therefore, the owners of this car can repair it. You can identify and fix problems by reading the step-by-step instructions. When the first signs of problems appear, you should not delay repairs, since other suspension elements will also be subject to increased wear.
Body reinforcement
Today, many motorists are wondering about strengthening the body. All the advantages of this operation can be explained using the example of a cardboard box from any model of household appliance. It is easy to tear it with your hands, but if you strengthen it at the corners with tape, the box turns into a durable thing that is not so easily dented.
VAZ 2106 body strengthening
The car will be more prepared for extreme and emergency situations if it is strengthened. Despite the fact that the frame of this car is quite rigid and durable, some of its areas are so vulnerable that they are easily deformed.
Front and lower struts
Installing the lower brace
Installing front struts is one of the common methods of strengthening. This tuning has a lot of advantages:
- Ease of implementation;
- Low cost of work;
- A significant increase in the rigidity of the car frame in the front part.
Selecting spacers for your “six” will also not present any difficulty. There are various models of these components available on the market. There are so many of them for every taste and color that it’s dizzying. It will be easy for each owner of a VAZ 2106 to choose front struts that are suitable in terms of parameters and price characteristics.
Even an inexperienced owner can strengthen the “six” with front struts. The geometry of the car is simple, various elements are installed in several ways, without much complexity.
In addition to the usual front struts for reinforcement, there are also lower struts. Their installation will have a positive effect on the body, the handling characteristics of the “six” will increase, and road stability will improve. But the lower struts are quite difficult to install compared to the front ones, and not every car owner is capable of this.
Bottom and its reinforcement
Body modification for VAZ 2106 photo
We offer an option for strengthening the bottom of the VAZ 2106. It is suitable for beginners who are not “friendly” with welding. The process can be carried out in normal garage conditions. The method is not only simple, but also cheap. The price of consumables will not take much money out of the family budget.
We prepare the following materials and equipment:
- Pieces of galvanized steel (about 2 square meters);
- Bitumen-based mastic (2 cans are enough);
- Fastening elements (bolts, screws);
- Grinder and drill;
- New spars.
Here's what to do:
- Disassemble the interior, remove the Shumka;
- Scrape the mastic from the bottom to make it easier to assess the condition of the floor;
- Cut off rotten and too rusty parts of the floor with a grinder;
- Using the same grinder, polish the metal floor;
- Cover the floor inside and outside with pieces of tin;
- Apply with mastic (it is better to use two layers with breaks for drying);
- Treat the galvanized surface with mastic. Fix the pieces prepared for installation from the outside with self-tapping screws (cut off their protruding ends in the interior);
- In the interior, put galvanized sheeting, also heavily coated with mastic, but fasten it with bolts.
Reworking the body of a VAZ 2106 instructions
- Prepare the side members by drilling 6 holes on the mating tabs (3 on one side and 3 on the other);
- Place the spar to the floor, press it from below with a jack and mark the locations of the holes in the floor;
- Remove the side member and drill holes in the floor;
- Treat the element with mastic, as well as the bottom section in this place;
- Place and secure firmly with bolts.
That's it. The protruding ends of the bolts can also be cut off. The sheet of iron supplied must also be covered with mastic on top, trying to push it into the cracks (if any remain). The cost of this tuning will not exceed 1000 rubles, but the effect will be just right. A floor reinforced in this way will last longer than one that has been overcooked.
Adjusting the front bearings
This procedure should be carried out as often as possible - approximately every 10 thousand km. mileage On a VAZ-2106 car, the front suspension needs constant monitoring; unfortunately, this is the most vulnerable unit. You hang the wheel, remove the protective cap, after which you will need to loosen the nut on the hub. And only after this you need to use a 27 wrench to unscrew or screw in the nut. It depends on which direction the adjustment is required.
Note: the tightening force should be light. In addition, after tightening, it is necessary to make approximately a sixth to seventh part of a turn in the opposite direction. The fact is that the hub has cone bearings, which are easily destroyed when trying to tighten it with force. But they are able to withstand heavy loads due to the fact that the contact area between the holder and the rollers is rather large.
Sources
- https://avtovx.ru/podveska-stoiki-amortizatory/zadnjaja-podveska-vaz-2106-217/
- https://FB.ru/article/447971/ustroystvo-diagnostika-i-remont-zadney-podveski-vaz-
- https://ovaze.ru/317-elementy-peredney-podveski.html
- https://Driving24.ru/kak-otremontirovat-perednyuyu-podvesku-vaz-2106/
- https://aklaypart.ru/remont/perednyaya-podveska-vaz-2106-ustrojstvo-osobennosti.html
- https://AlanSpb.ru/remont-i-tyuning/zadnyaya-podveska-vaz-2106-ustrojstvo-2.html
- https://bumper.guru/klassicheskie-modeli-vaz/hodovaya-chast/podveska-vaz-2106.html
- https://naruto-grand.ru/ustroystvo-perednyaya-podveska-remont-to-vaz-2106/
- https://adaptsport.ru/remont/remont-perednej-podveski-vaz-2106.html