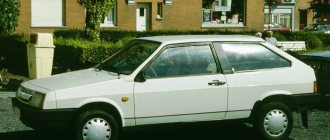
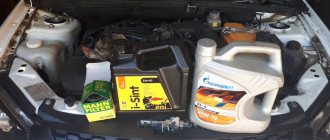
Electric power steering for modern cars has already become an integral part of them. On the Russian market it was first installed on the Lada Kalina ( VAZ 1118 ). The electric booster added both a lot of positive emotions and a lot of negative ones. Failure of this unit occurs quite often on the first samples. Our guest today was no exception - a car from the Lada Kalina family (Fig. 1).
The situation is quite typical: the client complains that the electric power steering sometimes turns off and the electric power steering warning light comes on
, but after you drive along some hole or rails, the electromechanical power steering (EMUR or EUR) resumes its operation.
This situation is very annoying, because not only the owner uses the car, but also his wife. It is much more problematic for a woman to turn the steering wheel without electric power assistance.
We start the car, and the electric power steering fault light actually lights up and it becomes quite difficult to turn the steering wheel. It is imperative to deal with this problem.
We connect the diagnostic scanner and connect to the EMUR control unit.
On the monitor screen we see the following error: C1044 - incorrect sequence of the rotor position sensor. What is a rotor position sensor and where is it located?
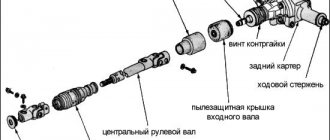
Let's take a break from our malfunction for a moment and touch on a little theory. Let's understand the EMUR device and what main parts it consists of. Let's consider all its parts separately.
Design EMUR Kalina 11186-3450008-00
- Steering shaft
- Electric motor
- Electronic control unit
- Torque sensor
- Rotor position sensor
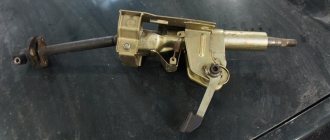
We remove the EMUR. On the nameplate (Fig. 7) there is article number 11186-3450008-00 manufactured by Aviaagregat, Makhachkala.
Remove the steering wheel, steering column switches and ignition switch. To get to the torque sensor , you must first remove the electric motor. We unscrew the bracket with 4 bolts, the cardan shaft, the lock nut and the 3 bolts securing the electric motor.
This is what we got (Fig. 12)
Next we pull out the shaft.
We take out the torque sensor (Fig. 17), having previously unsoldered the wires from the board (Fig. 16).
Design of an inductive torque sensor.
The inductive sensor consists of two concentric cylinders with holes (perforation slots), which are fixed to the shaft and rotate with it. And two concentric coils with primary and secondary windings, fixedly inserted into the EMUR housing. We will not go into various terminology, but let’s put it simply: an alternating current with a frequency of 20 kHz is supplied to the primary winding, and if we apply force to the shaft (that is, we begin to rotate the steering wheel), then a voltage “+” or “-” appears on the secondary winding depending on the direction of rotation, and the magnitude of this voltage is directly proportional to the applied torque (force). Thus, the electronic control unit (ECU) determines with what force you rotate the steering wheel in one direction or another.
Steering components Lada Granta, Kalina
Steering of Lada Kalina/Granta VAZ-2190 cars with electric booster and tilt-adjustable steering column.
The steering wheel is mounted on the splines of the steering shaft and secured with a self-locking nut. On vehicles equipped with a driver's airbag, an airbag module is installed in the steering wheel instead of a pad.
The steering shaft is composite. It consists of an upper and intermediate shaft. The upper shaft rotates in two bearings pressed into the steering column tube.
An ignition switch with an anti-theft device is installed on the top of the column pipe. The intermediate shaft is collapsible and has two cardan joints at the ends.
The Lada Granta/Kalina steering column is assembled with a gear motor and an electric power steering control unit. The efficiency of the electric booster depends on the speed of the vehicle.
The electric booster only works when the engine is on. The steering column brackets are attached to the body on four studs with self-locking nuts. The brackets are pivotally connected to the steering column pipe.
The upper bracket is equipped with a steering column fixation mechanism. By moving the locking lever to the lower position, you can change the angle of the steering column. When the lever is raised, the column is fixed in the selected position.
The steering mechanism of the Lada Kalina/Granta VAZ-2190 is rack-and-pinion type, consisting of a crankcase, a drive gear and a rack in gearing. The mechanism is secured to the partition of the engine compartment with two brackets on rubber supports.
When the steering wheel is turned, rotation is transmitted through the upper and intermediate shafts of the steering column to the drive gear, which, when turning, moves the rack.
Steering rods, which consist of the rods themselves, tips and adjusting bushings, are bolted to the Lada Granta/Kalina steering rack. At the inner ends of the steering rods there are eyes with rubber-metal bushings pressed into them.
Ball pins are installed in the outer rod ends, with which the steering rods are connected to the swing arms of the front suspension struts. When the rack moves, the rods rotate the front suspension struts.
The length of the tie rods can be changed by rotating the adjusting bushings and thereby changing the toe-in of the front wheels. The bushings are secured against spontaneous rotation by tightening bolts wrapped in the flanges of the tie rod ends.
Fig.32. Steering Lada Granta/Kalina
1 — tie rod end; 2 — adjusting sleeve; 3, 6 — brackets for fastening the steering mechanism; 4, 5 tie rods; 7 right protective cap; 8 — right steering gear support; 9 – protective cover of the steering mechanism; 10 — steering mechanism; 11 - seal; 12 — intermediate shaft with lower universal joint; 13 — upper universal joint; 14 — steering column with electric power steering; 15 — steering wheel; 16 — contact ring; 17 — steering wheel fastening nut; 18 — steering wheel pad (driver airbag); 19 steering shaft bearings; 20 left protective cap; 21 left steering gear support
Checking the steering of Lada Granta/Kalina
Visually check the condition of the protective covers of the tie rod ends and steering mechanism. Damaged covers (torn, cracked) must be replaced.
Make sure that the steering column locking lever is raised all the way. Trying to move the steering wheel in a vertical plane, we check that the steering column is securely fastened with the locking mechanism.
If the steering column of the Lada Kalina/Granta VAZ-2190 moves, remove the steering column lining and use a 13 mm wrench to tighten the nut of the steering column fixing lever axis.
Trying to move the steering wheel along the axis of the steering shaft, we make sure that there is no play in the steering wheel on the splines of the shaft and shaft in the steering column.
To check the play in the steering, turn the steering wheel to the position corresponding to straight forward movement. We place a slotted screwdriver on the instrument panel so that its blade is located next to the rim of the steering wheel (for reliability, it can be secured with masking tape).
Turning the steering wheel to the right until the wheels begin to turn (selecting play), and then to the left and using the blade of a screwdriver as a guide, use chalk, pieces of wire, or otherwise mark these positions on the rim. The play should not be more than 5″ (or 18 mm) when measured along the outside of the rim.
Increased play indicates the need to troubleshoot and fix the problem. As a rule, the tie rod ends in the Lada Granta/Kalina steering system are the first to fail.
To check that there is no play in the tie rod ends, an assistant slightly rocks the steering wheel from side to side. We place our hand at the junction of the steering rod with the swing arm of the suspension strut so that the palm touches them at the same time.
When play appears in the tie rod end, a displacement of the steering arm relative to the rod will be felt. Check the tightness of the nuts on the steering column universal joint bolts. We repeat the check on the other side of the car. We replace faulty hinges.
When rocking the steering wheel from side to side, listen to the operation of the steering mechanism. A knocking sound from the right edge of the steering gear indicates wear of the support sleeve. We remove the faulty steering mechanism and repair or replace it.
Turn on the ignition - the electric power steering fault indicator light on the instrument panel should light up. Let's start the engine.
The warning light should go out and the steering wheel should turn easily with one hand. If the lamp lights up while the engine is running, it indicates a malfunction of the electric amplifier and the need for repair.
Replacing the steering column of Lada Kalina/Granta VAZ-2190
Depending on the purpose of the work, the steering column can be removed as an assembly with the steering wheel and steering column switches. The operation is described with partial disassembly of the steering column.
– Turn the steering wheel to the position corresponding to driving in a straight line. Removing the steering wheel
– Remove the decorative lining of the steering column.
– Using a Phillips screwdriver, unscrew the three screws and remove the lower trim of the instrument panel.
– Disconnect the wiring harness blocks from the steering column switches and the slip ring.
– Loosen the coupling bolt and remove the connector assembly with the steering column switches and the slip ring.
– Disconnect the ignition switch wiring harness connectors.
– By releasing the clamps, we disconnect the two wiring harness blocks from the electric power steering of the Lada Granta/Kalina.
– The steering column can be removed complete with the intermediate shaft. However, it is more convenient to remove and install the steering column if you disconnect the intermediate shaft.
– The connection of the intermediate shaft universal joint flanges is possible only in one position, so you do not need to mark their relative position.
– Unscrew the nut of the coupling bolt connecting the universal joints of the intermediate shaft. We remove the bolt.
– Loosen the two nuts of the lower mounting of the Lada Granta/Kalina steering column.
– Using the same wrench, unscrew the two nuts of the upper mounting of the steering column.
– Remove the steering column assembly.
– Unscrew the nut of the coupling bolt of the flange of the lower cardan joint of the intermediate shaft. We remove the bolt.
– Use a slotted screwdriver to open the flange and remove the universal joint from the splines of the steering rack mechanism shaft of the Lada Kalina/Granta VAZ-2190.
How to remove and install a steering column
You will need: socket heads 13, 24, screwdrivers with Phillips and flat blades, a marker.
The steering column is one of the most important elements in ensuring traffic safety, so it is imperative to replace the shafts installed in the steering column for steering or the entire column in the event of such defects;
— deformation or damage to the intermediate shaft, play in the cardan joints, damage to the terminal connection of the lower joint with the steering gear shaft and the terminal connection of the upper joint to the steering column shaft;
— deformation or damage to parts and the steering column shaft, damage to the pins connecting the shaft to the steering wheel hub;
— damage to the mechanism for adjusting the position of the steering column;
— failure of the electric power steering control.
The steering column must be removed in this order.
1. Disconnect the wire in the battery from the negative terminal.
2. Remove the module from the airbag.
3. Remove the steering wheel.
4. Remove the steering column cover
5. Remove the steering column switches
6. Remove the airbag contact ring
7. Squeeze the clamp for the wiring harness block, disconnect the block from the contact group of the ignition lock (switch)
8. Release the clamp for the wiring harness block, disconnect the block from the antenna block from the immobilizer
9. Squeeze the clamp for the wiring harness block and disconnect the block from the electric power steering control unit
10. Similarly, disconnect the 2nd block from the block.
11. Mark, for example, with a marker how the lower cardan joint of the intermediate shaft and the steering mechanism shaft are mutually located.
12. Unscrew the nut from the coupling bolt of the steering column terminal connection.
13. Remove the bolt from the hole and disconnect the hinge from the steering mechanism shaft.
14. Unscrew the 4 nuts for securing the steering column to the dashboard frame and lower it down to the length of the wiring harness that you connect.
This is where the nuts for securing the steering column are located.
15. Squeeze the clamp for the wiring harness block, disconnect the column from the power steering.
16. Disconnect the holder for the wiring harness from the steering column bracket.
17. Disconnect the holder for the wiring harness from the bracket on the power steering.
18. Remove the steering column with the ignition lock (switch) and the intermediate shaft.
19. Install the steering column in the reverse order.
Steering of Lada Granta
It is designed to control the car while driving. Structurally, it consists of the following main elements:
The work of the mechanical part is that the driver acts on the steering wheel, the impulse through the steering mechanism and rack transmits force to the front wheels through the levers, and the car turns in the desired direction. A characteristic feature of a passenger car steering wheel is its smaller diameter (compared to a truck). The design of the mechanism also differs. The steering of the Lada Granta is complemented by an electric booster. The steering wheel can be adjusted in height. Unfortunately, there are no settings for departure.
The steering mechanism of the Lada Granta is rack-and-pinion type, the simplest and most inexpensive option.
The drive is mechanical, structurally consisting of levers, rods and hinges. For more efficient and convenient control, the Lada Granta is equipped with an electric amplifier. This is a complex mechanism that provides force through the use of electricity. An electric power steering, or simply EPS, is used to improve dynamic characteristics and controllability. And, according to some data, it allows you to save fuel by increasing the vehicle’s maneuverability.
Steering mechanism malfunctions and their elimination
The steering mechanism of the Lada Granta is quite reliable and rarely causes problems for the owner. However, this does not mean that problems do not occur at all. There are problems. And you need to know how to eliminate them.
| Cause of problems |
Elimination
Like the braking system, engine operation and other important components and assemblies, the steering system must be periodically inspected for malfunctions. If there are no signs, protective boots and other smaller structural parts must be inspected. The steering rack of the Lada Granta is a key control mechanism. It is thanks to this that the car is controlled by turning the wheel.
Not only the comfort of control, but also the safety of the driver and his passengers depends on the serviceability of the steering mechanism. Unit problems must be diagnosed and corrected in a timely manner.
Basic steering rack faults
The main sign of a breakdown is a knocking sound when turning. At first it is almost invisible and appears when hitting potholes. If you ignore the first symptoms, the noise will not go away and will constantly get worse. Then the knock will be transmitted to the steering wheel. If you ignore this symptom, the rack will simply jam, and this risks getting into an accident due to loss of control. The rack knocks due to wear of the hinges, teeth or rubber-metal bushings (damper).
Video text
Step-by-step instructions for repairing the Lada kalina 2 steering rack using a caprolon bushing from https://mirvtylok.ru/
in 9 out of 10 cases, play and knocking of the steering rack on the Lada Kalina occurs due to a worn bushing. Replacing a standard bushing with a reinforced one made of caprolon will save you from expensive repairs to the steering rack.
What are the advantages of installing a caprolon steering rack bushing?
1) Eliminates knocking and play in the Lada Kalina steering rack 2) Cost savings. You are guaranteed to save 2500-7500 rubles per steering rack replacement. Multiply this figure by the number of replacements you will make over the entire life of the car. Decent savings, agree! 3) Excellent level of quality. The original bushings wear out quickly because they are made of plastic. 4) The technical characteristics of caprolon and the experience of scientific specialists who worked in conjunction with qualified Lada Kalina repair technicians made it possible to develop a high-quality product that works effectively throughout the entire life of your car. 5) Ensuring good vehicle handling, familiar comfort and absolute steering control. 6) This bushing lasts an average of 80-100 thousand kilometers
Design features and differences: 1) The original version uses ear latches. 2) Our bushings are securely fixed in the rack body due to press fits. We consider this fixation to be optimal, taking into account the properties of graphite-filled caprolon.
Every Lada Kalina car owner will sooner or later be faced with the problem of steering rack failure and repair. Of course, experts and auto mechanics recommend changing this element, but not everyone can buy this element, so repair is the way out.
Video about steering rack repair on Lada Kalina:
The video material will tell you how to repair the steering rack, give basic recommendations and assembly features.
Steering rack adjustment
The unit knocks for various reasons. In fact, this is a real disease of the control mechanism, inherited from the Lada Kalina, since the components are identical on these cars. You can adjust the rack yourself.
To do this you will need a minimum of tools:
- steering rack calibration key;
- socket heads for 10 and 13;
- shaped screwdriver.
To tighten the slats, you can use two methods. The first involves using a special key that can be inserted into the gap of the arch on the left side. The second method is more labor-intensive and is suitable if it is not possible to stick your hand into the gap. To do this, you will need to dismantle the battery and its platform; this is the only way to get to the nut for tightening the gearbox. The first method is simple, so it’s better to consider the second option.
To do this, you need to disconnect the battery terminals and remove it, and then remove the platform under it. Now you can get to the nut located on the inside of the gearbox housing. You can buy a combination wrench for tightening, on the one hand - for tightening the rack, on the other - for tensioning the timing belt.
To tighten the nut, turn it clockwise.
Correct fault determination
- The right edge of the rack should shine, otherwise a steering rack repair kit is needed.
- The presence of even the slightest traces of rust, which will act as an abrasive material, is not allowed.
- You should check the integrity of the bushing: if it knocks or shows signs of wear, it needs to be replaced.
- It is necessary to carefully inspect all the fasteners: if places with loose clamps are found, tighten them.
You need to be very careful with the last factor. Excessive physical force will only do harm here. If you decide to diagnose and replace it yourself, you must use lubricant and a wrench. A heavily threaded bolt or nut simply requires the use of oil. In some cases, it can be moved 1-3 divisions, but do not despair. This is enough for a visual inspection.
There shouldn’t be any difficulties, because information on how to tighten the part is contained in the vehicle’s operating instructions.
Steering wheel tuning on Lada Granta
There are few options for upgrading the steering wheel on the Lada Granta. The most popular of them is installing a sports version. Such a steering wheel will not only make the interior more attractive, but will also increase the comfort of control, especially if it is selected correctly. You can install a multi-steering wheel, but only if the configuration is maximum, in other cases there will be nothing to control with its help.
The sports version must be injury-proof, that is, in the event of an accident it must be deformed without causing damage to the driver. Among the shortcomings, it can be noted that although there is an airbag in the standard steering wheel, the sports one does not have it. You can also modify the steering wheel by installing braid. More advanced ones install a heating thread under it.
To install the sports steering wheel, you will need to carry out the following operations.
- Align the front wheels straight (you can drive a little forward and back so that the trajectory is straight).
- Disconnect the battery terminals by de-energizing the vehicle's on-board network.
- The airbag control module must be disabled (if the Granta equipment is equipped with it). If you do not turn it off when removing the factory steering wheel, it may shoot out.
- Remove the steering wheel and install a horn on the adapter. The wiring must be stored in the adapter; to do this, carefully inspect all contacts.
- Connect the adapter to the shaft, but do not secure it with a nut.
- A sports steering wheel is installed on the adapter and secured with special screws.
You cannot throw away or sell the factory product; the sports version will raise questions when passing inspection.
Power steering and power steering: do-it-yourself installation
The electric booster first appeared on Kalina, then on Grant and on the new Priora. You can drive a car without an ESD. But if a car owner previously owned a car equipped with a hydraulic or electric booster, then, at a minimum, he will experience great inconvenience. On the Lada Granta in the minimum configuration, the manufacturer does not install electric power steering, so many owners of such cars decide to install the power steering themselves. This procedure is not the easiest, and the unit is not cheap. But its presence means a comfortable ride, maneuverability and safety.
Installation does not require any special knowledge or skills; minimal experience and a set of tools are sufficient. If, nevertheless, the question arose about installing electric power steering on the Lada Granta, then when purchasing an electric power steering unit, you should pay attention to its number.
The set of numbers contains a definition of the place of production, these are the last two digits:
- 00 – made in Makhachkala (not the highest quality, has many negative reviews);
- 04 – Korean amplifier, you can buy it in a store, a rare copy at auto wrecking yards;
- 02 – made in Kaluga, a good medium option.
To install the amplifier you will need a set of wrenches, screwdrivers and an angle grinder (grinder). Before proceeding with installation, the steering wheel, all steering column switches, the ignition switch, and the steering column with cardan must be removed. The further algorithm of actions is as follows.
- Knock out the bolts from the removed bracket in the form of a plate and cut off about 3 cm from the top with a grinder.
- Drill holes in the plate to mount the electric amplifier.
- Fix the cardan to the EUR.
- Place washers under the bracket (where the electric booster is mounted), and you can use them to adjust the steering wheel.
- Attach the electric booster, and then install the cardan into the rack.
Rack and pinion steering
If we talk in general about the steering mechanism of the Lada Grant, then the following are its main characteristics and features.
- The steering column provides the ability to adjust the tilt of the steering wheel. And the steering wheel itself can be locked by installing an anti-rotation device connected to the ignition switch.
- The steering mechanism is of a rack and pinion type, where it is possible to change the gear ratio in different operating modes.
- The mechanism is mainly equipped with electric power steering.
- The electric amplifier is equipped with a unit that allows you to independently diagnose the technical condition of the device, and, if necessary, exclude the amplifier from operation.
The schematic diagram of the Lada Granta steering device is quite simple. The rack-and-pinion type mechanism is fixed in the engine compartment on a special shield through rubber supports. Reliability of fastening is ensured by bolts welded to the body. Steering drive is provided through two separate tie rods, which interact with the steering arms of the front wheel struts.
Reliability of engagement of the gear pair on one side is ensured by a special gap set at the factory. On the other hand, the precision of engagement is maintained by a spring stop, which presses the rack itself against the gear teeth.
The above gap under normal conditions is 0.1 mm, but during operation it may be violated due to wear of individual parts. Thus, one of the main reasons why an extraneous knock appeared in the steering mechanism is a violation of the set gear clearance. It should be noted that there are other malfunctions that can lead to an unpleasant knocking sound in the car:
- loosening of the steering rack itself on the mounting bolts;
- loosening of the tie rod ball joint;
- wear or destruction of mechanical transmission teeth.
Design Features
The steering system of the Lada Kalina includes an electric power steering and a steering column that is adjustable in height and tilt. The steering mechanism is a steering rack with a variable transmission ratio. The rack engages with the engine crankcase through a gear having helical teeth, the pitch of which varies along the length of the rack. The figure shows the design of the Kalina steering rack.
The steering rack on Kalina is pressed against the gear by a spring. Friction is reduced by a plastic insert. The spring pressure is changed with an adjusting nut (the factory-set gap between the rack and the shaft is 0.1 mm). The second end of the rail rests against a plastic sleeve. Adjusting the gap helps eliminate knocking noises.
The steering system shaft is installed in bearings (one in the column bracket, the other in the electric booster housing). The column bracket is attached to the pedal bracket (front) and to the body bracket. The column bracket with the pipe is connected in the form of a hinge of two plates, which allows you to change the position of the steering wheel, and the range of movement is limited by the slots in the plates.
To fix the position of the pipe, there is a lever connected to the adjusting sleeve. It is screwed into a coupling bolt located in the slots of the plates. When you turn the lever, the bushing rotates, loosening the fixation of the plate, which allows you to change the position of the steering wheel. Springs between the plates and the bracket pull the pipe up when the fastening is loosened.
The steering system of the Lada Kalina has two tie rods and swing arms. The rod consists of external and internal tips and an adjusting threaded sleeve, which, when rotated, changes the length of the rod. The required adjustment of the rods is fixed with bolts. The rod is connected to the swing arm using an external tip that has a ball-type joint.
Kalina's electric power steering reduces the force applied to the steering wheel. It is assembled on the basis of an electric motor with a gearbox located under the steering system casing. The amplifier is controlled by an electronic unit that receives signals from sensors of vehicle speed, shaft rotation and steering torque.
The principle of operation of the amplifier is based on the fact that when the car is stationary, the torque on the steering shaft is the greatest, and when moving, it decreases with increasing speed. There is a power steering indicator on the dashboard.
Removing the steering gear
If a knock does occur, the car owner will have to dismantle the mechanism. It is more convenient and faster to carry out this work when the vehicle is on a lift. To carry out the work you will need the necessary tools, which in this case include:
- socket wrench or socket wrench 13;
- flat screwdriver;
- durable knife;
- special 24mm wrench for the steering rack;
- hexagon 6 with wrench.
Before starting work, the battery is disconnected, thereby taking the necessary safety measures. At the initial stage, you need to first loosen the bolts securing the front wheels. The wheels themselves should be left in the “straight” position before lifting the car onto the lift. Next, the steering wheel driveshaft is disconnected from the rack and pinion drive shaft.
This work is carried out from the salon. Therefore, the car is not raised high. The swing rods can now be released by unscrewing them from the swing arms. And as soon as this work is completed, you can begin to dismantle the steering mechanism. Using a 13mm wrench, unscrew the nuts securing it and remove the mounting clamps.
The steering mechanism is removed along with the disconnected steering rods. The next stage of repair work is disassembling the removed device. Here you should free the steering rack from all protective covers that are put on the mechanism. For this purpose, cut off all the fixing clamps, which will subsequently need to be replaced with new ones.
Reference data
Basic data for monitoring, adjustment and maintenance
Table 11.1
Tightening torques for threaded connections
Table 11.2
| Name of units and parts | Tightening torque, Nm (kgf-m) |
| Steering gear nut | 15-18,6 (1,5-1,9) |
| Steering column nut | 15-18,6 (1,5-1,9) |
| Nuts for coupling bolts securing intermediate shaft flanges | 23-27,4 (2,3-2,8) |
| Tie rod pinch bolt | 19-30,9 (2,0-3,2) |
| Steering wheel nut | 31,4-51 (3,2-5,2) |
| Ball stud fastening nut | 27,1-33,4 (2,8-3,4) |
| Bolt securing the steering linkage to the steering mechanism | |
| Steering gear bearing nut |
Diagnostics, repair and reassembly
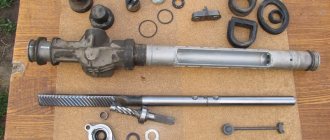
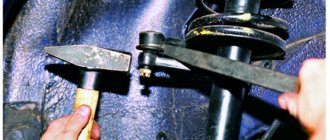
Before determining why there is a knock in the steering, you should completely disassemble the rack and carry out diagnostics for wear, destruction of components and connections. Disassembly is carried out in this order. Secure the steering rack in a vice, having previously installed spacers made of soft metal or other material. Unscrew the nut securing the mechanism crankcase pipe. The crankcase tube is removed. Remove the clamps securing the pipe bushings and remove them.
Unscrew the adjusting nut. Here you need to use a special 24mm wrench, which has external edges for unscrewing. Sequentially remove the rack stop spring, the sealing ring and the rack stop. Remove the crankcase cover. After removing the bearing cage and sealing ring, remove the rack. The second element of the steering mechanism pair - the gear shaft - is dismantled.
Now you can diagnose the condition of the bearings and sealing rings. After thorough cleaning, the wear of the gear sectors and the condition of the surface of the rack and shaft are assessed. After all, this is where the reason lies that causes the knocking that appears. If necessary, select the necessary parts and replace them.
Before reassembly, all critical connections are lubricated with a special compound. Very often, it is the insufficient amount of lubricant that leads to rapid wear of loaded parts, which violates the previously established clearance. Therefore, even a recently installed rack knocks again.
Assembling the steering mechanism is carried out in the reverse order. For correct and easy installation of dismantled bearings, you should select the required diameter of pipe cutting, which will help to correctly install the bearings in place. The assembled steering mechanism must be adjusted, since the size of the gap can also determine whether a knock will appear after reinstallation.
Adjusting the spring and power steering
Very often, the cause of a knocking sound when turning the steering wheel is a weakening of the pressure spring. It provides the required force for pressing the steering rack gear against the main shaft gear, which is set at the factory by adjusting and fixing the spring. As the vehicle is used, the spring loses its elasticity and relaxes.
In order to increase the pressing force of the spring, it is necessary to tighten it, which is done after disconnecting the steering mechanism, but without removing the steering rack. Repairing the steering rack in this case consists of setting the required gap between the rack and the shaft gear. The steering rack is installed in the middle position and is secured against movement.
The rubber plug is removed, and the indicator probe is placed in the hole of the stop adjusting nut so that it comes into contact with the rack stop. It is better to use a dial indicator. Then, turning the gear shaft that pushes the stop, the indicator measures the size of the stop's movement. The length of movement should not exceed 0.05 mm.
If this value is exceeded, it is eliminated by turning the adjusting nut. The steering rack is fixed in the position corresponding to the required clearance, and the ease of rotation of the pinion shaft is checked within the entire possible movement of the rack.
The adjustment nut is rotated using a special wrench for adjusting VAZ steering racks. It is not recommended to tighten the nut too much, which can have a negative effect when turning the steering wheel at maximum speed. If there is play when turning the steering wheel, the spring can be tightened by practically selecting the correct force.
In this case, initially the adjusting nut is turned by 20-25°, and the presence of knocking is checked when the rack is turned. If the noise is not eliminated, then tighten the nut again by 10-15°, and so on until the knocking noise is eliminated. If tightening the spring does not help, the steering rack needs to be repaired.
Adjusting Kalina's electric power steering is best done after removing the steering rack, but it can be done without dismantling with some inconvenience. The car is placed on the repair pit so that from below there is access to the mounting of the front part of the amplifier.
Rack adjustment
Before installing the rack and rods back, it is necessary to set the gaps of the gear connection. Please note that it is better to immediately replace the thrust nut with a new one. Set the rack to the middle position, as if the wheels were straight. For adjustment, a special clock-type indicator mechanism is used. We start rotating the gear shaft and measure the indicator readings.
If the value is 0.05 mm, then the adjusting nut should be tightened to the same amount. After the steering rack adjustment is completed, check the ease and uniformity of movement along the entire length of the rack stroke. Provided that everything is done accurately, you should fix the position of the adjusting nut by performing special core punching with a punch. When all the work has been completed, you can begin to reinstall the steering mechanism on the Lada Granta. After the mechanism has been installed back on the car, you should, even before starting to drive with the car stationary, turn the steering wheel, checking the uniformity of rotation. A check that will reveal that there is no knocking can only be done while driving on a rough road.
Steering malfunctions usually occur due to insufficiently frequent preventive inspections. If the owner has missed the appearance of minor leaks in the steering mechanism, loss of integrity of the protective covers, then the likelihood that a knock will soon appear in it is quite high. Therefore, it is important to carry out annual diagnostics.
| Large steering wheel play | |
| The fastening nuts on the ball rods have become loose. | The cotter pin may be missing. Tighten the fastening and install a cotter pin if necessary. |
| The clearance in the ball joint rods is too large. | Replacement of steering tips for Lada Granta. |
| The silent blocks of the hinges are worn out. | Replace the rods. |
| There is too much clearance between the rack and nut. | Worn elements must be replaced, and after replacement the mechanism must be adjusted. |
| There is a knocking sound when turning the steering wheel | |
| The tie rod nuts are loose. | Tighten the fastening nuts. |
| There is a large gap between the rack and the nut. | Replace worn elements; after replacement, the mechanism should be adjusted. |
| The steering mount is loose. | Tighten the fastening nuts holding the mechanism. |
| Steering wheel turns too hard | |
| The support bearing of the shock absorber strut is faulty. | Replace the support bearing. |
| The support sleeve is worn, the rack stop is worn. | Worn elements need to be replaced. |
| Tire pressure is too low. | Inflate tires to optimal pressure. |
| Ball joint parts are worn or damaged. | Replace elements. |
| The shock absorber struts or their elements have expired. | Repairing the shock absorber strut or replacing it. |
| The shaft bearings are worn out. | The shaft bearings need to be replaced. |
| The electric power steering is faulty. | Replacement of the EUR together with the shaft. |
Causes of extraneous sounds, removing the rack
Situations often arise when, when turning the steering wheel of the Lada Kalina, you can hear something knocking and rattling. Such extraneous sounds can be heard constantly or appear after a long period of parking. If something rattles in the steering mechanism, then you should find out the causes of these noises. They often occur due to wear on the ball joint. Such a defect may result in the impossibility of traffic movement, and the part will need to be replaced in a timely manner.
The cause of knocking or squeaking of the steering wheel is sometimes damage to the grenade. If the steering racks are faulty, in addition to knocking, the steering wheel kicks back or signs of the steering wheel biting appear. In this case, the steering rack will need to be adjusted or repaired, and possibly replaced. Noises appear when the shock absorber bushings wear out. The knocking noise may be caused by loosening of the bolts securing the crankcase.
The design of the Kalina steering system is such that tightening the steering rack and adjusting the spring can only be done after removing the rack. It is removed in the following order. The front part of the car is raised using a lift or trestles. From the interior side, the bolt for the splined fastening of the steering column is turned out.
The mounting location is located below the pedal block. The front wheels of the car are removed. Then the nuts of the rotary cams are unscrewed and removed. The battery is removed from under the hood along with the platform. The heat reflector is removed. Finally, the nuts securing the steering rack to the body are unscrewed. After this, the rail can be removed out.
When disassembling, adjusting and repairing the Kalina steering rack, you will need the following tool:
- special key for adjusting the VAZ rack;
- dial-type gap indicator;
- screwdriver, pliers, set of socket wrenches and wrenches;
- hammer;
- mallet;
- steering wheel end remover;
- calipers;
- chisel;
- brush.
Any extraneous sounds when turning the steering wheel should make the driver wary. It is necessary to immediately find out the reasons for their appearance. Repairing and adjusting the Kalina steering rack can improve driving safety.