During the operation of the Lada Priora car, owners are faced with the problem of poor and very long heating of the interior.
The article will cover in detail the topic of how to install a thermostat from Granta to Priora. The design features of the cooling systems of both models and the advantages of such modernization will also be considered.
Features of the VAZ-2110 thermostat
- accelerates the process of warming up the engine as a whole;
- maintains optimal operating temperature.
Experts call the main function of a car thermostat device to block the flow of cooling antifreeze as it enters the radiator. This is due to the operating mechanism of the thermostat itself. The fact is that antifreeze does not pass through a cold engine, and when it is heated to a certain temperature, the thermostat is triggered - it opens, and thanks to this the engine can warm up faster.
The design of a car thermostat is no different, as it consists of several elements:
All these elements are enclosed in a housing on which information about temperature conditions is indicated that corresponds to a specific car engine model.
Instruction No. 1
It often happens that the engine temperature does not rise to the optimal temperature during operation. For example, on the body of a thermostat device, 90 degrees is marked, and the temperature is not higher than 85. This problem can be solved with the help of a simple modification - modifying the rod. The fact is that in the process of opening the thermostat, the rod rests against the cover. If you expand the special recess in the lid, the thermostat will operate later. Therefore, it is easier to replace the rod with a bolt of the appropriate size.
- Pull the rod itself out of the cover.
- Drill a through hole at 4.5.
- Cut the internal thread to 5.
- Select the bolt length with a margin.
- Place a lock nut at 5 and a washer with an elastic band to seal.
- Reinstall the thermocouple.
- Fill with antifreeze.
- Check in practice, adjust the beginning of the opening of the large circle to 89 degrees.
Installation of a modified vehicle
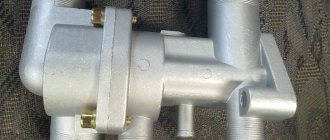
On a VAZ 2110 you can easily install a more advanced thermostat from Granta 2190. But you should still know a little about the design of the heating/cooling system in Granta. Its scheme can be easily implemented on the “ten”.
- Original TS Grants 2190 from BEHR;
- The lower radiator hose is from Granta, but the upper one 21214 will also work, or simply matched to size;
- Tee from VAZ 2110 for the cooling system;
- The studs are 8 mm in length - like from the camshaft bed;
- Straight long stove pipe from the “ten”;
- Gasket for thermostat.
We act according to this plan:
- We change the lower radiator pipe to the one from Granta (or similar). You can leave the original one, but connect it to a suitable diameter at a right angle using a piece of pipe. However, remember - the more connections, the more opportunities for leaks;
- We connect the expansion tank pipe through a VAZ 2110 tee: one end goes to the drain from the heater radiator, the other end goes to the supply pipe;
- Drain the coolant;
- We change the studs to longer ones and install the Granta thermostat;
- We twist the temperature sensor.
Next comes a check to see if the modified heating system is working properly. Typically, the Grant vehicle is more stable, provides faster heating of the air in the cabin, and is not subject to temperature fluctuations.
Which thermostat should you choose?
So, it has already been mentioned that there are collapsible and non-dismountable thermostats. But this is not the only nuance by which you can choose these details. There is also a division according to the number of holes. All stock thermostats have 5 holes, and tuning ones have 6 holes. Before you start making your choice, you should understand the difference between them.
Thermostats with 5 holes in which the fittings are inserted provide a slower passage of coolant. From a technical point of view, during frosts this approach is justified, since coolant flows through the system more slowly and the engine cools less. But there are also disadvantages: in hot weather there is a risk of engine overheating, and the stove does not warm up the interior well.
Thermostats with 6 holes allow you to get better cooling, and the stove also works more efficiently with them. But in winter, the engine will take longer to warm up.
So which is better to choose? The manufacturer recommends using only standard thermostats, but they do not always satisfy drivers. If you want to increase the efficiency of the stove, you should choose a part with 6 holes. Also, by purchasing a dismountable thermostat, you will have the opportunity to modify it yourself.
No. 2 Modification of the thermostat on the Lada Grant - replacement of the thermal insert
This method involves completely dismantling the flow regulator and disassembling it into its component elements. The detailed process is described above.
We troubleshoot the thermostat cavity, wipe it with a rag, and inspect it for cracks and other defects.
Removed spring from thermocouple
We replace the entire “core”. The following cores are suitable for the standard thermostat:
- Wahler: 3017.87 D (at 87°C);
- Behr (Behr) 3091.92V (at 90°C).
We replace the complete set, including the spring, and the modification of the Luzar thermostat on the Lada Grant is completed.
Thermostat under the cover in disassembled form. As an alternative, use the core from Daewoo or Renault, catalog part number - Vernet 4898.92. The design of the part is somewhat different and requires adjustment. For standard thermostats from Luzar, such an upgrade is not possible.
Subject to the recommendations, fuel consumption will decrease by 1.0 - 1.5% minimum.
Additional purpose of SOD
VAZ 21102 engine cooling system and electric fan
Being a system that is designed to cool engine parts that heat up during vehicle operation, the SOD also has a secondary purpose. In particular, this applies to indicators such as:
- heating the air in the heating system inside the cabin;
- reducing the temperature of the forced air entering the cylinders (applies to turbocharged engines);
- cooling the transmission fluid if the car has an automatic transmission;
- reducing the temperature of exhaust gases entering the recirculation system;
- The oil is also cooled using an additional built-in radiator.
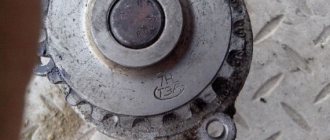
Marking of the VAZ 21102 engine cooling relay
You can learn more about the VAZ 2110 SOD through videos or photos that are widely available on the Internet. Each motorist can modify the system with his own hands as he pleases, but only if the instructions, of course, imply this. The price of a new fan is not so high that you would not try to upgrade the engine cooling system.
We install a thermostat from another model
There is another way to improve the operation of the thermostat; to achieve efficiency, you should use a part from a different model. With the correct selection, no additional modifications will be required, at the same time, the system will work correctly and without failures. The most important thing here is not to make a mistake when choosing a part. The best option would be to install a thermostat from Lada Granta; it is almost identical in mounting, but is more efficient. Therefore, many drivers limit themselves to installing it.
There is no need to modify the thermostat itself. But, it is a little larger compared to the standard part. Therefore, the studs will need to be replaced. 20 mm longer are installed in their place.
. This will be quite enough. There are no special features in the replacement process. Simply remove the old thermostat and install a new one in its place. Be sure to replace the gaskets.
Benefits of modernization
Replacing a standard thermostat with a device from Lada Granta does not take much time and can be done on your own without contacting a service center. Modernization has a number of advantages:
- The power unit warms up faster.
- The car interior begins to warm up when the temperature reaches 50 degrees.
- After 70 degrees, hot air flow begins.
- The engine does not overheat at idle.
- The problem of depressurization of the cooling system completely disappears.
Now the heating radiator does not depend on the pressure of the water pump and the opening of the bypass valve. The circulation of antifreeze in a small circle occurs consistently, without the influence of temperature and pressure.
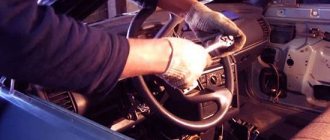
Removal and installation
Before you begin installing a new device, you must remove the old one from the engine. Let's look at the sequence of work using the fourteenth model as an example. To carry out this operation, you will need a minimum set of tools:
- Two screwdrivers: flat and Phillips.
- Set of wrenches.
- Sealant.
- Steel clamps (4 pieces).
- New thermostat from Lada Granta.
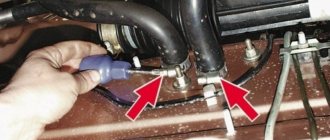
Work begins by draining the coolant from the system. Next, in order to free access to the part, you need to remove the air filter. Now that the element we need is in sight, it must be carefully removed. First of all, loosen the fastening clamps located on the thermostat pipes. It is necessary to remove the pipes themselves sequentially, starting with the lower ones, connecting the radiator and expansion tank.
After the pipes are disconnected, unscrew the fastening nuts on the device itself. This completes the dismantling. Before installing a new spare part, make sure there are no defects on the pipes and the device itself.
Installing a thermostat on VAZ 2114, 2109, etc. done in exactly the reverse order. A thin layer of sealant must be applied to all holes of the new part.
Pay special attention to the fact that the sealant is silicone based and can easily withstand temperatures up to 130 degrees
Place the thermostat in place and secure it with bolts. Next, put on the pipes: first the upper ones (from the stove and cylinder block), and then the lower ones (from the radiator and expansion tank). The mounting clamps must be completely replaced. Also, there is no need to tighten them right away, since they can squeeze the sealant inside the cooling system of VAZ 2114, 2109, etc. First, simply attach the clamps, and they should be fully tightened after 30 - 40 minutes.
After completing the procedure, do not rush to fill in the coolant. In order for the sealant to fully settle and not allow liquid to pass through, it must be allowed to dry for about 3 - 4 hours.
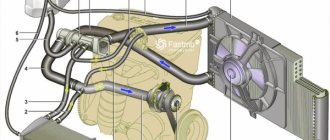
↑ Engine cooling system VAZ-2111 (with fuel injection system)
- 1–26 – see above
- 27 – hose for supplying coolant to the throttle pipe
- 28 – coolant drain hose from the throttle pipe
- 29 – coolant temperature sensor in the outlet pipe
- 30 – radiator tubes
- 31 – radiator core
The cooling system is liquid, closed type, with forced circulation. The tightness of the system is ensured by the inlet and outlet valves in the expansion tank plug. The exhaust valve maintains increased (compared to atmospheric) pressure in the system on a hot engine (due to this, the boiling point of the liquid becomes higher, steam losses are reduced). It opens at a pressure of 1.1-1.5 kgf/cm2. The intake valve opens when the pressure in the system decreases relative to atmospheric pressure by 0.03-0.13 kgf/cm2 (on a cooling engine).
The thermal operating conditions of the engine are maintained by a thermostat and an electric radiator fan. The latter is turned on by a sensor screwed into the left radiator tank (on a VAZ-2110 engine) or through a relay based on a signal from the electronic engine control unit (on VAZ-2111, -2112 engines). The sensor contacts close at a temperature of 99±2°C, and open at a temperature of 94±2°C.
↑ Temperature control
To monitor the coolant temperature, a sensor is screwed into the engine cylinder head and is connected to a temperature gauge on the dashboard. An additional temperature sensor is installed in the exhaust pipe of injection engines (VAZ-2111, VAZ-2112), which provides information to the electronic engine control unit.
↑ Coolant pump
The coolant pump is a vane, centrifugal type, driven from the crankshaft pulley by a timing belt. The pump housing is aluminum. The roller rotates in a double-row bearing with a “lifetime” supply of grease. The outer ring of the bearing is locked with a screw. A toothed pulley is pressed onto the front end of the roller, and an impeller is pressed onto the rear end. A thrust ring made of a graphite-containing composition is pressed to the end of the impeller, under which there is an oil seal. If the pump fails, it is recommended to replace it as an assembly.
The redistribution of liquid flows is controlled by a thermostat. On a cold engine, the thermostat bypass valve closes the pipe leading to the radiator, and the liquid circulates only in a small circle (through the thermostat bypass pipe), bypassing the radiator.
On a VAZ-2110 engine, the small circle includes a heater radiator, an intake manifold, a carburetor heating unit and a liquid chamber of a semi-automatic starting device. On VAZ-2111, VAZ-2112 engines, liquid, in addition to the heater, is supplied to the throttle assembly heating unit (heating of the intake manifold is not provided).
At a temperature of 87±2°C, the thermostat bypass valve begins to move, opening the main pipe; in this case, part of the liquid circulates in a large circle through the radiator. At a temperature of about 102°C, the pipe opens completely and all the liquid circulates in a large circle. The stroke of the main valve must be at least 8 mm.
↑ Thermostat
The VAZ-2112 engine thermostat has an increased resistance of the bypass valve (throttle hole), due to which the fluid flow through the heater radiator increases.
↑ Expansion tank
Coolant is poured into the system through the expansion tank. It is made of translucent polyethylene, which allows you to visually monitor the liquid level. The on-board monitoring system also reports a drop in the fluid level; for this, a sensor is provided in the tank lid. Two steam exhaust pipes are also connected to the tank: one from the heater radiator, the other from the engine cooling radiator.
↑ Radiator
The radiator consists of two vertical plastic tanks (the left one has a baffle) and two horizontal rows of round aluminum tubes with pressed-on cooling plates. To increase cooling efficiency, the plates are stamped with a notch.
The tubes are connected to the tanks through a rubber gasket. The liquid is supplied through the upper pipe and discharged through the lower. Next to the inlet pipe there is a thin pipe for the steam pipe.
The use of water in the cooling system is not recommended: hot water causes intense corrosion of aluminum parts.
How to check if the thermostat is working on a VAZ 2110
Checking and replacing the VAZ thermostat of the tenth family
| The redistribution of fluid flows in the engine cooling system is controlled by a thermostat. Over time, the thermostat valve may jam on a large or small circulation circle, and the cooling system will not work correctly (engine overheating/underheating). How difficult is it to check and change the thermostat yourself? |
Checking the Thermostat
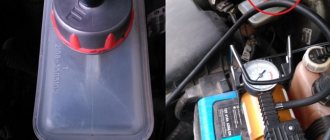
To check the thermostat, lower it into a vessel with coolant, heat the vessel and use a thermometer to control the beginning of the opening of the main valve.
| At a temperature of 87±2°C, the thermostat bypass valve begins to move, opening the main pipe; in this case, part of the liquid circulates in a large circle through the radiator. At a temperature of about 102°C, the pipe opens completely and all the liquid circulates in a large circle. The stroke of the main valve must be at least 8 mm. The thermostat of the VAZ-2112 engine has an increased resistance of the bypass valve (throttle hole), which increases the flow of fluid through the heater radiator. |
When checking the thermostat on a car after starting a cold engine, the radiator outlet (lower) hose should remain cold for a while and then quickly warm up, indicating the start of coolant circulation in a large circle.
Checking the thermostat in the store is very simple, just blow into the thermostat fitting. Thus, we will check how tightly the small circuit is closed when cold.
Removing the thermostat VAZ 2110
- Loosen the radiator outlet hose clamps.
- Loosen the clamps of the supply hose of the pump pipe and the hose connecting the thermostat to the outlet pipe.
- Remove thermostat.
Installation of a 6-hole thermostat in a VAZ 2110
- first VAZ 2110 - old style thermostat (left picture)
- until 2003 they had a 5-hole thermostat (2 pictures in the middle)
- after 2003 they have a 6-hole thermostat (right picture) - that’s why they are considered warmer compared to the previous ones. (catalog number 21082-1306010-11)
- More stable coolant temperature
- More productive heater operation
xn--2111-43da1a8c.xn--p1ai
Car engine cooling system repair
Operating principle of the engine cooling system
- Engine cooling radiator, which is designed to cool heated coolant with air flow.
- A radiator fan that increases the cooling intensity of the coolant in the radiator.
- The heater radiator, which is the source of heat for the car interior.
- An expansion tank, which serves to compensate for changes in the volume of coolant due to temperature. You won't be able to add antifreeze without it either.
- A pump or centrifugal pump that circulates coolant in the system.
- A thermostat, which is designed to regulate the amount of coolant passing through the radiator, thereby ensuring optimal temperature conditions in the system.
- The coolant temperature sensor is one of the cooling system control elements.
Diagnose the engine cooling system and identify problems
xn--2111-43da1a8c.xn--p1ai
Modification of the VAZ 2110 thermostat
| Comparison of bypass channels of a 6-hole thermostat - 11mm (left) and 5-hole - 16mm (right) |
Reducing the bypass channel for a 6-hole thermostat
xn--2111-43da1a8c.xn--p1ai
The best thermostat for VAZ 2110, 2111 and 2112
| The main task of the thermostat is to prevent engine overheating, as well as rapid warm-up and timely removal of heat from heating parts. Is the thermostat not working on your VAZ 2110? No problem, just replace it with a new one. And to avoid problems with it in the future, you should choose the right thermostat in the store... |
- The engine gets very hot.
- The engine does not reach operating temperature.
- What was the lifespan of the old thermostat?
- Which thermostat manufacturer is better?
- Is it better to replace the thermostat assembly or just its thermocouple?
xn--2111-43da1a8c.xn--p1ai
Modification of the thermostat
On a VAZ 2110, it is quite possible to modify the thermostat by adding another hole to the 5-hole device. Why is this needed and what does it give?
- In cars, in particular on the VAZ 2110, the injector becomes warmer with the advent of the sixth fitting due to the fact that the bypass channel decreases. For reference: a bypass is a pump for circulating liquid in a parallel pipeline;
- For the stove to operate, it is necessary for the coolant to circulate in a small circle. This happens through the bypass channel. The smaller its diameter, the more liquid will flow through the stove;
- An additional fitting, as a rule, prevents the heater return tee from leaking, since such malfunctions are not uncommon on “tens”.
An additional 8 mm hole is drilled in the body of the vehicle (thermostat). Install an additional pipe parallel to the same one going to the stove. It is needed so that the “waste” liquid from the heater enters the thermostat cavity, and there is no overcooling of the engine.
You also need a throttle washer - to increase the flow of fluid through the stove if the small circle is open, and an adjusting bolt resting on the leg of the element in order to regulate the opening temperature of the vehicle from the outside.
By the way, having modified it in this way, you can turn the carburetor TS 82, by drilling and tapping, into an injector suitable for the VAZ 2110.
Modification of the cooling system of the VAZ 2110
Why modify the VAZ 2110 engine cooling system and make it similar to the Lada Kalina SOD? In this article we will try to find the answer to this question. Let's take a closer look at Kalina's SOD. Under the hood there is an expansion tank, from where the liquid flows through hoses into a large circle. It turns out that it does not heat up to 85 degrees Celsius.
On the heater radiator we do not see a steam outlet hose, but on the main radiator the steam outlet begins after the large circle is opened. What is the superiority of this system compared to the cooling of the “ten”? Firstly, the power unit heats up much faster, which means the interior warms up. Secondly, the pressure in the new system is significantly less than in the standard VAZ 2110 system, which means that the expansion tank will no longer explode and will not be damaged. There is no need to frequently add coolant.
The Kalina engine cooling system has only one drawback compared to the VAZ system of the “tenth” model. The disadvantage is that the fan is turned on frequently without external airflow to the radiator. What is required to modify the cooling system? First, we need to find out what kind of heater is installed on the car. You also need to change your tires on time so that unforeseen complications do not arise later. The stove can be old or new. The new type of heater has greater performance, it has so-called “swirlers”, and the output size of the heat exchangers is smaller than the size of their input. The Kalina engine cooling system can be installed on both the old and the new “tens” stove. True, on an old heater, if installed, you will have to throttle the output, that is, reduce it by 6 mm.
A heater running on the new system will function perfectly, but only at high speeds, that is, while driving. If you stand still with the engine running, only warm air will blow from the air duct. In this case, you need to press the gas pedal a couple of times and hot air will come out of the stove again. It turns out that the radiator of the cooling system creates a kind of resistance that can only be overcome at idle by the standard cooling system of the “tens” engine.
As a rule, the heating of the throttle assembly will eventually air out, and after a while the stove will stop working altogether. What are the benefits of reducing the size of the outlet from an old-style stove? By doing this, we slow down the movement of coolant in the heater, and accordingly, the pressure in the throttle assembly increases. You can reduce the diameter of the stove outlet in different ways, for example, we cover it on the left with a throttle, and on the right with a ball valve.
In the process of modification, we will need such materials as: Kalinovsky thermostat, two L-shaped pipes, a special tee, a plug for the heater steam outlet, a plug for the tank, clamps. We have prepared everything we need, it’s time to start modifying the engine cooling system. First of all, we change the five-hole thermostat from Kalina. We transfer the tank to a large circle. We turn off the heater's steam outlet, which slows down the entire flow, then we plug the steam outlet of the tank.
Another modification option is to use a six-hole thermostat. In this case, it will not be possible to completely copy Kalina’s system, but you can try. We plug the sixth hole of the thermostat, connect the lower radiator pipe to the outlet of the tank, plug the steam outlet of the stove, select the optimal width of the bypass channel, and do this using the narrowing method. After completion of the modification, the engine cooling system must be purged, that is, excess air must be removed from there. Next, we pull out the pipe from the throttle assembly, which goes into the return line. Fill the reservoir with coolant.
We observe the fittings in the throttle body pipe; coolant should flow from there. If the fluid does not flow, then start the engine and close the hose with your finger. After coolant begins to flow from the pipe, we loop it, warm up the car to operating temperature and check the operation of the heater at idle. If hot air blows, then the work was done correctly, but if the air is barely warm, you will have to pull the pipe out of the throttle assembly again and repeat the entire subsequent procedure. At the end, check the fluid level and, if necessary, add it to the normal level.
To summarize, we note that this is far from a new method of modifying the engine cooling system; it has proven itself to be the best, regardless of the heater model. So it makes sense to do this, especially since lately the winters have started to be harsh and it’s uncomfortable to drive without a heater.
Differences in SOD
The SOD (cooling system of the Lada Priora power unit) has not received modernization. It was assembled according to the old scheme for models of 08–10 generation VAZs. It is noticeable that the engineers, when designing the SOD, placed the main emphasis on warming up the power unit. At the same time, the temperature and speed of warming up the car interior were placed in the background. As a result, the car received a heating radiator arrangement connected to a small circulation circle in a parallel manner. However, it completely depends on the operation of the thermostat bypass valve, as well as on the pressure of the water pump.
The Priora thermostat, regardless of what model it is, with 16 or 8 valves, is equipped with 2 shut-off devices - main and bypass. When warming up, the bypass lock is open, but not completely. Thus, antifreeze enters the heating radiator under low pressure. The neck of the bypass valve has a narrowing necessary to increase the antifreeze pressure. The pressure can only be increased by pressing the gas pedal, which is strictly prohibited when the engine is warming up. As a result, a narrow channel and high antifreeze pressure lead to leaks at the joints of the pipes.
Another problem is the expansion tank of the machine. It was included in the small circulation system. Most of the coolant passes through it, which is not necessary.
As soon as the main valve opens, the coolant flows into a large circulation to reduce the temperature. The thermostat copes with warming up the engine, but this time is not enough to warm up the car interior.
The SOD of the Lada Granta is designed in a different way. Engineers connected the heating radiator in series with the power unit. Now the antifreeze heats up equally - in the engine and heater. The expansion tank has also been removed from this circuit. Now it is included in the drain between the radiator in a large circulation circle.
There is also no need to apply additional pressure and narrow the diameter of the thermostat chambers. This made it possible to completely forget about the problem of coolant leakage through the joints of the pipes. The Lada Grant's thermostat warms up the power unit and interior much more efficiently, and it is able to maintain the temperature even while the antifreeze is cooling. The Granta engine operates at a temperature of 85–92 degrees without overheating when parked for a long time at idle speed.
Faced with the problem of poor interior heating in winter, motorists are thinking about upgrading the cooling system. Many people try to remake the standard thermostat, while further narrowing the shut-off valve chamber. This modification does not bring much effect. Next, step-by-step instructions will be given for installing the Granta thermostat on the Lada Priora.
Troubleshooting
A number of signs may indicate that the cooling system is failing, including:
- Antifreeze disappears from the system;
- The engine takes a long time to warm up. If this is due to weather conditions (frost, lack of a garage), then you need to insulate the engine;
- The engine detonates. This situation can most often arise due to the fact that a machine in which the cooling system is faulty is operated for a long time without proper repair;
- The sensor located on the instrument panel indicates that the coolant temperature has reached a dangerous temperature (arrow in the red zone);
- Torque is lost. This is a very unpleasant phenomenon in which, most often due to the fact that the engine has overheated, the head gasket leaks.
Narrowing of the bypass channel
If you decide that it is the bypass channel on the VAZ 2110 that needs to be adjusted, then the 6-hole thermostat should not have any problems. But with a 5-hole one, malfunctions may occur due to the fact that the cold pipe of the stove (outlet) will not be washed. Therefore, think about whether you need such a modification; maybe it’s better to immediately install a Granta thermostat or a six-hole one.
To reduce the bypass, you need to do the following:
- Cut a plate out of sheet aluminum so that it fits exactly inside the vehicle;
- Secure the plate with a rivet or cold welding, but so that the fastening does not interfere with the flow of coolant in a small circle;
- In this plate you need to drill a new hole of 5 or 6 mm (instead of the standard 8 mm);
- In addition to the steps described above, on a 6-hole heater, the stove return is connected to a thermostat.
After this modification, you will notice that the interior will warm up better and faster, but engine warming up will slow down somewhat.
5 hole thermostat modification
In this case, they simply make another hole, resulting in a thermostat with 6 holes. Carefully drill a hole in the thermostat housing and install the pipe into it. A washer from the throttle is also installed together with the pipe. This entire structure is covered with cold welding. All that remains is to assemble the thermostat. As a result, you will receive a workable design that will be superior to the standard version.
The standard heating and cooling system on domestic cars leaves much to be desired. Therefore, modification of the thermostat on the VAZ 2110 and 2112 is simply necessary in most cases. This work is not difficult; it does not require a large number of tools or special skills. Everything can be done in the garage, and in the shortest possible time. As a result, you will get a significantly more comfortable car interior.
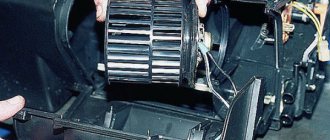
Engine cooling fan
VAZ 2110 engine cooling fan
Regarding the modification of the cooling system, which is often carried out, here we are talking about the fan. VSOD, as it is commonly called, on the VAZ 2110 has only one operating speed, although this causes a lot of dissatisfaction on the part of the motorist. So we have to carry out modernization and refinement.
VAZ 2110 engine cooling and fan
As a rule, motorists do not like it when the coolant arrow on the dashboard moves abruptly, and the fan turns on too abruptly. Let's consider below the disadvantages of the standard cooling system, which we will call CO in this article:
- the effect of thermal pumping, when during the hot season the temperature constantly fluctuates;
- constant shock loads (meaning electrical, current loads) on the on-board network.
It is not surprising that many drivers are annoyed when in the summer, at average driving speeds, the coolant temperature on the dashboard approaches the red zone. Of course, then the fan is connected and the arrow drops, but still.
- Such spasmodic behavior of the needle is considered the norm for VAZs, but drivers still look with envy at foreign cars where this is not observed. And all this can be easily eliminated if modernization is carried out.
- It is worth considering that when the needle jumps, errors on the on-board panel are possible, while the readings from the on-board computer are quite normal. But the irritation does not go away, and the effect is unpleasant and always alarming. I want to make temperature control smooth, so that the temperature is always maintained at the same level.
Modification of CO and fan using the first method
VAZ 2110 engine cooling system modification of Carlson (fan)
To do this, you will need to reduce the rotation speed of the Carlson. As for the electric motor, in this case, it will be necessary to ensure that it starts smoothly and, most importantly, at a lower coolant temperature (in other words, the electric motor will start earlier than usual).
It is worth noting that the method described above is more suitable for people who are professionally versed in electrical engineering. The method is quite complicated, but gives excellent results. As for modifications with your own hands, it is better to use the second method.
Second revision method
Modification of the engine cooling system for the VAZ 2110
Forced inclusion of Carlson is the second method. Needless to say, the fan will be connected via a button. This is very convenient and in the summer, in the hottest heat, you can turn on the Carlson with one press of a button, which will rotate at low speeds.