Starter VAZ 2109
As you know, the starter is one of the most important parts of a car. The malfunction of this element is easily detected, even by inexperienced drivers. Such repairs can be done on your own, you just have to have the instructions at hand, which will be given below. In this article we will look at the starter of the popular car of the golden youth of the 90s, the VAZ 2109. This car became the ancestor of a large number of cars.
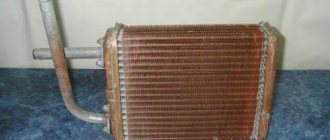
VAZ 2109 starter before repair
But as a result of use, this model began to crumble just like the previous Lada. Parts began to fail again, just like on the previous Zhiguli. The starter, which was the main part of the starting system, suffered especially, and was often subjected to heavy loads, especially in the winter.
Design and operating principle
To understand the features of the repair, you must first study the design of the starter and understand how it works for the benefit of your car.
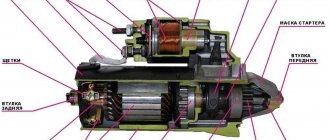
Let's start with the design. It includes four main nodes.
Knot
Peculiarities
It transmits direct current through four brushes
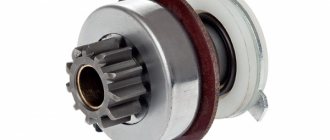
Freewheel with gear
A clutch or bendix drives the flywheel of your car's engine.
Serves to extend the bendix with gear when turning on the electrical appliance
Ensure easy rotation of the clutch, rotor, and gear. One bushing is located inside the starter, and the second is in the clutch housing.
Device diagram
Having familiarized yourself with the starter diagram, you can discuss the principle of its operation.
Do-it-yourself VAZ 2109 starter repair - an opportunity to save a lot of money
VAZ 2109 starter
As you know, the starter is one of the most important parts of a car. The malfunction of this element is easily detected, even by inexperienced drivers. Such repairs can be done on your own, you just have to have the instructions at hand, which will be given below. In this article, we will look at the starter of the popular car of the golden youth of the 90s, VAZ 2109.
This car became the ancestor of a large number of cars.
VAZ 2109 starter before repair
But as a result of use, this model began to crumble just like the previous Lada. Parts began to fail again, just like on the previous Zhiguli. The starter, which was the main part of the starting system, suffered especially, and was often subjected to heavy loads, especially in the winter.
How to repair a starter yourself
Repairing the VAZ 2109 starter is not particularly difficult for an experienced driver who has become familiar with this part in old models of classic Zhiguli cars. This part is quite simple in its design, like most cars of this family. The part consists of:
- a direct current electric motor, which has 4 poles equipped with an electromagnetic switch;
- there are also freewheels;
- traction relay.
Starter malfunctions
Malfunctions of this part are easy to distinguish. The overall design of the “nine” starter has not undergone absolutely any changes, although the developers have modernized some elements. So:
- The main difference from previous starter models is the shaft sleeve, which is no longer installed in the starter, but in the clutch system. And this element is often forgotten when carrying out repair work by people who have not received special technical education and have not studied the “nine” scheme. To replace the starter bushing on a VAZ 2109, you need to have some skills. If you have not done this work before, then you may find yourself face to face with various difficulties.
- Another malfunction that I would like to highlight is the VAZ 2109 starter solenoid relay. This part also becomes the culprit of V9 starter malfunction quite often. Its breakdown can be considered empty repeated operation, not holding the gear in the required mesh.
Otherwise, defects associated with the VAZ 2109 modification starter are as follows:
- the starter shaft does not rotate or does so very slowly;
- the gear slips, this happens when there is poor engagement with the flywheel ring, although the shaft rotates;
- During operation, the starter makes knocking noises or an uncharacteristic sound.
If you notice one of the above malfunctions, you must immediately proceed to repair. If you do not do this work right away, then you risk permanently damaging the part and being unable to repair it.
Dismantling
Before troubleshooting, you should look at the battery's performance. Symptoms of a weak battery are often similar to starter motor problems. You should also check the following type of communication: battery / ignition switch / starter / traction relay. Removing the starter is not so difficult. To do this you need:
- remove the terminals from the battery;
- disassemble the engine crankcase protection;
- disconnect the electrical wiring terminals;
- Unscrew the nuts securing the starter to the crankcase (there are three of them).
Attention: During the dismantling process, it is necessary to pay special attention to such parts of the starter as the armature, the condition of the winding, gear defects, cleanliness of contacts and much more.
Direct repair
You should not think that before removing the starter, you need to lift the VAZ 2109 car into the inspection hole. We begin to repair the starter after it has been completely removed. So let's begin:
- we check the relay by applying a voltage of 12 V to the output, do not forget that the minus should be short-circuited to the body;
- At the same time as this procedure, we attach an ohmmeter to the contact bolts (if the relay is working normally, the coupling should move into the hole when current is received, and the bolts should close - if this does not happen, then the relay should be replaced).
checking the starter relay VAZ 2109
- check the brushes;
- the starter cover is removed, after which the screw securing the fastening of all wires is unscrewed;
- the spring is removed;
- the brush is removed (as a rule, its minimum height should be 12 mm - otherwise, this means its erasing and mandatory replacement).
checking the starter brushes
We continue to work with the VAZ 2109. The starter, the repair of which is carried out by hand, must be carefully inspected. At this stage, you can even arm yourself with a magnifying glass in order to see everything better. Let's move on to the next action:
- we check the winding of the starter itself (as mentioned above, this device is not particularly different from other VAZ 2109 models, and do-it-yourself repair of the starter must be carried out skillfully and you need to know all the basics of the circuit);
- take an ohmmeter and check for a short circuit between the turns and on the body;
- inspect the collector and other windings (to do this, you need to carefully remove the ring so that it does not fly off, and pull it out);
- remove the washer from the axle;
- unscrew several bolts;
- we disconnect the tubes that serve to insulate the coupling bolts and pull them out;
- carefully inspect the collector and winding (there should be no soot or surf on them);
- Use sandpaper to wipe away minor changes on the surface.
Repairing the starter on a VAZ 2109 with your own hands also involves a thorough check of the armature winding.
- take a 220 W test lamp;
- we check the insulation for rupture, determine the runout of the shaft (which should be 0.08 mm, the insulation resistance should be at least 10 kOhm;
- we connect the armature collector with one wire with a current of 220 V;
- We connect the second wire through a 220 W 100 W lamp to the power housing (if the lamp lights up, then there is a breakdown in the armature and it needs to be replaced.
On a VAZ 21099 car, repairing a starter, where the armature is in order, also involves inspecting and checking the collector. Some important tips:
- if burning of the plates in two places is detected on the collector, then the coil is broken;
- if the plates turn blue, then a turn short circuit has occurred (this happens rarely, but it does occur):
- an interturn short circuit is detected on visible sections of the armature wire or bus bar (usually the turns are wrinkled or bent);
- Short circuits can be eliminated and tire bruises can be corrected by checking for the presence of foreign bodies;
- if the short circuit is not found, all that remains is to rewind the anchor.
On a VAZ 21093 car, repairing a starter, as well as on a VAZ 21099 and 2109, after checking the windings, involves inspecting the couplings and gears. To do this, we carry out the following type of operations:
- remove the washer from the armature axis;
- pull out the anchor assembly with the drive;
- remove the clutch drive lever;
- We begin to rotate the gear (there should be no chips or nicks; if there are any, it is advisable to replace the device).
A video can certainly help in this matter, but first of all you should understand what you are doing and how it works.
Attention: When assembling the starter in reverse order, it is advisable to check its casing. All plastic parts must be covered with lithol (pictured below), even if they are in good condition.
The instructions also recommend lubricating all parts that rub with machine oil for prevention. Having learned how to repair a starter with our own hands, we get a unique opportunity not only to repair our favorite car efficiently, but also to really save money. After all, the price of a new starter is not cheap in stores, and it is not always possible to find a good one.
Typical faults
It is better to start diagnosing the starter even before you remove it.
After dismantling, some signs of failure, by which the source of the problems can be determined, can no longer be determined.
Signs of a faulty element include:
- An unusual noise occurs when the engine starts;
- Complete absence or slow rotation of the starter;
- Rotation occurs, but there is no gear engagement with the Bendix ring;
- The unit rotates with the bendix, but then the clutch breaks;
- Turning the key in the ignition, there is silence.
Checking the dismantled unit
Before blaming the starter for everything, take the time to look under the hood and check the condition of the terminal contacts and connectors. Also pay attention to whether everything is ok with the battery. Only after this can you start working on the starter.
VAZ starter repair
The main reason your car may need starter repair is a distinct metallic grinding or clicking noise when the engine starts. Also, a malfunction of the starter may be indicated by the fact that the car does not start at all or attempts to start.
Experienced technicians at the Exclusive car service center are happy to offer you their services and repair the VAZ starter at the most affordable prices. By contacting us, you will receive a professional service, which includes such work as:
- Accurate and free diagnostics of VAZ starter.
- High-quality VAZ starter repair.
- Post-repair tests.
- Warranty for all types of work and spare parts.
A little about VAZ cars
The largest car manufacturer in Russia. The plant was built on the initiative of the Chairman of the Council of Ministers of the USSR Alexei Kosygin in the 1960s. . Equipment and technologies for it were purchased from the Italian concern Fiat. During the Soviet Union, its model range consisted of the following brands: Zhiguli, Niva, Oka, Sputnik, Samara. Today it produces various modifications of cars under the general name Lada, and also assembles Nissan and Renault cars, since these global brands have a controlling stake in VAZ.
Initially, VAZ cars were designed to saturate the domestic market of the USSR. They were affordable, reliable and easy to repair. At the present stage, these qualities have been supplemented by comfort and ease of operation, thanks to many additional options and modern functional equipment. At the same time, the price remained very affordable.
Our VAZ starter repair services
We repair starters of all VAZ models, for example:
After all the work, our technicians will be able to tell you how to best operate the repaired starter, and will tell you the timing for the next preventive inspection of your VAZ car.
We are pleased to offer you profitable repair of starter 2106, repair of starter 2107, repair of starter 2109, repair of starter 2110 and other models in St. Petersburg.
When you print the coupon, you get a 5% discount on your first visit! There is a cumulative discount system
Our car service center on Vasilyevsky Island repairs and replaces Ford generators of all the following models:
- Lada Kalina 1117/1118/1119
- Lada Samara 2113/2114/2115
- Lada Priora (Lada Priora 2170/2171/2172/21728)
- Lada Granta
- Lada Largus
- VAZ 2104
- VAZ 2105
- VAZ 2106
- VAZ 2107
- VAZ 2108
- VAZ 2109/21099
- VAZ 2110
- VAZ 2111
- VAZ 11113 Oka
- VAZ 2114
- VAZ 2115
Diagnostics
To carry out diagnostics, arm yourself with a conventional tester with voltmeter mode.
- Connect the battery terminals to the poles of your measuring device. You will need an assistant to drive.
- After connecting the terminals to the voltmeter, look at the readings of the device. If the battery is working properly, the data will be 11-13 V.
- Turn the ignition key and at this moment measure the voltage. If the losses are only 1-2 Volts, then the starter works normally and does not show resistance.
- If the voltmeter parameters decrease by 2 times or more, the reason is in the starter. Or rather its bushings or brushes.
- Remove the starter and check the relay. Connect the battery terminals to its terminals on the body and transfer it to 12 V. If the overrunning clutch moves in the front cover, then the relay works perfectly. If not, replace it.
Starter repair
Rice. 7.20. Starter parts: 1 – retaining ring; 2 – restrictive ring; 3 – drive with overrunning clutch; 4 – lever axis; 5 – front cover; 6 – drive lever; 7 – relay anchor; 8 – traction relay; 9 – back cover; 10 – protective casing; 11 – lock washer; 12 – coupling bolt; 13 – adjusting washer; 14 – brush spring; 15 – brush; 16 – body; 17 – anchor
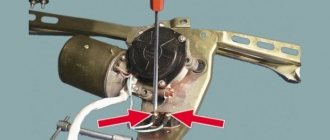
Unscrew the nut on the lower contact bolt of traction relay 8 (Fig. 7.20) and disconnect the stator winding lead from it. Unscrew the screws securing the traction relay and remove it. Disconnect armature 7 of the relay from lever 6 of the drive. Remove the rubber plug with washer from the front cover.
Unscrew the screws and remove the protective casing 10. Remove the lock washer 11, unscrew the coupling bolts 12 and disconnect the housing 16 with the rear cover 9 from the front cover 5 with the anchor 17.
Unscrew the screws securing the stator winding leads to the brush holders and disconnect the housing from the back cover. Remove springs 14 and brushes 15.
Remove the locking ring 1 and limit ring 2 and disconnect the armature from the drive 3.
Unscrew and remove the 4th lever shaft from the front cover. Disconnect lever 6 from the drive and remove drive 3 from the front cover. The drive is disassembled after removing the lock washer from the clutch hub.
To disassemble the traction relay, unscrew the screws securing its cover and unsolder the winding terminals from the “50” plug and from the tip attached to the lower contact bolt of the traction relay.
After disassembly, blow the parts with compressed air and wipe them clean.
Voltage is supplied through the lamp to the collector plates and to the armature core. When the lamp is lit, it indicates a short circuit between the winding or collector plates and ground. When checking, the megger should show a resistance of at least 10 kOhm. Replace the armature that has a short to ground.
Using a special device, check whether there are any short circuits between the armature winding sections or the commutator plates, and also whether there are breaks in the place where the leads of the winding sections are soldered to the commutator plates.
Inspect the working surface of the collector. If it is dirty or burnt, clean it with fine-grained sandpaper.
Check the runout of the core relative to the shaft journals. If it is more than 0.08 mm, replace the armature.
Check the condition of the spline surfaces and armature shaft journals. They should be free of nicks, nicks and wear. If yellow marks from the gear bushing appear on the surface of the shaft, remove them with fine-grit sandpaper, as they may cause the gear to stick on the shaft.
Drive unit. The starter drive should move freely on the armature shaft without noticeable jamming. The gear must rotate relative to the armature shaft in the direction of rotation of the armature under the influence of a torque of no more than 0.27 N·m (2.8 kgf·cm). The gear should not turn in the opposite direction. If there are nicks on the leading part of the gear teeth, grind them with a fine-grained sanding wheel of small diameter.
If drive parts are damaged or significantly worn, replace the drive with a new one.
Stator. Check with a megger or a lamp powered by 220 V to see if the stator winding is shorted to ground. The voltage is supplied through the lamp to the common terminal of the winding and to the starter housing. If the lamp is on or the megohmmeter shows a resistance of less than 10 kOhm, and also if the windings show signs of overheating (blackening of the insulation), replace the housing with the windings.
Lids. Check the covers for cracks. If they are present, replace the covers with new ones. Check the condition of the rear cover bushings and clutch housing. If they are worn, replace the rear cover and clutch housing.
Check the reliability of the brush holders on the back cover. The brush holders of the positive brushes must not have a short circuit to ground. The brushes must move freely in the grooves of the brush holders. Replace brushes worn up to 12 mm in height with new ones.
Check the spring pressure on the brushes with a dynamometer, which for new brushes should be 9.8±0.98 N (1±0.1) kgf and, if necessary, replace the springs with new ones.
Traction relay. Check the ease of movement of the relay armature. Check with an ohmmeter whether the relay contact bolts are closed by the contact plate. Check with an ohmmeter whether there is a break in the windings of the traction relay.
If there is a break in the relay windings, or the relay contact bolts are not closed by the contact plate, then replace the relay with a new one.
Before assembly, lubricate the screw splines of the armature shaft and freewheel hub, the gear and the rear cover bushing with engine oil. Lubricate the drive ring of the drive with Litol-24 grease.
Removal
Well, the check showed that the starter needs to be repaired. Therefore, the first thing we do is dismantle it.
- Secure the car stationary by turning on the handbrake and placing stoppers under the wheels.
- Move the negative terminal from the battery to the side. This will deprive your car of power.
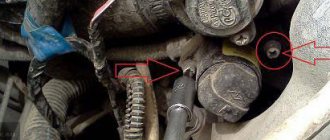
- Disconnect the wire connector from the starter solenoid relay terminal.
- Unscrew the fastening nut from the relay contact bolt and remove the wire.
- If there is a crankcase guard, remove it. Here all the bolts are simply unscrewed.
- The 2 starter fixing nuts are unscrewed from the bottom of the engine compartment. But the third one is more conveniently removed from inside the engine compartment.
- Having removed the fasteners and disconnected the wiring, you can safely remove your starter from the clutch housing.
Before starting work, be sure to clean the device from accumulated dirt so that it does not get inside the structure and reduce all repair efforts to nothing.
VAZ 21099 starter repair
Frequent causes of starter breakdowns in VAZ 21099 cars:
- severe brush wear
- nicks in the teeth of the flywheel crown
- the wire between the starter and battery has poor contact
- violation of operating rules
Working with us, you get:
fast and high-quality repairs
car repair of any brand
new generation high-tech equipment
efficiency - we will complete the work on time
Our service station
FAQ
What documents will I receive after the repair?
After repair or diagnostics, you receive an “Order Order”, which indicates all types of work performed, spare parts replaced, and cost.
Can I be present while my car is being repaired?
Yes, you can be present in the repair bay while your car is at the service station. But we recommend visiting a comfortable client area with coffee and Wi-Fi
Do you perform work on my brand of car?
We work with all makes and models of cars.
Do you work on weekends
The work schedule of our service stations is indicated in the Contacts section
How long should I wait for the necessary spare parts?
Spare parts are available at car service warehouses; you don’t need to look for them. Thanks to the availability of spare parts, repairs are completed within 1-2 hours.
Are deadlines met?
Yes, we always work within the specified deadlines. The exception is various force majeure events.
Reviews about the repair
The service is excellent. I was pleased with the attitude towards the client, that the guarantee is not just a word, but that the guys are really responsible for their work. Keep it up.
A good hundred. I came for problems with the universal joint, diagnostics and balancing were done within an hour. Prices are moderate. You can pay by card
There were problems with the generator. The diagnosis was carried out immediately. The faults were corrected within 2 days. The repair was guaranteed. Excellent service with normal prices.
As the weather warmed up, I discovered problems with the air conditioner. The problem was identified and within a few days the technicians fixed everything. Happy with everything! I will contact you again!
Breakdown statistics
Genstar: repair of the VAZ 21099 car starter: promptly, efficiently, without overpayments.
We have been providing this service for more than 10 years at an affordable price. Our staff consists of experienced employees who will quickly determine the source of the breakdown and offer a professional solution.
Prices for repairing a starter for a VAZ 21099 car from Genstar
The Genstar network of auto repair shops carries out starter repairs for various car models. Modern equipment and a staff of the best workers in the starter repair service enable us to guarantee high quality work in the shortest possible time. The cost of this service is determined individually, starting from 180 hryvnia.
For VAZ 21099 car starter repair
The priority area of repair work in which the automotive services of our network specialize is the repair of generators, starters and turbines in Kyiv. The starter is exactly that machine unit, without which it is impossible to start moving normally. The generator is also an important part of the machines. It ensures the operation of all electrical equipment of the car and charging the battery. If these 2 elements do not work correctly, the correct use of cars becomes impossible. Our auto repair shops will repair the starter of VAZ 21099 cars in Kyiv of any complexity. Significant experience in repairing generators and starters allows us to easily identify breakdowns and promptly fix them.
Our auto repair shops have a stock of all necessary spare parts, which will allow us to complete repair or replacement of the starter in the shortest possible time. This will also save your time and eliminate the need to independently search for the necessary spare parts in auto stores.
Carry out repairs and diagnostics of the starter of a VAZ 21099 car only at specialized service stations. This way you will not only save your time and money, but also ensure long-term operation of the car.
Solution
- First you need to put your “nine” in neutral gear, and also turn on the parking brake.
- After this, the hood opens, you need to find the red cable on the retractor.
- Using a thick screwdriver, you need to short-circuit the terminals on this component. When a short circuit occurs, sparks may fly in different directions - there is no need to worry, this is a normal situation.
- Then you need to try to start the engine. If you notice that the starter starts to work normally when screwing in, then the problem is not with it. If the device does not turn, then most likely it will need to be changed.
- If the mechanism is working properly, the red wire from the solenoid relay must be removed, and voltage from the battery must be applied to this terminal. If there is a pop, the relay will be fully operational. If there was no clap, then most likely the reason lies precisely in the relay.
- Check the contacts on the starter, it happens that due to oxidation it stops turning.
Starter repair
The starter of your car, despite its apparent unimportance, plays a key role in the operation of the car. Because of this, entrust starter repairs exclusively to a qualified auto electrician. Among other things, there is an economic aspect to this issue. Carrying out high-quality repairs is immeasurably cheaper than buying a new unit to replace an old one that was completely damaged by unqualified repairs.
Starter repair in Chelyabinsk
In Chelyabinsk there are many people offering starter repair services. But still, the car owner should be careful and avoid non-professionals who can easily aggravate the problem. Repairing the starter is a critical operation and should only be performed by a qualified technician. I am happy to offer you my services as an experienced auto electrician for starter repair. There are no hopeless situations and I will definitely help you.
Repair of starters on foreign cars
Starter repair on foreign cars has its own small specifics, mainly due to the more compact installation of engine attachments than on domestic cars. Plus, Russian starters are usually better known to the vast majority of auto electricians. As for me, thanks to my wide acquaintance with foreign cars, the removal and installation, as well as repair of the starter on foreign cars, is carried out by me quickly and efficiently.
VAZ starter repair
I am always happy to help VAZ car owners with starter repairs, especially since this operation on domestic cars is, in principle, quite simple and straightforward. However, I offer starter repair services not only for cars of the Volga Automobile Plant, but also for any domestic cars. If you have any difficulties with the starter and you need qualified help from an auto electrician, call immediately.
Starter repair price
Conventionally, the process of repairing starters can be divided into three stages: removal, disassembly and diagnostics. In general, repairing a starter takes about 1 hour and costs from 600 rubles. If you are very financially limited, you can perform some of the operations yourself, which will allow you to save a lot. For example, if you bring a starter that has already been removed, diagnostics and repairs will cost you only 400 rubles.
| Removing and installing the starter | from 200 rub | 20 minutes |
| Disassembling and assembling the starter | from 200 rub | 20 minutes |
| Starter diagnostics and repair | from 200 rub | 20 minutes |
Yesterday the starter stopped turning and I had to urgently look for a starter repair service. After some thought, I decided to opt for the services of Andrei Alexandrovich. It was the right choice. Andrey, thank you very much!
I couldn’t start the car in the morning :-(. It’s good that my husband had Andrey’s phone number. As it turned out, the problem was in the starter and Andrey fixed it within an hour. Andrey is a very good auto electrician. I recommend it to everyone.
I found Andrey's phone number when I urgently needed to start the car, but... nothing worked. Initially it was clear that there was a problem with the starter. Andrey quickly and expertly removed and repaired the starter. Literally half an hour later my car started up! I don’t know how to thank you!
My car is working, so when I heard a suspicious clicking sound when turning on the starter, it became clear that there was a chance that one day it simply wouldn’t start. I’ve been using Andrey Alexandrovich’s services for a long time, so there weren’t many options where to turn. As usual, Andrey did not need much time to identify the impending malfunction. Now everything works great. Thank you.
Dismantling the device
Sometimes, to eliminate a malfunction, you have to remove the starting mechanism and disassemble it.
Removing the starter consists of the following steps:
- First, the car must be de-energized by removing the negative terminal from the battery.
- Then you need to disconnect the connector with wires.
- The next step is to remove the crankcase protection.
- To remove the starter, it is more convenient to first unscrew the two nuts at the bottom of the engine compartment, and then move to the top and unscrew the third nut.
- Now you can remove the device from the clutch housing.
Before performing DIY repairs on a removed device, it should be washed and cleaned of dirt.