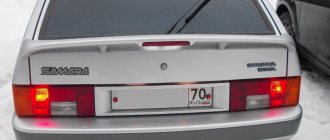
One bad thing happened to me, after buying the car I went to register it, and the tint on the rear lights did its job, they didn’t register the car, I couldn’t think of anything from a bribe to new headlights, but the funds didn’t allow me, I decided to get rid of the toner myself . Several methods were tried, including brake fluid, various solvents, but they did not give the desired result. The paint held on like a partisan during interrogation. It was decided to polish. After a trip to the auto and hardware stores, the following were purchased: 1. Set for polishing headlights - LAVR
It includes 3 types of sandpaper numbered 1-2-3 Number 1, respectively, the coarsest grit - 800, Number 2, medium grit 1500, Number 3, the smallest grit 2000. The set included a polishing compound consisting of wax and abrasive for finishing . We also purchased 400-grit grinding wheels for directly removing varnish from headlights (the roughest treatment) and a grinding wheel.
How to remove tint from headlights
Nikittaa 09.14.2008 - 10:03
(The car is really Russian, well, the varnish seems to come from a spray can that they sell in the markets)
Post edited by Nikittaa: 09.14.2008 - 13:06
Greetings! Optical tuning has been very popular lately. You can do anything with the headlights: xenon, bi-xenon, LEDs, eyelashes, tinting. The only question is how legal and practical is all this?
Not everyone likes all these modifications, and sometimes the “beauty” that was created by the previous owner has to be corrected by the new owner of the “tuned” car. It is also not uncommon to have to refuse and return the optics to their original condition due to refusal to undergo technical inspection. Yes, yes, it happens. When, because of your “cool” optics, you cannot pass a technical inspection or constantly receive fines and comments from the traffic police, then whether you like it or not, you need to somehow solve the problem.
If there is xenon and you get a lot of trouble because of it, remove it and bring the headlights into compliance with the requirements. If these are LEDs, put the halogens back. If it is a tint film, remove it. What if it's varnish? In this case, you will have to sweat.
In this article I’ll tell you about working (and not so working) methods for removing tinted varnish. You will learn how to effectively remove tint from headlights without damaging them.
So, I’ll start with the least effective, in my opinion, gradually moving on to more workable methods
- Glass replacement. Complete replacement of the headlight glass is a radical method; only a complete replacement of the headlight assembly will be more radical. The process is labor-intensive and requires certain skills and tools, as well as spare glasses. The headlights warm up, after which the sealant softens and allows the glass to separate from the body.
- Mechanical removal. I also consider this method of removing varnish from headlight glass to be radical and recommend using it only if other means have failed. This option involves removing headlight tint using an abrasive. That is, roughly speaking, sandpaper will be used, with which the varnish layer will be erased. The disadvantage of this method is that it is labor-intensive and also radical; the top layer of glass will be removed along with the varnish layer, which will lead to clouding and weakening of its protective properties.
- Nail polish remover (for nails). The principle is this: apply a little product to a rag, wet the painted area, and then quickly remove everything using a rag soaked in solvent. If you delay or do not calculate it, you can get the opposite effect - the plastic will become cloudy or white. In general, there is a high probability of destroying the glass.
- Professional liquid for removing tinted varnish. This product is specially designed for such work, so there should be no harm from it, and the effect is usually positive. Of course, this is not cheap, but it is many times cheaper and more convenient than buying new glass or sanding it with sandpaper. In addition, the simplicity of the method should be taken into account. Unlike all those described above, it is tritely simple: we apply the product to the tint and give the liquid time to react. After the varnish begins to swell, remove it with a rag.
On-site tinting
Car headlights are tinted in two ways: varnish or film.
Both the first and second methods have advantages and disadvantages.
Film from car headlights can be quickly removed, unlike varnish. When heated with a hairdryer, it comes off faster. If there is any glue left from the film, it can be washed off with a special liquid that is sold in stores that sell advertising films. For example in Remex. By the way, it also removes glue from vinyl/carbon films well.
How to remove varnish from headlights
Tinted varnish can also be removed from plastic car headlights, but it is much more difficult. You can remove the varnish layer with sandpaper and then polishing (When polishing by hand, it will take longer). First, 2000 sandpaper is used, then 3000, and then if you polish it all with 3M paste No. 2 - 3, then the headlights will become as good as new. It is better to remove the headlights in this case, and if you decide to do this without removing the headlights, then you need to cover the body and bumper elements around the headlights with masking tape so as not to damage them.
It is not recommended to remove the varnish with a solvent or acetone, as it will “corrode” the plastic headlights and they will become cloudy, and it can penetrate “deep” into the plastic. Although there are cases when the varnish from headlights was removed with a solvent - but very carefully.
The film for headlights in the color of the car body is usually not very transparent and the headlights are difficult to see during the day, which can affect traffic safety.
You can choose any degree of darkening with varnish for car headlights, since the varnish is applied in many layers, and there are only several types of darkening films.
All work is provided with a lifetime warranty.
Tinting. Tinted glass. Car window tinting. On-site tinting. Window tinting outcall. On-site car window tinting. Car departure tinting. Toning training. Car tinting training. Tinting training. Car tinting training. Tint center. Tinting Training Center.
— We create comfort for you and your family!
tonirovku.ru
How to remove from a car?
Car owners decide to remove tinting from car windows for various reasons. Most often, these are requirements for light transmission of glass in accordance with current legislation.
The following circumstances may also serve as a reason to remove the coating:
Coating defects (flaking, blistering, etc.).- Lack of driver comfort when driving due to poor visibility even in slight darkness.
- Glass defects that can only be corrected by removing the film.
- Unaesthetic appearance of tinting, etc.
To begin with, before using chemical reagents, you should try to remove the film in a less aggressive way.
Heated
It can be difficult to pick up and carefully pull off the film by the corner, especially in cases where the coating was glued a long time ago.
To remove the darkening film, you will need the following tools:
- hair dryer (household or industrial, which should be able to adjust the temperature);
- rags or napkin;
- glass cleaner;
- knife.
Work order:
- Turn on the hairdryer.
- Gently heat a small area of the film, starting from the edge. In this case, the adhesive composition will begin to melt. The optimal heating temperature is about +40ºС, the distance to the glass is at least 15 cm.
- Pry the edge with a knife.
- Continuing to warm the surface, moving from one zone to another, gradually remove the entire coating.
- Wash the glass.
The procedure with heating can be carried out only in the warm season. This should not be done in frosty weather, as temperature changes can cause glass to crack.
If the heating is insufficient, a lot of glue may remain on the glass, and the film itself will tear in your hands.
This video will show you how to remove tinting from glass using a hairdryer:
Using tools
You can remove the coating using a cold method yourself , using the following tools for this purpose:
- stationery knife;
- rubber scraper;
- rags;
- glass washing liquid;
- dishwashing detergent or liquid soap;
- nail polish remover with acetone or another product that can be used as a glue solvent.
Procedure:
Using a knife, carefully pry the film off the corner. To do this, you can moisten the edge with water and detergent.- Pulling the loose edge, begin to gradually remove the coating. In this case, you should continue to moisten the part of the glass that is being removed from the coating so that the moisture gets under the film coating.
- Apply dishwashing detergent to the cleared glass.
- Leave for 5-10 minutes.
- Using a rubber scraper, try to remove any remaining glue on the glass.
- If the adhesive layer cannot be completely removed, the surface must be treated with acetone or another solvent.
- Remove any remaining glue with a scraper.
- Wipe the window with a rag.
- Apply glass cleaner to the glass.
- Wait a couple of minutes.
- Wash off the composition from the window with a soft cloth so that there are no streaks left.
The use of detergents and other liquid products requires great care so that the composition does not get under the casing. If there is any doubt whether all the work can be carried out with extreme caution, it is better to press a rag along the border of the lower glass seal.
Chemical methods
In cases where the film cannot be removed using a cold or hot method, chemicals are used. An ammonia solution is used for this.
Usage:
- The selected reagent is applied to the surface of the glass coating.
- A cellophane film is placed on top (you can even use a garbage bag, for example) to prevent the applied liquid from quickly evaporating from the surface.
- Stand for 15 minutes.
- After the film softens - bubbles appear, wrinkles - you can begin to remove it.
- The remaining adhesive is removed with a solvent and a plastic spatula.
- Wash with detergent.
Ammonia can damage surfaces close to the glass, so they must be protected with cellophane film.
How to remove glue from glass tinting
Using a hair dryer by professionals is considered the best method. Without the use of chemicals, it will be possible to remove not only the film, but also glue residues. To do this, the glass is heated and unsightly marks are wiped off with special napkins. Some people use a steam generator: they heat the glass with steam, removing glue stains. Both methods are far from safe and should be practiced with great caution. Beginners should try easier methods using a chemical approach.
Soap solution
Glue residues are easily removed after softening in a soap solution. Using a knife or scraper right away is dangerous - there is a risk of scratching the glass. It is necessary to dilute laundry soap in warm water, moisten a rag, and wipe the glass. It must be moistened regularly, not allowing the water to dry out. After a few minutes, you can begin to separate the glue with a plastic, hard rubber scraper. Remaining glue can be wiped off with a napkin. For a more pronounced softening effect, some people add a little ammonia to the soap solution.
Degreasing solution
The principle of its operation is similar to that of a soap solution. Car detergent is added to water, whipped into foam, and applied to the window. After complete drying, wash the glass with a washcloth, removing any remaining glue. Wipe dry with a rag.
Rust converter
Such products are sold in sprays and suspensions; they are intended to dissolve and remove rust. The preparations can also be used against glue stains, but only with caution - the toxicity to the body is high. When working, it is better to drive the car out of the garage into fresh air, and you should also not forget about gloves. The converter is sprayed directly onto the glue stains, and after 10 minutes the windows are wiped with a cloth. StarWax, which is sold in automotive and hardware stores, has proven itself well.
Use of solvents
To get rid of glue, you can use solvents - acetone, white spirit. A rag should be moistened in one of them, rinse the glue stains well, and leave to dry. After 3-4 minutes, you can remove the softened adhesive using a plastic card, scraper, or spatula. Smoking is strictly prohibited during the procedure, the materials are highly flammable!
Petroleum-containing substances
Such products also belong to the category of organic solvents and can wash away the adhesive from the film (kerosene, gasoline). You need to thoroughly wipe the glass with a cloth soaked in these solvents. After a couple of minutes, the glue will soften and can be cleaned with a plastic scraper. Due to the toxicity, be sure to wear a respirator when working with solvents in the garage! You must also be careful not to stain the seat upholstery with petroleum products.
"Super Moment Anticley"
This product can also remove adhesive residue. It is sold in tubes, in gel form, does not flow, and can be conveniently applied to any surface. Anti-glue can remove any glue stains, even those based on cyanoacrylate. It is necessary to apply it to the glass in a thin layer and leave for 20-60 minutes (depending on the thickness of the adhesive coating). During this time, the connection to the surface will be destroyed, after which the remaining glue can be easily washed off with soap and water.
Biosolvent "Citosol"
This drug is created on the basis of biologically active components, it is absolutely harmless, it breaks down in water in 4 days. You can use Cytosol against stains from bitumen, adhesive tape, and vinyl film; it is excellent for cleaning glass and car bodywork. The product is applied to the glass, after half an hour the surface is washed well.
Household water repellents
Anti-rain preparations are also popular among drivers. These are hydrophobic products that disperse water after application to headlights, lanterns, and windshields. In addition to their intended purpose, sprays can be used to clean glass from glue. You just need to spray the stains with the solution, wait until the glue softens, then remove the residue with a plastic spatula.
Profoam 2000
This brand's universal cleaner easily removes remaining tape, stickers, tint film, and marker traces. With its help, you can tidy up not only the glass, but also the interior of the car, plastic parts, wipe off grease, technical grease, and dirt around the components. You need to spray the aerosol, after 30 seconds wipe off the glue with a napkin, then rinse the glass with water.
Liquid for cleaning the body from insects
Most of these products quickly cope not only with traces and stuck insect particles, but also with stains of glue and bitumen. Usually they are sprayed, then wiped off with a napkin along with the dirt. Automotive stores sell many different brands of products. The most popular are Bag Blitz, Insect Remover, Hi-Gear HG5625 and others.
Glue cleaners ZM 08184 or ZM 08984
Such products belong to the group of adhesive cleaners, therefore they can easily rid the surface of traces of adhesives, as well as mastic, bitumen, wax, and polishing. They are also suitable for cleaning glass from tinting adhesive. The material is highly flammable and must be handled with care. A small amount of cleaner should be applied to a napkin, wipe the dirty areas, and repeat if necessary.
Safety precautions
Most glass cleaning compounds are flammable, have a strong, pungent odor, some are quite toxic and can even cause poisoning and damage to the nervous system if their fumes are inhaled. If they come into contact with the skin, they can cause a burn and penetrate the bloodstream. Therefore, when working with solutions, you must observe safety precautions:
- Do not clean glass near an open fire, any heat sources, including hot objects; with an increased concentration of fumes in the air, a fire can break out even from a spark;
- work in protective clothing and rubber gloves to prevent products from getting on your skin;
- To protect against harmful fumes, wear a respirator and goggles.
Removing tint can be quite a labor-intensive process, especially if there is a lot of adhesive residue left on the glass. But if you purchase one of the described products, you can still give your car its original appearance, and without serious costs.
Features of removing old film
Old film has its own characteristics when removed . Adding to the complexity is the fact that she was exposed for a long time:
- sun rays;
- temperature changes;
- fogging, etc.
As a result, its surface can become fragile, and the glue, on the contrary, can literally “weld” to the glass. The first problem you may encounter is the difficulty of prying up the edge. This situation is most often characteristic of coatings that have been in use for at least 2 years.
The film must be properly moistened from the end of the glass . This can be done conveniently by spraying water with a spray bottle. The well-moistened film is left in this form for a quarter of an hour. After a while it will be easier to pick up the free edge with a knife.
The inability to pick up the edge may be due to the characteristics of the cheap glue used (for example, construction glue). A chemical method will help to cope with the removal of such coating.