August 23, 2021 Lada.Online 2 997 0
From the factory, Lada NIva Travel (formerly ChevyNiva), Niva Legend (formerly 4×4, 2121, 2131) are equipped with a hydraulic timing chain tensioner. One of the popular and simple modifications is the replacement of the hydraulic chain tensioner with a mechanical (automatic) one. Let's figure out why this is needed and how to replace it yourself.
Advantages of an automatic tensioner
- Reduces noise from chain operation.
- Does not require maintenance.
- Does not require an oil line, which eliminates chafing and loss of oil pressure.
- The chain is tensioned regardless of whether the engine is running or not.
- Automatically tightens the vehicle chain as it stretches.
- There are no plunger elements in the design (this eliminates jamming of the tensioner).
- Due to the adjusted spring tension force, the mechanical tensioner practically does not wear out the chain tension shoe.
- The service life of all timing components increases due to correct chain tension.
Price
: from 600 rub.
Where can I buy
: in our online store (category Chain tensioners).
Hydraulic chain tensioner. The genuine pain of the domestic auto industry
Hydraulics, as you know, is a science that loves precision. The diameters of holes and bushings are ideally adjusted to microns, valves work reliably like clockwork and high requirements for the purity and quality of the working fluid (in our case, oil). Alas, when it comes to cheap domestic spare parts, the path to hell is paved with good intentions, such as the use of a progressive hydraulic tensioner for Lada 4x4 engines.
It would seem like a finely tuned automatic system. No periodic adjustments or diagnostics for you: the plunger reliably self-locks at working cut-offs until chain wear increases and additional force becomes necessary to tension it. Alas, when it comes to domestic spare parts, all this is good only in theory.
How to replace
Replacement procedure for Chevy Niva
:
1.
Remove the plastic engine cover.
2.
Remove the air duct pipes.
3.
Remove the oil line along with the tee.
4.
Remove the hydraulic chain tensioner.
5.
Remove dirt and oil.
6.
Install the mechanical tensioner using sealant.
The process of installing an automatic chain tensioner on a Lada Niva Legend (4×4):
The process of installing an automatic chain tensioner on a Lada Niva Travel (Chevrolet):
Chain tensioner. Installation.
When replacing the hydraulic chain tensioner and installing a mechanical tensioner, I always remove the valve cover, and after “pulling out” the pin, use a ratchet wrench to make one full revolution of the crankshaft. This way you can avoid one “mean” moment. A slack chain can come out of the grooves of the tensioner and chain guide shoe, and if this is not noticed and corrected, very unpleasant consequences are possible (this applies to a single-row chain). Also, as a result of the first revolution, the primary slack of the chain is selected and, as a rule, the rod immediately comes out one or two more clicks, relative to the first shot.
Owner reviews
Review from the owner romanov696 about the ISAI tensioner:
The rustling of the chain was more annoying, especially when it was cold. Plus, the standard hydraulic system itself is not the most reliable or the best. I won't argue, but I don't like her. On the Classic I have a mechanical tensioner, no problems at all.
Review from excidium owner about ISAI tensioner:
As a result, the sound of the clanging chain disappeared when starting the engine. What was required to be achieved. Well, the reliability of a mechanical tensioner can only be judged during operation.
Review from the owner 31alexxx about the Trialli tensioner:
The hardware looks and feels well made, there are practically no backlashes or cracks. The mounting plate is much thicker than that of the hydraulic tensioner (I don’t know whether it was factory installed or not). Another thing that persuaded me to choose this spare part was the fairly large area of the piece of iron that rests on the plastic tensioner. By the way, the kit comes with a good quality gasket. Result: the slight clicking sound of the hydraulic compensators has become more clearly audible, the engine runs noticeably smoother!
Depecher owner's review of the Pilot tensioner:
By the way, I didn’t notice any difference in the behavior of the car on the way home; apparently, on an almost new car, the standard GNC still works quite adequately, so I didn’t feel anything at all after the replacement. Although there was snow on the street and low flow speeds of many kilometers of traffic jams, it was not particularly possible to evaluate the behavior of the car in a wide range of speeds. But this replacement of the State Scientific Center was necessary so as not to ruin everything in the future.
Comparison of mechanical tensioners Ryloth and Isai from 113region:
Today, I decided to change the Pilot to Isai, because... I thought that the Pilot was already tired after 50 thousand. But, having removed the Pilot, I didn’t find anything criminal - there was no wear on either the comb or the ratchet, the spring was normal. But since I took it off, I installed Isaiah - it won’t lie on the shelf for years, I need to try it))) I installed it. I went for a ride. Now a little comparison: Both Pilot and Isai are good, both perform their function 100%, if not fake (this applies to Pilot, because they say about Isai that we are unkillable). The only thing is that Isai is a little quieter, because... The Pilot has a moment when the chain is a little loose, but not enough for the comb to “click”, so at those moments it is a little noisier. But in general, the difference is not significant for the average user. Therefore, you can take both this one and this one.
Other improvements
:
- How to install electric headlight corrector instead of hydraulic corrector on Lada Granta, Niva
- How to make removable transfer case levers on a Niva, which 100% eliminate the howl and hum of the Republic of Kazakhstan
Keywords: 4x4 engine | Niva engine
+1
Share on social networks:
Found an error? Select it and press Ctrl+Enter..
Replacing the timing chain Niva 21214 injector
Here we will talk about independently replacing the timing chain drive on a Niva 21214. The timing belt affects the operation of the entire car, so the importance of this unit should not be underestimated. Replacing a chain drive is a rather complicated process, which, however, can be done by any car enthusiast, provided that he follows the instructions and shows a little diligence.
A chain has significant advantages over a belt drive. These include, first of all, its reliability. While a belt can break, this rarely happens with a chain. Usually it just stretches. It lasts much longer than the belt, which means it needs to be changed less often. But still, the chain does not last forever, and after a while it also has to be replaced with a new one. When replacing the chain yourself, it is very important to set the marks correctly and follow safety precautions.
When to change the timing chain?
The manufacturer does not give clear recommendations regarding the timing of replacing the timing chain on the Niva. Experts assure that the need for replacement may arise no earlier than after 100,000 km. But it is very important to periodically carry out diagnostic procedures for chain transmission. It may well happen that the chain weakens. This will be noticeable by the characteristic sound that the running engine will make. First you need to try to tighten the chain. If this cannot be done in the usual way, replacement becomes necessary. In this case, you can contact a service center, where this repair will be carried out by professionals, or you can try to change the chain yourself. The latter option is preferable in terms of savings and gaining the necessary experience.
If the mark on the camshaft gear does not match the mark on the bearing housing, it's time to take action. The chain drive also needs to be replaced if chips or cracks appear on it. All this suggests that your chain has served its intended life and it is time to replace it.
So, you have decided that you will make the replacement yourself. What do you need to do next? First of all, go to the store and buy a new chain there. You can check the quality of the chain you are purchasing. We take the chain and place it flat on our palms. If its sagging exceeds 1 cm, you better look for consumables elsewhere. In addition to the chain itself, you will also have to buy a set of oil seals, a tensioner, dampers, and a set of gaskets. Then we prepare the tools that will be useful in the work and begin the repair.
Replacing the chain drive
- Place the car on a level surface. Open the hood. Disconnect the battery. Remove the air filter.
- The choke cable should be disconnected and moved away. It is also necessary to disconnect all electrical drives and pipes.
- Remove the fan, generator belt and pump roller. The belt should be thoroughly examined. If deep cracks or other damage is found on it, it must be replaced with a new one. Remove the tray protection and thoroughly clean its cover.
- Remove the valve plug. Unscrew the camshaft sprocket screw.
- Take a wrench and unscrew the ratchet nut.
- Now we begin to rotate the crankshaft until the marks on it and on the engine casing completely coincide. Make sure that the marks also match on the bearing housing and camshaft sprockets.
Hydraulic chain tensioner. The genuine pain of the domestic auto industry
Hydraulics, as you know, is a science that loves precision. The diameters of holes and bushings are ideally adjusted to microns, valves work reliably like clockwork and high requirements for the purity and quality of the working fluid (in our case, oil). Alas, when it comes to cheap domestic spare parts, the path to hell is paved with good intentions, such as the use of a progressive hydraulic tensioner for Lada 4x4 engines.
It would seem like a finely tuned automatic system. No periodic adjustments or diagnostics for you: the plunger reliably self-locks at working cut-offs until chain wear increases and additional force becomes necessary to tension it. Alas, when it comes to domestic spare parts, all this is good only in theory.
Without once again venting in angry odes towards the domestic automobile industry, we will simply summarize that the problem of extraneous noise from the internal combustion engine, the main cause of which is often the hydraulic chain tensioner on the VAZ 21214, exists and we have to deal with it somehow. And, as we know, there is no smoke without fire, and another common problem with the hydraulic chain tensioning system is the failure of the oil-conducting system. Killed by running a dry internal combustion engine sounds like a bad dream. What to do and how to continue to live?
When is stretching necessary?
Chain tensioning is required in the following cases:
- after engine repair;
- after replacing the product;
- when stretched after prolonged use.
Timing belt VAZ 2101
In the first two cases, it is clear that checking the tension is necessary, since the chain was removed or replaced. In addition, you should also check that the alignment marks match. These marks are located on the crankshaft and camshaft. You can determine the need for tension by the sounds of the engine running. If the tension is weak, then during its operation extraneous noises are heard in the place where the chain drive is located. At the same time, timing parts wear out faster. Therefore, when checking the tension, it is necessary to pay attention to the condition of the damper and the shoe.
Timing tensioner shoe
If the tension is weak, the links can jump several teeth, then the valve timing will be disrupted. In this case, the car may stall, not start, and the speed will fluctuate. You can use a flathead screwdriver to check. It needs to be inserted and, using as a lever, pressed on the chain. It should not bend and be stretched like an arrow. Do not put too much pressure on the drive, although the part is metal, it is subject to deformation.
The video below looks at a VAZ 2101 car, in which a clattering sound is heard when the engine is running. It shows in detail how to check the condition of the damper, the shoe, and how to carry out tension.
ORDER CHIP TUNING OF YOUR CAR RIGHT NOW!
Leave an online request for the service and we will contact you to clarify details
Content:
general information
It has long been known that the quality of car parts produced at the AvtoVAZ plant is not of a high level. And timing parts are no exception. The chain has to be constantly tightened, almost every thousand kilometers. A hydraulic chain tensioner will help get rid of this problem. It is this device that we will talk about in this article. Let's look in detail at the operation scheme and replacement of the device.
Scheme of work
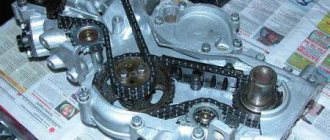
The figure below shows a diagram of the operation of the spring-hydraulic chain tensioner of the VAZ 21214 car. 1 – camshaft star; 2 – timing chain; 3 – chain damper; 4 – auxiliary device drive star; 5 – crankshaft star; 6 – tensioner “shoe”; 7 – hydraulic chain tensioner; 8 – line fitting; 9 – oil line; 10 – adapter fitting; 11 – oil pressure sensor (emergency).
Replacing the drive chain hydraulic tensioner
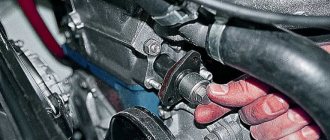
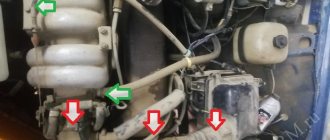
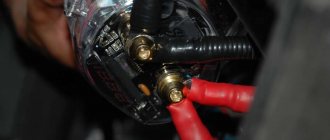
Detailed instructions with photos for replacing the hydraulic chain tensioner: The hydraulic tensioner is located under the cooling pipes in the front of the cylinder head.
Using a “10” wrench, which has five edges, we unscrew the tube fitting that supplies oil to the hydraulic tensioner. we take out the phone. Using a 10mm socket, unscrew the two nuts that press the tensioner to the cylinder block. Then remove the hydraulic tensioner. At the same time as replacing the tensioner, it is recommended to replace the sealing gasket.
Assembly is carried out in reverse order. If after all the manipulations you start the engine and still do not hear the rattle of the chain, then everything has been done correctly.
Prices for hydraulic tensioner VAZ 21214 range from 400 rubles. up to 900 rub. Depending on the region. But there is no shortage of this device on store shelves.
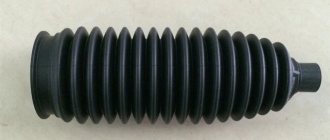
Tranquilizer
Another important element in this system is the Niva Chevrolet chain damper, which prevents the resonance effect from occurring. This system consists of the following elements:
The damper is located inside the cylinder head on the front side and is attached to it with two bolts. If it is damaged or worn out, vibrations appear, which can lead to the chain jumping and thereby damaging the motor.
Replacement
To replace, you will need a ten-size socket wrench and a screwdriver. When the tool is ready, we go through the following steps:
It is necessary to purchase a new element exactly the same as the one that was installed previously, since models that were produced earlier may have a damper of a different shape.
Summarizing everything written above, we can conclude that to carry out this work you do not need to have special knowledge or have a special tool, therefore, if necessary, following all the above instructions, you can do all the work yourself.
Types and design of tensioner shoes
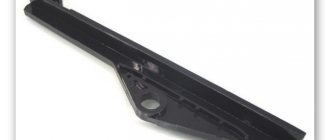
On VAZ-2101, 2103, 21213/21214 engines of all modifications, sliding tensioner shoes are used - the chain slides along their surface, which has an anti-friction coating. Today you can find two types of shoes, differing in materials of manufacture:
- Old-style shoes - metal with anti-friction coating; — The new type of shoes are solid plastic.
The old style tensioner shoes have an extremely simple design. The basis of the part is a bent steel plate, at one end of which there is a loop for mounting on the engine. On the outer (convex) side, a layer of plastic is applied to the plate, with which the shoe slides along the chain. On the inside, closer to the end of the shoe, a bracket is attached with the help of two rivets - a stop for the tensioner.
The new style shoe is a one-piece plastic part that has an arched shape with a molded bracket for the tensioner stop and a loop for mounting on the engine. To increase strength and reliability, stiffening ribs are made in the body of the shoe.
According to their applicability, tensioner shoes are divided into several groups:
— Shoe type 2101-1006090 — used on VAZ 1200 and 1300 engines. A distinctive detail of this shoe is a semicircular recess in the upper part of the bracket (pusher stop); — Shoe type 2103-1006090 — used on VAZ 1500 and 1600 engines. A distinctive detail of this type of shoe is a semicircular recess in the lower part of the bracket (from the hinge side); — Shoe type 21213-1006090 — used on the VAZ-21213 (1700) engine. It has no marks and is larger in size; — Shoe type 21214-1006090 is a modern plastic shoe used on VAZ-21214 and some other 1700 engines.
There was also a universal tensioner shoe available in the 1970s, but it is impossible to find today.
The tensioner shoe is installed under the timing cover; it is mounted on the engine using one complexly shaped bolt, which also acts as an axle. Such a bolt ensures reliable installation of the shoe, but at the same time prevents excessive tightening and jamming of the part during operation.