Rockring
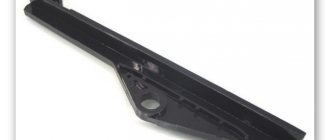
Rockring is an element of power protection for the front sprocket of a bicycle from mechanical impacts against the side, the ground and other obstacles. The design of the rockring is extremely simple; it is a circle of standard dimensions, the diameter of which is slightly larger than the diameter of the largest bicycle star. The rockring is mounted on a standard mount and, in fact, replaces the largest sprocket of the vehicle chassis. The rockring can be used simultaneously with the front derailleur. For the manufacture of this protective element, metal and impact-resistant plastic are used.
Roller damper
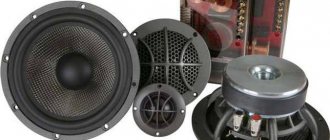
The roller guide is an element that simply maintains the chain in the correct position, preventing it from jumping off the sprocket even during aggressive driving. To protect the chain of high-speed bicycles, it is rational to use large-diameter rollers that protect the two front sprockets from mechanical damage.
Another type of protective device is a frame design. In this case, a special frame is responsible for holding the chain in the correct position. According to experienced cyclists, this design is characterized by high reliability and performance.
Timing chain: how it works and how to change the chain
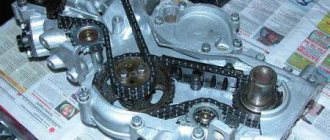
Since ancient times in Rus', the presence of a chain in the timing drive was considered a good omen. The answer to this is simple: there is an opinion that a chain is something eternal and does not require maintenance. But as you might have guessed, this opinion is false: the chain stretches and wears out remarkably well, which means it needs periodic replacement. In this article we will briefly talk about the design of the gas distribution mechanism and its typical breakdowns, and then we will go to the repair area and replace the chain on an experimental Mitsubishi Pajero with a 4M41 diesel engine. By the way, our car is undergoing a major overhaul - in the last article we already talked about how we put the cylinder head in order after 500,000 kilometers. Next in line is the gas distribution mechanism drive.
There are no more or less critical elements in the engine, but there is still a mechanism, the incorrect assembly of which can only be discovered after installation is completed and an attempt is made to start the engine. Yes, just an attempt - and often unsuccessful. “Jump” the master by one tooth or make a mistake in at least one mark - and hello, disassembly! It’s good if the timing belt drive is a belt drive - and if it’s a chain that is enclosed in a housing and covered with a lid... But first things first.
Why is a timing drive needed?
For those who came here to educate themselves, we will traditionally give a brief excursion into the structure and purpose of the gas distribution mechanism. In short, its role is to provide communication between the opening/closing of valves and the movement of the piston (and with it the crankshaft), for which it is necessary to connect the crankshaft to the camshaft. In terms of the gear ratio, the connection is rigid: it is always 2 to 1 - that is, for every two revolutions of the crankshaft there is one revolution of the camshaft.
In general, the timing drive ensures compliance with the valve timing. Does it sound scary? In reality, everything is not so scary, it’s enough to start with the basics. The engines we are considering are four-stroke, that is, during their operation four strokes are constantly performed: start - compression - power stroke - exhaust. Phases are the valve opening moments expressed in the angle of rotation of the crankshaft. Yes, that’s what they write: the opening angle of the intake valve is 12 degrees before TDC (top dead center, where the piston stops before going down). This means that the valve will begin to open thanks to the camshaft cam when the piston slightly reaches TDC. A little - these are the same 12 degrees of crankshaft rotation. Another 12 degrees clockwise and the piston is at TDC. Well, the phases are a schedule for the opening of valves.
If the engine is equipped with phase shifters (for example, the VANOS system from BMW), then the angles of these phases can change. But valve opening angles do not exist in isolation from the system: the fuel injection system and ignition system (if the engine is gasoline) operate depending on them. It turns out that if the master made a mistake when installing the timing drive, the valve will begin to open not at 12 degrees, but, for example, at 14, but the injection and ignition will work in the hope that everything is correct. Valves that are opened and closed at the wrong time will result in unstable engine operation, and if the “jump” turns out to be significant, then the meeting of the valve with the piston will not be far away.
What types of drives are there?
There are several ways to connect the crankshaft to the camshaft: belt, chain, gear and combined (this is exactly our case). In general, from their descriptions everything is already clear - at least with the first three. In the latter case, gear and chain types are often combined.
Each type of drive has its own advantages and disadvantages. The belt is easy to maintain and relatively inexpensive, the chain is more reliable than the belt, but requires lubrication, the gears are almost perfect, but their weight and installation during assembly are a living hell. They combine different types if it is necessary to achieve the required result for less money.
What can go wrong?
Of course, for different types of timing drives, possible malfunctions and breakdowns also differ. Let's look at them all in order - and start with the belt. The very first and main problem here is the wear of the belt itself, expressed in its fraying and stretching. Belt teeth can also be sheared. Well, the second “weak link”, of course, is the tensioner and intermediate rollers. They, like the belt, wear out and therefore often require replacement along with the belt. At the same time, when replacing the belt, the wear of the teeth on the toothed pulleys of the camshaft drive is also checked.
If the timing belt is driven by a chain, then there are two main types of problems: either the chain is stretched, or the teeth of the sprockets are worn out, or both occur. The most common option is the first. If the chain is replaced, the tensioner shoe and damper are replaced along with it. These two parts are necessary to align the operation of the chain. After all, the belt is elastic in itself and stretches due to its own elasticity. The chain is devoid of such properties - and therefore, so that during operation and changes in speed the chain links do not bite, a damper is installed, which is a metal plate with a plastic working part, against which (of course, not without lubrication) the chain “rubs”. Well, for constant tension of the chain, a tensioner and a shoe are installed, similar to a damper, but fixed only on one side (to be able to move it).
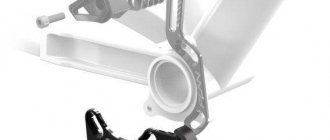
Standard rockring device
Speaking about dampers, we should also definitely mention another type of protective accessory - a cassette type, which was invented and successfully used in practice by artisans. The design elements of the cassette-type device do not contact the sprocket; it is installed on the chainstay of the bicycle frame. The home-made cassette accessory does an excellent job of holding the bicycle chain on obstacles, but makes it very difficult to change gears.
How to detect a fault
You can detect a weakened tensioner on a Chevrolet Niva by checking the chain pulls away from the sprocket. But such a check requires removing the protective casing from the car, which is extremely irrational in cases of uncertainty about the proper operation of the tensioner. Therefore, it is recommended to carry out a mandatory check of the chain for tension after 60-100 thousand km. But, if the driver notices a rustling sound in the hood area, which resembles the sound of a diesel engine, then it is important to pay attention to this before the trip. This evidence of a rustling sound indicates that the chain has become loose and is hitting the teeth of the sprockets. Therefore, having discovered such a characteristic sound, it is worth urgently checking the tension.
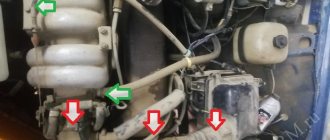
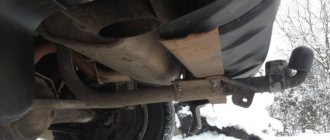
Where is the device located in the Chevrolet Niva and what does it look like?
The device is located on the passenger side under the hood of the car. Having opened the hood, you need to find the cooling pipes in the area of the front of the cylinder head, under them the hydraulic tensioner itself is located. A photo of the device that is installed on the Chevrolet Niva is located below.
Location of the part in the car
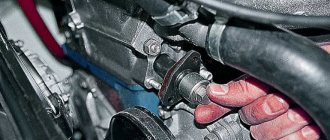
Components and principle of operation of the hydraulic tensioner
As you can see in the photo, the device has a cylindrical shape; it is screwed on the outside with a lid with a small hole through which oil flows. Inside the device there is a small ball and a spring, which ensures free flow of oil in one direction and does not release it in the opposite direction. Inside the device body there is a cylinder with rings. On the inside of the housing walls there are spiral notches that have an inclined shape. When the chain is loosened, the piston, under pressure in the housing, moves to a certain notch on the housing wall. When the tension occurs, the body notches do not allow the piston to take its original position. It is carried out by engaging the piston rings with one-sided notches. This is how the tension device works.
Types of fastening of factory dampers
At the moment, there are three standards for attaching a protective accessory:
- ISCG – mounting the device on a bicycle frame by fixing it with bolts at three points around the circumference. In this case, the standard distance between the mounting points is 47.77 mm.
- ISCG 05 is the most popular device mounting method, supported by many well-known brands of bicycles and bicycle accessories. With a total circle diameter of 73 mm, the distance between the fasteners is 55.92 mm.
- BB is a type of mounting on a carriage that presses the damper to the bicycle frame.
Self-production
In addition to purchasing, many consider making a bicycle chain guide themselves. Indeed, there is nothing complicated about it. There are visual diagrams for rockrings and mounts, but for pen mounts there are do-it-yourself options that are even more reliable than those sold in stores.
What is usually made:
- partial rockring with BB mount, full rockring without damper - metal work;
- full ISCG mount with frames - you can do it yourself without metalworking;
- separate partially mounted rollers for front or rear sprocket;
- Protective frames for the chain - conditionally, are not dampers, but effectively perform their function.
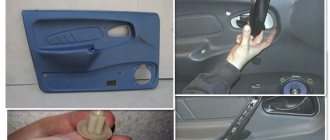
Installing a bicycle chain guide with your own hands
The principle of installing dampers of various types is almost identical. To install the protective accessory, you will need the following tools:
- connecting rod squeezer;
- set of hexagons;
- carriage remover;
- thread locker;
- a key for unscrewing the system's bonnets;
- lubricant
The algorithm of actions aimed at self-installation of the damper should be as follows:
- Remove the connecting rods and sprocket from the system. If necessary, you can unscrew the carriage in order to fix the star and guide in the correct position.
- Screw the “banana” to the “ears” of the carriage cup.
- Install the connecting rods in the standard position, pulling the chain onto the sprocket so that both rollers are in close contact with the washers. Please note: the fastening elements of the rollers must be tightened simultaneously on both sides (outer and inner).
- Leaving a minimum gap between the internal damper plate and the star, you need to tighten the three adjusting bolts.
After performing these simple manipulations, you need to make sure once again that all elements of the system are securely fixed. Next, you need to adjust the chain tension, alternately switching to the smallest and largest sprockets. The length of the chain can be adjusted as needed by lengthening or shortening it. Installation work has been completed.
( 68 votes, average: 4.88 out of 5)
Bicycle rack
Cycling computers
Related Posts
Removing links
We have often mentioned the need to remove extra links as a common problem for cyclists. If in the case of a regular bicycle a collapsible chain is used with a lock installed on one of the links, then the vast majority of modern models require the use of non-dismountable mechanisms in which all the links are well connected to each other.
The most difficulties arise with solid chains, especially for inexperienced users. But if you have certain knowledge, even in this case you can remove the required number of links without much difficulty. The secret is hidden in turning the pin head on one of the links using sandpaper.
You can choose an easier method, but it will require the use of a squeezer - a special tool that allows you to separate the rivets on a permanent bicycle chain mechanism. Using a squeeze, you can return the mechanism to working condition.
So we have mastered an important procedure that every cyclist faces. Now you don’t have to contact a stranger every time to replace and adjust the chain on your bicycle.