Payment for goods and downloading of the book in electronic form (PDF format) is made on the website.
To do this, you need to find the book you are interested in and click on the “Buy” button. The price of the book is indicated on the button.
For convenience, the price on the website for residents of Russia, Belarus and Kazakhstan is presented in rubles.
For residents of Ukraine in hryvnias, and for all other countries - dollars.
After clicking on the “BUY” button, a payment window will open where you can select a payment system with which you can pay for the selected book using any bank card (Visa, MasterCard, MIR, etc.)
When you click on the “Pay by bank card” button, the Portmone payment system will open, which is the easiest way to make a payment.
In addition, the website offers four payment systems for payment:
- Yandex (payment from any bank cards, Yandex Money account, QIWI Wallet, terminals, etc.);
- Portmone (payment from any bank cards, Portmone account);
- PayPal (payment from any bank cards, PayPal account);
- WebMoney (payment from any bank cards, payment from WebMoney wallets).
Payment via Yandex Cashier
After selecting payment via Yandex, the Yandex Cashier payment system will launch, where you need to select a convenient payment method (bank card, QIWI, Yandex Money account, etc.)
After specifying payment details and confirming payment, payment for the goods will occur.
If you have a bank card in a currency other than the ruble, then the money will be debited from the card at the rate of the Central Bank of Russia at the time of the purchase.
This payment method is optimal for residents of Russia, Kazakhstan and Belarus.
Official website of the Yandex Kassa payment system https://kassa.yandex.ru
Payment via Portmone
After selecting payment through Portmone, the payment system will launch, where you need to select the payment method: bank card or Portmone account.
The price in the Portmone payment system is converted into dollars at the exchange rate of the Central Bank of the country where you are located.
If you have a bank card in a currency other than the dollar, then the money will be debited from the card at the rate of the Central Bank of your country at the time of the purchase.
After specifying payment details and confirming payment, payment for the goods will occur.
Official website of the Portmone payment system https://www.portmone.com
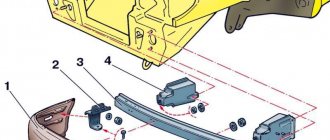
Sheathing installation
You need to assemble the cladding along with the other parts in the same sequence as it was disassembled. After the fragment has completely dried, you must:
- Insert the column into the hole and mount it into the iron frame of the door.
- Connect the electronics.
- Secure the lining with clips to the card.
- Secure the handle with two bolts.
- Replace the plug.
If, before dismantling work begins, contamination is found inside the structure, it is cleaned out. At the same time, it’s worth checking the condition of the wires and tightening the window lift nuts to prevent the door from being disassembled in the near future.
Payment via PayPal
After selecting payment via PayPal, the PayPal payment system will launch, where you need to select the payment method: bank card or PayPal account.
If you already have a PayPal account, then you need to log into it and make a payment.
If you do not have a PayPal account and you want to pay using a bank card via PayPal, you need to click on the “Create an Account” button - shown with an arrow in the picture.
PayPal will then prompt you to select your country and provide your credit card information.
After specifying the information required to make the payment, you must click on the “Pay Now” button.
Official website of the PayPal payment system https://www.paypal.com
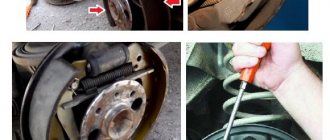
Glass replacement
It is better to buy glass and a glass holder as a set for replacement.
To replace, you need an extension, a wrench, an 8 and 10 mm socket and an assistant.
The side glass is blocked with a screwdriver to prevent it from falling out. The door trim is removed. A felt-tip pen marks the places where the glass frame is attached to the door on the frame and on the door. The bolts securing the glass frame to the window regulator are turned out.
The window regulator bar must be fully raised. The cable on the roller from the bottom of the glass is dismantled. Then the seals (velvet covers) are carefully removed.
Hold the glass during this time so that it does not fall out. After removing the seals, the glass is lowered down about 10 cm, tilted to the side and removed from the groove.
Replacing the door glass of a VAZ 2114
The new glass is installed in the reverse order. Apply WD-40 or a similar lubricant to the glass frame, insert the glass and leave to dry. After the grease has dried, the glass is installed in the door. New glass is installed in the seals.
If the seals have become unusable, new ones are cut out of rubber, while the old ones are used as patterns.
The glass with seals is inserted into the groove, aligned and lowered into the stopper. The window lifter handle is lowered to its lowest position. The glass is fixed with bolts and the cable is installed in its original place.
The operation of the window regulator is checked and, if necessary, the cable tension and the position of the seals are changed.
Payment via WebMoney
After selecting payment via WebMoney, the payment system will launch, where you need to select the payment method: bank card or WebMoney wallet.
If you already have a WebMoney wallet, then you need to log into it and make a payment.
If you do not have a WebMoney wallet and you want to pay in another way, you need to select any of the methods that WebMoney offers and make the payment
After specifying payment details and confirming payment, payment for the goods will occur.
Official website of the WebMoney payment system https://www.webmoney.ru/
Downloading a book
After successfully completing the payment (by any method) and returning to the KrutilVertel store from the payment system website, you will be taken to the successful payment page:
On this page you need to indicate your e-mail, where access to download the book will be sent.
If you are already registered on our website, then simply follow the link to your personal account.
The book you purchased will be in your personal account, from where you can always download it.
Please note that after making the payment, you need to return back from the payment system website to the KrutilVertel website.
If for some reason you did not return back to the site and closed the payment system tab with a message about the successful completion of the payment, please let us know - we will send you a letter indicating access to download the book.
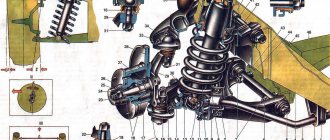
Replacing the window regulator
To replace the window regulator, you need an extension, a wrench and a 10 mm socket.
Having freed the front door from the trim, remove the 2 bolts securing the glass to the bar. Usually they are tightened tightly, so it is more convenient to use the head as a lever.
Remove three nuts securing the electric motor, one nut under the glass, two in the center and one nut at the bottom of the door.
After removing all the nuts, disconnect the power plug from the electric motor.
Replacing the window regulator
The window regulator is removed from the studs and taken out of the cavity into the technological hole in the center of the door. Installing the window regulator occurs in the reverse order.
After removing the structure, the electric motor is first checked. If it is faulty, it is replaced. If the cause of the breakdown is not obvious, replace the window regulator.
Problems when paying with bank cards
Sometimes difficulties may arise when paying with Visa/MasterCard bank cards. The most common of them:
- There is a restriction on the card for paying for online purchases
- A plastic card is not intended for making payments online.
- The plastic card is not activated for making payments online.
- There are not enough funds on the plastic card.
In order to solve these problems, you need to call or write to the technical support of the bank where you are served. Bank specialists will help you resolve them and make payments.
That's basically it. The entire process of paying for a book in PDF format on car repair on our website takes 1-2 minutes.
If you still have any questions, you can ask them using the feedback form, or write us an email at [email protected]
How to disassemble the door of a VAZ 2114 and remove the trim? Do-it-yourself front and back – EASY
Since VAZ cars are very popular in our country, I often receive questions from motorists regarding maintenance. Especially from owners of 2114, 2115 and sometimes 2113! For some reason, young people choose these particular options. And often very often, owners are interested in the following question - how to disassemble a door or remove the trim? For example, install acoustics, repair a window regulator, or simply glue it to improve sound insulation. Since I also had a VAZ 2114, and also disassembled the front and rear doors, today I want to “throw out” a small instruction that will help you in this matter...
I will try to answer all the questions at once, that is, removing both the front and rear door trims. In fact, there is nothing complicated here, the main thing is to strictly follow all the instructions.
About the tool
What we need are screwdrivers, preferably one Phillips and the other straight. Also buy “pistons” for trim, they are universal and suitable for the entire VAZ family. Many people also call them “Christmas trees.”
They cost pennies, but they break when disassembled. Therefore, it is advisable to have them, otherwise the door will rattle. We won't need anything more.
I suggest starting from the front.
Disassembling the front door
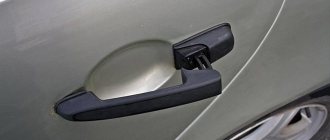
1) First, we need to remove the main handle with which the door closes. We press out the decorative trim with a screwdriver, but be careful not to damage it. Next, unscrew the bolts, there are two of them, and remove the handle.
2) Then we remove the decorative trim of the unlocking handle, you know that kind of black plastic, we also pick it up with a screwdriver and pull it out, there are two latches there, be careful.
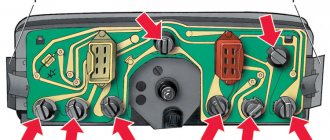
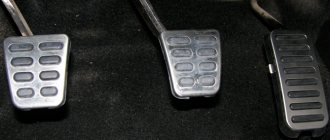
3) Then you need to remove the lower shelf, in which the window lift buttons are installed, there are two or three bolts there. The shelf comes out together with the power window cable, disconnect them and remove them.
4) Next, as a rule, comes the speaker, it is fastened with 2 - 4 bolts, to be honest, I have seen only one. We unscrew, there are cross-shaped bolts from the factory. Let's remove it.
5) In the upper part, unscrew the locking “latch”; it simply unscrews like a bolt.
6) Everything is removed, now we need to detach the upholstery itself, this is a little more complicated. You can pull the corners, or you can pick it up with a screwdriver and pull it towards you - the main thing is not to break it, we carefully try to separate it. If some rivets are broken (and this will be 100%), don’t worry, we bought new ones
At this point the “analysis” is completed, as you can see, there is nothing complicated and it is also considered that the front part is complex. Let's watch the video.
Everything is much easier at the back.
Removing the rear trim
There is no point in repeating the main points; they are almost identical.
The handle is also disassembled and the plug and the upper locking “latch” are removed. But there are no shelves or speakers here.
There is also no power window, that is, there is no wiring that needs to be disconnected. But here there is a regular window handle, as people call it – “oars” or a “muscle power” drive. In order to disassemble it, you need to bend it slightly towards yourself with a screwdriver - pull out the lower locking ring. After which the handle will simply come off on its own.
We repeat the same procedure with the upholstery as on the front door, just gently pull. Remember about rivets.
Now a short video.
What else I would like to note is that if you read the instructions, it recommends completely changing the rivets every time you remove the upholstery - they simply lose their characteristics, the antennae fall off, if my memory serves me correctly, there are 8 of them on each upholstery. This threatens to cause rattling on bumps and uneven roads.
A little advice from me
Guys, if they were just disassembling it about repairing a window regulator or installing speakers. My advice to you is that you can improve the design a little, namely, reduce its airflow. I advise you to read this article.
If you are not ready for such insulation, then you should apply ordinary thick cellophane to the metal, 0.3 mm is enough. We directly cut out the door according to the stencil and glue it to the metal (you can use double tape), after making holes for the handles and bolts. I have seen this on many foreign cars, they have it as a must!
What does this give us:
1) The door will not blow out as quickly during the cold period, which will give us a little more heat. The interior will warm up faster.
2) There will still be fewer crickets, because this layer will not allow plastic and metal to interact directly.
Personally tested on my former VAZ 2114, the interior is really warmer in winter.
I’ll finish here, I think it was useful for you, read our AUTOBLOG.
(
3 votes, average: 4.33 out of 5)