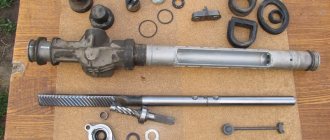
The rack is one of the key parts in the steering mechanism, and it is assigned the task of transmitting turning force to the wheels through the hinges and rods when the steering wheel moves to the side. In modern cars, to facilitate the process of turning the steering wheel, the mechanism is equipped with hydraulic boosters, but this does not make the rack play a lesser role. For various reasons, the steering rack may fail or become loose, which will lead to difficulties when driving, as well as the appearance of extraneous sounds when turning the steering wheel.
2Tighten the steering rack
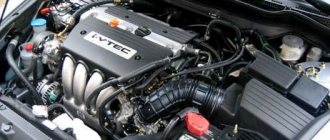
Most often, hydraulic type racks are installed in modern cars, because this type of part accurately and quickly transmits steering rotation, even if the speed is quite high.
The steering rack does not deteriorate quickly, but constant driving on uneven roads with holes and potholes is a direct path to failure of the part in question. In addition to everything else, speed bumps, which often get stuck on uneven roads, also cause the breakdown of such a part. Don’t forget about dust, which negatively affects the operation of the steering rack.
You don’t need to immediately think that a knock in the steering rack will cause the need to replace it; tightening it can also help with this problem. Despite the fact that this method of repair is not always the most effective, but often tightening the steering rack becomes the solution to such a problem.
Regulatory processes are not something complicated in this case, so anyone who has ever sat behind the wheel and at least has a rough idea of where and what the car is can handle this task without any problems.
In order to tighten the steering rack, you will need:
- partner
- key
- car pit
- gap measuring device
The sequence of actions is as follows:
- The car must be on the handbrake so that under no circumstances does it roll anywhere
- The wheels of the vehicle must be in a straight line
- You will need to use a backlash meter to determine the gap.
- We take an adjusting screw (you can find it by studying the car passport, because this screw can be located in different places in each vehicle).
- The tightening process should be carried out in a moderate mode; there is no need to rush anywhere. After each revolution, it is imperative to check the movement of the steering wheel and its travel.
- If you think you have tightened the steering rack properly, you need to check this by road testing.
- It so happened that the drive wheels “go” with tension - then the rack will definitely need to be loosened a little.
- You need to understand that tightening a part such as a steering rack does not always completely eliminate a knock in the steering wheel, but often the situation can still be saved. No one is saying that the problem will disappear forever, but temporarily you can get rid of knocking and such unnecessary play.
The driver of the vehicle should keep in mind that some time after tightening the steering rack, it will still become “loose” and may even fail completely, so contacting a service station is mandatory, and the sooner the better.
Let's look at another detailed instruction for tightening the steering rack in a car:
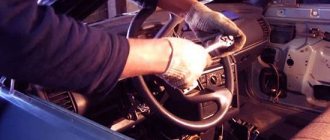
- We lift the car onto the overpass (you can just put it on the pit). You need to understand that this process is carried out from under the car.
- We find the adjusting nut, the main purpose of which is to tighten the steering rack. If you don’t know where exactly it is located, read the instructions (the passport for your car).
- If your car does not have such a nut (and in some models this may be the case), then you will not be able to deal with the problem yourself. The only way out in such a situation is to seek help from professionals at the service station.
- When you find such a nut on the bottom of the car, it's time to pick up a wrench to tighten it.
- Do not forget that in some cases the nuts are equipped with protective caps, which will need to be removed before tightening the nut.
Now that the key has been selected, we proceed to directly tightening the nut. In this case, you can’t overdo it either, because the steering wheel will simply stop turning.
Recommendations
After completing the adjustments, the rack should also be checked while running. It is important to pay attention to the fact that after turning the steering wheel, the steering wheel itself must return to the zero position (steering wheel straight) without driver assistance. If you have to turn the steering wheel by hand (the steering wheel does not return to zero), this indicates obvious problems with the rack (too tight the adjusting nut, wedging, etc.).
You can accurately check this nuance on a straight section of road with a good road surface without defects. Please note that when checking you need to be careful and careful! If there is no suitable site or you are not confident in your abilities, it is better to refuse these tests.
To check the steering return, just go through a turn and, at the exit of it, press the gas, briefly removing your hands from the steering wheel. If the steering wheel does not tend to return to the zero position and needs to be turned independently, then the nut on the rack may be overtightened and needs to be loosened.
Tightening the rack with removal
How to Rebuild the Steering Rack on Kalina
Immediately equip yourself with a steering rack specialized for the “ten”, and also get ready to remove the rods. From the tools, grab:
- Pliers;
- Mounting blade;
- Socket wrench 19;
- Hammer;
- Flat screwdriver;
- Set of heads - from 10 to 27.
Get started:
- Unscrew the nuts inside the passenger compartment and remove the fastening bolts of the lower universal joint to the steering rack gear shaft. To do this, you will need a 13mm socket. The bolt can turn, so hold it with an open-end wrench.
- In the engine compartment itself, remove the nut of the upper fastening of the rack boot.
- At the bottom of the car, remove two more nuts that secure the rack boot.
- Remove the boot.
- Raise the front of the car and remove the front wheels.
If you are going to remove the steering, but not dismantle the rods, follow these instructions:
- Remove the locking plate from the rod mount by prying it off with a screwdriver. Then unscrew the two bolts that secure the rods and rack;
- Using a 13mm socket, remove the nuts from the steering gear brackets connecting to the front panel;
- Move the rack forward a little to remove the gear shaft from the shield hole;
- Remove the rack together with the rods.
If you want to remove the steering rods, unscrew the rod end from the swing arm of the shock absorber struts. To do this you will have to do the following:
- Remove the cotter pin using pliers;
- Using a 19mm spanner, unscrew the ball pin fastening nut, but not all the way;
- Use a 17 socket to loosen the tension bolt of the rod end;
- Now press out the ball pin. To do this, insert a mounting blade between the swing arm and the tip. Press the tip away from the lever, and apply several blows with a hammer to the end of the rotary lever;
- Unscrew the ball stud nut completely;
- Remove the ball pin from the lever hole;
- Use a screwdriver to open the groove of the tie rod end;
- Remove the tip, holding the threaded adjusting sleeve with a 27mm wrench. Count the number of turns so that during reassembly you can tighten it by the same number of turns;
- On the tie rod, try to maintain the position of the threaded bushing. This way the toe angle of the wheels will remain as correct as possible.
Car steering structure
Despite the wide variety of control mechanisms, the operating principle of each of them contains similar fundamentals:
- culm wheel;
- rotation shaft – connection between the car interior and the engine compartment;
- rack body;
- a gear mechanism and an axial shaft for horizontal movement of the machine's tie rod ends;
- anthers, bushings, bearings, clamps;
- hydraulic lubrication supply pipes or the presence of an electric drive motor for power steering.
The above design is of a template nature and is suitable for most domestic and foreign automobile brands. In some situations there will be minor additions of new equipment. And this is obvious, because every manufacturer tries to make their brand perfect and uses new technologies to increase their service life.
Adjusting the steering wheel play on a VAZ 2101-VAZ 2107
How to Remove Steering Rack Ford Focus 2
Welcome! Steering wheel play is a fairly common problem in almost all cars, especially cars of the “Classic” family. Backlash can occur for various reasons, ranging from a banal collision with a bump and ending with a malfunction in the steering system itself, so in order to remove the backlash you will have to make an effort that you will appreciate in the future.
Note! To adjust the backlash you will need to stock up on: A screwdriver and also a wrench set to “17”!
- Adjusting the free play of the steering wheel
- Additional video clip
What can cause backlash? In fact, it occurs for various reasons, some of which were described above. But if play occurs, this may be to blame: A loose or heavily worn fastening of the steering mechanism, as well as the pendulum arm and the steering rods themselves.
Note! Before sinning on all these items of the steering mechanism, it is first recommended to check and, if possible, correct the increased gap that can be found in the engagement of the roller with the worm of the steering mechanism - we will do this adjustment!
How to adjust play, also known as free play at the steering wheel on a VAZ 2101-VAZ 2107?
Note! It is better to do the work with an assistant, as it is much easier and more convenient!
1) First, remove the protective cap that covers the column adjustment screw.
2) Then loosen the adjusting screw nut (Indicated by the red arrow) using a 17mm wrench. The nut must be loosened until the washer located under this nut can be lifted (Indicated by a blue arrow).
Next, when the nut is loosened, ask your assistant to sit behind the wheel of your car and sharply turn the steering wheel in different directions several times, while using a screwdriver, screw in the adjusting screw, which is indicated by the green arrow.
Note! Do this until the play at the steering wheel is within normal limits. Also, do not over-tighten the adjusting screw, otherwise the steering wheel may become very difficult to turn!
3) Next, completely tighten the adjusting screw nut, which is indicated by the red arrow, and while screwing, use a screwdriver to hold the screw itself from turning it.
Note! After the completed operations, check the free play of the steering wheel; if the steering wheel is difficult to turn, then slightly loosen the adjusting screw by loosening the nut. If, after completing the work, the steering play remains the same or has moved but not significantly, and if turning the steering wheel is accompanied by squeaking and clicking, then have it repaired at a car repair shop or replace the steering mechanism with a new one!
The steering mechanism is a very delicate thing and therefore it is not recommended to repair it yourself, because if assembled incorrectly, the mechanism can jam on the road and therefore the car will stop responding to steering movements!
If you don’t know how to check the steering wheel play, then read the article entitled: “Checking the free play of the steering wheel on a VAZ”!
Additional video clip: You can watch more detailed adjustment of the steering wheel free play in the video clip located just below:
Vaz-Russia.ru
Vehicle control system tightening mechanism
In which direction to tighten the steering rack is a question that interests most motorists - owners of domestic vehicles.
It is important to know: various types of work should begin after a full and comprehensive diagnostic inspection of the vehicle has been carried out, the source of the breakdown has been identified, and the number of spare parts and consumables has been correctly calculated.
To tighten the control mechanism at home you will not need much:
- set of automotive tools, wrench size “17”;
- portable lighting fixture to increase lighting in the garage;
- in some cases, a movable jack or inspection hole;
- rags or gloves.
Adjusting the steering rack without removing it
Lada Priora hatchback Logbook Steering rack repair
If you cannot decide how to tighten the steering rack on a VAZ 2110, we recommend that you familiarize yourself with the second option - without removing it.
For this method, arm yourself with a special wrench, which is made in the form of an octagon, 17 mm in size.
The steering wheel should be tightened to “tens” only in cases where knocking noises are observed during operation of the steering mechanism. It’s not worth it to just do work without a real need.
- Drive into the inspection hole or lift the car on a lift.
- Remove the engine guard, take a flathead screwdriver and hold a good light under the car.
- Locate the rear subframe at the rear of the steering rack. There the rack and shaft should intersect. The adjusting nut is located in that place. Do not confuse it with the adjusting nut plug. This is a common mistake made by beginners.
- If the steering gear was previously untouched, there will be a green plug on the nut. It functions as a stopper and is installed directly at the factory.
- Use a flathead screwdriver to remove the plug. It will probably break, but there's nothing wrong with that.
- After removing the stopper, pick up a specialized adjusting key and tighten it, moving clockwise. Do not press too hard. The degree of clamping directly depends on the strength of the knocks when moving.
- Turn the key 10 degrees, check the rack for play. If it is present, press more. It is not recommended to rotate more than 15 degrees at a time.
- Checking the degree of clamping is quite easy. Take the rack and turn it sharply in one direction or the other. If no extraneous noise is observed, the rail is tightened well.
- There is no point in trying to replace the stopper, even if you managed to keep it intact. It does not carry any benefit.
Video
We figured out how to adjust the steering rack on a VAZ 2110 with and without removal. Which option is more attractive to you - decide for yourself. By removing the rail, you can additionally perform some other work, check the condition of the units, components, replace something, tighten it.
Obviously, it is more than possible to carry out the adjustment yourself. The only caveat is the search for a specialized adjustment key specifically for the VAZ 2110 car. Without it, you cannot do anything; there are no analogues among the available tools. It is not expensive, so there is no need to worry. But also to squeeze.
Recommendations
Restoring the functionality of the mechanism is possible in a garage. To properly tighten a gear pair, follow several rules:
- Wear personal protective equipment. When working under the machine, you should use goggles, gloves, etc. This will prevent foreign objects from getting into your eyes and causing injury.
- Before work, check the integrity of the protective boots. If there are cracks or mechanical damage, replace the rubber seals.
- The mechanism is checked on a level area with high quality coating. Testing on a busy public road is prohibited.
- To eliminate play, check the integrity of the rods. If necessary, replace them with new ones.
You can tighten the rail yourself. There is no need to use specialized equipment. To avoid injury, use personal protective equipment. After adjustment, the performance is checked on a straight section of road.
Have you tried tightening the rack on your car? What tool did you use? Leave comments below the article. Add text to bookmarks and share it on social networks.
Video tips from the authors of the videos will complement our article and help you understand the issue.
How to tighten the steering rack - do not fall for service scams:
How to properly tighten the steering rack without ruining it:
Signs of a faulty steering rack
If there are problems with the steering rack, the driver will immediately feel it by the “behavior” of the car. The following main symptoms of a faulty steering rack can be identified:
- When turning the steering wheel, a knock is heard from the rack;
- You feel play in the steering wheel;
- The wheels turn a smaller or larger angle when you turn the steering wheel than before. In general, the car becomes more difficult to control;
- There is no effort when the steering wheel is in the center position;
- There is no force at all even when turning the steering wheel, but the situation is corrected after the power steering fluid warms up above 50 degrees Celsius.
Symptoms can appear all at once or separately. In most cases, the cause of malfunction of the steering mechanism is a loose rack, not a failed one. Accordingly, tightening the steering rack will solve the problems that have arisen.
How to make adjustments
The principle of operation of the unit is based on the displacement of the bar using a gear. Steering rods are mounted at the edges of the bar. They are connected to wheel mechanisms. When the steering wheel rotates, the gear located on the shaft moves the bar with teeth in the desired direction.
To eliminate play in the rack, the elements of the gear pair are pressed tightly against each other. In this case, the steering wheel rotates freely without applying much physical effort. Surface wear leads to incorrect operation of the unit.
By tightening the adjusting element, the parts of the gear pair are pressed against each other. This makes it possible to eliminate play in the steering rack.
Overtightening the screw leads to strong clamping of the components. In this case, strong friction is formed between them. In this case, free rotation of the steering wheel will be difficult. The wear rate of components will increase. Incorrect adjustment impairs the performance of the steering rack.
Subtleties and nuances of replacing the front suspension silent block, useful tips - read about it here.
Typical malfunctions, causes
Among the typical malfunctions of this important unit are various backlashes.
In addition, the reasons include hitting curbs and too sharp acceleration with the steering wheel in extreme positions. This increases the load on the gearbox and other parts that work together with the rack. Under these conditions, even power steering systems fail. You can tell that the steering rack needs to be adjusted by the characteristic knocking noises coming from under the car.
Step-by-step instruction.
The main task of adjusting the RR is to get rid of knocking, play and make the car easier to drive. For this procedure, you will need the help of a friend, since it will be difficult to do it alone.
- We bring the car onto a pit or overpass; in extreme cases, jacks are also suitable. In the latter case, the front wheels must be placed straight, and do not forget to secure the jacks when lifting the car.
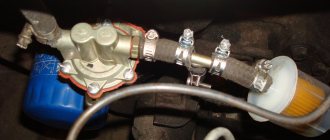
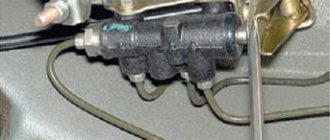
- To adjust, tighten the adjusting screw, which is located in the steering system, namely in the end cover.
- The screw should be tightened very slowly. When adjusting the screw, we check for play, steering wheel travel and the presence of knocking. Backlash can be measured using a special device - a backlash meter. When measuring, you must adhere to GOST, according to which the backlash cannot be more than 10 degrees.
- After the procedure, you should test the machine in motion. If there is no heaviness during maneuvering, then everything is tightened well, but if there is such a problem, then the screw needs to be loosened a little.
That's all. Finally, I’ll just repeat that tightening the steering rack screw may not solve the problem; in such cases, the best solution would be to go for a consultation with a specialist.
To ensure normal steering operation, the steering rack is periodically adjusted. What is this detail? It is a power unit in the control mechanism, through which force is transmitted from the steering column directly to the wheels. That is, the steering rack controls the car by turning the front or rear wheels.
Repair and maintenance
Over the years of operation it has been proven that the steering on VAZ 2107 vehicles has impressive reliability. However, this does not take away the fact that the machine requires periodic inspection and repair.
- When performing maintenance, it is important to check for increased play as well as increased wear on the ball joints. To do this, you need to turn the steering wheel from one side to the other. If the wheels do not respond when the steering wheel is turned 5 degrees from its original position, this indicates severe wear. Here you will need to repair the steering column on a VAZ 2107.
- To avoid the need for urgent and rather expensive repairs of the steering gear on a VAZ 2107, it is necessary to change the oil in the worm gear housing. This is done at intervals of 60 thousand kilometers. Leaks may occur through the seals, so they are carefully checked 2-3 times a year. This is one of the weak points of the system.
- The swing arm should be inspected by slowly rotating the steering wheel from side to side. If the parts move in a vertical plane, then surgical intervention is required.
To do this, the drive and steering mechanism are dismantled completely or partially. Everything depends directly on the nature of the breakdown.
Check which parts have defects and what has failed. Inspection is required for each component of the mechanism. If parts are worn out, there is no point in trying to repair them. There is only one way out - a complete replacement of worn-out components of the steering system on a car from a Volga company.
If problems arise with the steering, it is advisable to contact a professional service station.
You can replace the gearbox yourself, but the process is complicated and requires at least minimal experience and skills.
The VAZ "Seven" is a true classic of the domestic automotive industry. Unlike modern LADAs, they are more reliable and durable, which is proven by the huge presence of these cars on our roads.
Of course, the VAZ 2107 has long been outdated, it does not have a hydraulic booster, and you have to apply sufficient force to turn and maneuver. But for connoisseurs this is not a problem.