Features of the gearbox device
Before we talk about the causes of vibration, you should first understand the operating principle of the gear shift lever. So, in rear-wheel drive cars it directly enters the box (since it is located parallel to the car body) and its rattling is a sure sign of problems in the transmission itself.
In turn, the VAZ 2114 gearbox handle is connected to the gearbox by a system of special rods (after all, the gearbox on this car is installed perpendicular to the body) and does not have direct contact with it. The main source of sounds and rattling in this case is a small metal bushing, which connects the gear shift lever to the rod.
Its most common defects (leading to vibration) are:
- wrong size;
- poor (with backlashes) fit of parts;
- lack of gasket.
As a result of this, during movement the bushing begins to shift and hits the wings of the rod, thus causing metallic sounds and rattling.
Gear shift mechanism
The gearshift mechanism is usually mounted in gearbox covers and is used to select, engage, and disengage gears. In addition, devices are installed in the gear shift mechanism that prevent the inclusion of two gears at the same time and prevent spontaneous gear shifting.
The main requirements for this mechanism are ease and simplicity of gearbox control, noiseless and smooth gear shifting, reliable locking of the engaged gear, prevention of simultaneous engagement of two or more gears, as well as protection from engaging a gear opposite to the vehicle's movement while moving. In addition, the activation mechanism must be reliable, durable, not requiring complex adjustments and easy to maintain. Malfunctions of the gear shift mechanism can lead to damage to parts and failure of such an expensive unit as a gearbox.
***
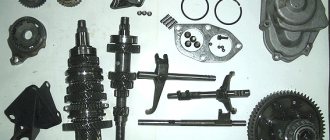
The gearbox shift mechanism of a truck (Fig. 1, a) consists of three rods, three forks, three clamps with balls, a fuse for engaging first gear and reverse gear and a locking device. Rods 8, 9, 11 are located in the holes of the internal bosses of the crankcase cover 1. Forks 5, 7, 10 are attached to them, connected to the synchronizer carriages and to the movable gear wheel for engaging first gear and reverse gear.
Clamps 4 hold the rods in the neutral or engaged position, which prevents spontaneous gear disengagement. Each retainer is a ball with a spring installed above the rods in special sockets in the crankcase cover. The rods for the clamp balls have special grooves (holes). Moving the rod with the fork, and therefore the synchronizer, is only possible when force is applied by the driver, as a result of which the ball sinks into its seat.
The locking device prevents two gears from being engaged simultaneously. It consists of a pin 12 and two pairs of balls 6 located between the rods in a special horizontal channel of the crankcase cover. When any rod moves, the other two are locked with balls that fit into the corresponding grooves on the slides.
In order to prevent accidental engagement of reverse gear or first gear when the vehicle is moving, a fuse is mounted in the wall of the gearbox cover, consisting of a bushing, a ring with a spring 3 and a stop. To engage first gear or reverse gear, it is necessary to press the fuse spring all the way, for which some force is applied to the driver control lever.
***
The gear shift mechanism of a passenger car (Fig. 1, b) is arranged as follows. Rod 14 of the third and fourth gear shift fork is installed in the holes of the front and rear walls of the crankcase, and rods 13 and 16 are installed in the holes of the rear wall and crankcase boss.
The 15, 21, 23 gear shift forks are secured with a bolt on each rod. To hold the rods in the neutral position and in one of the extreme positions when the gear is engaged, they have three sockets, to which the retainer ball 20 is pressed by a spring 19. The clamps are located in bushings and are closed with a cover 18. In the head of each rod there is a groove into which the lower end of the gear shift lever fits.
The locking device consists of three locking blocks 17. The two outer blocks are installed in the holes of the rear wall of the crankcase, and the middle block is in the hole of the rod 14. When the rod 13 or 16 moves, it squeezes out a block that fits into the socket of the middle rod and at the same time presses the other through the middle block cracker to the socket of the opposite rod. This way, these rods will be locked in the neutral position. When moving the middle rod 14, two crackers are squeezed out at once and the outer rods 13 and 16 are fixed.
***
Academic disciplines
- Engineering graphics
- MDK.01.01. "Car design"
- General structure of the car
- car engine
- Car transmission
- Steering
- Brake system
- Suspension
- Wheels
- Body
- Car electrical equipment
- Basic car theory
- Basics of technical diagnostics
- Fundamentals of hydraulics and heat engineering
- Metrology and standardization
- Agreecultural machines. Agreecultural equipment
- Basics of agronomy
- Transportation of dangerous goods
- Materials Science
- Management
- Technical mechanics
- Tips for graduate student
Olympics and tests
- "Engineering graphics"
- "Technical Mechanics"
- "Engine and its systems"
- "Car chassis"
- "Car electrical equipment"
Dismantling and repair of the VAZ 2114 gearbox handle
In order to eliminate the vibration of the bushing, you must first figure out how to remove the gearbox handle of the VAZ 2114. In order to do this, you only need a 13-size spanner.
The gearbox lever is removed in the following order:
- Place the car on the viewing platform and put the handbrake on.
- Remove the old handle casing (this should be done carefully, as it can easily be torn).
- At the base of the lever, find the fastening bolt connecting it to the rod, and unscrew the nut with a 13mm wrench.
- Remove the lever together with the mounting sleeve.
There is an alternative option for dismantling the handle, which must be done outside the machine.
It is done like this:
- Place the car in the pit and put on the handbrake.
- Using a 13mm wrench, unscrew the fastening nut where the tube enters the link (pipe-lever).
- Remove the cover from the cross (it is advisable to place a basin under the machine, as oil will leak out during this process).
- Unscrew the crosspiece fastener and remove the lever.
Once the shift knob is removed, you can begin to eliminate the vibration.
To do this you need:
- remove the outer braid of the plastic sleeve, freeing its steel body;
- wash off any remaining old grease;
- carefully inspect the surface of the bushing for signs of friction on the metal. Their detection will indicate that the bushing is made incorrectly and is oversized;
- constantly checking the size of the fit under the bushing, grind off excess metal from its surface with a file (as a rule, you need to grind off a little - just a couple of millimeters);
- put new grease on the bushing (in the same place where the old one was);
- choose a soft rubber gasket or wrap the surface with insulating tape (this is not necessary, but this will reduce possible vibrations);
- install the gear shift lever in its place and tighten the fasteners.
When screwing the nut, it is recommended to drop a few drops of a special lock onto the thread. This will help prevent it from unwinding on its own and will securely hold the bushing in place.
If the handle was dismantled using an alternative method, then reassembly is performed in the following order:
- install the lever in place and tighten the mounting bolt;
- turn the car into fourth gear (as a result of this, the bushing will automatically fall into place - inside the rocker tube);
- engage neutral gear and finally lock the handle. Also, at this point you can slightly adjust the position of the lever “to suit you” while in the cabin. It is advisable to do this together with a friend - one holds the handle in a comfortable position, the other tightens its fasteners.
In some cases (for example, if the bushing is too worn), there is no point in carrying out repair work, since soon the vibrations and metallic clanging will return, again spoiling the mood and causing discomfort. In this situation, it is best to replace this element with a new one, especially since it is not so expensive.
After completing the work on turning the bushing, you should start the car and check the effectiveness of the repair.
If everything was done correctly, you will notice that:
- The VAZ 2114 gear knob no longer rattles in neutral;
- there is no ringing or vibration at high speed;
- Gear shifting began to occur more tightly and at the same time more smoothly.
If minor vibrations and metallic sounds still remain, you can remove the handle again and grind off another small amount of metal from the sleeve.
If suddenly the rattling of the gear shift lever appears during a long trip, then you can temporarily eliminate this trouble by simply removing the handle cover and placing a small piece of rubber under the bushing.
Removing the rattling of the gearshift knob
99.9% of owners of cars of the Samara family are familiar with this problem: at rpm 1900-2500 (depending on who) the gearshift knob resonates and a VERY unpleasant rattling noise begins. The handle trembles, vibrates... It depends on you - but I am VERY not pleased. My ex-four is no exception. At the first maintenance (we are talking about the former cherry 14k), I asked both the service technicians and their chief warranty engineer: “How to get rid of handle rattling?” The guys smiled in response and said something like this: “I also have a Samara, it also rattles. You can’t do anything with it, just sell it and buy a foreign car!” Of course, such arrangements did not suit me. I went online to look for “brothers in misfortune.” I read a lot of threads on the forums. The problem is indeed very common. The first thing I read was to change the “cardan” to a Kalinovsky one. I did so and changed it. Kalinovsky is indeed, unlike the native one, of higher quality, all “knocked down”, without play. Everything is clear there.
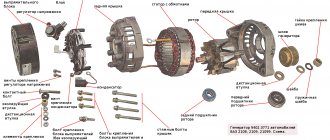
Kalinovsky cardan
It’s in the store, depending on your luck. I found it for 350 rubles. I installed it, the sensations when shifting gears changed, the movement became clearer and better. BUT! This did not prevent vibrations. It became a little smaller, but it still rattled VERY loudly.
I was upset again. I went online again to look for clues. I found a bunch of new tips - sawing down the lever, changing the linkage to a short-throw one, installing vibration-damping springs near the lever... In general, a bunch of useless nonsense.
On one of the sites I came across advice whose usefulness I doubted until I completed it.
The method is VERY SIMPLE and 200% effective. Moreover, it is done quickly and free of charge. It is for these reasons that I want to share with you.
Today I did the same thing in 10 minutes on my new white cloud. The result for me personally is predictable - the vibrations are completely gone up to 5000 rpm.
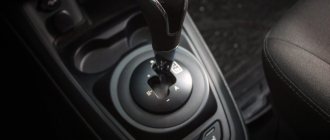
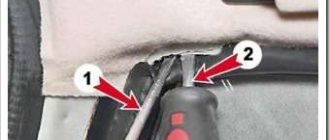
So, in order. Here is the pen, if anyone doesn’t know))
gear knob
We remove the casing upwards, carefully squeezing the casing frame towards the center and prying it up. We see this inside:
Next, use two 13mm wrenches to unscrew the nut and remove the bolt. We move the fork to the side. We get this:
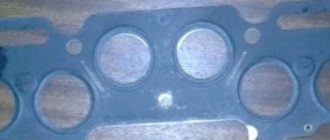
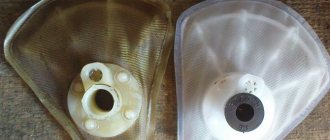
Next, remove the metal sleeve from the horizontal tube on the gearshift lever itself:
Here she is, my dear fucking bush. This is precisely the reason for the rattling of the gearshift lever.
All you need to do is shorten it by half a millimeter. 0.5mm. It is made of a relatively soft alloy, so we clamp it in a yew without fanaticism, otherwise it can be deformed and it will not fit into place. Or, alternatively, hold it with pliers.
Take a file and carefully grind one end down by half a millimeter. You need to grind perpendicularly, that is, evenly.
We grind, put everything back together as it was, tighten the nut on the bolt tighter. cover with a casing. Ready!
What we have: the rattling goes away completely. Silence.
The asking price is zero rubles.
The gears may stick in a little tight at first. there is no need to loosen the nut. In a few days, everything will get used to it and it will be fine, but rattling will not appear. Verified.
Rhetorical question: why the hell doesn’t AvtoVAZ make this bushing shorter?