How to remove and replace?
To replace the Chevrolet Niva rocker you will need:
- Set of heads ½.
- Spanners, open-end or ratchet wrenches for “10”, “13”, “17”, “19”
- Screwdriver Set
The rocker on a Niva Chevrolet SUV is removed in the following order:
- Be sure to disconnect the negative terminal of the battery under the hood.
- Set the gearshift lever to the middle position.
- In the cabin, the lining of the instrument panel console is dismantled. We unscrew all the fastening bolts of the plastic panels, remove the ashtray, the glove box with cup holders, and then lift up the entire lining of the floor tunnel.
- We remove the gearshift lever and transfer case linings using a screwdriver.
- Unscrew the front driveshaft from the drive shaft. We tie the removed part to a convenient place on the body.
- Unscrew and dismantle the intermediate shaft. To do this you will need keys for “13”, “19”.
- To make the work more convenient, use a “13” wrench to remove the two nuts securing the cross member of the rear gearbox suspension to the underbody. It will go down a little, thereby increasing the space for dismantling the required unit.
- We unscrew the nut securing the gear shift drive from the rear drive support using a socket “17” with an extension. Also, together with the nut, it is necessary to remove the expansion sleeve and 2 support washers.
- Using a ring ratchet wrench set to “13”, loosen the tension clamp of the drive rod.
- Using a “13” socket with an extension, unscrew the three fastening nuts securing the gear shift control drive bracket to the rear cover of the box.
- We take out the rocker assembly along with the lever and bracket.
- We remove the speed selection mechanism using a “10” wrench and unscrew the 3 nuts securing the housing.
- We remove the entire mechanism assembly.
Installation of the drive after repair or replacement is carried out in the reverse order.
Advice! You should not independently modify (overcook, shift, lengthen or shorten) the factory design.
And also interesting: Lada Niva Travel 2021 - photo and price, characteristics, all the disadvantages (owner reviews) of the new Lada Niva Travel
As a replacement for the unit, it is better to purchase a standard rocker, which is equipped at the factory with basic vehicle models. After installation, it is recommended to additionally treat all moving joints with modern grease Mobilgrease XHP™ 220 or conventional Litol-24.
Replacing the drive boot on Niva
The method described below allows you not only to replace the anthers on the hinges, but also to apply lubricant if it is not enough.
- wrenches 17.13;
- large pliers;
- a pair of flat-head screwdrivers - one larger, the second smaller;
- hammer;
- a soft metal drift (if available, a CV joint puller);
- special lubricant for hinges;
- clean rags.
Torn boot
Place the car on the inspection hole, tighten the handbrake, and engage first or second speed. Next steps:
- Loosen the wheel nuts, jack up the wheel and remove it.
- Place a small block of wood under the lower arm to compress it and lower the jack.
- Unscrew the nuts and remove the 3 ball joint bolts.
- Unscrew the shock absorber from below and push it up.
- Knock the hub cap through the wood spacer.
- Pull out the cone-shaped washer and, pulling the brake disc towards you, move it to the side.
- Remove the grenade.
- Having descended into the hole, turn the drive shaft by hand to grab the protrusions of the inner CV joint clamp with pliers.
- Scratch the marks on the grenade body and the drive shaft to put it “as was.”
- Move the boot away from the grenade.
- Feel for the retaining ring inside the hinge and pull it out using a flathead screwdriver.
- Pull out the joint: if you are not going to change the lubricant, put it in a plastic bag.
- Move the plastic casing with the boot at the outer “grenade” towards the inner hinge so that it does not interfere.
- Knock down or use a puller to remove the clip.
- With the device in a vise, remove both retaining rings using a flathead screwdriver.
- Pull out the old boot. If new grease is added, flush everything.
- Place a new boot and boot, add lubricant to it and reassemble the unit in the reverse order.
In the article, we discussed the removal and installation of front wheel drives in the article - “Replacing front wheel drives.”
In this article we will look at replacing the angular velocity joints of the front drive VAZ-21213.
We prepare the car for repair. We install it on a viewing hole or on a lift.
We remove the drive from the car. We clean the hinge from the outside and clamp it in a vice with soft pads.
Since the outer hinge is most often replaced, we will consider this operation first.
Using pliers or pliers, we squeeze the small clamp by the protrusions and, prying it up with a screwdriver, disconnect it.
We remove the large clamp in the same way.
If the protective cover is attached using plastic clamps, then simply cut the clamps using side cutters.
We slide the protective plastic and rubber cover along the shaft.
We clean and wipe the end part of the hinge from old grease.
Using a drift made of soft metal or a wooden spacer made of durable wood, we knock down the hinge by striking the end of the cage.
We take into account that the drift should not transfer force to the separator or balls in order to avoid their damage.
This is the case if you need to put this hinge back on the shaft.
We remove the hinge. The joint on the shaft is held in place by a retaining ring, which is located in a groove at the end of the shaft.
The retaining ring is usually sold complete with the hinge. Pry up the retaining ring with a thin screwdriver
Remove the retaining ring
Separate the protective covers
Removing the rubber cover
Removing the plastic casing
If you need to replace the thrust ring, remove it with pliers
Install the hinge in reverse order.
We clean the shaft and joint from old grease, apply a thin layer of new CV joint grease and put a casing and a new cover on the shaft.
We install a new retaining ring on the shaft. We put 60 cm3 of CV joint grease into the joint cavity.
Using a soft metal drift or a strong wooden spacer, press the joint onto the shaft.
We put on a rubber cover. We install clamps. Before tightening the clamps, you need to release excess air from the rubber boot by prying up the seating belt of the boot with a screwdriver.
Buy auto parts boot for the handbrake lever Niva Chevrolet for foreign cars - Autopiter
Prices and delivery times depend on the city chosen.
Moscow Cart
The search for “boot for the handbrake lever on a Chevrolet Niva” found 44 positions Lever st/o. VAZ 2123 Chevrolet Niva Avtopribor
Gearbox lever boot for VAZ-2123 “Chevrolet Niva” (external) (manufacturer: Balakovo Rezino Tekhnika)
Gearbox lever boot 2123 (internal) (03441)
Boot RCS V-2123 "Niva Chevrolet"
Handbrake lever boot for UAZ-452 “Loaf”
Gearbox boot for VAZ-2123 Chevrolet Niva (manufacturer: Balakovo Rezino Tekhnika)
Gear selector boot for VAZ-2123 Chevrolet Niva
switch (limit switch) 2123-3710230 of the handbrake lever Niva-Chevrolet (79.3710)
Suspension arm 2123 Chevrolet Niva upper left AvtoVAZ
Pendulum arm 21213, 2123 Chevrolet Niva assembly AvtoVAZ
Boot RCS VAZ 2123 Niva Chevrolet 2123-1602518
Transfer case connection boot for VAZ-2123 Chevrolet Niva (CV joint)
2123-1703200Р Gearbox lever boot 2123 (on the thrust joint) “BRT”
Suspension arm 2123 Chevrolet Niva upper right AvtoVAZ
Suspension arm 2123 Chevrolet Niva lower left AvtoVAZ
Handbrake lever VAZ 2101-07, Niva-2121-13 (in collection) 2103-3508012 VIS
Transfer case lever boot 2121/1111/2110/2170
gear lever boot 2123-1703101 Niva-Chevrolet ***
2123-1703225Р Gearbox lever boot /2123/
Transfer case lever boot for VAZ-2123 Chevrolet Niva (upper)
2123-1703101Р Gearbox lever boot 2123 external “BRT”
Pendulum arm 21213, 2123 Chevrolet Niva assembled on INTER-AUTO bearings
Suspension arm 2123 Chevrolet Niva lower right AvtoVAZ
Lower lever for VAZ-2123 Chevrolet Niva (Chevrolet Niva) AvtoVAZ right
Lower lever for VAZ-2123 Chevrolet Niva (Chevrolet Niva) AvtoVAZ left
Adjusting, repairing and replacing the Chevrolet Niva rocker: photos and videos
Chevrolet Niva gearbox lever play
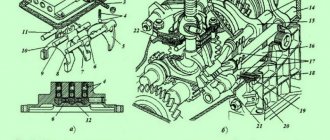
Remove the screwdriver from the locking hole on the transmission control lever housing. The rod has a turnbuckle and a protective cover that need to be removed. The shift lever is removed by holding it up.
Home Textbooks - Transport Niva Chevrolet release Design, operation, maintenance, repair. Site search….
Before driving your vehicle, make sure that the transmission control lever moves from neutral to all six gears.
The shift lever is removed by holding it up.
If the screwdriver does not fit into the locking hole, the position of the rod is not adjusted correctly.
At the point in the engine compartment where the selector rod passes through the bulkhead, loosen the selector rod pinch bolt A near the rubber coupling B to allow free play between the two halves of the selector rod.
Move the gearbox control lever so that the tip of the screwdriver is inserted into the locking hole in the lever housing; Make sure that the lever is still in the fourth speed position. In the engine compartment, tighten the pinch bolt on the gear selector rod to the required torque.
Remove the screwdriver from the locking hole and install the plastic plug. Fifth speed disappears when it is turned on; 3. Reverse gear is engaged when the forward five gears are selected.
This indicates a malfunction of the drive rod, but you should not rush to remove the gearbox and repair it, as you can try to adjust the product. Although adjustment is a rather difficult task, it is easier and cheaper than replacing a box or a link. Location of the rocker clamp bolt Adjusting the rocker includes the following steps: First gear is engaged at the gearbox.
To turn it on, you can start the engine and move the gearbox lever until the car starts moving. Afterwards, the engine is turned off, the first gear remains on, and shoes are placed under the wheels.
Don't forget the handbrake. Lower into the overpass and loosen the bolt of the rocker clamp.
Malfunctions
The most common causes of malfunction:
- the backlash and vibration of the gearshift lever has increased;
- 5th speed goes out or reverse gear is engaged;
- It is difficult to engage reverse;
- fuzzy long-term switching of speeds.
Also interesting: The “Rural Field of Krasnoyarsk” competition was held in Shushenskoye / Sports news of Krasnoyarsk and the Krasnoyarsk Territory / Newslab.Ru
Reference! Vibration of the gearshift lever is the most common problem that occurs in many vehicles when the internal combustion engine is running in the range of 2500 - 3500 rpm.
Signs of trouble
Symptoms of malfunction depend on which component is experiencing problems:
- Clutch. In case of breakdowns, jerking occurs when starting to move, slipping under load, or “driving” when trying to stop or change gear. Sometimes the malfunction manifests itself in the form of noise when pressing the clutch pedal or in other conditions.
- Gear box. This unit is more complex, and accordingly, its breakdowns are more varied. They manifest themselves in unclear or difficult gear shifting. Oil leaks, crunching noises and extraneous noises are also possible.
- Cardans and intermediate shaft. Here, malfunctions manifest themselves in the form of knocking during acceleration, squeaking or vibration while driving.
- Main bridge. In the event of a breakdown, the mechanism begins to make noise, knocking noises occur when accelerating and oil leaks.
- Transfer case. Problems make themselves felt in the form of spontaneous shutdown of bridges, noise and knocking. There may also be an oil leak.
- Constant velocity joints. Worn parts begin to crunch and knock while driving. The crunch is especially noticeable when the steering wheel is turned hard.
Do-it-yourself gear shift assembly adjustment
To correctly adjust the gear selection mechanism you will need a 13 key
Sequencing:
- We start the engine, engage 1st gear. As soon as the car starts to move, we stop and turn off the engine. In this case, we leave the first gearbox speed in the ON position. We put the car on the handbrake and anti-rollbacks.
- We loosen the coupling bolt of the clamp securing the connecting rod of the gearbox under the body. For ease of work, you can use a lift, overpass, pit or jacks.
- We move the plastic traction lock located in the passenger compartment all the way to the extreme left position.
- Then we fix the loosened bolt of the mounting clamp back.
You can also try one more method to eliminate rattling and play in the gearbox handle: using a “13” wrench, you need to tighten the lever fastening nut until the axial play is eliminated.
Important! The permissible clearances of the drive unit must correspond to the following values in millimeters: D = 1.5±0.5; E = 1±0.5.
The lever nut must be tightened to a torque of 24.5 Nm (2.5 kgfm).
If, after the adjustment has been made, the same difficulties with gear shifting and vibration remain, this means that this unit is worn beyond the permissible norm and needs to be replaced.
Repairing faults and adjusting the VAZ-2123 steering gear
Bleeding and adjusting the Chevrolet Niva clutch: step-by-step instructions
How to repair a Chevrolet Niva transfer case with your own hands: detailed disassembly instructions
Checking clutch performance
Let's start by looking at the concept of cohesion. So, this is a mechanism whose operating principle is based on the force of sliding friction (friction clutch). It is used to transmit torque.
The Chevrolet Niva has a clutch closed with a central diaphragm spring, which is installed using a hydraulic drive. A reinforced clutch is also installed on this car, which has a large diameter and a powerful damper. In addition, this element has a large disk thickness. Over time, on a Chevrolet Niva this mechanism fails, requiring either adjustment or replacement. You can check the functionality in the following ways:
- Engage neutral gear and start the engine. Next, you need to wait a little until the engine warms up and depress the clutch pedal, engaging reverse gear. If the transmission is easily engaged, this means that the system is working properly. It’s another matter if you hear creaks - this indicates the need for repairs.
- An easier way to check is to switch gears in order and check for any extraneous sounds from below. If they are, then you need to immediately go to the service center.
- You can notice a malfunction of the mechanism when it starts to slip while accelerating. This also means that it’s time to show the car to the experts.
There is no need to worry too much about a faulty clutch, because you can bleed the hydraulic drive. If you have at least the slightest knowledge of mechanics and the desire to independently adjust the operation of the mechanism, then you do not need to go to a service station at all. Bleeding the hydraulic drive is done as follows:
- first, the hose is put on the cylinder valve, and the other side is immersed in the brake fluid;
- Next, you need to press the clutch pedal and hold it a little. This manipulation should be repeated exactly 5 times;
- then you need to open the valve and release the pressure. This operation must be performed until the liquid flows out.
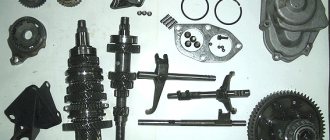
Repair of the gearshift mechanism of the transmission (slide) Niva Chevrolet - niva chevrolet (VAZ 2123, Chevy)
See also Disassembly and assembly of the gear selection mechanism drive)
| You will need: a 10mm wrench, a screwdriver, a hammer, and a bit. |
2. Remove the clamp from the mechanism rod.
| 1. Remove the gear selection mechanism (see “Disassembling the gearbox”). | |
4. Knock out the rod joint axis.
| 3. Remove the cover of the mechanism rod. | |
| 5. Remove the joint from the gear selector lever. |
8. Remove the protective cover of the mechanism housing and the spring.
| 7. Remove the rod eye bushings. Replace them if necessary. | |
10. ... sealing rings. Replace rings if necessary.
| 9. Remove the locking and... | |
12. Unscrew the three nuts securing the gear selector flange.
| 11. Remove the spherical washer. | |
14. Remove the guide plate washer.
| 13. Remove the flange, seal and two lever gaskets. | |
| 16. ...lever from the guide plate. |
| 17. Assemble the gear selection mechanism in the reverse order of removal. |
Video
Adjusting the rocker on a Chevrolet Niva, video tutorials
CHEVROLET NIVA. PROBLEM OF GEAR SWITCHING HOT. SOLUTION IN 30 MINUTES!
Maybe counter, there’s a counter puck there
••• Chevrolet Niva rocker adjustment. Denis vvv Guru (), closed 1 year ago. Do not forget…
First of all, under the hood of the Chevrolet Niva, the nut of the screw securing the tip of the gearbox lever with the gear shift rod is loosened.
After this, you should go down into the pit again, but tighten the loosened clamp bolt.
How to choose a new backstage? What kind of rocker should I put on a Niva Chevrolet?
This question came to the mind of every Niva car owner who had to deal with a malfunction of this element. Before installing the seals, they will need to be lubricated with Litol. This completes the repair of the product; all that remains is to assemble all the parts in the reverse order of removal. Once assembly is complete, don't forget about the new clamp that had to be cut when removing the cover.
Node device
On older models, this unit is located under the bottom of the car, thereby being exposed to increased contamination and moisture.
The design of the gear shift mechanism does not have complex connections, the work is carried out without much load, but owners often encounter wear and tear on this unit.
Read news about the new Niva
- Auto.ru: buy, sell and exchange a car
- Mud tires for Niva 4x4: radius 15 and 16 - which one is better to install "
- Winch for the field in Voronezh: 500 items: free shipping, 28% discount [go]
- The best motorized towing vehicles of 2021 with advantages and disadvantages
- Niva Chevrolet alarm connection points
- UAZ Ptriot and Chevrolet Niva - comparison of car characteristics
- UAZ on low pressure tires| AUTO HANDMADE
- How to change the handbrake cable on a Chevrolet Niva
Replacement and repair of Niva Chevrolet gearbox
Replacement and repair are the same thing. In both cases, the gearbox is removed. Only in one is disassembly and troubleshooting, in the other is the process reverse to removal - installation of a new gearbox. Removing the gearbox is performed in the following sequence:
- The gearshift knob is removed from the interior side. To do this, you need to press the lock with a screwdriver. However, you don’t have to remove it at the root, but simply unscrew the handle.
- In order to lighten the weight of the box and prevent oil from leaking, it needs to be drained. There is nothing complicated, the process is similar to draining oil from the engine.
- After this, remove the driveshaft that goes to the transfer case. A mark is required before removal.
- Remove the flush shaft and the mechanism responsible for selecting the desired speed.
- When removing the box, the exhaust pipe will get in the way. Another name for it is “pants”.
- After this, everything attached to the gearbox is removed - the speed sensor and the clutch cylinder. Thus, it is necessary to release everything that is attached to the box and the engine at the same time. All that remains is to unscrew the fasteners and with a partner pull out the gearbox. However, this can be done alone - using a special stand.
There is nothing complicated about repairs either. The box is completely disassembled and defective. It is necessary to inspect the gears for wear. For quality repairs, worn components need to be replaced. Be sure to replace all oil seals and seals. It wouldn't hurt to change the clutch right away. It is recommended to replace the bearings without fail.
It is worth noting that the weak point is 5th gear. She stands higher than the rest and receives less lubrication. Determine the condition of the latch. If it is worn out, the 5th will fly out at speed, which is not very pleasant or comfortable. In addition, it can fly out due to wear of the gear teeth. The unscrewed shank nut also makes its contribution. Do not forget about backlash in the mechanisms - they are unacceptable, otherwise they will manifest themselves in knocking when starting off.
The gearbox is installed in the reverse order of removal.
Is the gear selection mechanism from Classic suitable for VAZ 2123?
In the modern world of developed technologies, equipment and a huge number of spare parts offered by stores, garage buyers and tuning enthusiasts have access to any actions to repair, constructively alter and modernize their cars.
- the designer excluded the installation of restrictor rings at the end of the secondary shaft;
- a modern spacer bushing has been installed to provide the speedometer drive function;
- The idler gear axis is fixed separately on the manual transmission housing.
If you are faced with a breakdown of the factory gearbox on a Shnivy, and buying a new unit is too expensive, then you can choose a good used version of the classic gearbox and make several modifications yourself.
Tips for replacing the gearbox
Initially, it is necessary to dismantle the factory gearbox with all adjacent mechanisms (muffler, cardan shaft and exhaust shaft). Dismantling is carried out with speed 1 turned on. To install a 4-mortar from a classic, you will also need to rearrange the gear shift assembly itself (shift lever and rocker), and the reverse gear release tab (for this you will have to remove the rear cover).
When moving the gear selector from one gearbox to another, we recommend changing the restrictive retaining ring.
You will have to tinker a little with the rear support crossmember of the gearbox to the body because... classic won't do. The hole for the speedometer cable can be plugged with a rubber seal selected to size.
Useful! When replacing the gearbox, it is recommended to replace all seals and gaskets. Also, with the speed release assembly removed, pay attention to the condition of the clutch release bearing. If necessary, it is easier to replace it while everything is disassembled and accessible.
Signs of gearbox wear
The driver must pay attention to possible failure of vehicle components, including knowing the characteristic signs of wear on the gearbox linkage in order to take timely action to replace it. Despite the fact that the mechanism is quite reliable, you should be aware of the following “symptoms” of its imminent breakdown:
Increased play at the gearshift knob. This can be noticeable both when the handle is in neutral and in one of the gears;
- Difficulty shifting gears. For example, one or more gears are difficult to “stick”, or maybe a crunching noise occurs when the lever moves in their direction;
- It feels like changing gears has become more difficult, as if the lever has become much heavier;
- Gears are engaged incorrectly, for example, instead of fifth, third is engaged or vice versa.
Drivers often ignore the appearance of play in the gearbox, believing that this is a normal situation. In fact, if backlash occurs, it is imperative to diagnose the gearbox, and, if necessary, adjust or replace the linkage. The fact is that a slight play is already a fairly serious symptom of a faulty gearbox linkage. If it “breaks” while the car is moving, this can lead to serious consequences for both the car and the driver, since in such a situation there is a high risk of getting into an accident. That is why, if you notice problems with gear shifting, be sure to contact a service center for diagnosis and repair of the linkage, if necessary.
Video on how to permanently get rid of a rattling gear lever
- Self-adjustment of the scenes on the VAZ-2110
- What is a rocker in a car?
- Signs of a mechanism malfunction
- Instructions for adjusting the scenes of the VAZ-2110
- Instructions for replacing the VAZ-2110 backstage
Each unit, component or part of the car, even the most insignificant, would seem to require a certain amount of care and timely adjustment. This also applies to the clutch of a manual transmission. A gearbox element that has been misadjusted can cause unpleasant sensations while driving. For example, it may happen that the gear shift knob begins to rattle, the gears will shift inaccurately or may periodically get knocked out, and the lever will begin to “play.” In order to get rid of such troubles, you should carry out a fairly simple procedure for adjusting the gearbox rocker. Moreover, this process will not take much effort from you, and it will last about half an hour.
Causes of malfunction
• Uncharacteristic noises. The bearings are noisy, the gears are worn out, the oil level is insufficient. The movement of the axle shafts also has an effect. • Difficulty changing gears. They arise because: the clutch does not engage completely, the bushings in the hinges are worn out, the drive is not adjusted correctly. The rod seats are dirty, the forks are deformed, and synchronizers often break due to errors in switching. • Spontaneous or incorrect gear shifting. The reason for this may be wear of the balls and sockets of the rods, malfunction of the synchronizer spring and its other parts (clutch teeth, short hub teeth are wrinkled). • Oil leakage. It occurs due to wear of the shaft seals, the fastening of the gearbox housing has become loose, and the sealing gaskets have been damaged. The seals in this car are a sore spot. • Problems with the lever handle. For example, the lever does not respond correctly to control. This occurs due to problems with the backstage. It requires not just replacement, but also proper adjustment.
How to remove the gearbox on a Chevrolet Niva yourself. Video
- Remove the ground from the battery (using the “10” key).
- Then unscrew the bolt securing the starter from above (using a “13” wrench).
After this, you begin to work inside the car:
- Remove the handles from the transfer case levers by turning them and pulling them up.
- The casing of the boxes (both transfer case and gearbox) must be removed. To do this you will have to remove six screws.
- By turning the casing, it can be removed.
- Remove the housing and boot from the transfer case lever (removing the three screws).
- Remove the connectors from the blocking sensor. Do not pull on the wire itself so as not to tear it off.
- The cover on the slide can be removed by unscrewing two self-tapping screws.
- Then engage reverse gear. To remove the lever itself, you will have to hook the locking sleeve with a screwdriver. When removing plastic and rubber parts of the lever, do not break the collet.
The main stage of work is directly removing the box. Watch the video - removing the gearbox on a Chevrolet Niva. If protection is installed under the crankcase, it must be removed. This also applies to the soundproof casing.
- It is advisable to mark the flanges of the shafts and boxes. This will allow the parts to be positioned correctly during installation.
- The bolt on the flange may be tight. Then you can help with a chisel, which is inserted between the flange and the bolt itself. A couple of hits should be enough.
- Disconnect the rear propeller shaft from the transfer case. Stuck flanges are “treated” again with a chisel.
- Remove the front driveshaft.
- Disconnect the speedometer cable. When removing the oil deflector washer, be careful. Move the cable to the side.
- If the car has a speed sensor, its connector must be disconnected.
- Then unscrew the fastening of the elastic coupling onto the flange of the input shaft of the box.
- The bolts are pulled out when the flange is in a strictly defined position.
- To remove the transfer case, unscrew the four nuts (using a 13mm wrench).
- After removing the cotter pin, remove the spring and fasteners on the clutch cylinder.
- Move the starter closer to the radiator, after loosening its fasteners.
- Remove the bolt holding the clamp from the muffler pipe. For greater convenience, you may also have to remove the muffler bracket (with the same “13” key).
- Loosen the bolts on the gearbox housing (using a 10mm wrench) and the nuts on the traverses.
- The box is attached to the engine with 19mm bolts. There is no need to remove the bottom bolt on the left completely yet, just loosen it. The rest will have to be removed using an extension cord. Now remove all bolts.
- Carefully remove the box and disconnect it from the motor. Already holding it in your hands, move it back, right up to the stop of the scenes. The box should not be left hanging on the shaft.
Installation is carried out in reverse order.
Source
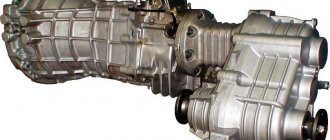
Design and principle of operation
The Chevrolet Niva transmission includes the following components:
- A five-speed manual gearbox allows you to change not only the amount of torque, but also the direction of rotation.
- Split front axle with a gearbox mounted on the power elements of the body.
- Dry single-plate clutch, which, when the pedal is pressed, briefly disconnects the transmission from the engine.
- Solid rear axle, into which the gearbox and differential are integrated. This allows you to increase and distribute torque between the wheels of the same axle.
- The intermediate shaft through which torque is transmitted from the gearbox to the transfer case.
- Transfer case that distributes rotational energy between axles.
- Two cardan shafts transmitting power to the axles (front and rear).
- Constant velocity joints that drive the steering wheels.
It works like this: engine torque is transmitted to the manual transmission through the clutch, then through the intermediate shaft to the transfer case and a pair of drive axles.