Signs of a faulty oil pump
There are several typical symptoms of a faulty oil pump. These include:
- Reduced engine oil pressure. This will be indicated by the oil can light on the dashboard.
- Increasing engine oil pressure. Engine oil is squeezed out of various seals and joints in the system. For example, oil seals, gaskets, oil filter connection points. In more rare cases, due to excess pressure in the oil system, the car refuses to start at all. This happens because the hydraulic compensators stop performing their functions, and accordingly, the valves function poorly.
- Increased oil consumption. Occurs due to leakage or waste.
It is necessary to understand that some of them may indicate failure of other elements of the oil system. Therefore, it is advisable to carry out the check in a comprehensive manner.
Malfunctions in the operation of the pressure reducing valve
The structure of the pressure reducing valve is quite simple, which ensures its reliability and reduces the likelihood of breakdown. However, sometimes this still happens. Most often this is due to wear and tear of the mechanism, so do not forget to regularly diagnose all components of the car, as well as promptly replace outdated parts.
There are two main types of mechanism failure.
- The valve creates insufficient pressure. Usually the cause of this problem lies in the spring. With prolonged use, it becomes less elastic and stretches. As a result, the valve remains slightly open all the time. Due to this, the pressure decreases, and the oil does not reach some engine components. Sometimes it happens that unprofessional craftsmen install a spring with insufficient elasticity during repairs. This has the same effect.
- Excessive pressure builds up in the valve. As a rule, the cause of this breakdown is the entry of debris into the mechanism or the use of old viscous oil.
How to determine that the pressure relief valve is broken?
It is impossible to determine at first glance that the valve is broken. It is necessary to carefully inspect other elements of the system and exclude the possibility of damage to other parts of the oil pump. In order to understand that there are malfunctions in it, you should look at the dashboard. Most car models have a sensor located there that indicates problems in the system. It is a warning light with a pictogram that lights up at high speeds.
If the pressure indicator on the dashboard lights up, you need to check the operation of the oil pump
If this happens, you should stop the car immediately, as further movement may lead to permanent engine damage. Turn it off and get out of the car. Next, you will need to take the following steps.
- Wear protective gloves. At the moment, the engine compartment of the car is hot, so you can easily get burned.
- There is no point in checking the oil level if you have just stopped. It will take time before it drains into the crankcase. At this time, you need to inspect the engine: look for fresh oil leaks or damage to the crankcase.
- If the problem is a broken crankcase, you will need to seal it. This can be done using available materials: an ordinary rag, a piece of rubber and even tape.
- Inspect the oil filter. Damage to its gasket can also cause a breakdown.
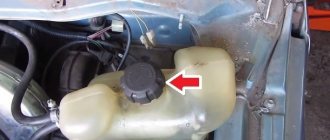
- If the above items are in order, you should check the oil level. This is done with a special probe with o and “maximum”. Ideally, the oil level should be between them. If there is a lack of lubricant, simply add it.
The required oil level is between the minimum and maximum marks
All further actions are carried out on the valve removed from the pumping system. Examine it carefully. Often the cause of breakdown is clogging of the mechanism. This usually happens to drivers who are too lazy to change the oil. Dirt accumulates on the surface of the valve or spring, which prevents normal operation. If you have recently carried out a major overhaul of your car, then there is a risk that the valve was not properly washed and there are particles of chips and other debris left in it.
For this reason, technicians often recommend replacing valves after major repairs. If you do not want to do this, make sure that the system is not clogged before using the vehicle.
There is an unusual way to check the functionality of this element. Take a small piece of cotton (or other breathable) fabric and place it on the fitting that is parallel to the lid. Now you need to take a sharp breath through the material. If you feel strong resistance, it means that the valve is working as it should: it blocks the air flow and passes it through a special hole. A working mechanism should not be easily blown through.
Table: diagnosis of low pressure in the oil pump, causes and remedy
| Guide to diagnosing hypotension | ||
| Malfunction | Cause | Remedy |
|
|
|
| Low oil pressure throughout the entire engine speed range | There is too little oil in the engine. The oil intake screen is dirty, the oil intake tube is broken | Add oil to the engine. Remove the oil sump, clean the mesh, if necessary, replace the tube. |
| Worn oil pump | Remove, check, replace if necessary | |
| Engine bearing wear | Repair the engine | |
Causes of oil pump failure
The reason why the oil pump has failed can be determined by diagnostics. There are at least 8 main oil pump faults. These include:
- Clogged oil pickup strainer. It is located at the inlet of the pump, and its function is to coarsely filter the engine oil. Like the system’s oil filter, it gradually becomes clogged with small debris and slag (often such slag is formed as a result of flushing the engine with various means).
- Malfunction of the oil pump pressure reducing valve. Usually the piston and spring included in its design fail.
- Wear of the inner surface of the pump housing, the so-called “mirror”. Occurs for natural reasons during engine operation.
- Wear of the working surfaces (blades, splines, axles) of the oil pump gears. It happens both over time of long operation and due to rare changes of (very thick) oil.
- Using dirty or unsuitable engine oil. The presence of debris in the oil can be for various reasons - careless installation of a pump or filter, use of low-quality lubricating fluid.
- Careless pump assembly. In particular, various debris was allowed to get into the oil or the pump was not assembled correctly.
- Drop in oil level in the engine crankcase. Under such conditions, the pump operates at excessive capacity, which causes it to overheat and may fail prematurely.
- Dirty oil filter. When the filter is very clogged, the pump has to make significant efforts to pump the oil. This leads to its wear and partial or complete failure.
Regardless of the reason that caused the partial failure of the oil pump, it is necessary to carry out a detailed check of it and, if necessary, make repairs or complete replacement.
Functions and malfunctions of the oil pump pressure reducing valve
A mandatory attribute of the lubrication system of any internal combustion engine is the oil pump pressure reducing valve (OPRN). Many car enthusiasts have no idea about such a part, although its role in ensuring the performance of the engine is very great. It is also worth understanding the structure, operation and malfunctions of this unit because its analogues are present in any systems where compressed liquids or gases are used as a working medium.
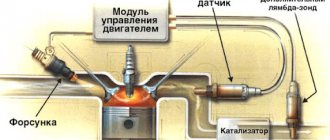
Purpose of the oil pump pressure reducing valve
As is known, lubrication of the rubbing surfaces of engine sliding bearings (main, connecting rod, piston pins, bearings, etc.) occurs with a constant supply of engine oil under pressure.
If the pressure is not enough, then wear, overheating and failure of the working parts occur, and if the pressure exceeds the norm, then the motor can suffer serious damage. To avoid this, a pressure reducing valve comes into play.
One interpretation of the term “reduction” is the reduction or weakening of something. In mechanical engineering, a valve is called a pressure-reducing valve when, at a certain peak moment (increasing to the maximum pressure, oil, water, air, gas, etc.) it opens the passage and helps normalize the pressure of the working medium. Thus, the valve mechanism is designed to protect against damage due to excessive increase oil pressure.
Valve device
The oil pump pressure reducing valve has a very simple design.
The main parts are:
- housing with a channel system;
- a valve (ball or small piston) that closes the bypass channel;
- spring;
- stop screw or bolt.
It is easy to understand the principle of operation of the design. The thrust screw creates pressure on one end of the spring, which, by the compression force of the spiral, presses the valve to the socket, which has a through hole in the channel. As soon as the pressure in the channel increases enough to overcome the resistance of the spring, the valve lowers and the oil flows. When the pressure normalizes, the spring returns the valve to its original position, closing the gap.
There are two types of RKMN according to the housing design:
- the entire valve mechanism is completely removed from the oil pump;
- the valve is built into the oil pump housing.
Valve malfunctions and solutions
There are two types of malfunctions in the operation of the oil pump pressure reducing valve:
- the valve does not maintain pressure at the required level;
- the valve does not open when the maximum value is reached.
In the first case, we can only talk about the fact that the spring creates weak pressure. This phenomenon is extremely rare, but if the engine fails to maintain oil pressure, do not forget about the valve. The spring may not cope with the work for various reasons: wear, incorrect selection, installation of a spring that is too soft or defective.
More often, clogging of the lumen or jamming of the valve occurs. This happens when the oil has not been changed for too long, and dirt particles gradually coke on the surfaces. If the engine oil channels are poorly flushed after a major overhaul, chips and debris may collect in them, which can also jam the valve.
“Treatment” of any valve breakdowns consists of disassembling, diagnosing, cleaning the channels and replacing failed elements. Experts strongly recommend replacing the oil pump and the safety valve along with it after each engine overhaul.
How to determine if an oil pump is faulty
There are two types of pump testing - without dismantling it and with dismantling it. Without removing the pump, you can verify its malfunction only when it is already in a “dying” state, so it is better to remove it to perform detailed diagnostics.
How to check the oil pump without removing it
Before directly testing the pump, it makes sense to check the oil pressure in the system using a pressure gauge. This way you can make sure that the oil pressure light is working correctly and did not light up in vain. To do this, a pressure gauge is screwed in instead of the emergency lamp pressure sensor.
Please note that the pressure value often drops precisely “when it’s hot,” that is, when the engine is warm. Therefore, the test must be carried out on a warm engine and at idle speed. The minimum and maximum pressure values will differ for different machines. For example, for a VAZ “classic” (VAZ 2101-2107) the minimum emergency pressure value is 0.35...0.45 kgf/cm². It is under such conditions that the emergency lamp on the instrument panel is activated. The normal pressure value is 3.5…4.5 kgf/cm² at a rotation speed of 5600 rpm.
On the same “classic” you can check the oil pump without removing it from its seat. To do this, you need to dismantle the distributor and remove the pump drive gear. Next, evaluate her condition. If there are numerous scuffs on its surface on the blades or on the gear axis, then the pump must be dismantled. It is also worth paying attention to the gear splines. If they are knocked down, it means the pump is jammed. This is usually due to debris and/or sludge in the oil.
Another check without dismantling the pump is to check the play of its rod. This is done in the same way, with the distributor removed and the gear removed. You need to take a long screwdriver and simply move the rod with it. If there is play, it means the pump has failed. On a normal working pump, the gap between the surfaces of the rod and the housing should be 0.1 mm, respectively, and there is practically no play.
Oil receiver mesh
For further inspection it is necessary to dismantle and disassemble the pump. This is also done in order to subsequently flush out any accumulated debris. First you need to unscrew the oil receiver. In this case, it is necessary to check the condition of the sealing ring present at the joint. If it has hardened significantly, it is advisable to change it. Pay special attention to the oil receiver mesh, since most often it is the reason that the pump does not pump oil well. Accordingly, if it is clogged, it needs to be cleaned, or even the entire oil receiver complete with mesh must be changed.
Repair of oil pump for VAZ 2108, 2109, 21099 cars
Based on the fact that the entire work of the oil pump consists of rotating the gears in the housing, with minimal clearances, its repair on VAZ 2108, 2109, 21099 cars comes down to rejecting worn out parts after several control measurements.
Despite the fact that this unit has a long service life and rarely fails, the use of low-quality motor oil, and the considerable mileage of the engines of these no longer young cars (far exceeding 100,000 km - the trouble-free service life of the oil pump) leads to gradual or sudden (for some) his refusal.
You should not immediately rush to repair the oil pump when the emergency oil pressure lamp on the instrument panel lights up. To begin with, you should change the oil filter, engine oil, check the oil pressure sensor, and clean the oil intake in the car engine sump. If it doesn't help, then go ahead.
To repair the oil pump, you will need special tools: a micrometer (with limits from 0 to 25 mm), a caliper. As well as a metal ruler and a set of flat probes. If they are not there, then it is better not to repair the oil pump, but to replace it with a new one (since the price of special tools will be higher than the price of a new pump).
Features of oil pump repair for VAZ 2108, 2109, 21099 cars
— Remove the oil pump from the car engine
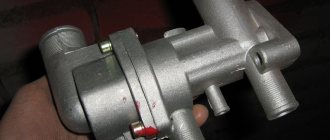
We disassemble and wash it (with diesel fuel or kerosene). Blow with compressed air. Particular attention should be paid to flushing the pressure relief valve holes, as dirt getting under the valve is one of the most common causes of oil pump failure.
Pressure reducing valve openings for flushing
— Visually inspect the oil pump
Its parts (working surface of the housing, gears) should not show signs of severe wear: scratches, cracks, crumbling. The pressure reducing valve and the hole for it should not have pronounced longitudinal marks.
The working surface of the oil pump housing 2108 under the drive and driven gears should not have deep marks
Next, we check how worn the driven and driving gears are, and their workplace.
— We measure the size of the gap between the plane of the housing and the gears
We apply the ruler with its edge to the plane of the pump housing and use a feeler gauge to measure the gap between the ruler and the gears. The clearance for the drive gear is 0.12 mm, the driven gear is 0.15 mm.
Measuring the gap between gears and ruler
— We measure the thickness of the drive and driven gears
We use a micrometer. The thickness of the drive gear is 7.45 - 7.47 mm (nominal), the maximum size is 7.42 mm. The thickness of the driven gear is 7.45 - 7.47 mm (nominal), the maximum size is 7.35 mm.
Measuring the thickness of the drive and driven gears of the 2108 oil pump
— We measure the diameter of the driven gear seat and the thickness of the partition between the drive and driven gears in the pump housing
We use a caliper. The diameter of the driven gear seat should not exceed 75.1 mm. The minimum thickness of the dividing wall between the driven and driving gears (segment) is 3.4 mm.
Measuring the mounting hole of the driven gear and the thickness of the segment in the oil pump housing
We carry out additional checks (optional).
— We check the presence or absence of deformation of the plane of the oil pump housing cover
Place it on a flat surface and rock it. There shouldn't be any gap. If there is deformation, it can be eliminated by grinding.
Oil pump housing cover plane 2108 for grinding
— We measure the diameter of the hole for the pressure reducing valve (12.03 mm)
— It is also advisable to measure the size of the pressure reducing valve spring
Without load - 44.72 mm and under load 4±0.24 kgf - 31.7 mm.
Reducing valve spring length
Rejected parts should be replaced with new ones, measurements taken again, lubricated with engine oil and installed on the engine. Before installation, clean the oil intake receiver.
In addition, it is advisable to replace the crankshaft oil seal pressed into the pump housing.
Notes and additions
— More unpleasant reasons for the emergency oil pressure light to come on and the pressure in the engine lubrication system to decrease include cranking or wear of the liners on the crankshaft and wear of the crankshaft journals (this is already an engine overhaul).
— The oil pump pressure reducing valve plug is tightened with great force. Before unscrewing, carefully clean it from dirt and use a high-quality edger with non-licked edges for unscrewing.
Purpose of the oil pump on the VAZ 2114 and VAZ 2115
The main task of the oil pump is to create excess pressure in the engine lubrication system and ensure continuous circulation of oil in the lubrication channels.
Only rotary oil pumps are installed on the VAZ 2114
Any breakdown of the oil pump leads to a drop in lubricant pressure, after which the friction between the moving parts of the engine increases sharply. As a result, almost all engine components are damaged, and they can only be restored after an expensive overhaul.
Types of oil pumps for VAZ 2114 and VAZ 2115
The design of the VAZ 2114 and VAZ 2115 engines is the same. Therefore, the oil pumps on these machines are also exactly the same. These are adjustable rotary pumps equipped with a pressure reducing valve.
Main design elements of the rotary adjustable oil pump VAZ 2114
On earlier VAZ models, gear oil pumps were installed, but VAZ engineers gradually abandoned these devices, since the rotary oil pump has important advantages:
- rotary oil pumps, unlike gear pumps, almost never foam the engine oil in the system;
- if an adjustable rotary oil pump is installed on the car, then the car owner will not have to change the engine oil too often (since the foaming problem has been solved, the working life of the lubricant increases on average by 2.5 times);
- Due to the design features, the oil rotary pump significantly facilitates engine operation. When using oil pumps of this type, engine power increases by 35%.
Location of oil pumps on VAZ 2114 and VAZ 2115
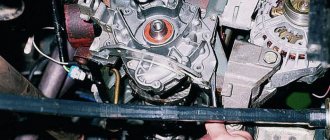
The oil pump on the VAZ 2114 and VAZ 2115 is located under the car engine. It is covered by an oil pan, and the pan, in turn, is covered by a crankcase protection. Therefore, in order to get to the oil pump, the car owner will have to remove these parts, having first driven the car onto an overpass or inspection hole.
To get to the oil pump, you will have to remove the pan and crankcase from the VAZ 2114
What is a pressure reducing valve?
Often the pressure reducing valve is installed in the bypass channel of the oil pump.
The pressure reducing valve in a modern engine looks like an infusorian slipper compared to other complex devices. The oil pump valve is extremely simple. In VAZ 2110, 2109, 2112 engines, in the ZMZ 406 engine it is a ball on which a spring is constantly acting. The force of the spring pressure on the valve can be adjusted by a stop screw in the oil pump housing. The relief valve in some engines has a separate housing, but in most cases it is built into the oil pump bypass passage.
The valve is located between the suction chamber and the compression chamber. As soon as the pressure exceeds the norm, the oil puts more pressure on the valve than usual, it opens and releases the lubricant back to the pump inlet or into the crankcase. The pressure is adjusted using a stop screw located in the oil pump housing.
To ensure the required oil pressure, an oil pump is used, which distributes the lubricant throughout all engine components. The oil pump is driven by one of the shafts: camshaft or crankshaft, and works together with the engine. Further transmission of torque to the pump gears is carried out using a special drive shaft.
However, creating pressure alone is not enough, because it is necessary to control this important parameter. Too much pressure can cause the seals and gaskets to wear out, causing them to leak oil out. In addition, in a number of cases, excess pressure became the cause of many more critical components.
Too little pressure also has a negative effect. If there is not enough of it, the oil is not able to penetrate into hard-to-reach places. Running these parts dry will cause them to wear out very quickly.
To avoid these troubles, a special oil pressure reducing valve is installed on the oil pump. When the pressure in the system increases, it opens and allows a certain amount of oil into the crankcase. After the inlet pressure decreases, it closes; this is closely connected with the engine crankcase ventilation system.
If we consider this process in more detail, it turns out that the oil acts on a special bolt, which, overcoming the resistance of the spring, due to oil pressure, opens the valve. After the pressure returns to normal, the spring returns to its original position. This process is cyclical and continues throughout the entire operating time of the engine.
The valve consists of a special casing. Along its entire length there is a system of channels through which the lubricant circulates. At the end of the circulation channel there is a bolt or ball. This element opens or closes the channel to allow or limit the flow of oil.
The main difference between this pressure regulation system is that it is extremely simple. Its design is more reliable and maintainable than electric or any other types of valves.
The valve can be either part of the entire pump or its separate element. The second option provides a modular system, the faulty unit of which can be easily replaced.
The operating principle of the system is simple. The main reacting body in this unit is the thrust bolt. It is he who puts pressure on the spring and presses the valve to the hole.
As soon as the pressure in the system increases and exceeds the permissible level, the oil overcomes the elasticity of the spring, squeezes out the valve and passes into a special compartment.
After the pressure normalizes, the spring returns the valve to its original state, and the engine operates normally.
The oil pump pressure reducing valve has a simple design:
- A small casing in which a special system of channels is provided (it is through them that the oil moves);
- a special valve that looks like a small piston or ball. Its task is to block the passage in a timely manner and prevent an increase in pressure in the engine;
- spring;
- a thrust bolt (sometimes a screw).
Note! What makes this system so special is its simplicity of execution, which ensures maximum reliability and operational efficiency.
The pressure reducing valve itself is produced in two versions - it can be located in the pump housing (built into it) or have the form of a separate mechanism.
As you can see, the system is well thought out. But even such high-quality devices sometimes fail. Let's look at the main valve malfunctions and how to eliminate them.
Causes of oil pump failure
There are a number of typical breakdowns due to which the oil pump completely or partially fails:
- physical wear of the housing, rotor or driven gear. There is a gap of 0.2 mm between the pump gears and the housing. There is also a gap between the teeth of the pump gears - 0.5 mm. As wear occurs, these gaps increase, and the pressure created by the pump at the outlet pipe drops. Since replacing and adjusting worn gears is a very labor-intensive process and not everyone can do it, car enthusiasts follow the path of least resistance and simply change the entire oil pump;
The gaps in VAZ oil pumps are checked with a special feeler gauge
A blockage in the oil receiver can completely damage the VAZ oil pump
Separate mention should be made of motor oil. Its quality also has a significant impact on the service life of the pump and its serviceability. The fact is that the oil pump is the only engine element that is lubricated with unfiltered oil (because the oil filter is installed only on the pump outlet). And if the car owner is used to saving on high-quality oil, then he may not count on long and uninterrupted operation of the oil pump.
Removal from engine for disassembly
The video demonstrates the process of checking the VAZ 2104 oil pump. But measuring the gap between the housing and the gears, assessing the output of the drive and driven gears, the oil pump housing cover and many other subtleties are relevant for all types of oil pumps. Before disassembling, we recommend studying the structure and operating principle of the oil pump.
For a preliminary check, remove the distributor and remove the oil pump drive gear. If you find deep scuffs on the axle, you will most likely encounter knocked-down splines. Wedging of the drive gear is extremely dangerous, as the splines can be licked off. The consequence of a breakdown will be oil starvation, which for the engine ends at least with the crankshaft liners turned. You can also visually assess the play of the oil pump rod. On a working pump, the gap between the rod and housing pair should not exceed 0.1 mm.
The oil pump on classic VAZ cars is unscrewed from the crankcase. Therefore, to check, you will have to drain the oil and remove the pan, having first loosened the engine mounts (the engine needs to be raised a little).
Troubleshooting
Unscrew the oil receiver cap with pressure reducing valve. Don't lose the original spring thrust washer
Also note that one of the bolts will be shorter. Therefore, be sure to remember the location of its seat.
Using a caliper, measure the length of the spring at rest (should be at least 38 mm).
Remove the cover on which you can remove the wear marks left by the gears
Deep scoring is a clear sign that the oil pump is worn out. Repairing the cover involves leveling the mating plane.
Remove the oil pump drive gear from the housing. Check the condition of the teeth and shaft. Scratches and abrasions indicate wear. In the driven gear, additionally evaluate the condition of the fixation axis hole. Check the walls of the oil pump housing and the driven gear axis. Furrows and potholes indicate that debris has entered the work area.
Clearance tolerances
- The gap between the housing plane and the gears. To measure, apply a caliper and insert a suitable feeler gauge into the gap formed. The norm is 0.066-0.161 mm. A gap of 0.2 mm is considered critical.
- Gap between gear teeth. At extreme wear, the gap is 0.25 mm. If you get values of no more than 0.15 mm, the gears are still in good condition.
- The gap between the walls of the working area of the oil pump housing and the gears should not exceed 0.25 mm; A range of 0.11-0.18 mm is considered normal.
- The optimal gap between the hole in the housing and the gear shaft is 0.016-0.055 mm. When checking the VAZ oil pump without removing it from the engine, we said that the play should not be more than 0.1 mm. As for the gap between the axle and the driven gear, it should be in the range of 0.017-0.057 mm; critical limit – 0.1 mm.
The entire troubleshooting process is clearly shown in the video.
Replacing the oil pump on VAZ 2114 and VAZ 2115
Before starting work, you should prepare everything you need. To replace the oil pump you will need:
- open-end wrenches - set;
- puller for VAZ oil filters;
- socket heads - set;
- container for draining old oil;
- 6 liters of new engine oil;
- 2 medium sized flathead screwdrivers.
Oil pump replacement sequence
- The machine is installed on a trestle or inspection hole and securely secured with wheel chocks. The negative wire is removed from the battery.
- The drain plug is unscrewed and the old oil is drained into a substitute container.
Oil from the VAZ 2114 should be drained into a container placed in advance
It is convenient to remove the pulley from the VAZ 2114 crankshaft using two screwdrivers
Be sure to remove the key from the groove on the VAZ 2114 crankshaft
The crankcase from the VAZ 2114 is removed only after the oil is completely drained
The VAZ 2114 oil receiver is held on by just a couple of bolts
After unscrewing the bolts, the VAZ 2114 oil receiver is removed manually
The VAZ 2114 oil pump is held on by six bolts and washers
To separate the thin gasket under the oil pump of the VAZ 2114, you can use a flat screwdriver
After unscrewing the six mounting bolts, the VAZ 2114 oil pump is removed from the crankshaft
Video: changing the oil pump of a VAZ 2114
Important points
There are a couple of nuances that you definitely need to remember when changing the oil pump:
- Before installing a new oil pump, you need to remove the plastic oil seal from it and generously lubricate its inner edge with engine oil. This will make it much easier to install the pump on the crankshaft;
The inner edge of the oil pump oil seal must be lubricated with oil.
The VAZ 2114 oil pump oil seal should be filled with a pointed stick or pencil
Replacing the oil pump on VAZ 2114 and VAZ 2115 cars is a task that seems impossible only at first glance. Upon closer examination, it turns out that you can cope with it on your own, saving a significant amount on the services of a qualified auto mechanic.
A device such as the oil pump on the VAZ 2114 performs one main function - it serves to supply oil to the moving elements of the engine and, thus, lubricates them. It is powered by the operation of the motor itself. On some VAZ models, the pump is mounted on the crankshaft, on others it has additional adapter units, including an additional shaft, a drive belt and other parts that serve to transmit rotation from the crankshaft to the pump.
The operating principle of modern VAZ rotary pumps
After starting the engine, the car begins to move and gradually accelerates. The crankshaft rotates faster and faster. As the shaft rotation speed increases, the pressure in the engine's lubrication system gradually drops, and the need for new oil increases.
Scheme of pumping oil with a rotary pump on VAZ cars
As the oil pressure decreases, the spring on the movable pump stator expands, the stator attached to it begins to rotate, then moves and engages with the driven rotor. This begins the suction of oil into the pump cavity. The oil is then forced into the engine by the rotor blades and the suction cycle is repeated.
Signs and causes of oil pump failure
If the VAZ 2114 oil pump starts to malfunction, this immediately affects the oil pressure in the system (it drops sharply), as a result of which the warning light comes on. True, it’s not worth replacing the pump with a new one right away. You should first check whether the sensor itself is working? This is very simple to do - you need to take the wire coming from this device and press it to ground (motor housing).
If the sensor is working properly, the emergency light will go out immediately after pressing. In this case, the pump will still have to be repaired. If the lamp continues to glow, then the sensor itself is not working and will need to be replaced.
There can be several reasons for an oil pump failure. Most often, its gears fail (especially often when the oil is changed infrequently, which, as already mentioned, causes abrasive wear). In addition, there may be problems with the filter valve (it may get stuck), as well as with the sealing elements. In the latter case, oil leaks from the system.
How to replace the oil pump?
Tools
Before we talk about how to remove the oil pump on a VAZ 2114, we first outline the list of tools necessary for this:
- open-end wrenches “10” and “13”;
- set of socket heads;
- gimbal adapter;
- extension;
- crank/ratchet;
- highly desirable - a torque wrench.
Replacement
Before moving on to the description of replacing the oil pump, it is worth noting that according to the rules, the crankshaft oil seal is also replaced at the same time.
The replacement of the VAZ 2114 oil pump itself is carried out in the following order:
- Disconnect the negative cable from the corresponding battery terminal.
- Drain the engine oil.
- Remove the belt from the generator.
- Remove the belt from the camshaft.
- Using a pair of screwdrivers, remove the pulley from the crankshaft (after this you should pay attention to the key - if it does not sit tightly on the shaft, you should remove it and set it aside so as not to accidentally lose it).
- Remove the engine oil sump.
- Remove the pair of bolts securing the oil pickup to the main bearing.
- Unscrew the bolt securing the oil pump to the oil receiver and remove the latter.
- Unscrew the six bolts that secure the oil pump (important - there are flat washers under each bolt).
- Use a screwdriver to pry up the oil pump, resting it between the main bearing and the pump cover, and then move it.
- Remove the pump from the crankshaft.
At this point, the entire process of removing the oil pump can be considered complete.
After the camshaft drive belt is removed during the dismantling process, it is strictly forbidden to turn both the camshaft itself and the crankshaft.
Reinstalling the oil pump occurs in exactly the same order, but in reverse order. Before starting installation, you should inspect the pump and rotate its main gear so that the protrusions on it coincide with the splines located on the crankshaft, and the working edge of the oil seal must be lubricated with liquid lubricant and carefully tucked into the crankshaft journal.
After the new oil pump is installed, a new oil filter should be installed, and then oil should be added to the system. Then you should start the car engine and let it idle for at least three minutes - this is necessary to distribute the oil on its moving elements. After this, the car can be operated as usual.