05/14/2021 14,007 VAZ 2114
Author: Ivan Baranov
While operating a car, some car enthusiasts are faced with the same important question, namely: how to remove the box on a VAZ 2114 or on another car of this AvtoVAZ line. The VAZ 2114 gearbox is the same as on the VAZ G8. The only difference is that the VAZ 2108 does not have a dipstick, and it accelerates faster.
The gearbox may need to be removed in a variety of cases, for example, in order to replace the clutch or something in its system, as well as to repair the gearbox itself.
[Hide]
CONSTRUCTION FEATURES
Structurally, the gearbox device is divided into 3 main parts: gearbox housing, rear cover and clutch housing. The internals of the device can be divided into two groups - the main pair and the differential with gear ratios.
The main pair, also known as the drive shaft of the gearbox, performs the function of reducing the speed transmitted from the engine to the crankshaft. The VAZ 2114 GP gearbox reduces engine speed by almost four times (gear ratio – 3.7).
Manipulations with the main pair, aimed at changing the gear ratio, allow you to change the length of the gears, which makes it possible to influence the acceleration and maximum speed of the fourteenth. However, it is not recommended to interfere with the operation of the box without proper qualifications - you can do irreparable things.
The VAZ 2114 gearbox that comes as standard has the following gear ratios:
- First speed – 3.636;
- Second speed – 1.95;
- Third speed – 1.357;
- Fourth speed – 0.941;
- Fifth speed – 0.784;
- Reverse – 3.53.
As evidenced by the reviews of the owners of the fourteenth, the standard gearbox is not the ideal of engineering thinking - the first speed is too short, the second, on the contrary, is long. Poorly selected gear ratios cause a serious loss of vehicle dynamics during acceleration when switching gears from 1 to 2.
The cost of a new gearbox for a VAZ 2114 is about 16 thousand rubles; used gearboxes can be found at prices ranging from 4 to 10 thousand, their price varies greatly depending on the condition.
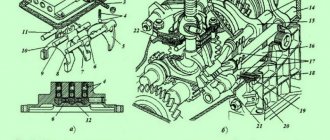
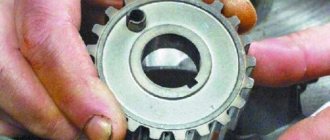
Gearbox device
Gearbox removed and slightly disassembled
Before starting the process, it is necessary to study the structure of the gearbox, as well as its design. This is necessary in order to determine the reasons why the unit needs to be dismantled, as well as to determine the mounting fasteners.
Transmission device diagram
1 – clutch release bearing; 2 – guide sleeve; 3 – input shaft; 4 – roller bearing of the secondary shaft; 5 – secondary shaft; 6 – retaining ring; 7 – satellite axis; 8 – speedometer drive drive gear; 9 – transport plug; 10 – wheel drive oil seal; 11 – tapered roller bearing of the differential; 12 – axle gear; 13 – satellite; 14 – differential box; 15 – clutch housing; 16 – driven gear of the main gear; 17 – drain plug; 18 – adjusting ring; 19 – driven gear of the 1st gear of the secondary shaft; 20 – synchronizer for 1st and 2nd gears; 21 – driven gear of the second gear of the secondary shaft; 22 – retaining ring; 23 – persistent half ring; 24 – driven gear of the third gear of the secondary shaft; 25 – synchronizer for 3rd and 4th gears; 26 – driven gear of the fourth gear of the secondary shaft; 27 – needle bearing of the secondary shaft gears; 28 – ball bearing of the secondary shaft; 29 – thrust plate; 30 – driven gear V of the secondary shaft transmission; 31 – 5th gear synchronizer assembly; 32 – nut; 33 – thrust washer; 34 – drive gear V of the input shaft; 35 – rear cover of the gearbox housing; 36 – ball bearing of the input shaft; 37 – gearbox housing; 38 – roller bearing of the input shaft; 39 – breather; 40 – input shaft oil seal
POSSIBLE FAULTS
Despite the imperfect operation, the VAZ 2114 gearbox, when used correctly, is distinguished by good endurance and durability. If you do not hesitate to prevent and promptly eliminate breakdowns, repairing it is not expensive.
Let's consider the main gearbox malfunctions that the owner of the fourteenth may encounter:
- Lack of speed fixation when switching. If the speeds are out of whack, the cause is most likely worn teeth on the gears and clutch. Accelerated wear of these parts is caused by incorrect gear shifting and non-compliance with the speed limit. The problem is resolved by replacing the gears.
- The gear shift lever is tight. The reasons are mechanical damage to the teeth of the lever fixing on the hinge or wear of the reaction rod; it’s also a good idea to check the integrity of the plastic parts of the gearbox drive;
- The VAZ 2114 gearbox is humming. Most often, the gearbox is humming in neutral gear. First of all, you need to check and, if necessary, add oil (in general, the box may hum due to the use of low-quality lubricants). If the oil is normal, the problem is wear of the bearing on the input shaft, which can only be determined through diagnostics or by disassembling the gearbox;
- Crunching sound when changing speed. Here it is necessary to change the worn out synchronizer, and it must be changed immediately after the problem has been discovered, because if you tighten it, the gear unit will completely fly off;
- Knock. The gearbox on a VAZ 2114 can knock both under load and without it, and in any gear. The cause of the knocking noise is a damaged drive gear of the problematic transmission.
One of the key factors for the trouble-free operation of gearbox number fourteen is the use of high-quality lubricants. The most suitable option is GL-4 mineral oil. It is not cheap, but it does its job at 5+; when using mineral oil, VAZ gearbox repairs are usually required extremely rarely.
Most VAZ 2114 owners agree that the best gearbox oil is 75W90. It is distinguished by greater fluidity than typical gearbox oils, due to which the lubricant better gets into those places of the gearbox, the lubrication of which is provided exclusively by splashing. Good options for 75W90 are Hypoid-Getriebeoil TDL and Liqui Moly Vollsynthetisches Getriebeoil (GL-5).
Checking the oil level should be carried out every three weeks. In the gearbox, the fourteenth gear is placed vertically, the topmost is the fifth, it is the one that is most susceptible to failure due to lack of lubrication, so it is always necessary to fill in oil to the maximum mark, and best of all - 200-250 ml. more than the required norm.
Removing the gearbox
If all the steps described above have been completed correctly, then withdrawal can begin. The process goes as follows:
Unscrew the gearbox bolts
We hang up the gearbox and remove it
When the work is completed and the box is completely dismantled, you should disassemble it and check the parts for wear. If possible, repairs and replacement of damaged elements are carried out. In some cases, the problem can be solved by replacing bearings or seals, rather than purchasing a new gearbox.
Source
REMOVAL AND REPAIR
Almost any DIY repair of a VAZ 2114 gearbox - installing new bearings, clutch or gears - involves removing it. To do this, you will need screwdrivers, a set of wrenches, WD-40 and hanging equipment to lift the unit.
Let's figure out how to remove the gearbox of the fourteenth:
- We drive the car onto an overpass or into a garage with a pit. First of all, we disconnect and remove the battery, then drain the oil from the gearbox and remove the starter. To do this, you need to disconnect the power wires from it, remove the protective jacket, unscrew the two fixing nuts from the bottom (from the pit) and one from the top of the starter;
- Now you need to remove the connecting cable from the clutch release fork and remove it from the bracket on the gearbox;
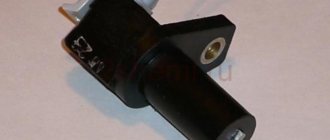
- Disconnect the wiring to the speed sensor. The wire block is secured by a spring, which must be compressed to disconnect the connection;
- We climb under the fourteenth and disconnect the wiring from the reverse sensor;
- We tighten the bolts with which the jet thrust bracket is attached to the unit body;
- We remove jet thrust. To do this, you need to loosen the clamp connected to the rod and move it back, which will make it possible to remove it from the hinge;
- Now you need to dismantle the wheel drives: remove the left one completely, and simply unscrew the right one, move it to the side and hang it on the car body;
- We unscrew the bolts from the ball joint (left) that secure it to the steering knuckle;
- We dismantle the gearbox mount to the engine on the lower right side; to do this you need to remove the supporting brackets from the stud;
- Remove the clutch housing cover (it is secured with 3 bolts);
- Unscrew the bolt on the lower left gearbox mount;
- Unscrew the nuts that secure the left and rear engine mount;
- Now we remove the fixing bolts with which the gearbox is attached to the rear engine support. We dismantle the support itself;
- Using a screwdriver as a lever, insert it into the hole between the engine cylinder block and the clutch housing, and move the gearbox off the guides as far back as possible. The rear part of the box body should pass on top of the suspension extension, and the input shaft will be disconnected from the clutch, after which the unit can be removed from under the car.
Now you know how to remove the VAZ 2114 gearbox. Good luck with your driving without any breakdowns!
How to remove?
To remove the gearbox you will need:
- set of keys;
- screwdrivers;
- assistant;
- WD-40;
- board or other hanging equipment.
Disconnect the terminals from the battery and remove it. Drain the oil and remove the starter. As you work, if you cannot unscrew any fastener or bolt, do not forget to use WD-40.
- We place the car on the overpass (pit) and remove the crankcase protection by unscrewing 3 fasteners.
- Remove the clutch cable from the release fork. Then we pull it out of the bracket on the box.
- Remove the wiring block from the speed sensor (DS), secured with a spring. Therefore, to remove it, we compress the element.
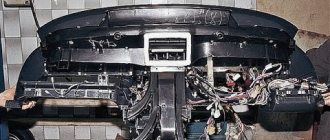
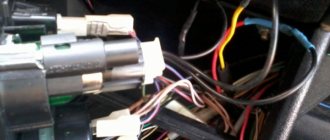
- We unscrew bolt No. 1 securing the ignition module bracket to our gearbox, No. 2 and 3, shown in the figure.
Unscrewing the bolts securing the ignition module bracket
- We climb under the car and find the wiring block for the reverse sensor. Disconnect.
- Unscrew the 2 bolts securing the torque arm to the box.
- Loosen the gearbox shift rod clamp. We take it out from the gear selection rod hinge, pushing it back.
- We remove the wheel drives. We tie the plug inserted in place of one of the drives with a rope or wire so that it does not fall out during dismantling of the gearbox. The right drive does not need to be completely removed. We disconnect the element from the box and hang it in the body, first moving it to the side.
- So that the gearbox can be removed without additional difficulties, unscrew the two bolts of the left ball joint from the steering knuckle.
- Unscrew the lower right mount of the gearbox to the engine. The support bracket must be removed from the stud.
- If necessary, just loosen the fastening of the element.
- Unscrew the 3 bolts and remove the clutch housing cover.
- Unscrew the bolt of the lower left gearbox mounting.
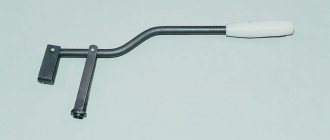
- We hang the engine using a board or other device.
- Unscrew the nut securing the left power unit support (from the bottom of the car).
- Remove the fastening elements of the rear support of the power unit to the body.
- We unscrew the bolts securing the rear support to the gearbox, holding the nuts from turning with a second wrench, and remove it.
- By inserting a screwdriver between the clutch housing and the cylinder block, we move the gearbox off the guide bushings. At the same time, be sure to hold the part.
- We move the gearbox as far back as possible, passing the rear cover of the box over the front suspension brace. The input shaft should disengage from the clutch. If this fails, push the engine to the side. Lowering the front end of the box, remove it from under the car.