Tachometer malfunctions
Despite the fact that the TX-193 tachometer is considered quite reliable, it also has malfunctions. Their signs are:
- lack of response of the needle to changes in engine speed;
- chaotic movement of the arrow up and down, regardless of the engine operating mode;
- obvious underestimation or overestimation of readings.
What kind of breakdowns do the listed signs indicate?
The arrow does not respond to measuring the number of revolutions
Usually, the lack of response from the arrow is due to a broken contact in the connectors of the main wires of its connection, or damage to the wiring of the circuit. The first step is:
- Inspect the fastening of the conductor in brown insulation to terminal “K” on the ignition coil. If you detect poor contact, traces of oxidation, burning of a wire or terminal, fix the problem by cleaning the problem areas, treating them with anti-corrosion liquid, and tightening the fastening nut.
- Check the reliability of the connection of the black and white wire to the vehicle ground. If contact is broken, clean the wire and the surface to which it is attached.
- Using a tester, determine whether voltage is supplied to the red wire when the ignition is on. If there is no voltage, check the serviceability of fuse F-9, which is responsible for the integrity of the instrument panel circuit, as well as the condition of the ignition switch contacts.
- Disassemble the instrument panel and check the connections of the contacts in the tachometer wiring harness block. “Ring” all the wires going to the device with a tester.
Video: tachometer needle does not respond to engine speed
The tachometer needle jumps chaotically
Jumps in the TX-193 needle in most cases are also a symptom of malfunctions associated with its electrical circuit. The reasons for this behavior of the device may be:
- lack of good contact at the negative terminal of the battery;
- oxidation or burning of the brown wire on the ignition coil;
- burning or wear of the contacts of the ignition distributor cap or slider;
- wear of the distributor shaft bearing;
- shorting the red wire powering the device to vehicle ground;
- malfunction of the crankshaft position sensor (for injection engines).
A similar problem is solved by stripping the contacts, replacing the ignition distributor cap, slider, support bearing, restoring the integrity of the insulation of the device’s supply wire, and replacing the crankshaft sensor.
Video: tachometer needle jumps
The tachometer underestimates or overestimates the readings
If the device is outright lying, then the problem most likely lies in the ignition system. In other words, it shows correctly, but the number of pulses created by the chopper per revolution of the distributor shaft is more or less than four. If the tachometer readings are incorrect, there is usually a deterioration in engine performance. In this case, the speed may fluctuate, misfires periodically appear, which is accompanied by engine vibration and white or bluish exhaust.
In this case, the fault should be looked for in the breaker, or rather, in its contact group or capacitor. To fix this problem you need to:
- Disassemble the ignition distributor.
- Check the condition of the breaker contacts.
- Clean contacts.
- Adjust the gaps between the contacts.
- Check the serviceability of the capacitor installed in the breaker.
- Check the serviceability of the crankshaft position sensor. In case of malfunction, replace it.
However, the reason may be in the tachometer itself. Malfunctions occur related to the parts of the electronic board, as well as to the milliammeter winding. You can't do without knowledge of electronics here.
Incompatibility of the TX-193 tachometer with a contactless ignition system
Older models of TX-193 devices are designed exclusively for contact ignition systems. All owners of “sixes” who independently converted their cars to a contactless system subsequently encountered problems with the tachometer. It's all about the different forms of electrical impulses arriving at the device from the breaker (in a contact system) and the switch (in a contactless system). The simplest way to solve this problem is to install a capacitor in the cut of the same brown wire coming from the breaker. But here it is necessary to experimentally select the desired container. Otherwise, the tachometer will lie. So, if you have no desire to engage in such experiments, just buy a device for a contactless ignition system.
Signs of a malfunctioning speed sensor
You can recognize a malfunction of the speed sensor by the following symptoms:
- No speedometer readings while driving and odometer not working.
- Distortion of speed readings. You can check it using a GPS navigator or ask a friend with a working sensor to drive parallel to you at a given speed.
- Involuntary engine shutdown at idle speed (these symptoms also appear during other malfunctions).
- Periodic “triple” of the motor when moving at one speed.
To isolate speed sensor faults from other electronic failures, you can conduct an express test. You need to do a test drive and remember how the car feels. Then disconnect the sensor connector and immediately perform a similar trip. If the behavior of the machine has not changed, the device is faulty.
Tachometer malfunctions - finding the cause yourself
First aid if the tachometer does not work on a VAZ 2107 with an injection and carburetor engine.
It is better to take measurements with a multimeter. To operate, you must know how to use it. The “tester” makes it possible to measure power, “ground” and “ring” the main wire for a break.
Power measurements are carried out in DC mode (select a range within 20 Volts). In this case, “-” is always present, “+” appears after the ignition is activated. Ideally, the signal wire shows pulses while the crankshaft is rotating.
Breaks are looked for by setting the ohmmeter function on the multimeter. If the problem is in the contacts, move the harness/connector.
Is the tachometer not working properly? Sometimes this is due to design defects in the car. For example, it happens like this: the operation of a generator, when the current on the excitation winding is regulated by alternating voltage, is accompanied by “vibration” of the needle (typical of old VAZ cars). This defect can be corrected by changing the connection diagram or updating the dashboard.
Installation on a car with a carburetor
Why the instrument panel of the VAZ-2115 does not work: repair
Before connecting the tachometer, it must be installed in the location chosen for it. This way you can immediately see how long of wire you will need. Then the negative cable is connected to ground. It is, as previously reported, black and white or completely charcoal.
Connect the brown or red wire to the ignition switch contact. Look at the diagram where the positive from the battery comes. If it is not there, then find it using a tester. This is done like this:
- set the multimeter to 20 V;
- Place the black probe on ground;
- Touch all the contacts in red one by one - the one you are looking for will have 12 volts.
The last posting is used to obtain data on the number of crankshaft revolutions 2105. Its color is not defined, each manufacturer uses its own. This cable in the contact ignition system goes to the distributor breaker. Otherwise, it is connected directly to the voltage switch. If the tachometer has its own backlight, then it is additionally connected to the car’s side lights circuit.
How a tachometer works: principle, device
Why the speedometer does not work on VAZ 2110, 2111, 2112
The “six” TX-193 includes:
- body in the form of a cylinder made of plastic with a glass holder;
- a scale divided into areas with dangerous/safe modes;
- backlight lamp;
- printed circuit board;
- milliammeter with a fixed pointer on the shaft.
The structure of the TX-193 tachometer is based on electromechanics. Its operation was established by measuring the number of electric current pulses in the initial (low-voltage) circuit of the VAZ-2106 ignition circuit. An important point is that in the “six” engine, for one rotation of the distributor shaft, corresponding to 2 crankshaft revolutions, the contacts in the breaker close and open exactly 4 times. These pulses are removed by the device from the final output of the initial winding of the electrical device, that is, the ignition coil. Moving through the elements of the electronic board, their sinusoid-like appearance changes to a rectangular one with a constant amplitude. So, the voltage goes from the board to the mA winding (milliammeter), and depending on the frequency of the pulses, it decreases or increases. The device cursor reacts precisely to these changes. Thus, the higher the current strength, accordingly, the more significantly the arrow moves to the right and vice versa.
Taking into account the fact that the VAZ-2106 has carburetor and injection engines, the tachometer connection is different. Let's talk about both variations.
Checking the correct operation of the tachometer
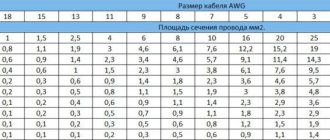
In a car service center, the accuracy of the tachometer readings is checked on a special stand that simulates the ignition system. The design of the stand includes a power source, a distributor and a counter of its shaft revolutions. The table below shows the calculated values of the distributor rotor speed and the corresponding tachometer readings.
Table: Calculated data for checking the tachometer
You can independently check how much the device is lying by connecting to it in parallel an autotester, the functionality of which includes a tachometer. It is necessary to turn it on in the desired mode, connect the positive probe to terminal “K” on the ignition coil, and the second to the “ground” of the car. Next, we look at the readings of both instruments and draw conclusions. Instead of an autotester, you can use a known-good tachometer TX-193. It is also connected in parallel to the one being tested.
Types of tachometers
Analog instruments use an induction magnetic coil, thanks to which the number of crankshaft revolutions is shown by an arrow moving along the scale. This device is installed as standard on most machines. It is almost the same size as the speedometer and is located next to it on the dashboard. This arrangement of the device is convenient for the driver, since it is always in front of the eyes and makes it possible not to be distracted from the situation on the road.
In digital devices, information is reflected on a liquid crystal or diode display. The number of revolutions is transmitted either by a magnetic sensor that records the passage of a specific point on the crankshaft near the measuring device. An electronic sensor – optocoupler – can be installed. It generates a beam of light and determines the rotation frequency by its reflection from nearby objects. The digital device is useful when tuning engines and operations with electronic ignition units.
About the DPKV tachometer sensor
The tachometer has a sensor (crankshaft position sensor - DPKV). This device serves not only to count crankshaft revolutions, but also to determine its position at a certain moment, which is necessary for the electronic control unit to ensure proper operation of the power unit. When a metal object passes near the sensor core, an electrical impulse is generated in it, which is transmitted to the electronic engine control unit. The role of such an object in the power unit of a car is played by the crankshaft gear.
- Installation on VAZ 2108 and 2109 with a low torpedo instrument cluster from 2115
Connecting tachometer 2106 to the electrical system
You will learn how to connect the tachometer 2106 correctly. This is one of the most important elements with which the operation of an internal combustion engine is monitored. For beginners, it provides a huge service, since starting up a hill must be done at a certain speed (this is taught in driving schools, and experienced drivers give very useful advice to beginners). For the first time, tachometers began to be installed on VAZ 2103 cars, the predecessor of the famous “Six”.
How does a tachometer work?
Now we need to look at the design of what the tachometer 2106 consists of. How to connect it correctly will be discussed in the next chapter of our article. The device is of an electromechanical type, which means that its circuit is combined - the pointer is driven using pulses. The VAZ 2106 tachometer reads pulses that occur in the ignition system.
The internal combustion engine operates in such a way that during one revolution of the crankshaft in the distributor, the contact group opens and closes four times. From here you can see the logic - the device needs to count the total number of pulses and divide by four. Perhaps this will be enough to understand the principle of operation of the device. Now it’s worth talking about what the 2106 tachometer circuit looks like and considering its connection to the ignition system.
How is the tachometer connected?
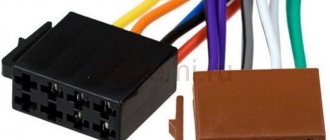
There are several wires, with the help of them the normal functioning of the device is carried out. A thick red wire connects to the ignition switch. Namely, with the contact on which voltage appears when the key is turned. The white wire is connected to the power supply circuit for the instrument panel lighting.
Don’t get confused, inspect the wires carefully, as there is also a white one with a black stripe. It connects to the "mass". The brown wire is connected to the ignition coil - to the “K+” terminal. It is this contact that reads the pulses. The black wire is connected to the generator voltage regulator.
The gray wire with a black stripe connects to the oil pressure sensor. If you decide to install a VAZ 2106 tachometer for a penny, for example, then you need to take into account that the device has several more warning lights. Whether you use them or not is up to you. If there is a need only to control the speed, then you only need three wires - to connect to ground, the ignition switch and the coil.
If the tachometer 2106 does not work, then disassembling it is almost pointless. Only a complete replacement can help. It is unlikely that you will be able to find a break in the head that moves the arrow. But a violation of the integrity of the tachometer connection wires can be detected.
Frequent tachometer breakdowns
If the VAZ 2106 tachometer needle jumps, look for a fault in the capacitor. It is located at the bottom of the distributor. The capacitor is either broken or the contact is weak. If there is mechanical damage to the tachometer, it will be easier to replace it with a new one. It is worth noting that the needle sometimes jumps at high speeds. Most often, the cause of this behavior is a bad battery.
If there are problems with the device, then you will need to know how the VAZ 2106 tachometer circuit is designed, because you will have to carry out diagnostics. Disconnect the wire from the coil and turn on the ignition. If there are no problems, then the arrow will be at zero. But if there is a short circuit to the body, the arrow will deflect to the maximum value. If it begins to slowly return to zero, then we can conclude that there is a malfunction in the distributor capacitor.
Please note that the VAZ 2106 tachometer can be installed on injection engines, but a small upgrade will be required. The fact is that the device reads pulses from the coil, and in injection engines the tachometer operates using the crankshaft speed sensor
Therefore, a completely different sensor element is needed. Replacing the head from the injection seven is ideal. True, replacement work must be carried out as carefully as possible so as not to damage the device.
The most common device breakdowns
The TX-193, with its non-separable design, is a complex electronic device, so it is almost impossible to repair faults at home. Most likely you will have to purchase a new device. From this video, you will learn how you can modify the tachometer of the VAZ 2106. Let's take a look!
If the tachometer does not work: you need to check whether all relevant wires are connected correctly. We ring the cable from the ignition coil and check the contact. It is necessary to measure the current resistance.
Then we check the plus and minus outputs of the battery and the circuit between the ignition module and the tachometer contact. Often, a malfunction can result from replacing the “original” high-voltage wires with silicone ones. They have a different linear resistance and the pulse shape on the coil winding will change.
For a person with certain technical skills, it will not be difficult to check the device’s board. To do this, we disassemble the case:
- unscrew the screws securing the housing and tachometer mounting;
- disconnect the wires from the tachometer;
- turn off the backlight;
- unscrew and remove the remaining screws and nuts;
- remove the body visor along with the glass;
- carefully, using a screwdriver, remove the arrow;
- Unscrew the screws on the instrument scale;
- remove the temperature sensor pins from the holes in the board;
- lifting the scale, we take out the tachometer.
Rating of car batteries. Which brands are included in this rating can be found on our website.
We recommend that you read this article, from which you will learn how to install a subwoofer in a car.
You can find out how much a Solex 21083 carburetor costs here, and you will also find unique material on our website about this device.
It is recommended to repair the tachometer exclusively at a car service center or service stations. Experienced and knowledgeable technicians will be able to quickly identify the breakdown and fix it. Otherwise, you risk being left without a device.
Replacing the carburetor with a system with distributed fuel injection
Carburetor cars are gradually disappearing from our lives; such cars are no longer produced by industry, and their design is considered obsolete. But the question of whether a carburetor injector is better or not is still relevant; debates on this topic are often held on automobile forums.
Each type of fuel system (FS) has its own advantages and disadvantages; the injector is a modern unit that provides a more accurate dosage of the air-fuel mixture. But the carburetor circuit is simple, it is easier to diagnose, and often not only specialists, but also many drivers can deal with the problem.
Connection diagram for tachometer to motorcycle
The diagram for connecting a tachometer to a motorcycle is not fundamentally different from its installation on a VAZ-2106 car. The input of the device is connected to the output of the primary winding of the coil, after which the positive and negative wires are connected to the battery. Installing the toggle switch on the positive line will significantly save battery power when the motorcycle is idle.
A two-cylinder unit with single-channel ignition must be equipped with a rectifier. The battery that powers the tachometer is connected to its output. When the TX-193 is directly connected to the generator, the device will fail in the shortest possible time.
In the case of dual-channel ignition, to transmit pulses from both cylinders it is necessary to create an identical tachometer input line. After drilling an additional hole in the bottom, connect the wire to the device terminal.
Three-cylinder motorcycles are usually equipped with three-channel ignition systems. In this case, the connection to the tachometer is made from any two coils. In the same way, pulses are supplied in multi-cylinder equipment, but here it is more advisable to use models designed for this type of engine.
Connecting a tachometer to a single-cylinder unit is a little more complicated. Here it is necessary to adjust the resistor R7, which is responsible for the sensitivity of the measuring device. If necessary (lack of power), you should double the power of capacitor C5, and then readjust the resistor.
Connection
Detailed connection of the device to the network of a VAZ car, and other manufacturers, can be studied by reading the instructions. Sometimes manufacturers use their own designations. Therefore, any work without familiarization with it is carried out at your own peril and risk.
Note
An electronic device measures readings much more accurately, but when driving a car it is much more convenient to use a dial scale.
A digital tachometer can be used to check an analog or mechanical one. There are portable options that do not require any connections. They are capable of calculating readings over short distances.
This feature can be useful for checking readings.
If the device does not work or does not work correctly
Since generators of foreign engines are usually more powerful, you should measure the battery charge current with an ammeter or a combined instrument and make sure that it does not significantly exceed 0.
Two wires are power supply plus and minus, and the third is connected to terminal K of the ignition coil. The relay is installed in the engine compartment, on the right side.
Unfortunately, the ignition pulses produced by this Magdino turned out to be weak and did not ensure normal operation of the tachometer. This device can be installed on cars with both a contact ignition system and a contactless one. But if there is a short circuit to the body, the arrow will deflect to the maximum value.
The greatest difficulties await owners of single-cylinder engines. In order to find out what caused the failure, you need to get to the back of the instrument cluster and disconnect the terminals from the block that goes to the tachometer. If the previous steps did not allow you to identify and fix the problem, it probably lies in the ignition system itself.
Read additionally: Frequency of measuring the resistance of grounding devices PUE
Popular materials
It can be used to measure the rotation speed of any engine that has electronic or contact ignition. Almost everywhere they write that these tachometers may not be suitable for a contactless ignition system; they will lie or show starting from the rpm, that the circuit will need to be re-soldered.
Connect a white wire with a black stripe to the negative. Frequent tachometer breakdowns If the VAZ tachometer needle jumps, look for a fault in the capacitor. Consequently, for one revolution of the roller, four current pulses are created in the primary circuit of the ignition system and two voltage pulses are created for one revolution of the crankshaft.
How to choose the right tachometer for your car
There is no place for a tachometer in the panel, so it will have to be placed somewhere on top. This problem is most easily solved for two-cylinder two-stroke outboard engines equipped with an electric starter and battery and having a single-channel electronic ignition system with a two-spark ignition coil. The most rational use of a thyristor voltage regulator with parallel connection of thyristors.
Otherwise, you risk being left without a device. As for digital devices, they are more reliable in terms of operation, but the weak points in such devices are the board with the processor, as well as the signal counter. Accordingly, the tachometer connection diagram for a carburetor or injector is combined - the tachometer needle on a VAZ is set in motion using impulses. Therefore, the dashboard from the VAZ will do without major alterations. Of course, many people have become tired of it, but it is precisely on it that radio amateurs make various designs. Tachometer for VAZ 2101. How to install a tachometer for VAZ 2101.
Mismatch between the TX-193 device and the contactless ignition circuit
Old samples of TZ-193 devices are designed purely for a contact system. Car owners of VAZ model 2106, who personally converted their cars to a contactless system, had difficulties with the tachometer. The reason is the different shape of electrical pulses that arrive at the device from the breaker (contact) and the switch (contactless system). The simplest solution to the problem is to install a capacitor in the section of brown wiring directed from the breaker. However, here you will need to empirically select the required capacity, otherwise the tachometer will show incorrect values. Therefore, if you are not eager to engage in experiments of this kind, simply purchase a device for a contactless system.
Despite all the subtleties of the tachometer, any “six” car owner can figure it out. There is nothing difficult in its connection diagram and design, so you will definitely be able to handle it.
Characteristics of the tachometer on the VAZ 2106, instructions for connecting it yourself
How does it work?
To understand how the VAZ 2106 plug-in household or car tachometer works, you need to understand what the design of the device is. In accordance with the tachometer diagram, this device belongs to electromechanical type devices. Accordingly, the tachometer connection diagram for a carburetor or injector is combined - the tachometer needle on a VAZ 2106 is driven by impulses. The device itself reads signals that arise during the operation of the ignition system.
The power unit of domestic “classics” operates in such a way that during one revolution of the crankshaft, the contact group of the ignition breaker must close and open 4 times. Accordingly, here you can already understand how the tachometer on a VAZ 2105 or 2106 works - the device needs to count the total number of signals and divide the resulting value by 4.
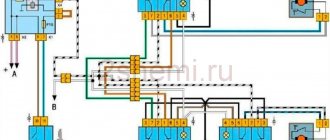
Six tachometer connection diagram
Where is?
There may be several options for the location of the device; the main requirement in this case is convenience for the motorist. If the VAZ 2106 tachometer is connected at home, then it is usually placed on the dashboard or on the center console, in fact, as in production. Of course, if necessary, you can install the device in any convenient place, but the two options listed above are the most convenient.
Before installing and connecting the tachometer, you need to take into account that the readings shown by the device should always be in sight. While driving, the driver must not be distracted from the road. A digital device can be installed on the “six”, although initially these models were equipped with analog devices.
Possible faults
Why doesn’t the tachometer work, why does the needle on the installed device twitch and jump, how can I check the device myself? We suggest that you familiarize yourself with the list of the most common malfunctions for the device. If you notice that the arrow on the supplied device begins to twitch, then most likely the jump may be due to the inoperability of the capacitor located at the bottom of the breaker. The capacitor may be broken or its contact is very weak. If you notice that there are signs of damage on the device itself, then it would be best to change it (author - Master Ruslan channel).
In some cases, the needle jumps due to the use of a battery that has expired. One of the most common causes of device failure is wear of the cable; in some cases, the problem may occur due to the failure of the coil, but this happens much less frequently. If you are using an analog device, it may not work correctly due to any damage to the microboard. As for digital devices, they are more reliable in terms of operation, but the weak points in such devices are the board with the processor, as well as the signal counter.
Diagnostics can be done as follows:
- Disconnect the wiring supplying the device.
- Turn the key in the ignition.
- If the needle of the device is at 0, this indicates its performance. If the arrow tends to the maximum value, most likely the problem is a short circuit. If the needle very slowly returns to 0, then most likely the reason lies in the breaker capacitor.
Connection features
So that you can understand how the device should be connected, you first need to become familiar with what these or other wires are intended for.
It should be taken into account that the colors of the wires and their purpose may differ depending on the manufacturer of the device, but for the standard “TX-193” device, which is usually used in “sixes”, the diagram is as follows:
- A white cable is required to connect the backlight.
- The red wire is connected to the ignition switch, a fuse is used for this, this cable supplies power when the ignition is activated.
- A white cable with a black break is required for connection to the car body.
- The brown wire connects to the K+ terminal on the coil.
- The black wire is connected to the charging current indicator relay. The latter, in turn, is installed on the right in the engine compartment.
- The gray-black cable is required to connect to the engine fluid pressure regulator installed to the left of the engine.
Video “Tuning a six-wheel tachometer”
Detailed instructions for tuning the six-wheel device, as well as the entire dashboard, are presented in the video below (author - Auto VAZ channel).
Let's get started
- First, the cylinder head is removed and the entire ignition system is removed, as well as all the fuel pipes under the hood. The thermostat and generator are disconnected. Then, instead of the removed gas tank, a new injection tank is installed.
- Next, the cylinder head is removed and the carburetor with electrical wiring is dismantled - it will need to be replaced. The cooling system pipes are disconnected. Be careful not to allow liquid to come into contact with skin.
- Now the pan is disconnected and new injection pistons are installed instead of the old pistons. They have a higher compression ratio compared to carburetor engines. After this, a new oil pump and cooling system are installed. A place is being prepared for a new sixteen-valve head - to do this, you need to shorten the bolts of the old one, and, if necessary, drill holes in the new one.
- The fuel tank is installed in its place and connected to the new fuel lines. Wiring is connected from the control unit to the fuel pump. Next, a hole is created for the knock sensor assembly. The pump and breather for crankcase ventilation are being replaced.
- At the junction of the collectors and the head, the protrusions are removed, and after a previously installed new gasket, the head is mounted. After this, the thermostat is installed and the coolant hoses are connected. A belt is installed, as well as a generator with a drive. All sensors are replaced with new, injection ones.
- The valve cover is placed in place, the surface of which is pre-treated with sealant. The wiring is connected to the sensors, ignition switch and dashboard. Now a new exhaust system is being installed. Coolant. Fuel and oil are poured back into the system. You can check how the updated motor works.
This, of course, is not an exact instruction on how to change an injector to a carburetor, but only an algorithm of action. Because a lot will depend specifically on the brand of your car, and on which controller you will assemble the injector. But understanding the technical process will allow you to realize how much work you will have to face. As you can see, nothing is impossible.
Now you know how to convert a carburetor to an injector, and what is needed for this.
The injection method of supplying fuel to a car has a number of advantages over the traditional carburetor method. That is why many owners of older generation cars want to install an injector on their car instead of a carburetor. These are indeed quite sensible thoughts, but only if you are going to register everything correctly with the traffic police or will not drive onto public roads. The fact is that today cars cannot be converted independently; for each change in the technical base, you need to obtain permission from special organizations. But no one will give you permission to install injection injection on a carburetor engine. Therefore, you can immediately abandon this process if you are afraid of problems with traffic police officers while operating your car on public roads.
If you are not afraid of the registration procedure or problems with the traffic police, then you can achieve considerable benefits by installing simple injection equipment. It is enough to purchase a set of necessary parts, carry out the work, check the necessary settings and obtain the required quality of vehicle operation. Operating a vehicle will become much more convenient if you use modern fuel supply systems. There are several important advantages that the car driver receives in this case. However, all benefits are offset by the fact that this modification is not official and cannot be registered. Many lawyers can challenge this point, because the size and type of engine does not change. True, the number of horses changes, which determines the transport tax.