What headlights are used on the VAZ 2106
Considering that production of the VAZ 2106 finally ceased back in 2006, it is easy to assume that many parts and structural elements of the car, which continues to be actively used by Russian motorists, may require replacement. This fully applies to headlights: the factory optics of the VAZ 2106 in most cases have exhausted their service life, but they are quite easily replaced with new, more up-to-date components, primarily alternative lamps and glass.
Factory optics of the VAZ 2106 today in most cases require reconstruction or replacement
Lamps
Standard lamps are most often replaced with bi-xenon or LED ones.
Bixenon
The use of xenon lamps today is considered to be one of the most advanced options for outdoor lighting for both imported and domestic cars, including the VAZ 2106. The bulb of a xenon lamp is filled with gas, which creates a glow after high voltage is applied to the electrodes. Ignition and normal operation of the xenon lamp are provided by special electronic units that generate the voltage of the required value. Bi-xenon technology differs from xenon in that it provides low and high beam in one lamp . Among the advantages of xenon over other types of automotive lighting, the durability of such lamps, their cost-effectiveness and efficiency are most often mentioned. The disadvantage of xenon is its high cost.
When installing bi-xenon on a VAZ 2106, you can replace both all four headlights and two of them, for example, external ones (i.e. low beam). To feel the difference between standard and newly installed optics, most often two bi-xenon lamps are enough: the level of illumination becomes such that there is no need to buy another rather expensive set.
The use of xenon lamps today is considered to be one of the most advanced options for implementing external lighting for the VAZ 2106
LED bulbs
Another alternative to the standard optics of the VAZ 2106 can be LED lamps. Compared to standard “six” lamps, LED lamps are more vibration-resistant and often have a waterproof housing, which allows them to be used quite successfully in poor road conditions. LED lamps are much cheaper than bi-xenon lamps, and can last the entire service life of the car. The disadvantage of this type of lamp is its high energy consumption.
One of the most popular types of light-emitting diode (LED) lamps for the VAZ 2106 is Sho-Me G1.2 H4 30W. The durability and high functionality of such a lamp is achieved through the use of three LEDs fixedly mounted in the device body. In terms of brightness, the lamp is not inferior to xenon, the use of Sho-Me G1.2 H4 30W is environmentally friendly, the generated beam of light does not blind oncoming drivers, since it is directed at an angle.
LED lamps can be a completely acceptable alternative to the standard optics of the VAZ 2106
Glass
Instead of factory glass, you can use, for example, acrylic or polycarbonate.
Acrylic glasses
Some owners of VAZ 2106 cars prefer to install acrylic headlight glasses instead of standard ones. Such headlights are quite often made in private workshops using heat shrinkage. To do this, as a rule, the gypsum matrix is removed from the old glass and a new acrylic headlight (which is nothing more than plexiglass) is cast over it using homemade devices. The thickness of an acrylic headlight is usually 3–4 mm. For a car enthusiast, such a headlight will cost much less than a standard one, but during operation it can quickly become cloudy and covered with cracks.
Polycarbonate
If the owner of the “six” has chosen polycarbonate as the material for the headlight glasses, he must take into account that:
- this material is more expensive than, for example, acrylic;
- the main advantages of polycarbonate compared to acrylic are its higher impact resistance and increased light transmittance;
- polycarbonate has high heat resistance and resistance to precipitation;
- You can only service polycarbonate headlights with a soft sponge; you cannot use abrasive materials to care for them;
- Polycarbonate is approximately 2 times lighter than glass.
Polycarbonate headlights are highly heat-resistant and weather-resistant
18.26. Replacing interior light bulbs
| EXECUTION ORDER |
| 1. Remove the ground wire from the battery. |
LAMP THAT TURN ON WHEN THE DOOR IS OPENED
Removal
| EXECUTION ORDER |
| 1. Using the blade of a thin screwdriver as a lever, remove the lamp from the socket and disconnect the electrical connector from it. |
| 2. On models where the lamp that turns on when the door is opened is combined with a reading lamp, remove the lampshade to access the lamps. |
Installation
| EXECUTION ORDER |
| 1. Installation is carried out in the reverse order of removal. |
GLOVE BOX LIGHT
Removal
| EXECUTION ORDER |
| 1. Using the blade of the screwdriver as a lever, remove the light from the socket and disconnect the electrical connector from it. |
| 2. Remove the light bulb from the lantern. |
Installation
| EXECUTION ORDER |
| 1. Installation is carried out in the reverse order of removal. |
LUGGAGE COMPARTMENT, ENGINE COMPARTMENT AND EDGE LIGHTING LAMP
Removal
Removing the light bulb from the engine compartment light
EXECUTION ORDER
1. Using the blade of a thin screwdriver as a lever, remove the flashlight from the socket and disconnect the electrical connector from it. 2
Using caution, remove the light bulb from the spring contacts of the flashlight (see Fig.
Removing the light bulb from the engine compartment light.
Installation
| EXECUTION ORDER |
| 1. Installation is carried out in the reverse order of removal. |
CIGARET LIGHTER LIGHT
Removal
| EXECUTION ORDER |
| 1. Remove the ashtray/cigarette lighter assembly from the instrument panel and disconnect the electrical connector from the cigarette lighter lamp. |
| 2. Pull to remove the lamp from the socket. |
Installation
| EXECUTION ORDER |
| 1. Installation is carried out in the reverse order of removal. |
CLOCK LIGHT
Removal
Removing the socket with the clock light bulb
| EXECUTION ORDER |
| 1. Take off your watch. |
| 2. Turn the socket with the light bulb and remove it from the back of the clock (see Fig. Removing the socket with the clock backlight bulb). |
| 3. Pull to remove the lamp from the socket. |
Installation
| EXECUTION ORDER |
| 1. Installation is carried out in the reverse order of removal. |
ON-BOARD COMPUTER DISPLAY LAMP
See corresponding description above.
HEATER CONTROL PANEL LIGHT
Removal
Removing the socket with the heater control panel light bulb
| EXECUTION ORDER |
| 1. Remove the heater control panel. |
| 2. From the back of the instrument panel, pull out and remove the socket with the light bulb (see Fig. Removing the socket with the light bulb for the heater control panel). |
| 3. Pull to remove the lamp from the socket. |
Installation
| EXECUTION ORDER |
| 1. Installation is carried out in the reverse order of removal. |
MIRROR LIGHT IN THE SUN VISOR
Removal
| EXECUTION ORDER |
| 1. Lower the sun visor and, using the blade of a thin screwdriver as leverage, remove the lens assembly from the mirror. Remove the backlight from the spring contacts. |
Installation
| EXECUTION ORDER |
| 1. Installation is carried out in the reverse order of removal. |
Electrical diagram
The wiring diagram for VAZ 2106 headlights includes:
- Actually the headlights.
- Circuit breakers.
- Indicator of high beam headlights on the speedometer.
- Low beam relay.
- Mode switch.
- High beam relay.
- Generator.
- External lighting switch.
- Battery.
- Ignition.
The wiring diagram for connecting VAZ 2106 headlights is simple in design and reliable in operation.
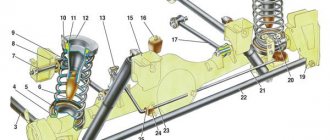
Understeering's shifter
The driver can turn on the low and high beam headlights using the steering column switch. In this case, it is necessary that the external lighting switch button is pressed. However, even if this button is not pressed, the driver can briefly turn on the high beam (for example, to give a light signal) by pulling the steering column switch lever towards him: this is possible due to the fact that the steering column light signal contact is powered directly from the ignition switch.
The steering column switch itself (which is also called the tube) on the “six” is three-lever (high, low beam and dimensions) and is attached with a clamp to the steering shaft bracket. If repair or replacement of the tube is required, then, as a rule, it is necessary to disassemble the steering column, and the most typical malfunctions of the steering column switch are failure of its contacts (as a result of which, for example, the high or low beam does not work) or mechanical damage to the tube itself.
The steering column switch on the “six” is a three-lever switch (high beam, low beam and dimensions) and is attached with a clamp to the steering shaft bracket
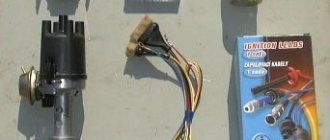
Headlight relay
The VAZ 2106 car initially used headlight relays of the RS-527 type, which were later replaced by relays 113.3747–10. Both relays are located in the power unit compartment on the mudguard on the right in the direction of travel of the vehicle. In terms of their technical characteristics, the low and high beam relays are identical:
- response voltage - 8 V (at 20–30 °C);
- gap between contacts - 2 mm;
- winding resistance - 85 Ohm (at 20 °C).
In normal condition, the headlight relay contacts are open: a closure occurs when the low or high beam is turned on using the steering column switch. Repairing relays when they fail is most often impractical: due to their low cost, it is easier to replace them with new ones.
Automatic headlight switching
The relevance of turning on headlights in automatic mode is due to the fact that many drivers forget to turn on low beams during the daytime (as required by traffic regulations) and as a result receive fines. In Russia, such a requirement appeared for the first time in 2005 and initially applied only to traffic outside populated areas. Since 2010, all drivers have been required to turn on low beams or side lights when driving: this measure is designed to improve road safety .
Those drivers who do not trust their own memory perform a simple modification of the VAZ 2106 electrical circuit, as a result of which the car’s low beam turns on automatically. Such an upgrade can be carried out in different ways, and most often the point of the upgrade is to ensure that the low beam turns on after the engine is started. This can be achieved, for example, by including a low beam relay in the generator circuit: this will require two additional relays, thanks to which it will be possible to control the headlights when the engine is on.
In order not to strain my memory and not to forget to turn on the neighbor, I installed a machine for myself)) This “device” looks like this. Operating principle: Started the engine - the low one turned on, turned it off - went out. I raised the handbrake with the engine running and the headlights went out; I released it and they came on. Disabling the low beam when the handbrake is raised is convenient during autostart. That is, turning off the lights using the handbrake has been removed and a power switch has been added, respectively, one relay has been removed. The low beam switches on after starting the engine and switches off when the ignition is turned off. The high beam is turned on by the standard steering column switch, but when it is turned on, the low beam does not go out, so the high beam shines into the distance, and the low beam additionally illuminates the space in front of the car.
Those drivers who do not trust their own memory perform a simple modification of the VAZ 2106 electrical circuit, as a result of which the car’s low beam turns on automaticallyMager73
https://www.drive2.ru/l/288230376151984970/
There are other options for automatically turning on the headlights, for example, through an oil pressure sensor, and any car enthusiast can choose the most suitable method for themselves.
Video: one of the ways to automate the inclusion of low beam on a VAZ 2106
Conclusion
The Zhiguli 2106 car has a fairly simple electrical circuit, so it is not difficult to find and fix headlight faults. To do this, you just need to adhere to the recommendations outlined above, and also be able to handle a device such as a multimeter.
You can find additional useful information on the topic discussed in the video in this article.
Car owners still use vehicles from the domestic automobile industry, but not all of their elements are durable. An example is the lamp in the low-beam headlights on the VAZ 2106 model. Let's consider which light bulbs are best suited for repairing them, what are the steps in the instructions for replacing them, and what common problems are encountered.
Fog lights
In conditions of poor visibility caused by atmospheric conditions, such as fog or thick snow, it can be difficult to do without such a useful addition to standard optics as fog lights. This type of headlight forms a beam of light directly above the road and does not shine into thick snow or fog. The most in demand among VAZ 2106 owners are the domestic PTF OSVAR and Avtosvet, as well as the imported Hella and BOSCH.
When installing PTF, you should be guided by traffic regulations, according to which there should be no more than two lamps of this type on a passenger car and they should be located at least 25 cm from the road surface. PTF must work in conjunction with the dimensions and license plate illumination. It is necessary to connect the PTF through a relay, since they are supplied with a large current, which can damage the switch.
In the connection diagram for PTF on a VAZ 2106, a relay should be used
The relay must have 4 contacts, numbered and connected as follows:
- 85 — power button;
- 87 - through the fuse on the battery;
- 86 - mass;
- 30 - PTF.
Video: installing PTF on a VAZ 2106
VAZ online stores, discounts for site users
- Accessories
- Spare parts
- Tuning
- Body kits
- Cases
- Studio
- Carbon tuning
- Flocking
Online stores for VAZ accessories
Online stores for VAZ spare parts
xn--2111-43da1a8c.xn--p1ai
Electrical equipment
The original instructions for the VAZ 2103 contained a colored insert with an electrical diagram
Dashboard
In addition to the external differences in the appearance of the models and the richer interior decoration, the dashboard of the VAZ 2103, luxurious for those times, immediately caught the eye.
But the interior wiring of the VAZ 2103 itself was inherited from the “kopek”, including the notorious fuse block.
Tachometer in the center – Italian trace of sporting spirit
It should be noted that other manufacturers, for example UAZ, also experienced problems with low-quality components - see the article Verified wiring diagram for UAZ 452
Fuse box
The VAZ 2103 wiring diagram was a classic version, where the role of the second wire was played by the metal body of the car, and all the main components of the electrical circuit were protected by fuses arranged in one group.
Structurally, this unit was not bad:
- Spring-loaded contacts firmly held the plastic guides;
- Due to this, contact between metal plates and fusible inserts was ensured;
- On the cover of the block there were images of circuits (a kind of instruction), which are protected by one or another fuse;
- In case of a short circuit, it was easy to replace the fuse with your own hands.
The photo below shows the unit with the cover removed. Thanks to it, the wiring in the car is reliably protected, but the unit itself is unreliable.
An old unit that should be replaced with a more modern one
Cleaning products
Any car, like the human body, needs proper care. Most motorists can make a car's interior look divine. But still, not everyone knows how to properly wash the engine from grease and dirt.
In order to wash the engine from grease and dirt deposits, it is clearly not enough to take a bucket of hot water and start moving a rag. In addition to a bucket of water, we need reagents with special composition. In the case of older and more persistent stains, such a set of cleaning products is clearly not enough for effective cleaning.
To solve this difficulty, they usually resort to the use of powerful liquid installations that supply special means under pressure, which is fundamentally not recommended, since a powerful jet of water can physically disrupt the operation of electrical wiring, pierce gaskets and damage other elements. As a result, the car breaks down.
Instructions for diagnosing and replacing electrical wiring
The task of a car's electrical wiring is to ensure high-quality transmission of electric current to all consumers included in the electrical circuit. If any device or component does not work, before changing it, it is necessary to test the electrical wiring that connects it to the power source and other components of the electrical network.
To check the electrical network you need to prepare:
- Multimeter.
- 12V test light with two wires.
Photo gallery
1. Multimeter for checking electrical equipment
2. Indicator light for diagnostics
If problems arise with electrical appliances, you should perform the following steps:
- Check voltage. To do this, the multimeter must be switched to voltage meter mode. One probe of the device must be connected to the mass, the role of which is played by the body. We connect the second to the power cord, having previously removed it from the device or instrument. If the tester shows the presence of voltage, then everything is in order. If there is no voltage, the source of the malfunction is located on the section of the circuit being tested.
- Short circuit. In this case, there is completely no voltage in the network. To check the mounting block, you need to remove the fuse and switch the tester into voltmeter mode. One probe must be connected to the terminals in the fuse socket. In this case, all devices included in the tested section of the network must be de-energized. If the numbers on the device jump when you move the wire, it means the wire is shorted.
- Grounding. Since VAZ cars mainly use a single-wire wiring diagram, it is necessary to check the quality of the grounding, since the body is used as a minus for electrical equipment. During operation, metal parts of the body oxidize, become rusty, and their fastening becomes loose. In this case, electrical contact is lost and electrical appliances operate intermittently.
Grounding testing is carried out according to the following algorithm:
- Remove the negative terminal from the battery. Connect one multimeter probe to the car body.
- The second probe is connected to the connection or ground point being tested.
- When values appear on the device, they should be checked against the recommended factory parameters. If the values match, then the grounding is OK.
Checking circuit integrity. This test is necessary to find open circuits.
The verification procedure is as follows:
- The section of the circuit being tested is de-energized: the negative terminal on the battery is disconnected or the corresponding fuse is removed.
- To test the circuit, the multimeter wires are connected to its ends, and one of the probes is connected to ground.
- If numbers appear on the display, this indicates the integrity of the circuit. If nothing appears on the screen, then there is a break in the circuit.
When replacing electrical wiring, use standard wiring or homemade wiring using elements from the standard one. You can use wiring from another car if it meets its specifications.
To replace the wiring, you need to disassemble the front part of the car. If the length of the wires is not enough, they should be increased. All connections must be well insulated. It is better to connect the wires by soldering. It is not advisable to twist the ends of the wires.
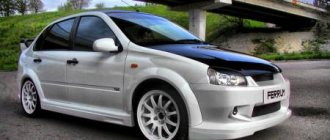
Solution
The best option for tuning the headlights of your VAZ 2106 is the procedure for completely replacing the headlights. When choosing suitable headlights for your “six”, it is best to choose the headlights from the BMW E34. BMW spare parts, especially older models, are often used when tuning classic VAZ cars. If you don’t know where to find such headlights for your car, you should just visit any car market, which will definitely have the headlights you need. A very pleasant aspect of purchasing these headlights will be their price, which should please you. Once you own the headlights, you will need to prepare the necessary tools for replacement. These tools include a grinder, wire cutters, a drill, nuts and bolts, as well as a set of screwdrivers and TV plugs. After all these preparations, you can finally start working on tuning the rear and front headlights.
Bottom line
All these procedures are easy to do with your own hands. After installing the fog lights, you will be able to control them using switches on the dashboard. To prevent the rear lights of your car from turning on along with the low beam, you will have to improve the “six” circuit. Use the new relay to control the headlights, but for the rear lights you can leave everything as it was. Thus, they will turn on along with the side lights. Every heart makes the tuning world a little better:
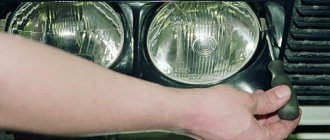
Welcome! Headlights - thanks to the light bulbs built into them, we see the road at night, but sometimes the headlights themselves break through broken glass, the road is no longer visible so well, and if the inside of the headlight is also deformed, then the light that the light gives will not be scattered at all, and Because of this, it will be very difficult to see the road at night, so broken headlights require replacement.
Note! To replace the headlights, you will only need to use a screwdriver and, if possible, a felt-tip pen to mark which wire connects to which headlight!
Summary:
When do you need to change headlights? In fact, it is the person himself who decides whether to change them or not, but still, if the headlight is very deformed and because of this you began to see the road poorly in the dark, then it is best to replace the headlight with a new one, because the 400 rubles spent later they will return to you with interest, since in poor lighting of the road you may not notice a hole, a small pothole, or just a person, and in this regard, you can deform the suspension by running into a hole, or because of your poor lighting a person may get hurt, because you may simply not see it.
Light vs Dark
Work at the Dmitrovsky Automotive Test Site begins as usual. While the photographer is looking for good angles in the gathering twilight, the team is placing a grid of cones on the asphalt. The distance between them is 10 meters. At each pole we will measure the illumination given by the headlights of each car with a lux meter, and based on the measurement results we will draw the light beams of each headlight. We draw the line between light and darkness based on the illumination value of one lux - everything below this value is perceived as darkness from the driver’s seat.
Mazdas with halogen and xenon in low beam mode performed predictably: the range is not the most impressive. The light “exhausted” at about 70 meters
Pay attention to the difference in the shape of the beam: with gas-discharge optics it is more shifted towards the right side of the road
If both cars were new, the superiority of xenon would be more impressive. His lamps already noticeably decrease in brightness by the age of three, and our experimental CX-5 was five years old. It is for this reason that gas-discharge lamps are recommended to be replaced in pairs. This does not happen with halogens.
Bi-LED lenses Luma | Standard Bi-LED |
Standard bi-xenon | Standard halogen |
As soon as the crossovers with LED lamps reached their starting position, the cone “walker” had more work to do. The car with standard lights reached the 150-meter mark. And the LED lenses we installed in the fourth car exceeded this achievement by 40 meters! Don’t rush to accuse them of being merciless towards the eyes of oncoming drivers: the farthest illuminated cones, according to the light meter readings, are located on the two lines to the right in the direction of travel - in fact, on the right side of the road and on the side of the road.
Directly in front of the car and to the left, where there is a chance of blinding oncoming people, the factory LED headlight shines even more than the tuning one. For example, on the left center line at a distance of 60 meters from the car, in the first case we measured two luxes, and in the second - one. Interestingly, for the human eye the picture is different. This can be seen in the photographs: the non-original LED headlights shine brighter and more evenly than the stock ones. The advantages of standard ones include a wider beam at a short distance from the bumper, which helps when maneuvering on unlit roads at low speeds.
Bi-LED lenses Luma | Standard Bi-LED |
Standard bi-xenon | Standard halogen |
Having studied the measurement protocols in the low beam mode, we already guessed what to expect from the high beam: in most cases, the established hierarchy is preserved. This is what happened in the dispute between cars with LED optics. The second generation CX‑5 reached up to 240 meters with its LED light, the old car with installed LED lenses — up to 280 meters. In both cases, this is an excellent result with which you can feel confident on the track.
The halogen light “shot” further than xenon: a quarter of a kilometer versus 220 meters. In addition to the already mentioned reduction in the brightness of gas-discharge lamps, another factor played a role. In a simple Mazda, low beam and high beam operate from different lamps. The second one rarely comes into play, and its reflex section is ideally preserved for many years. And the xenon light on the CX‑5 comes from one lamp and through one lens. That is, the resource of the lamp and lens is consumed mostly by the low beam, but at the same time the high beam also suffers. Here is the result: a Mazda CX‑5 driven with halogen lights gave a more effective high beam.
The best manufacturers
Drivers determine the best low beam lamps based on several criteria. The popularity rating does not include the brightest ones, since driving within the city with such lights is prohibited, and high beams must be used on the highway.
Koito
The Japanese company, with a century of production experience, produces halogen and LED headlight bulbs in ten lines. The peculiarity of the models is high build quality and the use of new technologies. The optics provide good illumination of the strip without a blurred left edge. The length of the light beam in the low beams is up to 50 meters. The lamps provide light yellow and white light and do not blind oncoming drivers.
Osram
A car headlight lamp from Osram is mounted on most European cars as standard optics. The brand has established itself as a reliable and high-quality supplier since 1906. The company produces all types of auto lighting from halogen lamps to point electronic laser units.
Each copy is checked for compliance and marked on the base. In production, quartz glass and refractory metals are used for the filament. The optics have the best price-quality ratios.
Philips
Philips headlight bulbs provide comfortable illumination of the road at any time. Options for low beams can be used in PTF, high beam headlights do not exceed European brightness standards for automotive optics.
Models are made from original components and environmentally friendly materials without the use of lead and mercury. One of the few brands whose products are rarely tampered with.
Bosch
remains a leader in the production of automotive optics. In addition to lamps for headlights, the brand produces ECUs, optical systems, flashlights and spotlights for additional lighting. The products are certified and installed on many cars as standard.