A modern car is literally crammed with complex electronics, which are not so easy to repair. It is for this reason that car owners, at the slightest problem with on-board electrical devices, do not fool themselves, but immediately contact the nearest car service center. However, there are exceptions to this rule. For example, if the diode bridge on a VAZ 2107 is burnt out, then you can completely refrain from visiting a car service center and replace the burnt-out device yourself. Let's figure out how this is done.
- Signs and causes of diode bridge failure
- How to ring a diode bridge on a VAZ 2107
We check the diode bridge with a regular light bulb
- Checking the diode bridge for open circuit
- Checking the diode bridge with a household multimeter
- Sequencing
The main function of the diode bridge on the VAZ 2107
The diode bridge is an integral part of the VAZ 2107 generator. The car's generator produces alternating current. And the main task of the diode bridge is to convert the alternating current of the generator into direct current of the on-board network with subsequent charging of the battery. That is why car enthusiasts usually call a diode bridge a rectifier block. The peculiarity of this unit is that it allows direct current to pass only towards the battery. The current passed through the diode bridge is subsequently used to ensure the operation of the heater, low and high beam headlights, side lights, audio system, etc.
It will not be possible to charge the VAZ 2107 battery without a diode bridge
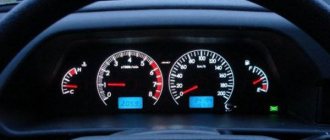
The charging voltage in a VAZ 2107 car ranges from 13.5 to 14.5 volts. To provide the required voltage, 2D219B diodes are most often used in the diode bridges of this car.
Finding a 2D219B diode on sale is becoming more and more difficult every year
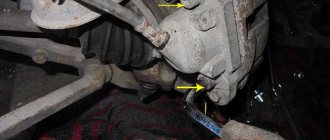
And there is a diode bridge inside the VAZ 2107 generator. And in order to get to the bridge, the car owner will first have to remove and disassemble the generator. There are no other options.
What should you do first?
How to replace a diode bridge? This assumption should not be the first one when there is a problem with battery charging. Before you start disassembling the generator and changing the bridge, you need to check the charger brushes and the voltage regulating element. If everything is in order, then almost 100% of the diode bridge needs to be replaced.
The replacement process is not complicated, so this work can be easily done on your own. To check the functionality of the bridge, it must be removed from the generator. Of course, you can check without removing it, but it is very difficult and inconvenient.
{banner_content}
Signs and causes of diode bridge failure
As mentioned above, a generator equipped with a diode bridge is the most important component of a car. If the alternator fails for some reason, the battery will stop charging. And this is the only sign of a faulty diode bridge. Without additional recharge, the battery will work for a few hours at most, after which the car will be completely immobilized. A diode bridge fails when one or more diodes burn out in it. Here are the reasons why this happens:
- moisture has entered the generator. Most often, this is condensation that forms on the internal surfaces of the generator in the autumn-spring period, when relatively warm weather alternates with frosts;
The diode bridge burned out due to moisture getting into the VAZ 2107 generator - The diode has simply exhausted its resource. Like any other part, the diode has its own service life. The manufacturer of 2D219B diodes claims that the service life of their products is about 10 years, but after this period no one guarantees anything to the car owner;
- The diode burned out due to the negligence of the car owner. This usually happens when a novice car enthusiast tries to “light” his car from another car and at the same time confuses the battery poles. After such an error, the entire diode bridge and part of the generator usually burn out.
Purpose of the rectifier
Since alternating current generators are more advanced, compact and repairable compared to direct current modifications, a generator diode bridge is added to the design by default to convert alternating current to direct current.
Rice. 2 Connection diagram of the diode block
In other words, without a rectifier assembly, electricity will be generated by the generator windings, but will become unusable for the on-board network and battery. Headlight lamps, air conditioning compressor windings and electrical circuits of other consumers will burn out, and the engine will not be able to start.
Replacing the stove radiator
This problem is not common. But when the heater core fails, problems cannot be avoided. It is installed in some cars inside the dashboard (“thanks” to the designers).
The issue can be resolved in two ways:
- contact a service station;
- replace the heater radiator yourself.
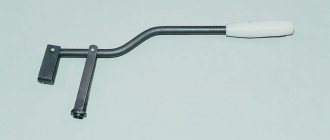
In the second option, replacing the stove radiator without removing the panel is suitable. To do this, you need to disconnect the negative terminal. Remove the steering wheel cover by unscrewing the 4 mounting bolts.
Remove the pedal covers. Then, pressing the gas pedal all the way, unscrew the brake mount. Next, take care of the heater radiator pipes: disconnect them. Move the bottom part of the panel to remove the radiator. In this case, you will have to sweat a lot.
Assembly is carried out in reverse order. To avoid problems during installation, you need to shorten the pipes by about 20 mm.
There is another way to solve the problem. But this is a more labor-intensive method associated with dismantling the instrument panel, heating radiator and removing the ECU.
Assembly is carried out in reverse order. But it’s unlikely to cope with this task on your own. This is a problem for service station technicians.
Powershift dual mass flywheel replacement price
Our car services have some of the most reasonable prices for repairs and maintenance of Powershift transmissions. In particular, the cost of services for replacing a dual-mass flywheel is only 11,900 rubles. This price includes the following works:
- diagnostics of vehicle and transmission condition;
- dismantling the gearbox;
- removing the flywheel;
- installation of a new part;
- installation of a gearbox on a car;
- adaptation of manual transmission.
Rectifier circuit diagram, explanations
To increase the power of the generator, an additional arm of diodes VD7, VD8 is used, that is, an eleven-diode bridge. The additional diodes are connected to the common point of the stator winding, wound in a WYE (star) configuration where the phase voltage is applied. With the help of these diodes, the generator power is added, it increases by 15 - 20% without design changes or harm to the generator components.
Rice. No. 2. Schematic diagram of the generator, where under the number 4 on the diagram there are diodes of the power rectifier, VD7, VD8 - diodes that increase the power of the generator. Under the number 7 are the diodes of the excitation winding rectifier.
Circuit of its own rectifier using diodes VD9, VD11. Thanks to these diodes, the battery holds a charge for a long time when the engine is turned off.
Auto magazine
In practice, this is not so difficult to do. It is enough to know some features of the process. It is important to adhere to the correct operating algorithm.
Choice
.
Replacing the kingpins on a UAZ Bukhanka with your own hands
begins with selecting parts. Now, in addition to standard kingpins, you can also find roller ones. A bearing is installed in them. The specific choice depends on the intended operating conditions. If you drive mainly on dirt roads, rarely visiting serious dirt, then you can take roller bearings. When operating a UAZ on forest roads with a lot of dirt, it is better to use standard ones. They are much more reliable.
When purchasing, you should pay attention to the packaging of the part. In addition to the logo and part name, the manufacturer's address must be present here.
Before starting work, you should hang the front axle on jacks. To do this, you can use a rolling jack. Having raised the car, you need to install a stand under the bridge and lower the jack a little. This is done in case of problems with the jack to prevent the car from falling. You also need to drain the transmission oil from the axle.
Work should begin by removing the brake caliper. At the same time, remove the brake shield. They will interfere when removing the king pin. But you can still do without it. Some procedures will just be a little more complicated. The final step is to remove the steering tip and unscrew the oil nipple.
After this, you can begin dismantling the kingpin. We will consider this process on a regular kingpin. To do this, carefully screw the bolt into the kingpin. Suitable for diameter M10
. Then you should pull out the king pin by hooking it by the cap. If this does not help, then you can try the next method. A steel plate is taken, it is fixed motionless above the kingpin, an M10 hole is made in it, through which a suitable bolt is screwed into the kingpin. A couple of nuts are attached to it under the plate. By twisting them, the kingpin rises to the plate.
Next step
is to remove the washer and press out the bushing. There are no problems with the first step (with the washer), but with the bushing you will have to tinker. She sits on the seat quite tightly. Therefore, we need to find a way to break the lock and squeeze the bushing out at least a little. The most convenient way to do this is with a pointed nail. It is advisable to start work from the lock side. You need to put a nail under the bushing and press it out a little, this is done in a circle. Until you can pull out this element using pliers.
After removing the bushing, the inside is thoroughly washed with gasoline. Old grease and dirt must be removed. After this, fresh lubricant is placed inside. Lithol is ideal for these purposes. After this, a new bushing is installed. Install a new kingpin, carefully hammering it into place. It is better to do this through a wooden die. Do not drive the part completely. Do not forget that the steering ends are attached to it, so you need to ensure secure fastening.
If the kingpin is tight, with a characteristic sound similar to the sound of an anvil, it is most likely installed incorrectly and is skewed. Pull out the king pin and put it back in place. Just be careful. Distortion can also be caused by incorrect hammer blows. Then everything is assembled in reverse order.
DIY replacement instructions
In the event of a breakdown, the repair of the DM consists of its replacement, which is done as follows:
- First you need to turn off the ignition, open the hood and turn off the power to the on-board network; to do this, disconnect the battery.
- Once the battery terminal is reset, you will need to disconnect the pink cable responsible for activating the generator assembly. The wire itself is fixed with a bolt and nut; the nut itself will need to be unscrewed.
- Now you need to slightly loosen the tension on the top as well as the bottom nuts. Unscrew the tension screws and remove the strap. Inspect it - if the belt shows signs of damage - cracks, delamination - then it is better to change it immediately. If the strap is intact, set it aside.
- After completing these steps, you need to rotate the generator mechanism 90 degrees, this is done so that you can access the lower mounting screw. Unscrew it.
- Next, carefully inspect the body of the dismantled unit. If necessary, clean - there should be no dirt, especially on the connections. Dirt getting inside the generator housing can also lead to its incorrect operation and even failure. Bend the fasteners and remove the cover.
- Next, you need to clean the inside of the rings as carefully, but most effectively as possible.
- After this, all you have to do is dismantle the failed DM and replace it with a working part. When the installation is completed, the structure is assembled in the reverse order. Do not forget to tighten the strap, just make sure that it is not too tight, this is important. Having done this, you will need to start the engine of your car and diagnose the operation of the new DM.
Selection of diodes for the rectifier bridge
The main thing they look at when choosing a diode is power. It depends on the highest rated current produced by the generator. The higher the generator power, the more powerful the diodes. Diodes for the rectifier bridge are conventionally divided into categories:
· low power diodes, current 300mA;
· medium power diodes, current 300mA – 10 A;
· high power diodes above 10 A.
Diodes are divided according to the type of material used, these are germanium and silicon. Most manufacturers prefer silicon diodes. The main reasons for choosing silicon diodes:
· low reverse current;
· high permissible reverse voltage up to 1500 V;
· performance of silicon diodes from -60 to +150оС
Germanium diodes have a low reverse voltage value of up to 400V. They operate in the temperature range from -60 to +85°C.
For example, to replace diodes for a Bosch generator with a 140A for a Touring Custom car. For such a generator you need 50A diodes, for example, Cargo 50A 138634 and Cargo 138635, for a 140A generator you will need 12 pieces, for an 80A generator 6 pieces.