October 23, 2015 Lada.Online 203 622 37
It's hard to imagine a modern car without a rear view camera. If your car does not have this option from the factory, then you can install the camera yourself. The “Lux” configurations of Lada Granta, Kalina 2, Priora cars have similar multimedia systems (MMS), so the process of connecting and setting up the camera is identical. During installation of the camera, there may be differences depending on the type of body (hatchback, station wagon, sedan, liftback), but they are insignificant.
Lada Granta - installing a rear view camera
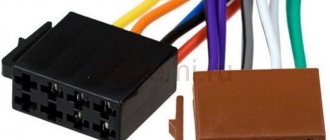
Due to the fact that a 2-DIN Chinese radio was purchased, I was honored to install a rear view camera. The radio came with a rear view camera, which had to be mounted on the outside of the trunk door. I was too lazy to run “kilometers” of wires along the trunk lid, rear pillar, disassemble the ceiling, and the sides of the trunk, so, after surfing the Internet, I found a camera that fits into the bumper, like parking sensors (much closer to the reversing lights). Installation in the bumper is the same as when installing parking sensors, instructions are here. A cutter of suitable size is included in the kit. The liftback has two reverse lights, so I connected the camera to the second one (the parking sensors are connected to the first one). The cameras came with wires. Connection diagram:
connection diagram
Connector P2 - red wire to + reverse lamps, black - ground.
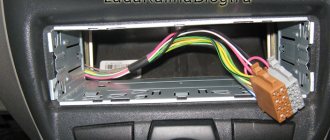
The signal wire from the camera to the radio (which has tulip connectors) has another additional red wire P3. This is the power supply for the radio to output images from the camera. We connect one end to the + of the reverse light, the other to pin 9 of the radio connector (red dot on the ISO connector of the radio). Since birth, I had audio equipment in my car, but this wire was not in the block. I pulled the wiring out of the block that came with the radio and inserted it into the ISO block of the car. The wire was thrown under the carpet, the tulip is connected to the CAMIN connector on the radio.
connection
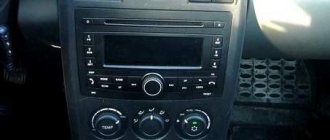
This is what happened on the screen
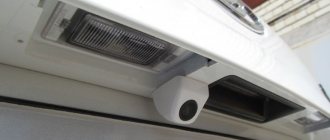
inside
This is what it looks like from the outside
outside
outside2
The rear view camera automatically turns on when you engage reverse gear, and also turns off automatically. If music or navigation is turned on, it turns off, then, when the camera is turned off, it turns on accordingly. An unpleasant feature is that at night, when driving in a narrow space, you still need to look in the mirrors; the glowing radio screen from the camera on is blinding. I found a solution: first turn on the radio or music, while the music is running, forcefully turn off the screen with the button in the upper right corner (the radio has a function that switches to day or night brightness (there is almost no difference between them) or turns off the screen), turn on reverse - image with The cameras are not displayed and you can safely move along the mirrors. I don’t know yet how quickly the camera will get dirty in this location, but I think wiping the camera is not a big problem. But the camera is positioned exactly in the center of the car and the image is not shifted anywhere.
CONNECTION
General diagram for connecting a rear view camera:
In the trunk we connect the camera to the rear light wiring:
- +12V to green wire (reverse)
- "mass" to black
We connect the miniISO connector to the radio, the location of the wires in the blue block is as follows:
- Ground (outer part of the tulip) of the connector to pin 16.
- Plus (central part) of the connector to pin 19.
It is worth noting that if the MMC was installed on a car in the “norm” or “standard” configuration, then you will need to additionally supply +12V from reverse to pin No. 1 of connector A1 of the radio.
The process is also shown in the video:
How to choose a good camera. Review of prices from different manufacturers
| № | Article/name | Price, rub.) |
| 1. | Kalina, Kalina-2, Granta (liftback), Vesta, Priora |
*prices are current as of September 24, 2018.
Technical characteristics of the rear camera of the Grant Liftback:
- Matrix type: CCD (photosensitive);
- Viewing angle: 170°;
- Resolution 800 x 600 pixels;
- Zoom level: 0.01 Lux;
- Aspect ratio: 4:3;
- Gradation: parking lines on the screen (0.5 / 1.0 / 1.5 meters);
- Moisture and dust protection: present, level IP 67;
- Brightness: 300;
- Recommended voltage for correct operation: 12V;
- Operating temperature range: - 25° - + 35°;
- Connection type: ISO connector, from the back of a 2-DIMM radio or a separate folding monitor.
The most popular gadgets are in the price category up to 1,500 rubles. Picture display quality, focusing, zoom level are at an average level. Of course, the image is grainy, pixels are visible, and the viewing angle is only 170 degrees.
The rear view camera on the Granta Liftback in the range of up to 3,000 rubles has improved characteristics, image output quality, and a viewing angle of 180°. Despite decent parameters, gadgets in this price category are beyond the means of most car owners.
How to choose a camera
The modern electronics market, and especially China, is overcrowded with a variety of cameras, and this makes choosing the right thing more complicated. In order to make your work easier, decide on your priorities, what worries you more – price or quality. Not everyone needs high-definition cameras, or cameras that can show even in low light. For some drivers, an inexpensive rear view camera for the radio is enough.
What parameters should you pay attention to if you decide to purchase a higher quality product, then in this case there are at least five points that need to be taken into account when purchasing:
- What resolution does the camera record in? The higher the video resolution, the better the recording quality. And high image clarity is not always needed.
- The next point is the camera’s sensitivity to lighting. With cheaper models, low-light recording quality can be very poor. Therefore, if, due to circumstances, you often use a car in the dark, then this point is worth paying attention to.
- If, before purchasing, you have already decided where to install the rear view camera, then you need to pay attention to the installation method of this particular model.
- The next point is this viewing angle that the camera lens captures. Usually it is in the range from 120 to 180 degrees. It is better to take something in between these two indicators, so that you have a good view of the rear view, but do not have a panorama, because it distorts reality.
- Selecting the monitor on which the camera will display the image. But if you already have a radio with a screen in your car, then you just need to think about how to connect the rear view camera to the radio.
Procedure for installing the rear camera on the Granta liftback
- We place the car on a flat area.
- Remove the rear door trim.
- Remove the driver's and passenger's door sills on the left side.
- We lay a block with wires from the center console to the rear door lid.
- We dismantle the saber - spoiler.
- We install the mount.
- We connect the wiring to the 2-DIMM radio.
The order may differ from the above. In the event that the owner does not want to display the image on the standard radio. In this case, use a folding monitor. The location of fixation is arbitrary.
Preparatory stage
- isolation;
- screwdrivers with different tips;
- plastic spatula for plastic;
- blocks with wires;
- adapter - ISO type connector.
Dismantling works
- remove the thresholds from the left driver and passenger doors;
- fold the back row of seats;
- remove the upper trim of the interior and luggage compartment;
- Unscrew the fasteners, remove the spoiler from the trunk lid.
Laying wires, power supply from the circuit
We lay the wiring from the central channel of the console to the trunk lid along the following route:
- location for fixing the standard radio,
- the lower part of the dashboard on the left side under the steering wheel,
- thresholds,
- rear door pillar,
- luggage compartment lid.
Connecting wiring, installing standard casing
After installing the camera, connect the positive cable to the flashlight wiring. We place the block with wires in a corrugated material made of fire-resistant material, and fasten the casing.
From the back of the 2-DIMM radio, we connect to the miniISO connector:
- black wire: ground;
- red: 12V power supply from the reversing light.
The designations on the plug are: pin 16 and pin 19, respectively. For the standard MMC radio, no additional firmware is required. The screen automatically switches to camera mode when reverse gear is activated. We start the engine, activate “R” gear, an image appears on the screen of the standard rear view camera.
Setting up standard MMS
No firmware is required for the radio; you just need to activate the rear view camera. To do this, download the program (To download files you need to log in to the site) and copy it to removable media (USB Flash).
- Go to the desktop (WinCE). On the radio screen, hold down the “Settings” button, then “Exit” and “Desktop”.
- Let's launch the program. My device - USB disk - Folder with the program - Run the CamOnOff file.
- We allow you to use the camera. Click on the corresponding button. We close the program, it and the flash drive will no longer be needed.
By the way, the whole process is also shown in the video:
We check the operation of the rear view camera, including reverse gear.
Let us remind you that some motorists prefer to use parking sensors instead of a camera.
Reviews
| from 3000 | ||
| 2. | Viori – 264897PR | from 2700 |
| 3. | Lada Granta Liftback LGR-01 | from 1400 |
| 4. | CAM-98645236 | —/— |
| 5. | LGR-112 | —/— |
| 6. | Folding monitor 4.3 MR-01 | from 2000 |
| № | Positive |
| 1. | Vitaly , 41 years old: connected the camera to the standard radio, did not flash anything additional. In total, I spent half an hour. I bought a Chinese Viori – 264897PR. |
| 2. | Gennady , 33 years old: the picture when reversing is good, the distance is marked. In case of insufficient lighting, I used side mirrors for objectivity of data. |
| 3. | Sergey , 31 years old: I work as a taxi driver, I spend a lot of time on the road. In order to deliver/pick up a client as quickly as possible, it is necessary to maneuver in the limited space of courtyard areas. The camera is an indispensable assistant. |
| 4. | Kirill , 39 years old: a friend recommended a Viori rear view camera - 264897PR. I installed it and have been using it for over a month, no complaints. |
| 5. | Maxim , 42 years old: received a gift from his son for his birthday, installed it on his own. The lighting is good and the viewing angle is sufficient. |
| Negative | |
| 1. | Victor , 38 years old: I didn’t like the image on the standard radio, so I additionally bought a folding monitor and installed it on the dashboard. The quality is good, no graininess. |
| 2. | Dmitry , 29 years old: I bought a folding monitor along with a rear view camera, since the image on my original radio was poor. I've been using it for two months, no complaints. |
| 3. | Vasily , 27 years old: bought a car with a built-in rear view camera. I didn’t like the image quality on the “native” screen. I bought a folding monitor at the store. |
Conclusion The standard screen displays the image from the rear view camera with a resolution of 800 x 600 pixels. Obviously, this is not a 1920 x 1080 HD format, but the picture is quite legible. Those wishing to improve output quality can additionally purchase a portable monitor for an additional fee.