How to remove a torpedo on a grant video
Part one is here
We disassemble the car, remove the dashboard, make noise and are now at the stage of reassembly with sound insulation and additional bauble being carried out along the way.
And so we continue to slowly cover the floor of the car with vibroplast.
After sealing the motor shield with vibroplast, we seal the entire shield with Biplast. With it there is the greatest chance that the torpedo will fall back into place. We cover the stove and air duct pipes with the same material.
We weight the torpedo with a vibroplast and pass it through from above with a biplast. We seal the edges of the torpedo with an anti-creaking agent - also known as madeleine.
We put the standard sound insulation back on the engine shield and begin to go through the floor. There are various rumors about this material that it creaks almost immediately and picks up moisture, but while I’ve been riding for almost 3 months, everything is fine, the floor doesn’t creak anywhere.
We lay out the wiring for limit switches and door activators, drag back the amplifier, video camera and other things. General view before splenium like this.
We throw back the torpedo beam, lay the wiring for seat heating, music and signaling. Don't forget to make reserves of wires for future inventions. And we continue to lay the splen.
After installing the splen, we put back the standard Shumka, admire it, smoke
Well, then we sketch out the floor and start working on the doors.
We threw on a radio tape recorder so that it wouldn’t be boring, made noise on the door foam with an acoustic vibroplast, then we put a ring under the speaker and prepared to plug the internal openings of the door with a vibroplast. The door trim itself made noise with vibration, then with biplast and at the edges with madeline (Anti-creak). We placed podiums under the speakers and assembled the doors.
Well, the mood was completely lifted when the torpedo sat in place, all the wires found their place and the assembly of the interior began.
Then they didn’t remove it anymore, like the floor in the cabin, they finished the trunk, glued the plastic panels of the pillars and the rear parcel shelf with vibra and madeleine, put the belts back, and assembled them. The MMC 2190 radio arrived and was installed. After playing with the “miracle TV”, we installed seat heaters and put the seats in place. Next came the DVR and I would like to talk about it separately.
Removing the instrument panel (torpedo) on a Lada Granta car is carried out to replace it with a new one in case of severe damage or replacement of component elements, as well as when carrying out various work in which the presence of a torpedo will interfere. To perform the repair, you will need socket heads “13” and “24”, as well as two screwdrivers with a flat blade and a Phillips blade.
In the process of dismantling the panel frame, you will have to disconnect a significant number of electrical connectors, which only a qualified technician can do. Therefore, if you are not sure, it is better to contact a specialized workshop.
Do the following sequence of actions:
- First of all, you need to de-energize the car; to do this, disconnect the minus terminal from the battery.
- We remove the cigarette lighter socket from its mounting socket and disconnect the block with wires from it.
- We remove the head unit and disconnect the antenna cable tip and connectors with wires from it.
- Remove the central trim of the instrument panel console.
- Next, remove the glove box cover.
- Remove the inner panel of the glove box by unscrewing the screws that secure it.
- Remove the lining of the front pillars.
- We remove the floor tunnel lining, after which we dismantle the steering wheel (the steering wheel must first be set to a position corresponding to the straight-line movement of the car)
- Remove the plastic cover of the fuse box, then the steering column cover and steering column switches.
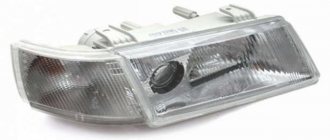
- We dismantle the external lighting control unit, and then remove the headlight hydrocorrector regulator.
- We remove the instrument cluster and disconnect the connectors with wires from it.
- We unscrew the four screws securing the air duct damper control unit to the instrument panel.
- Unscrew the eighteen screws securing the decorative panel to the frame. Then we move the decorative panel away from the frame as much as the air ducts fixed on the inside allow.
- Carefully insert your hand and use a Phillips screwdriver to unscrew the screws securing the air ducts to the panel.
- Remove the decorative trim.
- Remove the windshield air duct by unscrewing the two screws securing it.
- We remove two bracket nuts from the torpedo brackets and move them to the air duct brackets.
- Having completed the necessary repairs, we carry out the installation in the reverse order.
And so I found some free time to describe a little the process of soundproofing my car. Let me remind you that the car was picked up from the dealer and went straight to my bay to install additional equipment. On the way I had to stop by and register it because... the car stood up for a long time and for more than half of the installation period (about 20-25 days in total) could not be driven - they took it apart well.
Along with the installation of the security complex, noise insulation, music installation, a DVR, and various other additions were made, which I will try to describe in the coming posts.
And so noise. It all started with disassembling the interior. They took it apart thoroughly and down to the bare metal. There were no unforeseen situations with disassembling the interior; the car is not complicated in this regard.
With the choice of the sound insulation material itself, everything was simple for us; in St. Petersburg there is such a brand as STP, it is easy to get, convenient to work with, and there is always material available for any task.
I'll start with the trunk lid. There was no need to disassemble it; in the factory configuration there is simply nothing there except a cambric, which is placed on the sharp edge of the metal so as not to cut your hand when closing the trunk. Before soundproofing, the lid is very light, which allows it to rise well when opened with the trunk tarsion bars in the middle position.
Along the way, we purchase a trunk lid trim for the grant with an emergency sign and make noise with an STP AERO vibrator, followed by Biplast.
The noise inside the lid is not very convenient, you have to push it. It is best to press the Shumka with a roller, which is sold at the same STP or together with the Shumka. In general, I had experience working with a machine without a roller - I wiped out all my hands and couldn’t work with them for 5 days - you shouldn’t skimp on this thing.
We install the rear view camera in the lock cylinder and begin to assemble
Connecting standard radios
Many consumers who buy standard radios for Lada are interested: if I take the entire multimedia package for my car, will I be able to install the entire multi-system myself. Let's try to do this. Also, installing all the equipment in the cabin may be necessity number 1, since the Lada model range is mainly sold without the initial complete set of the entire stereo system.
Let's reveal a little secret before installation
First you need to purchase everything to assemble your new device. You can buy everything you need in auto stores or at the car market. Another option is an internet site, here it is even possible to acquire equipment in improved versions, with new versions. These radios have all the full functionality, including all navigation systems and a complete map of Russia. In addition, the online store will be able to offer you the latest Lada Granta Lux radio.
Conventional stereo systems do not look so stylish in the interior of the Lada Grant, but a luxury panel will give it a sophisticated and chic look. And the cost is quite affordable.
First steps
Before installation, let's figure out what the whole process is. The niche for the radio is made so that after all the work only the control panel is visible. Nothing more unnecessary.
- Using a flathead screwdriver, remove the plastic cover that protects the audio system cavity.
- Look what's inside - you should see several connectors, they are designed to connect the device.
- There should be a mounting frame on the radio. It must be removed and placed on the pocket compartment.
Next we move on to connecting the radio. To do this, simply connect the two connectors together and put the stereo system in place. This is how easy it is to install a Lada Granta car radio. You can install the speakers either at the back or on the side of the front doors. To do this, just cut two holes for them.
Head unit for grants
Firmware
For some reason, many car enthusiasts prefer to use a standard Lada car radio with firmware. Although it does not affect the sound quality in any way, the fact remains not in favor of the original. Also, when using firmware of at least a Lux or 2 Din model, you can get additional functionality. In addition, this service makes it possible to create additional functions that the regular interface does not have.
Let's start the process
We will need an SD card using FAT formatting. You can use the same card when formatting in exFAT. Before the whole process, be sure to download the firmware. This can be done here. When everything has been downloaded, we next copy file documents to the root directory of the SD card. Before this, we save the received materials to a flash drive. Then we transfer the received data to the memory of our car radio. Overload in progress.
Firmware for radio
As soon as we see that the reboot status scale is in full, it means we can use the new expanded capabilities of our standard Lada Granta Lux radio, 2 din.
Now you know all the details of all the functions, installation and firmware of the standard radios of the Lada Granta Lux, 2 din and other models of the audio system of this car brand. If you think that you are not able to handle all the necessary settings yourself, then you can look on the Internet for craftsmen who specialize in creating your personal menu for the entire system. There is evidence that they have learned to implement an interface where they can remove, for example, a radio receiver from the system itself and use directly necessary functions.
Remember. Also, the firmware sometimes requires screen calibration before operating the analog menu.
That's all we could tell you. If you follow the instructions received, the whole thing will be done faster, and you will definitely enjoy the updated head unit Lada Granta 2 din, Lux.
In the Lada Grant, the standard audio preparation of the car has already been completed from the factory, the wires for power supply and speakers have been laid, so installing and connecting the radio does not present any particular difficulties. The installation space in the front panel console of the car is designed for installing a 1-DIN car radio. No tools are required for installation; all dimensions are already made in accordance with generally accepted housing standards. When installing a 2-DIN car radio, you will need to cut out the partition and purchase a frame for the console to fit the size of your audio system.
How to remove a torpedo on a Kalina video
In order to remove the center console (the black trim on the instrument panel) of the Lada Kalina, we will need a Phillips screwdriver and a lot of patience, especially when installing it later, so we will have to be patient.
- The first step is to remove the cassette player, if you have one installed, and disconnect the wires connected to it.
- It is also better to remove the metal insert in which the radio is mounted to make removal easier. After it has been removed, we press on the back side of the plugs, which are located on both sides of the “Hazard Alarm” button.
- And unscrew the two bolts securing the lower part of this lining, which are located under these plugs with a Phillips screwdriver:
- Then you need to remove the three heater adjustment levers, which are marked below in the photo with numbers 1, 2,3. They are easy to remove; just pull them with a little effort.
- Now, disconnect the plug from the hazard warning button:
- After this, you need to slightly pull the lining towards you, starting from the very bottom, overcoming the obstacle of the metal clamps, and pull the lining out of its seat.
- To remove it completely, you need to disconnect all the wires that lead to the lighting bulbs and fan speed control:
Problems when paying with bank cards
Sometimes difficulties may arise when paying with Visa/MasterCard bank cards. The most common of them:
- There is a restriction on the card for paying for online purchases
- A plastic card is not intended for making payments online.
- The plastic card is not activated for making payments online.
- There are not enough funds on the plastic card.
In order to solve these problems, you need to call or write to the technical support of the bank where you are served. Bank specialists will help you resolve them and make payments.
That's basically it. The entire process of paying for a book in PDF format on car repair on our website takes 1-2 minutes.
If you still have any questions, you can ask them using the feedback form, or write us an email at
VAZ 2110 panel, removal, installation of dashboard, sound insulation of VAZ 2110 panel
The VAZ 2110 panel or the “tens” dashboard has become a new word in the interior design of Lada cars. Despite its interesting shape and ergonomic appearance, panel 2110 eventually begins to make a lot of unnecessary sounds when the car is moving. This is especially noticeable on cars with high mileage. Therefore, very often the “tens” torpedo is completely disassembled in order to carry out total sound insulation and eliminate squeaks.
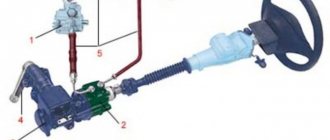
Let's say right away that disassembling the VAZ 2110 panel is not difficult in principle, but it is a very labor-intensive job that requires time and attention. The fact is that to remove the panel you will have to completely unscrew the steering wheel and disconnect a lot of electrical connectors. In order not to damage the electrics, before disassembling the VAZ 2110 dashboard, be sure to disconnect the battery . This is how the “tens” panel looks schematically.
This figure shows in detail, in the smallest detail, all the fasteners of the VAZ 2110 panel.
- 1 – panel
- 2 – side nozzle for ventilation and heating of the cabin
- 3 – instrument panel trim
- 4 – cover fastening screws
- 5 – panel fastening screws
- 6 – box
- 7 – console trim
- 8 – cover
- 9 – instrument panel panel
- 10 – mounting block cover
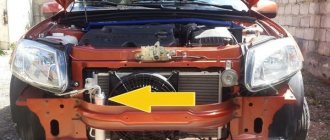
If you remove the panel completely, then only this should remain, look at the photo -
The red arrows indicate where the nuts and screws are attached, and the two large white arrows indicate the special mounting pins. When installing the panel, it must be installed on them; they serve to center the dashboard relative to the body.
Removal and installation of VAZ 2110 panel
Below are step-by-step instructions for removing the “tens” dashboard.
- Disconnecting the battery
- Remove the steering wheel and steering column switches
- Be sure to remove the top lining of the floor tunnel
- Remove the glove compartment and unscrew the mounting screws
- Remove the headlight hydraulic adjustment handle by pulling it towards you
- Unscrew the hydraulic corrector nut and remove it
- Remove the upper side air duct deflectors by prying them up with a screwdriver
- Under the deflectors we find the panel fastening nuts, unscrew them
- We unscrew the screws from the bottom of the dashboard, next to the hood release lever, at the mounting block, in the niche of the glove box, etc.
- Now you can remove the door seals, remove the lining covering the front pillars
- Disconnect the electrical wiring terminals
- You can remove the panel by holding the steering column adjustment lever in the desired position
Do-it-yourself dashboard overexposure
You will need: remove and disassemble the instrument cluster, SMD LEDs (unsoldered from LED strip or LED lamp), soldering iron.
The process of replacing LEDs on the instrument panel board consists of unsoldering the standard SMD LED and soldering a new one in its place. During such tuning, there are several important points to consider:
- take your time so as not to damage the conductive traces of the board;
- observe the polarity (SMD LEDs have a bevel on one side, install a new LED in the same position);
- do not overheat the LEDs; high temperatures may cause them to fail;
After soldering the required LEDs, it is recommended to check the backlight. To connect the instrument cluster at home, you need to apply +12V to pins 19 and 21, and ground to 17. You can also verify that the installed LEDs are working properly using a multimeter in “tester” mode, connecting the probes to the LED according to the polarity (red probe is plus) :
If all LEDs are installed successfully, reassemble in the reverse order. Relighting the instrument cluster of Grants or Kalinas is a great way to make your car more individual and stylish. It is noteworthy that there are a lot of options for implementing such panel tuning, but which style suits you best? Participate in the survey, share video materials and photos of your improvements.
Let us remind you that the website presents other modifications to the instrument panel, for example, you can reflash it and install an outside air temperature sensor.
How to remove the instrument panel (dashboard) of Lada Granta
Removing the instrument panel (torpedo) on a Lada Granta car is carried out to replace it with a new one in case of severe damage or replacement of component elements, as well as when carrying out various work in which the presence of a torpedo will interfere. To perform the repair, you will need socket heads “13” and “24”, as well as two screwdrivers with a flat blade and a Phillips blade.
In the process of dismantling the panel frame, you will have to disconnect a significant number of electrical connectors, which only a qualified technician can do. Therefore, if you are not sure, it is better to contact a specialized workshop.
Do the following sequence of actions:
- First of all, you need to de-energize the car; to do this, disconnect the minus terminal from the battery.
- We remove the cigarette lighter socket from its mounting socket and disconnect the block with wires from it.
- We remove the head unit and disconnect the antenna cable tip and connectors with wires from it.
- Remove the central trim of the instrument panel console.
- Next, remove the glove box cover.
- Remove the inner panel of the glove box by unscrewing the screws that secure it.
- Remove the lining of the front pillars.
- We remove the floor tunnel lining, after which we dismantle the steering wheel (the steering wheel must first be set to a position corresponding to the straight-line movement of the car)
- Remove the plastic cover of the fuse box, then the steering column cover and steering column switches.
- We dismantle the external lighting control unit, and then remove the headlight hydrocorrector regulator.
- We remove the instrument cluster and disconnect the connectors with wires from it.
- We unscrew the four screws securing the air duct damper control unit to the instrument panel.
- Unscrew the eighteen screws securing the decorative panel to the frame. Then we move the decorative panel away from the frame as much as the air ducts fixed on the inside allow.
- Carefully insert your hand and use a Phillips screwdriver to unscrew the screws securing the air ducts to the panel.
- Remove the decorative trim.
- Remove the windshield air duct by unscrewing the two screws securing it.
- We remove two bracket nuts from the torpedo brackets and move them to the air duct brackets.
- Having completed the necessary repairs, we carry out the installation in the reverse order.
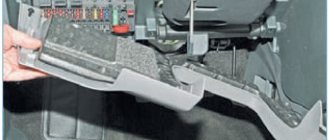
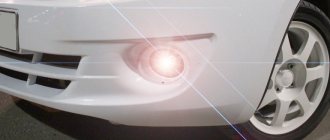
Eliminating squeaks from the dashboard visor.
The last common source of squeaks can be the instrument panel visor. To eliminate squeaks, we do not need to remove the entire visor trim. It is enough just to move it a little away from the instrument panel body. First you need to unscrew the two self-tapping screws at the top of the visor, remove the fuse box cover and unscrew the self-tapping screw securing the instrument visor.
Then we apply Bitoplast 5mm or Madeline to the place where the visor comes into contact with the instrument panel and return the visor to its place.
By completing a set of these simple measures, you are guaranteed to get rid of the most common noises in your salon.
Don’t forget to also read our other useful articles and discuss them on our forum.
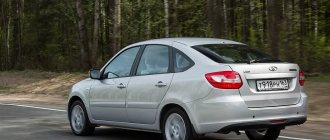
Soundproofing Lada Granta
Soundproofing Lada Granta
is a burning topic for many thousands, if not millions of our compatriots in Russian car clubs. No wonder, because this domestic car is in the top sales among available cars of this class and, of course, we all want it to be even more comfortable and cozy. This is exactly why hundreds of car owners visit us every month - we make your cars quieter. The car always comes to us by appointment and immediately goes to work with us without delay. An hour before arrival, we cut all the necessary material according to our patterns and have it heated in our special oven to a temperature of 50 degrees. Sound insulation of Grants, like any other car, is no different for us from a foreign car and we provide services only for maximum sound insulation without any compromises. The owner of the car is next to us all 8 hours in a cozy atmosphere and watches our work over a cup of coffee paired with free Wi-Fi