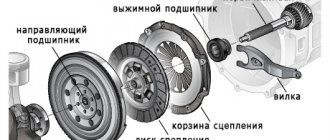
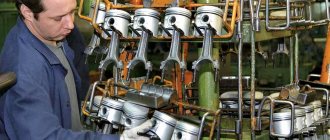
The VAZ-2107 is equipped with a powerful interior heating system. A comfortable temperature in the cabin is ensured by taking heat from the coolant heated by the engine. The conditions for normal operation of the VAZ-2107 interior heater are the condition of the heater radiator and the functionality of the antifreeze supply shut-off valve. If everything is in order with these elements, the stove of this car is capable of maintaining a comfortable temperature in the cabin when operating the car in winter.
But under harsh climatic conditions, the standard heater of the VAZ-2107 may simply not cope with the task, and even at maximum power with a warm engine, it will be cool in the cabin.
You can increase the efficiency of the VAZ-2107 interior heating system by installing an additional stove. Installing another heat source will allow you to maintain a comfortable temperature even in very frosty winters.
Types of additional heaters
There are three types of additional heaters for the VAZ-2107, and each of them has its own characteristics. The interior of this car can be equipped with:
- electric heater;
- autonomous heater;
- additional stove radiator.
Which one to give preference is up to the car owner to decide, and here consider the positive and negative sides of each option. Electric heaters are a heater with a fan, adjusted to operate from a 12 V network. The main advantage is ease of installation, since they just need to be connected to the on-board network through the cigarette lighter or run the wiring directly to the battery.
The negative qualities of electric heaters include low power and heavy load on the on-board network. You should not expect a significant increase in the temperature in the cabin; it is suitable for intensive heating of glass, since it is not recommended to use it for a long time.
Self-contained stoves include an internal combustion engine and a fan installed in a housing. The essence of its work is that the internal combustion engine (ICE) heats up during operation, and the generated heat is supplied to the passenger compartment by a fan. And since the heating of the internal combustion engine is strong, such an additional stove is effective. The positive qualities of such a heater include autonomy; it works even when the car’s engine is turned off. The negative side of an autonomous stove is increased noise and additional fuel consumption.
One of the best options is to use an additional radiator installed inside the car, which is connected to the engine cooling system. Such an additional stove does not require fuel and creates a slight load on the on-board network, while installing another heat exchanger allows you to increase the temperature in the cabin. The disadvantage is the complexity of installation.
How to choose engine heating
Of course, before installing heating, you need to buy it. We will consider two options, one with and without an electric pump. Let's look at the advantages and disadvantages of each of them.
Installation of engine heating on a VAZ 2107 with an electric pump
This preheating differs from the other type by the presence of a pump that circulates the coolant while it is warming up. Naturally, this significantly speeds up the warming up process, however, the circulation of the coolant does not allow it to warm up to the required level.
- as mentioned above, such preheating of the engine warms up the coolant much faster.
- the engine warms up most evenly, which allows you to minimize wear during the first start.
Flaws:
Perhaps the shortcomings are not as few as we would like. First of all, constant circulation of water requires high power of the heating element. If it is less than 1.5 kilowatts, this may result in the engine simply not warming up to the required temperature. It will just need to be reheated during operation.
any mechanic will tell you that the fewer parts in a unit, the more reliable it is. An electric pump is installed here, which actually adds a few extra parts. Accordingly, the reliability of such an installation decreases. In addition, installation becomes more complicated.
Installing engine heating on a VAZ 2107 without an electric pump
There is a second type, it is the most common because it is easy to install, does not require any maintenance, and is also highly reliable.
- As mentioned above, first of all it is reliability.
No need for additional power. If you only have a 220 volt outlet, then this is quite enough.
Easy to install. It is enough to install only a couple of tees and the heated housing itself.
Flaws:
- Water circulates only under pressure from the temperature difference. That is, when the water has warmed up in the heating housing, it will continue to flow through a small cooling circle.
Installation locations, connection diagrams
You can purchase an additional stove for the VAZ-2107 or make it yourself. The design of such a heater includes a radiator, which is connected to the cooling system through pipes, and a fan that creates air flow.
If you decide to install an additional heater radiator, first of all decide on the installation location. There are three optimal locations for installing equipment:
- Under the front passenger seat
- Below the front panel under the glove compartment.
- On the center tunnel between the front seats
The location should be selected based on the overall dimensions of the stove.
The next important condition is the connection diagram. You install the additional radiator in series with the standard one (the drain pipe of the standard one acts as an inlet for the additional one). The disadvantage of this connection is the weak heat transfer from the other heat exchanger, since it will receive antifreeze, which has already given off some of the heat.
An additional stove can be connected in parallel to the standard heater (the supply and drain of the second radiator cut into the corresponding pipes on the main stove). The negative side here is the likelihood that the main flow of liquid will flow only to one radiator; in this case, the second one will heat poorly.
Video: Installing an additional stove
What could they be?
Depending on how the effect is achieved, different electric pumps can be installed. Gazelle may have different models of such devices, but the most common are the following:
- Liquid. This system involves removing heat from excessively heated engine elements using fluid flow.
- Air. The same mechanics of operation, but using air flow.
- Combined. Provides for combining the previous two options.
On modern cars, a liquid electric pump is most often installed. With the help of such a system, the Gazelle is provided with uniform and efficient cooling, and also does not make so much noise, which is also important for many motorists. That is why in the future we will consider the principle of operation of cooling systems using the example of such equipment.
How to install an additional stove
To install an additional heater in a VAZ-2107 you will need:
- stove (homemade, purchased);
- pipelines;
- tees for insertion into the cooling system;
- shut-off valve (to completely shut off the second radiator).
The installation algorithm is relatively simple and includes the following steps:
- Drain the coolant from the engine.
- Place and secure the stove in the chosen location
- We cut tees into the cooling system pipes
- Install the shutoff valve on the supply pipe
- We connect the radiator to the cooling system using pipelines through a tap according to the selected circuit (series, parallel). We place the tubes laid throughout the cabin secretly (in places where they are not visible and the likelihood of damage is low).
- We lay the power wires for the stove fan and install the control button.
- We fill the cooling system with antifreeze and check the connections for leaks.
- We remove air pockets from the cooling system.
- We check the functionality of the second stove.
If everything is done correctly, then the second heater, after heating the engine, supplies a heated air flow into the cabin. Finally, we note that if the additional stove heats poorly, it means that the performance of the standard water pump of the cooling system is not enough to ensure proper circulation of the liquid. In this case, installing another pump - an electric one from GAZelle - can solve the problem.
Another pump cuts into the pipes through which antifreeze is supplied to the interior heating system. This unit ensured proper fluid flow through the system.
Video: Modification of the VAZ 2107 stove (DETAILED)
The heating of the interior of a VAZ classic is good, but modifying the VAZ 2107 stove with your own hands has only one goal, which is to make it even better. For car owners who live in the southern regions, this issue is not so relevant. But residents of the northern regions will be more interested in this. They are much more likely to have to deal with severe frosts and icy cold inside the car. The fact that improvements are taking place is evidenced by the “sevens” on winter roads, whose drivers feel good on winter roads without bulky outerwear.
Modifying the VAZ 2107 stove with your own hands allows you to increase the heat output in the car interior, which means that the comfort of staying in the car interior during the cold season increases not only for the driver, but also for the passengers. No special work is expected when performing such work, which means that the owners of this VAZ model can carry it out independently.
Possible difficulties
If you don’t want to deal with a VAZ pump, you can look at a pump from a foreign car. Suitable, for example, is BOSCH 0 392 020 034, with a capacity of 750 l/h. And at the same time it’s worth buying 10 meters of thin tubing (corrugations) and clamps.
Be sure to drain all antifreeze from the system. The difficulty of installing the pump is primarily due to the discrepancy between the diameters of the pipe and the pump fittings: the diameter of the pipe is 16 mm, and the diameter of the pump is 20 mm. If the pipe is a little elastic, you can try to pull it onto the outlet fitting.
To insert the fitting into the pipe, it is necessary to lubricate it with oil. It is difficult to work in confined spaces, so it is necessary to secure the pipe with a self-locking clamp, and fix the clamp on the screed to the engine support. This will make your work easier. It is better to secure the pump with ties to the air conditioner pipe.
A few words about the disadvantages of heating the seven
There are not many of them noted, but they still exist. These include the following problems:
- Lack of warm air in the rear seat area;
- Weak air flow from the left deflector;
- Noisy operation of the heater motor;
- Frequent faucet leaks.
As can be seen from the list, the shortcomings can be eliminated independently, which is what we will talk about in this article. It will address the following issues:.
- How to change the standard stove tap;
- Eliminating radiator problems;
- Modernization of the left deflector
Pump installation process
Before starting work, cool the engine naturally. Then drain the coolant into a clean container. We will need it later, so we have to worry about its cleanliness.
After this procedure, take a new pump and, on the side where the impeller is located, unscrew the four screws. The gasket made of rubber material, which is found in this place, is lubricated with conventional sealant. Next, we reassemble the pump, but instead of the removed screws, we install elongated thin bolts under the nuts. Only this approach ensures the best sealing of the connection.
The next step is to determine where to install the additional electric pump. There are several possibilities for this:
— on the washer reservoir mounting stud;
— on a pin near the battery;
— on the mounts of the standard Shumka, located on the engine shield.
Usually, preference is given to the standard approach, which is described in the instructions included with the electric pump, that is, the second option. Therefore, the pump must be positioned in such a way that its horizontal pipe faces the block, for which the iron fastening clamp must be loosened.
The next step, after installing the pump in the selected position, is installing the hoses. To do this, remove them from the stove and from the tube coming out from under the manifold. Next, take a reinforced hose of sufficient length and try it on in place. The main thing is that it reaches from the collector brass tube to the pump tube without kinks or stress.
To attach it to the tube from under the manifold, you first need to install an adapter corner on it (to prevent the hose from bending) with a small piece of hose (at least 10 cm); we fasten the structure with clamps (4 pieces are required).
The process of connecting the pump to the hose from the stove is much easier, since it does not require the installation of adapters; you just need to pull out the required size and make the connection. Also secure with clamps (2 pcs.). In order to finally secure everything, it is recommended to put an aluminum corrugated pipe on the installed hoses in the area of the exhaust manifold so that the hot air does not melt the hoses. We finally secure everything and move on to connecting the electrics.
When installing the pump, the ground wire of the winding must be grounded, the power wire of the relay is connected to the pump wiring, the positive wire from the relay is passed through a fuse that is connected to the battery positive. The control from the plus relay is pulled to the start button in the interior along with the battery plus. The button in the cabin is placed in any convenient place.
The final stage is checking the pump in action. To do this, you need to return the antifreeze to its homeland, and if necessary, add more, start the engine and wait a little while the engine warms up. Then use the button to start the additional pump.
Replacing the standard heater tap
This unit is installed in the car interior in the area of the front passenger's feet. Many owners are unaware of its existence until coolant leaks into the cabin. For a salon whose floor is covered with carpet, this is not very good. Many problems arise in cleaning and drying it, especially in the cold season.
Installing a new faucet solves the problem, but sometimes only for a short time. This forces the owners to come up with something new, and they do. Instead of a standard tap, a curved tube is installed. The leaks are fixed, but other problems appear. The absence of a tap in the system will not make it possible to regulate the supply of coolant to the heater radiator. This will lead to the car being too hot during the warm season.
The authors of this idea propose turning off the supply of liquid to the stove radiator in the summer, and renewing it in cold weather. This is not entirely convenient, since even in the summer, situations may arise when it is necessary to supply warm air to the cabin. For example, to exclude .
Therefore, the best solution in this situation would be to install a water tap in the engine compartment of the car. This is also not without its drawbacks, since each time to regulate the flow of fluid to the heater radiator, you need to stop and climb into the engine compartment.
Design options
The structure of the cooling system is quite similar for diesel and gasoline engines, and it includes a large number of elements, including:
- coolant radiator;
- heater heat exchanger;
- radiator fan;
- oil radiator;
- thermostat;
- expansion tank;
Among other things, a centrifugal pump (electric pump) is installed in the car. The Gazelle today is equipped with the most popular version of such devices, which is widely used in other cars.
It is also worth noting the fact that the so-called cooling jacket is necessarily included in the circuit.
How to get rid of problems with the stove radiator?
Experts say that more than 30% of all interior heating problems are caused by radiators. Various radiators, copper or aluminum, can be installed on sevens. They have their own operating characteristics and differ slightly in overall dimensions. The most common reason for their unsatisfactory operation is clogged radiator cells that need to be cleaned.
To reduce problems with clogging, you need to use high-quality coolant, try not to use powder sealants to eliminate leaks, and avoid using water as a coolant. It contributes to the rapid destruction of the thin walls of aluminum radiator tubes. “Left” antifreeze, which in most cases does not contain additives, also accelerates the wear of parts of the cooling and heating system.
As a more radical measure, you can try replacing the fan in the heating system. We must immediately warn you that simply taking another one and installing it instead of the standard unit will not work, some work is needed to complete it. The fan most often used during conversion is from the VAZ 2108. Why does it attract owners of classics? The electric motor of this unit has higher speeds, is less noisy, and more economical.
Modification of the stove - installation of a pump from GAZelle
The material was provided by our forum user “Olezhek”, for which we thank him very much. For a long time, the noise of the stove was disturbing and the poor airflow of the left driver's window irritated me. On the advice of members of the forum (from autolada.ru), I completely disassembled the stove and cut out the third engine support for the stove (the one that is directed towards the engine), leaving the motor on bushings (about which later I literally regretted it for a couple of months and had to disassemble it again and replaced it with a bearing one) after this alteration, the blowing into the left air duct became much stronger, with the lid closed, but I think that I still need to cut off one jumper that I did not cut off the first time. I was not going to stop at this alteration. Before that, I already had the idea of installing a resistance from the 9-kid stove and installing a switch from it, but in the end I didn’t like the decision about the external design, and then I caught my eye on the switch from the viburnum, it’s 4-position, it put me in a bit of a stupor , but after the idea came to mind to use both, resistances from 9 and from the classics, connecting them in series in the manner of a nine-wheeler. The connection diagram has changed a little
After measuring the resistances, the following was obtained: half of the 9th small 0.7 Ohms, the second half of the 9th 1.4 Ohms and the classic largest 2 Ohms. I assembled it, tried the speeds, in the end the first and second are almost the same, because at the first speed a very small value is thrown out, it is not significant compared to the others. But the second and third differ significantly, now I usually use the second speed (since it is enough under any conditions, especially when the interior warms up, and there is much less noise), very rarely the third on the classic first, and during the winter never haven't used 4, usually it's the second one. I placed the resistance inside the stove next to the standard one.
Connected according to the diagram above. Now it was the turn of the switch, I decided to install a round switch instead of the dashboard brightness control, the switch itself is a little thinner than the hole for the regulator, so I had to make a ring that was glued into the well from under the regulator and then the switch was glued into this ring. I cut the ring out of an old shelf using a set of wood bits of a suitable diameter.
I attached the switch on the back side with hot glue, because I didn’t want to come up with anything else. The connections were made directly on the switch, due to the fact that I couldn’t find a terminal block for this switch. I installed a jumper instead of the dashboard backlight resistor. I drove like this for a long time, especially since it was warm and I was happy about the silence of the stove, but severe cold came and I began to lack warmth, or the car, or rather the interior, did not have time to warm up, after surfing the Internet I decided to go in two ways to increase the heating of the interior , the first is the installation of a pump from a gazelle, the second is the installation of a Chevy Nivovsky thermostat, it seemed to me that it would be easier to install the pump, especially since some procedures could be carried out at home in the warmth. So: a pump from a gazelle was purchased (disassembled on the same day and coated with sealant), because... I’m not a pioneer, I read from articles on the Internet that there are two samples of pumps, 16 mm pipes and 18 mm, I was going to leave the original pipe near the engine, and it’s just 16 mm, and returning to the original design in case of anything would not be difficult. We bought clamps, half a meter of 16mm hose (which I didn’t need in advance, but I didn’t want to go shopping if I suddenly needed something), a relay, a fuse, male and female terminals, heat shrink, and classic pipes for the stove. This installation method is suitable for classics with an injector; on a carb, this most likely won’t work, and you’ll have to connect it with long hoses; in principle, I don’t see anything wrong with that. After the first fitting, it was decided to install the pump as close as possible to the stove outlet.
Nearby was the mount of the receiver to the engine (circled), in this place a bolt was screwed in (already unscrewed), but if you screwed on the pump without any plates, it turned out that it hung a little low and the tubes from the stove and from the pump were strongly bent, coupled with the fact that they and they became a little shorter, I was afraid that when the engine moved on the cushions, they could bend greatly and this would lead to their rapid wear and ultimately leakage. I made a plate in which I drilled several holes; one of them screws the plate to the receiver mount, and the other to the “ear” of the pump mount. (Several holes were made just so that it would not be necessary to remove and adjust several times.)
There are no sizes, because everything was done by weight and locally. The mounting holes are the ones that are not damaged by rust. Installed pump.
Now, as for the pipes, everything was simple with them, as I wrote above, we bought classic ones for the stove, I sawed one of them in the shape of the letter “G” with a grinder as shown in the photo.
The one with the bend was put on the central outlet from the pump and turned towards the stove, and the straight one was put on the side outlet and put on the standard tube that goes to drain into the pump. Now we are all making sure that everything is in place as it should, nothing is pinched anywhere and is moderately free, because vibrations from the engine are transmitted to these very tubes, if we like everything, then we tighten the clamps, bolts, fill in antifreeze, connect the pump directly to the battery and we remove the plugs with a pump, start the car, warm it up, and after it has cooled down, check the antifreeze level and top it up if necessary. Now the electrical connection. I wanted, and I had reasons for this, that the pump would work only starting with the second speed, because I use the first speed in the autumn/spring period and a large amount of heat is not needed enough to operate in normal mode. But the rest of the time, running the pump would be useful, so I sketched out this diagram.
From the picture you can see that this diagram is a continuation of the one shown above. Just to decouple all the speeds of the stove from each other, diodes were added, those that are connected in the forward direction towards the engine, I bought KD213, there were more than enough of them, but there were no others in the car store and I didn’t want to go to the radio store, those that go to control the stove We also bought them there; their characteristics also seemed more than sufficient to me because, anyway, the control was implemented through a relay. I assembled the circuit using a hinged method.
About the procedure for such a replacement
The work can be done approximately in the following sequence:
- In the removed plastic casing of the stove, you need to cut off the shell at the bottom of the casing. This is due to the fact that the “eight” fan is slightly longer than the standard device;
- It is necessary to cut the ridge that supplies air to the floor of the machine;
- The next step is to install a new unit instead of the standard fan and securely fasten it;
- Connect the device to the car's on-board network. In this case, they use a button and additional resistors from the VAZ 2108
.
After this modification, the interior will be noticeably warmer.
What can I install?
Some people prefer to install devices from foreign manufacturers (for example, equipment from Bosch). But many more often use the Gazelle electric pump. Reviews about this device from people who use it are often quite positive, since it allows you to significantly improve the performance of your car for a small amount of money.
The Gazelle pump is a standard centrifugal pump. During operation, the liquid flow is thrown by the blades to the periphery from the center, which provides a vacuum at the inlet and increases the force of pumping the liquid. It is worth noting that the installed electric pump from the Gazelle on the VAZ cannot pump air due to too large gaps between the housing and the impeller.
Modernization of the front left deflector
As noted earlier, one of the disadvantages of the heating system of this VAZ model is the weak air flow from the left front deflector. This causes inconvenience to the driver while driving, as the side window fogs up. This impairs visibility, which can lead to an emergency. Craftsmen found a way out of this situation.
To increase the supply of warm air to the deflector, small fans began to be installed. Computer devices do this job very well; they are small-sized and economical. To install them, you need to remove the deflector and prepare a place for the fan in it. When connecting it to the on-board network, you need to provide a separate switch.
As you can see, there is quite a lot of room for improvement. Modifying the VAZ 2107 stove with your own hands at home is doable. It all depends on your skills and abilities, as well as financial capabilities for purchasing certain materials and tools.
With the onset of cold weather, every car owner performs a preventive inspection of the vehicle and eliminates possible malfunctions. As a rule, the antifreeze is replaced, the oil is changed, and the tires are changed to winter ones. The stove also requires special attention, since it is one of the main components of the car that provides comfort in cold weather.
Like any component in a car, the stove can also stop functioning. In winter, such a breakdown can make the car impossible to operate: the windows become covered with frost or sweat, resulting in poor visibility.
To repair the stove yourself, you need to know its structure.
The heating system includes the following components:
- Heater. Its task is to heat the air. The main element of the heater is the radiator, through which coolant circulates.
- A fan that directs heated air into the cabin. The fan is mounted in the casing using elastic pads that dampen vibration.
- The stove control system, which includes a fan button, as well as dampers and control knobs for heating modes.
What could they be?
“Gazelle” pumps can be very different, and their first difference is the year of manufacture. More modern models vibrate much less, and, in principle, connecting an electric pump (Gazelle) from new models will save you from a lot of hassle and problems. The main problem that most often occurs in such devices is their leakage, which leads to rather unpleasant consequences and the need for repair. Fortunately, the procedure is relatively quick and cheap, since many workshops easily service the electric pump on the Gazelle, the installation of which is increasingly practiced by modern motorists today.
It is worth noting that if you can choose a truly high-quality device and at the same time carry out the installation procedure correctly, the likelihood of it breaking will be minimized.
Heater stove VAZ 2107, principle of operation
The heating system operates as follows:
Air enters the air intake box, which is located in the engine compartment near the windshield, through special grilles on the hood.
In the event of a downpour or rain, water, separated from the air, flows into the holes in the box. This makes it possible to use the heater in any weather, but until the radiator heats up, the air entering the cabin during rain will be damp.
The air flow rushes into the heater and, passing through the radiator, heats up. Heating is regulated using a tap that regulates the amount of coolant passing through. The crane is controlled by a flexible rod, which is attached to the control lever.
When driving, the air flow enters under the hood and the air independently enters the heater. When stopping or driving at low speeds, an electric fan is used, which is controlled by a switch with three positions: “low speed”, “full speed” and “off”. Reduced speed is achieved by turning on the electric motor through a resistor, which reduces the voltage on the motor winding.
After the radiator, the air enters the air ducts and exits through deflectors, which allow you to change the direction of flow.
Independent production of an additional auto stove
For those who do not want or cannot purchase a “factory” heater for the cabin, we can recommend making the device themselves. To do this, you will need an old computer power supply, a couple of strips of ceramic tiles, powerful wiring, and nichrome springs for the heater.
Step 1. Select a working power supply
This device perfectly warms up the interior of a small car such as a Hyundai or Daewoo. The main thing is not to overdo it with the calculated power, because it is powered by a battery or generator.
How to improve the performance of the VAZ 2107 stove by increasing the volume of hot air
As you know, the stove on the VAZ 2107 does not heat well and is noisy. Therefore, it is not uncommon for it to undergo modernization. There are many tips on improving this device on the Internet. Many motorists have tried to improve the performance of the heater on their own. But the desired effect did not work.
For example, you can do this yourself:
- redistribute air flows;
- seal the joints of the air ducts with the nozzles.
However, in general, the temperature in the cabin will remain at the same level. To make your car cozy and warm, you need to increase the amount of heat supplied using a radiator. The problem is the factory heater fan, which is too small and does not produce the required airflow. Therefore the fan needs to be replaced. At the same time, it is better to replace it with a similar product from the domestic G8, since such fans have a higher rotation speed and lower energy consumption.
Video
The Avto Fix Info channel spoke in detail about the procedure for replacing the radiator device on the stove of the domestic “Seven”.
It's winter, it's time to install a 220 volt heater on the engine. In principle, there is nothing complicated in this procedure, the only problem is the availability of a warm room for the work. In this article we will talk about how to install engine heating on a VAZ 2107.
How to replace the heater valve of a VAZ 2107
Work order:
Every fall, a good car enthusiast thinks about preparing his car for winter. Particular care should be taken when preparing the VAZ 2107 stove, which should heat the car well. The heating system fails for various reasons, and if you don’t pay attention to it in the summer, then in the winter, with severe frosts, all the windows will freeze and fog up from the inside, and driving such a car will become dangerous, and maybe even completely impossible.
It is necessary to know the structure of the stove well so that in winter you do not have any unpleasant surprises with heating the interior.
Catalytic mini heater
What other ways are there to keep warm inside a car? For example, there are very convenient mini-heaters that will help warm your hands. They are also produced by Kovea. They are very economical and safe and in such catalytic burners heating occurs without flame.
Video about how a catalytic mini-heater works:
The Zippo flameless hand warmer has also proven itself quite well. It is the size of a large lighter from the same company, but it heats well. Interestingly, it was also used by soldiers in the First World War to avoid freezing in the trenches.
Stove design
The stove consists of the following parts:
- The heater is installed in it (indicated by number 5 in the figure), it heats the air penetrating from outside;
- The stove fan, or motor (indicated by the number 14 in the figure), it pumps a flow of warm air into the cabin, it is mounted in a special casing (indicated by the number 16 in the figure) on elastic cushions that dampen its vibration;
- The stove control system is a fan button (indicated by the number 18 in the figure), three control knobs for heating modes - blowing onto the windows, taking air from the cabin or from the street, and opening and closing the stove tap.
1, 9 – air ducts for heating the side windows on the left and right; 2 — air duct for heating the windshield; 3 — radiator casing; 4 — air intake cover; 5 — heater radiator; 6 — radiator valve; 7, 8 radiator hoses for supplying and discharging hot fluid from the cooling system; 10 — rotary deflectors; 11 — air duct damper; 12 — air distribution cover; 13 — fan guide casing; 15 — lever of the air distribution cover; 17 — control rods; 19 - central air duct.
The heating system works in the following order:
- Air for heating comes from outside, through air intakes on the hood.
- Under the hood there is a special box, insulated with a rubber seal, for air flow.
- From it the air flow is directed to the stove.
- Next, the air is heated by a radiator, which is fed with antifreeze and antifreeze. The degree of heating is regulated by the heater tap. The faucet is controlled by a flexible rod using a control lever.
- At high vehicle speeds, air can enter the passenger compartment without the fan being turned on. Therefore, at high speed you can use the stove without additional load on the car’s electrical network. The interior heater is turned on by a fan switch that has three positions - neutral and two speeds: low and high. Speeds are provided by a resistor; it increases the resistance of the circuit and reduces the speed of the fan.
- The fan accelerates the warm air flow through the air ducts to the sides, onto the side windows for good visibility of the rear-view mirrors, and into the grille deflectors, which can change the direction of the air flow for better airflow. There is also a flow of warm air through the air duct to blow on the windshield.
Above in the figure, blue shows the circulation diagram of cold air flows, and orange shows the movement diagram of warm air flows. Main parts of the heating system:
1 — air distribution cover; 2 – fan electric motor; 3 – fan, impeller housing; 4 – heater tap; 15 – radiator.
The stove is controlled:
VAZ cars, despite their age, are still popular among car enthusiasts. Based on the number of shortcomings of domestic cars, owners are forced to resort to improving and modernizing certain elements of vehicles. This article will talk about tuning the stove, since it is the weak link of the vehicle.
It often happens that the standard VAZ 2107 stove cannot cope with severe frosts
Everyone knows how important the heating system of a car is for the comfort of the driver and passengers during cold winter periods. Freezing windows and cold in the car create great discomfort. Let's look at the main options for improving the vehicle's stove.
Method thirteen - well, this is absolutely for extreme sports enthusiasts!
If you often find yourself in situations where you have to fight the cold in the car (for example, you are a traveler), then you can take a regular wood stove with you on the road. If you don't believe me, look:
A real oven in the car
So how? Did you believe it? You can stock up on firewood or brushwood for free, for example, if your forced stop occurred in the forest or next to an old and dilapidated building with a lot of boards.
If your car stalls in winter, don’t despair. Armed with any of the heaters listed above and having studied all the tips described, you will not freeze and survive in harsh weather conditions. Even if you find yourself in a car at night, face to face with a cold and harsh winter, you can create all the conditions in the cabin that are similar to the comfort of home. So, don't worry, motorists!
Reasons for poor-quality heating of the VAZ-2107 interior
To solve the problem, it is necessary to eliminate its original source. Therefore, before we talk about options for improving the heating system of the seven, let’s look at the causes of problems with the heating of the vehicle.
The main reasons for poor-quality heating of the VAZ-2107 interior are most often:
- Leaking heating system faucet;
- Low level of air supply from the deflector;
- Loud operation of the heating system engine;
- Poor quality supply of warm air to.
Based on the above reasons for stove malfunctions, we can conclude that in order to improve its operation, it is important to modernize the faucet and baffles, troubleshoot the radiator and improve the operation of the fan.
As you can see, passengers and the driver will be able to make minor modifications. It is important that upgrading the stove does not require significant experience and can be carried out independently by the car owner without the help of professionals.
Pump installation process
Before starting work, cool the engine naturally. Then drain the coolant into a clean container. We will need it later, so we have to worry about its cleanliness.
After this procedure, take a new pump and, on the side where the impeller is located, unscrew the four screws. The gasket made of rubber material, which is found in this place, is lubricated with conventional sealant. Next, we reassemble the pump, but instead of the removed screws, we install elongated thin bolts under the nuts. Only this approach ensures the best sealing of the connection.
The next step is to determine where to install the additional electric pump. There are several possibilities for this:
— on the washer reservoir mounting stud;
— on a pin near the battery;
— on the mounts of the standard Shumka, located on the engine shield.
Usually, preference is given to the standard approach, which is described in the instructions included with the electric pump, that is, the second option. Therefore, the pump must be positioned in such a way that its horizontal pipe faces the block, for which the iron fastening clamp must be loosened.
The next step, after installing the pump in the selected position, is installing the hoses. To do this, remove them from the stove and from the tube coming out from under the manifold. Next, take a reinforced hose of sufficient length and try it on in place. The main thing is that it reaches from the collector brass tube to the pump tube without kinks or stress.
To attach it to the tube from under the manifold, you first need to install an adapter corner on it (to prevent the hose from bending) with a small piece of hose (at least 10 cm); we fasten the structure with clamps (4 pieces are required).
The process of connecting the pump to the hose from the stove is much easier, since it does not require the installation of adapters; you just need to pull out the required size and make the connection. Also secure with clamps (2 pcs.). In order to finally secure everything, it is recommended to put an aluminum corrugated pipe on the installed hoses in the area of the exhaust manifold so that the hot air does not melt the hoses. We finally secure everything and move on to connecting the electrics.
When installing the pump, the ground wire of the winding must be grounded, the power wire of the relay is connected to the pump wiring, the positive wire from the relay is passed through a fuse that is connected to the battery positive. The control from the plus relay is pulled to the start button in the interior along with the battery plus. The button in the cabin is placed in any convenient place.
The final stage is checking the pump in action. To do this, you need to return the antifreeze to its homeland, and if necessary, add more, start the engine and wait a little while the engine warms up. Then use the button to start the additional pump.
Do-it-yourself options for improving the VAZ-2107 stove
Let's look at how to improve the operation of the domestic seven heating system exclusively on our own.
We begin the modernization of heating elements by replacing the standard faucet with a more reliable product. The tap is located in the front part of the car in the passenger foot area. Sometimes, car owners find out about its location only in the event of a coolant leak. Leakage causes a lot of trouble for the owner, especially in cold weather. Antifreeze leaks out under the passenger's feet, and not only the carpets, but also the upholstery of the car has to be dried. Coolant also contains substances that adversely affect human health. It is important to fix the leak as soon as possible.
Replacing a conventional faucet with a similar new product helps solve the issue only for a short period of time. Experts advise several options for solving this problem. Alternatively, you can replace the standard tap of the machine with a curved sealed tube. Thus, leaks are eliminated, however, another inconvenience arises. The absence of a tap does not make it possible to shut off the supply of coolant to the heater radiator. In summer it will be very hot inside the car. A more acceptable solution to the issue is to install a conventional water tap to supply antifreeze to the heater radiator in the engine compartment of the car. The only inconvenience with such an upgrade will be the need to open the tap for manipulation.
Another drawback in the operation of the VAZ-2107 heating system is the poor quality of the deflector, which is located on the driver’s side. This causes the glass to fog up, which impairs the driver’s visibility and can cause an accident. To improve the performance of the deflector, it will be improved by installing a small fan in it. Most often, spare parts from computer equipment are used for this. For installation, you need to remove the deflector and prepare a place in it for installing the fan. It is better to connect the fan power supply to a separate button, which will be more practical to use.
The next stage of tuning is troubleshooting the radiator. On the VAZ-2107, oversized copper or aluminum radiators were most often installed. The reason for their poor performance can most often be the occurrence of blockages in the heating system. To improve heating of the vehicle interior, it is necessary to completely clean the radiator and parts of the cooling and heating system. It is important to use high-quality coolants for the car and not to use water instead of antifreeze. This way, you can protect your heating system from leaks and blockages.
The most radical and effective way to modify the VAZ-2107 stove with your own hands is to replace the standard fan with a similar product from the domestic eight. This option will increase the heat supplied to the vehicle interior by the radiator and improve its heating. Figure 8 fans are characterized by a higher rotation speed and low energy consumption. To install a new product, you need to disassemble the lower part of the stove to get to the fan and dismantle it. It will no longer be needed in the future. To install a figure-of-eight fan, you need to trim the ridge that is responsible for supplying air to the floor of the car. A more powerful figure-eight fan with five blades is installed in place of the standard product. It is very important to secure it securely. For correct operation of the fan, it is advisable to also replace the resistor and regulators with similar products from the VAZ-2108. And also the fan switch button must be replaced with a button from the VAZ-2108. The standard seven button can quickly burn out due to the difference in the current supply.
How does the cooling system work? Description of circulation path
The cooling work is mainly provided by the engine management system. In modern drives, the operating algorithm is implemented on the basis of a mathematical model that takes into account many different parameters, after which the optimal activation conditions are set, as well as the operating time of the structural elements.
The coolant is transported through the system due to forced circulation, which is provided by an electric pump (Gazelle). Repair of such equipment in the event of problems should be carried out as soon as possible, since otherwise the engine can quickly fail due to excessive temperature rise.
The operating principle of this device is such that the liquid moves through the “cooling jacket”, while providing engine cooling and, accordingly, heating the coolant. It itself can move along or across, depending on the technology used.
Depending on the temperature, the liquid circulates in a large or small circle. After starting the engine, both the equipment itself and the coolant contained in it are at a low temperature. To speed up warming up, the liquid begins to move in a small circle without entering the radiator.
As it heats up, the thermostat gradually begins to open, as a result of which it moves in a large circle, directly through the radiator. If necessary, the liquid can also be additionally cooled by an air flow from a fan.
After complete cooling, the electric pump from the Gazelle on the VAZ-2114 again supplies liquid to the “cooling jacket”, and during engine operation this cycle is repeated many times.